Page is loading ...
Page is loading ...

Quick Start Guide
1
English
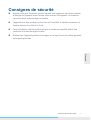
Safety Instructions
Make sure the supplied voltage meets the power consumption requirements
of the camera before powering the camera on. Incorrect voltage may cause
damage to the camera.
The camera should be protected from water and moisture, excessive heat,
direct sunlight and cold.
This installation should be made by a qualied service person and should
conform to all local codes.
Unplug the camera during lightning storms or when unused for long periods
of time.

2 Quick Start Guide
Compliance
This equipment complies with the requirements as listed below:
FCC Part 15 Class B
CE: 2004/108/EC-Electromagnetic Compatibility (EMC) directive of EN55022
and EN55024.
WEEE
Waste Electrical and Electronic Equipment
Correct disposal of this product (applicable in the European Union
and other European countries with separate collection systems). This
product should be disposed of, at the end of its useful life, as per
applicable local lows, regulations and procedures.

Quick Start Guide
3
English
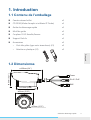
1. Introduction
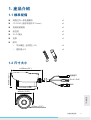
1.1 Package Contents
Bullet Network Camera x1
CD-ROM (User manual and IP Finder utility) x1
Quick Start Guide x1
Guide Pattern x1
RJ-45 Female / Female Coupler x1
Pack-in Bracket x1
Accessories x3
• Flat Head Screw (Tapping Type) (#1) x3
• Plastic Anchor (#2) x3
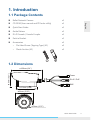
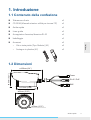
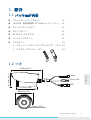
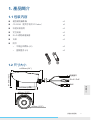
1.2 Dimensions
81.5mm (3.21”)
ø91mm (3.58”)
ø70mm (2.76”)
ø162mm (6.4”)
ø111mm (4.4”)
Power
RJ-45 / PoE
BNC

4 Quick Start Guide
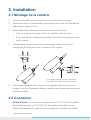
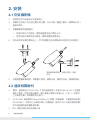
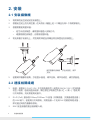
2. Installation
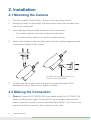
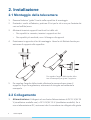
2.1 Mounting the Camera
1. Post the supplied “Guide Pattern” sticker on the mounting surface.
2. Aiming the circles on the sticker, drill three screw holes and one cable entry
hole in the ceiling/wall.
3. Optionally insert the provided anchors into the screw holes.
• For cement surfaces, insert the anchors into the holes.
• For softer surfaces, there is no need to use the anchors.
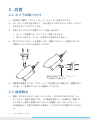
4. Position the bracket to the mounting holes. Use the supplied tapping screws
to secure the bracket to the surface.
To adjust the view angle, loosen the
knob to rotate the bracket.
5. To adjust the view angle, loosen the knob to rotate the bracket. After
adjustment is done, make sure to tighten the knob.
2.2 Making the Connection
1.
Power:
Connect to DC 12V/AC 24V (non-heater model) or DC 24V/AC 24V
(heater model) power supply. If using the DC power supply, make sure the
power connector is wired to correct polarities (Red+/Black–). If you are to use
power via the PoE connection, this connector is not used.

Quick Start Guide
5
English
2.
RJ-45 (PoE):
Connect to the LAN port of a standard 10BaseT/100BaseTX
device, e.g., hub, switch or router. If you are going to use PoE function,
connect to a PoE-capable network device. Power will be supplied through the
Ethernet cable.
3.
BNC:
Connect to composite video in connector of a monitor.
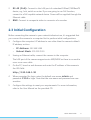
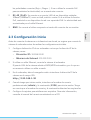
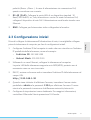
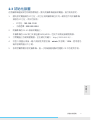
2.3 Initial Conguration
Before connecting the camera to your network infrastructure, it’s suggested that
you connect the camera to a computer rst to perform initial congurations.
1. Congure the computer’s IP address to one other than the camera’s default
IP address, such as:
•
IP Address:
192.168.1.100
•
Subnet Mask:
255.255.255.0
2. Usning an Ethernet cable, connect the camera to the computer.
The LAN port of the camera supports auto MDI/MDIX so there is no need to
use a cross-over cable.
3. On the PC, launch a web browser and enter the IP address of the camera in
the URL eld:
http://192.168.1.30
4. When prompted for login, enter the default user name:
admin
and
password:
1234
to login. Note that the user name and password are case-
sensitive.
5. Congure the settings to meet your requirements. For more information,
refer to the User Manual on the provided CD.

6 Quick Start Guide
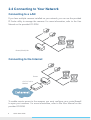
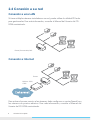
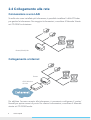
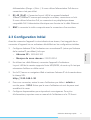
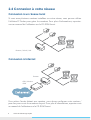
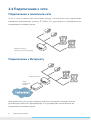
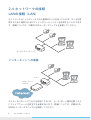
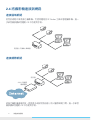
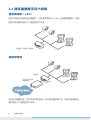
2.4 Connecting to Your Network
Connecting to a LAN
If you have multiple cameras installed on your network, you can use the provided
IP Finder utility to manage the cameras. For more information, refer to the User
Manual on the provided CD-ROM.
Router/Switch/Hub
Connecting to the Internet
Router
x D S L / C a b l e
Modem
To enable remote access to the cameras, you must congure your router/rewall
to open port numbers. For more information, refer to the User Manual on the
provided CD-ROM.
Page is loading ...
Page is loading ...
Page is loading ...
Page is loading ...
Page is loading ...
Page is loading ...
Page is loading ...
Page is loading ...
Page is loading ...
Page is loading ...
Page is loading ...
Page is loading ...
Page is loading ...
Page is loading ...
Page is loading ...
Page is loading ...
Page is loading ...
Page is loading ...
Page is loading ...
Page is loading ...
Page is loading ...
Page is loading ...
Page is loading ...
Page is loading ...
Page is loading ...
Page is loading ...
Page is loading ...
Page is loading ...
Page is loading ...
Page is loading ...
Page is loading ...
Page is loading ...
Page is loading ...
Page is loading ...
Page is loading ...
Page is loading ...
Page is loading ...
Page is loading ...
Page is loading ...
Page is loading ...
Page is loading ...
Page is loading ...
Page is loading ...
Page is loading ...
Page is loading ...
Page is loading ...
Page is loading ...
Page is loading ...
Page is loading ...
Page is loading ...
Page is loading ...
Page is loading ...
Page is loading ...
Page is loading ...
Page is loading ...
Page is loading ...
-
 1
1
-
 2
2
-
 3
3
-
 4
4
-
 5
5
-
 6
6
-
 7
7
-
 8
8
-
 9
9
-
 10
10
-
 11
11
-
 12
12
-
 13
13
-
 14
14
-
 15
15
-
 16
16
-
 17
17
-
 18
18
-
 19
19
-
 20
20
-
 21
21
-
 22
22
-
 23
23
-
 24
24
-
 25
25
-
 26
26
-
 27
27
-
 28
28
-
 29
29
-
 30
30
-
 31
31
-
 32
32
-
 33
33
-
 34
34
-
 35
35
-
 36
36
-
 37
37
-
 38
38
-
 39
39
-
 40
40
-
 41
41
-
 42
42
-
 43
43
-
 44
44
-
 45
45
-
 46
46
-
 47
47
-
 48
48
-
 49
49
-
 50
50
-
 51
51
-
 52
52
-
 53
53
-
 54
54
-
 55
55
-
 56
56
-
 57
57
-
 58
58
-
 59
59
-
 60
60
-
 61
61
-
 62
62
-
 63
63
-
 64
64


Ask a question and I''ll find the answer in the document
Finding information in a document is now easier with AI
in other languages
- italiano: Messoa NCR870 Guida Rapida
- français: Messoa NCR870 Guide de démarrage rapide
- español: Messoa NCR870 Guía de inicio rápido
- русский: Messoa NCR870 Инструкция по началу работы
- 日本語: Messoa NCR870 クイックスタートガイド
Related papers
-
Messoa LPR610 Quick start guide
-
-
Messoa NCR870S(H) Quick start guide
-
-
-
-
-
-
Messoa NDF821 Quick start guide
-
Other documents
-
Atlantis NETMASTER F8POE User manual
-
Sanyo VCC-N6695P Installation guide
-
Sony YTICB45 Installation guide
-
 American Dynamics illustra 600 Quick start guide
-
Digimerge DNB13TF2 User guide
-
Ubiquiti Networks BM2HP User manual
-
König CMP-EHUB15 Specification
-
D-Link DCS-5615 Install guide
-
dji Zenmuse X7 Quick start guide
-
Intellinet IPC-350W Wireless Network Megapixel Pan/Tilt Video Surveillance Camera Installation guide
