Roche cobas s 201 system User manual

Type
User manual

Roche cobas s 201 system is a fully automated sample preparation system designed for pooling of individual donor specimens to create sample pools for infectious disease testing. It utilizes advanced robotic technology to accurately and efficiently pool specimens, reducing the number of tests required and potentially increasing laboratory productivity. The system features user-friendly software with intuitive graphical interface, ensuring ease of use and minimizing training requirements. Its compact design allows for seamless integration into various laboratory settings.

Roche cobas s 201 system is a fully automated sample preparation system designed for pooling of individual donor specimens to create sample pools for infectious disease testing. It utilizes advanced robotic technology to accurately and efficiently pool specimens, reducing the number of tests required and potentially increasing laboratory productivity. The system features user-friendly software with intuitive graphical interface, ensuring ease of use and minimizing training requirements. Its compact design allows for seamless integration into various laboratory settings.

03/2008, version 1.0 3.1
Workflow 3
The workflow for processing small pools on the cobas s 201 system is
shown in Figure 3.1.
Figure 3.1
Workflow
3.2 03/2008, version 1.0
Perform Primary Pooling
Do not eat, drink, or smoke in laboratory work areas.
Wear protective disposable gloves and laboratory coats whenever
handling samples, preparing consumables, or cleaning.
Wear eye protection when handling samples. Wash hands thoroughly
afterwards.
Remove Samples from Storage
Warm specimens to room temperature before using.
See the assay-specific package insert for recommended instructions
on collection, storage, and handling.
Initialize Hardware and Software
1
Turn on the Pooling Management workstation if it is powered off. The
Welcome to Roche PDM dialog box is displayed.
The Pooling Management workstation is normally left on, except
for a daily restart. The Welcome to Roche PDM dialog box is
displayed if the previous user has logged off.
Press the Ctrl, Alt, and Del keys simultaneously if the Welcome to
Roche PDM dialog box is not displayed.
2 Enter the appropriate login ID and password into the Welcome to Roche
PDM dialog box and then click OK. The Roche PDM Pooling Manager
application starts automatically.
3 Turn on the Hamilton Microlab STAR IVD / STARlet IVD Pipettor if it is
powered off.
The Hamilton Microlab STAR IVD / STARlet IVD Pipettor is
normally left in Standby mode.
4 Click the Wizard button (in the global command button panel on the right
side of the Pooling Manager screen) to access the Pooling Wizard.
5 Perform maintenance procedures if required (see Hamilton Microlab
STAR IVD / STARlet IVD Pipettor in the cobas s 201 system Hardware and
Software Reference Manual for WNV for details).
Workflow
03/2008, version 1.0 3.3
Select the Primary Pooling Type
1
Select the pooling type in the Pooling Wizard Primary Pooling panel.
A description of the pooling option is provided next to each
button.
Once a sample has been successfully aspirated by the system, then
that sample is no longer eligible to be included in a Primary Pool. A
Primary Pool can only include new donors and donors that are
listed in the Required Pooling Worklist with a request of Primary
run required.
2 Click Start.
A map of the pooling deck is displayed. The pooling run ID is
automatically assigned and displayed in the title bar (see Deck
Layout in the cobas s 201 system Hardware and Software Reference
Manual for WNV).
3 The system displays the UDEC Selection dialog box if the laboratory
administrator assigned UDECs to the selected test. Mark the UDECs, if
any, to be pipetted in the first batch of the pooling run (see Selecting
UDECs in the cobas s 201 system Hardware and Software Reference Manual
for WNV).
3.4 03/2008, version 1.0
Load Donor Tubes
1
Place uncapped individual donor tubes in a donor tube carrier (see Donor
Tubes in the cobas s 201 system Hardware and Software Reference Manual
for WNV for additional information).
Load donor tubes starting in position 1 of the carrier. Do not leave
gaps between the tubes. The donor tube barcode labels must face
right, visible through the gap, when the carrier is placed on the
loading deck.
2 Insert the donor tube carrier into the designated track on the loading
deck.
The Workflow Guide (see Deck Layout in the cobas s 201 system
Hardware and Software Reference Manual for WNV) contains a
prompt to indicate the correct track.
3 Slide the carrier forward slowly and carefully (to avoid splashing) until it
engages the stop hook at the end of the loading deck.
4 Repeat steps 1 through 3 until all of the donor tube carriers have been
loaded.
Load full carriers first. The application assumes donor tube loading
is complete when all the tracks are loaded or if a partially full rack
is loaded. Otherwise, select Done to indicate donor tube loading is
complete.
Refer to Error Handling in the cobas s 201 system Hardware and
Software Reference Manual for WNV if a loading error occurs.
CAUTION
To prevent a carrier with individual donor tubes from tipping over and
contaminating the area, handle donor tube carriers carefully during
filling and before inserting on the loading deck.
Workflow
03/2008, version 1.0 3.5
Load Library Plates
Library Plates are optional. If your system is configured to use
Library Plates, load them now.
1 Place the required number of Library Plates (up to five) on a plate carrier.
(see Plate Carrier in the cobas s 201 system Hardware and Software
Reference Manual for WNV).
Inspect each Library Plate for defects when placing it on the carrier.
Library Plates cannot be reused.
The Consumables Calculator shows the number of Library Plates
that are required.
The Library Plates will not seat properly on the carrier unless the
Library Plate barcode labels face right when the carrier is placed on
the loading deck.
2 Insert the plate carrier into the designated tracks on the loading deck.
The Workflow Guide contains a prompt to indicate the correct
track. The plate carrier occupies six tracks.
3 Slide the carrier forward until it engages the stop hook at the end of the
loading deck.
Refer to Error Handling in the cobas s 201 system Hardware and
Software Reference Manual for WNV if a loading error occurs.
3.6 03/2008, version 1.0
Load SK24 Racks
1
Place the required number of uncapped S-tubes with attached S-tube
barcode clips on an SK24 rack.
The Consumables Calculator shows the number of S-tubes that are
necessary for sample pools and UDECs. In addition, S-tubes must
always be placed in the positions 23 and 24 for RMECs.
Do not load more than the required number of S-tubes.
2 Insert the SK24 rack into an S-tube carrier.
3 Insert the S-tube carrier into the designated tracks on the loading deck.
The Workflow Guide contains a prompt to indicate the correct
track. The S-tube carrier occupies two tracks.
4 Slide the carrier forward until it engages the stop hook at the end of the
loading deck.
5 Depending on the number of pools being created, the Consumables
Calculator may indicate additional SK24 racks are required. Repeat steps 1
through 4 if additional S-tube carriers are needed.
Refer to Error Handling in the cobas s 201 system Hardware and
Software Reference Manual for WNV if a loading error occurs.
CAUTION
Never pipette a sample directly into an S-tube. All donor specimens and
controls must be processed by the Hamilton Microlab STAR IVD /
STARlet IVD Pipettor.
Workflow
03/2008, version 1.0 3.7
Load Pipette Tips
1
Place the required number of tip racks (up to five) on a tip carrier (see Tip
Carrier in the cobas s 201 system Hardware and Software Reference Manual
for WNV).
Always load more than the required number of pipette tips. The
Consumables Calculator shows the number of pipette tips that are
required.
The tip rack barcode labels must face right when the carrier is
placed on the loading deck.
The tip rack in the first position in the tip carrier must contain at
least one tip in order to pass load check.
2 Insert the tip carrier into the designated tracks on the loading deck.
The Workflow Guide contains a prompt to indicate the correct
track. The tip carrier occupies six tracks.
3 Slide the carrier forward until it engages the stop hook at the end of the
loading deck.
Refer to Error Handling in the cobas s 201 system Hardware and
Software Reference Manual for WNV if a loading error occurs.
A second tip carrier containing up to five additional tip racks can
be loaded if required.
3.8 03/2008, version 1.0
Load Negative RMECs
1
Obtain a 24-position donor tube carrier.
2 Uncap a negative control tube. Carefully place the control tube in
position 1 on the 24-position donor tube carrier.
The Hamilton Microlab STAR IVD / STARlet IVD Pipettor pipettes
liquid directly from the control vial. Do not transfer the control
liquid to a test tube.
The barcode label must face right, visible through the gap, when
the carrier is placed on the loading deck.
3 Uncap and place the required number of additional negative control tubes
in adjacent positions on the 24-position donor tube carrier.
The Consumables Calculator shows the number of negative control
tubes that are required. Two negative control tubes are required for
each WNV batch. The second negative control is used for diluting
the positive control.
Load control tubes starting in position 1 of the 24-position donor
tube carrier. Do not leave any gaps between control tubes.
4 Place the donor tube carrier with the negative control(s) on the loading
deck.
The Workflow Guide contains a prompt to indicate the correct
track.
Refer to Error Handling in the cobas s 201 system Hardware and
Software Reference Manual for WNV if a loading error occurs.
CAUTION
Handle the control tubes carefully when uncapping, loading, and
unloading them on the donor tube carrier.
WARNING
Universal safety precautions should be taken when handling and
processing controls.
Workflow
03/2008, version 1.0 3.9
Load Positive RMECs
1
Obtain a 24-position donor tube carrier.
2 Uncap a positive control tube. Carefully place the control tube in
position 1 on the 24-position donor tube carrier.
The Hamilton Microlab STAR IVD / STARlet IVD Pipettor pipettes
liquid directly from the control tube. Do not transfer the control
liquid to a test tube.
The barcode label must face right, visible through the gap, when
the carrier is placed on the loading deck.
3 Uncap and place the required number of additional positive control tubes
in adjacent positions on the 24-position donor tube carrier(s).
The Consumables Calculator shows the number of positive control
tubes that are required. One positive control tube is required for
each WNV batch.
Load the positive controls in any order starting in position 1 of the
24-position donor tube carrier. Do not leave gaps between the
controls.
CAUTION
Handle the control tubes carefully when uncapping, loading, and
unloading them on the donor tube carrier.
WARNING
Universal safety precautions should be taken when handling and
processing controls.
CAUTION
Handle positive controls carefully, to prevent contamination of negative
controls and donor specimens.
3.10 03/2008, version 1.0
4 Place the first carrier with the positive control(s) on the loading deck.
The Workflow Guide contains a prompt to indicate the correct
track.
5 If required, load the second carrier in the indicated track.
Refer to Error Handling in the cobas s 201 system Hardware and
Software Reference Manual for WNV if a loading error occurs.
Load UDECs
Load the UDECs now if you elected to include them in the pipetting run.
1 Load the UDECs in uncapped 7 mL tubes starting in position 1 in a
32-position donor tube carrier. (see UDEC Tube Carriers in the cobas s
201 system Hardware and Software Reference Manual for WNV for
additional information).
The barcode labels must face right, visible through the gap, when
the carrier is placed on the loading deck. UDECs can be loaded in
any order. Do not leave gaps between the tubes.
Barcodes on the tubes must match the barcodes defined by the
laboratory administrator (see UDEC Tab in the cobas s 201 system
Hardware and Software Reference Manual for WNV).
2
Insert the donor tube carrier into the designated track on the loading deck.
The Workflow Guide contains a prompt to indicate the correct
track.
3 Slide the carrier forward slowly and carefully (to avoid splashing) until it
engages the stop hook at the end of the loading deck.
Refer to Error Handling in the cobas s 201 system Hardware and
Software Reference Manual for WNV if a loading error occurs.
CAUTION
Handle the control tubes carefully when uncapping, loading, and
unloading them on the donor tube carrier.
Workflow
03/2008, version 1.0 3.11
Complete the Run
Once controls are loaded, the pooling run starts and proceeds
automatically. RMECs are pipetted first, and the run is paused if a
pipetting error occurs during pipetting of RMECs. The RMEC samples
can then be replaced and the run continued (see Error Handling During
Pipetting of RMECs in the cobas s 201 system Hardware and Software
Reference Manual for WNV).
The operator should monitor pipetting of the RMECs. The system
does not allow donor pipetting to begin until all RMECs have been
successfully pipetted.
The Workflow Guide displays Unloading carriers when pooling is complete.
All carriers are unloaded from the main deck to the loading deck.
Review Alarms for the Run
1
Click Exit in the Pooling Wizard to return to the Roche PDM Pooling
Manager.
2 Use the Query tab (see Query Tab in the cobas s 201 system Hardware and
Software Reference Manual for WNV) to retrieve pooling information.
3 Display the Alarms View tab. Review any alarm messages that may have
been generated during the pooling run.
The Pooling Alarms Report can be printed by selecting Print Alarms
in the Alarms View tab.
3.12 03/2008, version 1.0
Print the Pooling Reports
1
Display the Pools View tab.
Successfully pipetted S-tubes have an S-tube status of OK. The pool
information is displayed in bold red type and the S-tube status is
Error or Aborted if an error occurred.
2 Select a batch in the Batches panel. Examine the status of the pools in the
batch, then click Print. The Pooling Manager Reports dialog box is
displayed.
3 Click Print to print the Pooling Batch Report and the Required Pooling
Report (if one was created) for the selected batch.
The Pooling Batch Report includes a barcoded batch ID that is
scanned during AMPLILINK software order creation (see Create
Orders in the cobas s 201 system Hardware and Software Reference
Manual for WNV).
The Required Pooling Report is created only if one or more donor
tubes in the current batch must be included in another pooling run
.
4
Repeat steps 2 and 3 for each batch (including an error batch, if one exists).
Error batches are described in Displaying Information for an Error
Batch in the cobas s 201 system Hardware and Software Reference
Manual for WNV.
Workflow
03/2008, version 1.0 3.13
Cap S-tubes and Transfer for Sample Preparation
1
Carefully replace the caps on each of the S-tubes.
Do not over-tighten the S-tube caps.
Make sure that the S-tubes and barcode clips are correctly seated in
the SK24 racks.
2 Remove the SK24 racks from the S-tube carriers.
3 Visually inspect each S-tube for consistent volume and red cell
contamination.
Reject a pool if an inconsistent volume or red cell contamination is
observed (see Rejecting a Pool in the cobas s 201 system Hardware
and Software Reference Manual for WNV).
Do not remove any S-tubes from the SK24 racks (including S-tubes
from rejected pools and S-tubes with a status of Error or Aborted).
4 Transfer the SK24 racks and Pooling Batch Reports to the sample
preparation area.
CAUTION
Do not remove carriers from the Hamilton Microlab STAR IVD /
STARlet IVD Pipettor until they have been transferred back to the
loading deck.
CAUTION
Do not separate an S-tube from its attached barcode clip. To avoid
inadvertently separating an S-tube and/or its barcode clip, do not
remove the S-tubes from the SK24 racks or change the position of the
S-tubes in the SK24 racks.
3.14 03/2008, version 1.0
Store Library Plates, Donor Tubes, and UDECs
1
If Library Plates were pipetted, remove them from the plate carrier.
2 Visually inspect each Library Plate well for consistent volume and red cell
contamination.
Reject a well if an inconsistent volume or red cell contamination is
observed (see Rejecting a Well in the cobas s 201 system Hardware
and Software Reference Manual for WNV).
3 Place a sealing mat on each Library Plate (see Sealing Mats in the cobas s
201 system Hardware and Software Reference Manual for WNV).
Place the sealing mat carefully to avoid cross-contamination.
4 Store the Library Plates and donor tubes according to instructions in the
assay-specific package insert.
5 UDEC IDs can be reused. Store UDECs according to standard laboratory
practices.
Discard RMECs
Remove the RMEC tubes from their carriers and discard. RMECs are for
single use only.
WARNING
Universal safety precautions should be taken when handling and
processing controls.
WARNING
Universal safety precautions should be taken when handling and
processing controls.
Workflow
03/2008, version 1.0 3.15
Perform Sample Preparation, Amplification,
Detection
Initialize the COBAS® AmpliPrep Instrument
The Data Station for AMPLILINK software is normally left on,
except for a daily restart. Refer to Start up and Log on in the cobas s
201 system Hardware and Software Reference Manual for WNV if the
Data Station is powered off.
The COBAS® AmpliPrep Instrument is normally left in Standby
mode. Refer to Starting the Instrument in the cobas s 201 system
Hardware and Software Reference Manual for WNV if the
instrument is powered off.
1 Check the status of the wash reagent reservoir. Replace if necessary.
A reservoir icon on the Systems window System tab is red if the
corresponding reservoir is empty (see System Tab in the cobas s 201
system Hardware and Software Reference Manual for WNV).
2 Empty the waste container if it requires emptying.
The waste icon on the Systems window System tab is red if the waste
level is too high.
3 Perform any maintenance that is listed in the Systems window Service Due
tab.
The background on the Systems icon turns yellow and an oil can
appears on the icon when service is due. Perform the required
service before starting the next run.
The system is automatically primed after each service is performed.
3.16 03/2008, version 1.0
Initialize the COBAS® TaqMan® Analyzer
The processed samples containing the Master Mix solution have a
limited stability, so the COBAS® TaqMan® Analyzer should be
ready to accept samples as soon as the COBAS® AmpliPrep
Instrument run is complete. Refer to the assay-specific package
insert for time limits.
If the COBAS® TaqMan® Analyzer is not ready to accept samples,
wait and transfer the samples once it is ready. The system
automatically invalidates any sample that was not transferred from
the COBAS® AmpliPrep Instrument to the COBAS® TaqMan®
Analyzer within the allowed transfer time, and will require the
sample be repeated.
AMPLILINK software displays a warning message and flags the
affected results if Master Mix stability time is exceeded.
The COBAS® TaqMan® Analyzer is normally left in Standby mode.
Refer to Starting up the analyzer in the cobas s 201 system Hardware
and Software Reference Manual for WNV if the analyzer is powered
off.
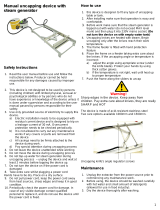
1 Place 24 empty and capped K-tubes into a K-carrier, and then place the
K-carrier in park position 2 on the left side of the COBAS® TaqMan®
Analyzer.
The analyzer must be powered off to perform this step.
The COBAS® TaqMan® Analyzer uses these empty K-tubes to fill
K-carrier positions 12, 13, 8, 17, 7, and 18 if a batch contains fewer
than six K-tubes. These positions must be occupied to balance the
K-carrier in the thermal cycler.
2 Perform any maintenance that is listed in the Systems window Service Due
tab before starting the next run.
The background on the Systems icon turns yellow and an oil can
appears on the icon when service is due. Perform the required
service before starting the next run.
Workflow
03/2008, version 1.0 3.17
Load Reagents
The reagents that are required depend upon the cassette status check and
the daily workload.
Reagents should be removed from the refrigerator prior to use.
Reagents should be loaded onto the COBAS® AmpliPrep
Instrument immediately after they are removed from storage to
avoid condensation on the barcode labels. Allow the reagents to
equilibrate on the instrument for at least thirty minutes before the
first sample is to be processed.
Cassettes with barcodes that are unreadable by the instrument
should be discarded.
Do not pool reagents from different lots or from different bottles of
the same lot.
Do not mix reagents (including cassettes) from different kits.
Do not use more than one lot number of reagents for a processing
run on the COBAS® AmpliPrep Instrument. A single lot of reagents
must be used for processing all specimens and controls in a batch.
Do not open COBAS® AmpliPrep Instrument cassettes and
exchange, mix, remove, or add bottles.
Do not use a kit after its expiration date.
Do not use a kit on more than one COBAS® AmpliPrep Instrument
unless the instruments are connected to the same Data Station for
AMPLILINK software.
Do not freeze reagents.
Never attempt to remove a rack when the LED for that rack is red.
1 Obtain the magnetic glass particle (MGP) cassettes that are required.
Reloading of MGP cassettes is not possible during a run due to the
shaking of the rack. The rack containing the MGP cassette is
unlocked after no more tests remain for that cassette, and a new
MGP cassette can be loaded at that time.
2 Place the MGP cassettes on a single reagent rack.
3 Obtain the other cassettes that are required.
4 Place these cassettes on other (up to four) reagent racks.
3.18 03/2008, version 1.0
Other reagent cassettes that are required to complete the orders in
the worklist can be loaded on up to four additional reagent racks.
These reagent racks are loaded in reagent rack positions B through
E, which are not shaken.
More than one cassette may be needed for a particular reagent to
complete a run. The system automatically switches to the next
cassette when the first cassette is depleted.
5 Open the load panel.
6 Slide the reagent rack containing the magnetic glass particle cassettes onto
rack position A. Slide the rack up to the first pin.
7 Wait for the reagent rack LED to begin flashing green. Then continue
sliding the rack to the back of the instrument. The LED turns orange.
8 Load the other reagent racks on rack positions B through E. All of the
reagent rack LEDs turn solid green when a complete kit of reagent
cassettes has been loaded.
The COBAS® AmpliPrep Instrument scans the reagent rack barcode label
and the reagent cassette barcode labels as each rack is loaded onto the
instrument.
The AMPLILINK software updates the Systems window Cassettes/Samples
tab with the scanned information (see Cassettes/Samples Tab in the cobas s
201 system Hardware and Software Reference Manual for WNV).
Reagents are supplied in a kit package that includes two sets of four
cassettes. The reagent cassettes that are loaded must all be from the
same kit package. If any cassette is missing, the remaining cassettes
for that assay are Blocked (see Displaying Cassette Error Details in
the cobas s 201 system Hardware and Software Reference Manual for
WNV).
9 Close the load panel.
WARNING
Transfer Head 1 contains a class 1 laser diode. Do not stare into the laser
transmitter.
Figure 3.2
Rack Platform
Shaker Rack
Reagent Racks
SK24 Racks
(A)
(B-E)
(F-H)
Workflow
03/2008, version 1.0 3.19
Load SPUs
Determine the load requirements. One SPU, one K-tube, and one K-tip
are needed for each S-tube order.
1 Obtain the required number of SPUs (up to three full SPU racks can be
loaded).
2 Remove the SPUs from their packaging. Inspect each SPU for defects.
3 Place the SPUs in the SPU racks, using the arrow on the SPU rack for
proper alignment.
Always make sure that the tips are properly seated. Press down on
the SPU splash guard (not the sample tips) to properly seat the SPU
in the rack. Make sure the sample tips are even.
4 Open the load panel.
5 Position the end of an SPU rack at the front of the SPU load positions.
Then slide the SPU rack towards the rear of the instrument. The SPU LED
is green when the rack is loaded properly.
When positioning the SPU rack, be sure that the single wells of the
SPU rack are to the right, that the left side of the SPU rack is under
the lip, and that all SPUs are seated properly.
The COBAS® AmpliPrep Instrument counts the SPUs and the
Systems window System tab updates supply status as each SPU rack
is loaded onto the system.
6 Close the load panel.
Figure 3.3
Filling an SPU Rack
Double Wells
Single Wells
Sample Tip
Splash Guard
WARNING
Transfer Head 1 contains a class 1 laser diode. Do not stare into the laser
transmitter.
3.20 03/2008, version 1.0
K-tubes
1
Open the load panel.
2 Load a full rack of K-tubes onto the COBAS® AmpliPrep Instrument
output platform in an available load position M, N, O, or P.
Up to four racks containing K-tubes or K-tips can be loaded.
Be sure the rack is full when it is loaded. The system does not check
each position in the rack, and assumes the rack is full when loaded.
Do not move partially filled racks to another position.
The Systems window System and Samples tabs update status as each
rack is loaded onto the instrument.
3 Close the load panel.
K-tips
1
Open the load panel.
2 Load full racks of K-tips onto the COBAS® AmpliPrep Instrument output
platform in an available load position M, N, O, or P.
Up to four racks containing K-tubes or K-tips can be loaded.
Be sure the rack is full when it is loaded. The system does not check
each position in the rack, and assumes the rack is full when loaded.
Do not move partially filled racks to another position.
The Systems window System and Samples tabs update status as each
rack is loaded onto the instrument.
3 Close the load panel.
WARNING
Transfer Head 1 contains a class 1 laser diode. Do not stare into the laser
transmitter.
WARNING
Transfer Head 1 contains a class 1 laser diode. Do not stare into the laser
transmitter.
  • Page 1 1
  • Page 2 2
  • Page 3 3
  • Page 4 4
  • Page 5 5
  • Page 6 6
  • Page 7 7
  • Page 8 8
  • Page 9 9
  • Page 10 10
  • Page 11 11
  • Page 12 12
  • Page 13 13
  • Page 14 14
  • Page 15 15
  • Page 16 16
  • Page 17 17
  • Page 18 18
  • Page 19 19
  • Page 20 20
  • Page 21 21
  • Page 22 22
  • Page 23 23
  • Page 24 24
  • Page 25 25
  • Page 26 26
  • Page 27 27
  • Page 28 28
  • Page 29 29
  • Page 30 30
  • Page 31 31
  • Page 32 32
  • Page 33 33
  • Page 34 34

Roche cobas s 201 system User manual

Type
User manual

Roche cobas s 201 system is a fully automated sample preparation system designed for pooling of individual donor specimens to create sample pools for infectious disease testing. It utilizes advanced robotic technology to accurately and efficiently pool specimens, reducing the number of tests required and potentially increasing laboratory productivity. The system features user-friendly software with intuitive graphical interface, ensuring ease of use and minimizing training requirements. Its compact design allows for seamless integration into various laboratory settings.

Ask a question and I''ll find the answer in the document

Finding information in a document is now easier with AI