Page is loading ...

User’s Guide
Copyright © 2006 Seiko Epson Corporation. All rights reserved.

2
P-5000 User’s Guide
Contents
Copyright and Trademarks
Chapter 1 Introduction
Main Features . . . . . . . . . . . . . . . . . . . . . . . . . . . . . . . . . . . . . . . . . . . . . . . . . . . . . . . . . . . . . 8
Important Notice . . . . . . . . . . . . . . . . . . . . . . . . . . . . . . . . . . . . . . . . . . . . . . . . . . . . . . . . . . . 8
Chapter 2 Getting Started
Parts . . . . . . . . . . . . . . . . . . . . . . . . . . . . . . . . . . . . . . . . . . . . . . . . . . . . . . . . . . . . . . . . . . . . 9
Setting Up the Viewer . . . . . . . . . . . . . . . . . . . . . . . . . . . . . . . . . . . . . . . . . . . . . . . . . . . . . . 11
Turning the power on. . . . . . . . . . . . . . . . . . . . . . . . . . . . . . . . . . . . . . . . . . . . . . . . . . . 11
Turning the power off. . . . . . . . . . . . . . . . . . . . . . . . . . . . . . . . . . . . . . . . . . . . . . . . . . . 12
Holding the key operations . . . . . . . . . . . . . . . . . . . . . . . . . . . . . . . . . . . . . . . . . . . . . . 13
How to use the Home screen. . . . . . . . . . . . . . . . . . . . . . . . . . . . . . . . . . . . . . . . . . . . . 13
Using the Software . . . . . . . . . . . . . . . . . . . . . . . . . . . . . . . . . . . . . . . . . . . . . . . . . . . . . . . . 14
About the software. . . . . . . . . . . . . . . . . . . . . . . . . . . . . . . . . . . . . . . . . . . . . . . . . . . . . 14
Installing the software . . . . . . . . . . . . . . . . . . . . . . . . . . . . . . . . . . . . . . . . . . . . . . . . . . 14
Uninstalling the Software. . . . . . . . . . . . . . . . . . . . . . . . . . . . . . . . . . . . . . . . . . . . . . . . . . . . 17
Chapter 3 Transferring Data
Setting and Removing CF/SD Memory Cards. . . . . . . . . . . . . . . . . . . . . . . . . . . . . . . . . . . . 18
Inserting a CF memory card into the CF Card slot . . . . . . . . . . . . . . . . . . . . . . . . . . . . 18
Removing a CF memory card from the slot. . . . . . . . . . . . . . . . . . . . . . . . . . . . . . . . . . 19
Inserting an SD memory card into the SD Card slot . . . . . . . . . . . . . . . . . . . . . . . . . . . 20
Removing an SD memory card from the slot. . . . . . . . . . . . . . . . . . . . . . . . . . . . . . . . . 20
Copying Data from CF/SD Memory Cards . . . . . . . . . . . . . . . . . . . . . . . . . . . . . . . . . . . . . . 21
Copying all data. . . . . . . . . . . . . . . . . . . . . . . . . . . . . . . . . . . . . . . . . . . . . . . . . . . . . . . 21
Copying particular data . . . . . . . . . . . . . . . . . . . . . . . . . . . . . . . . . . . . . . . . . . . . . . . . . 22
Copying Data from USB Devices. . . . . . . . . . . . . . . . . . . . . . . . . . . . . . . . . . . . . . . . . . . . . . 23
Connecting a USB device . . . . . . . . . . . . . . . . . . . . . . . . . . . . . . . . . . . . . . . . . . . . . . . 23
Copying all data. . . . . . . . . . . . . . . . . . . . . . . . . . . . . . . . . . . . . . . . . . . . . . . . . . . . . . . 24
Copying particular data . . . . . . . . . . . . . . . . . . . . . . . . . . . . . . . . . . . . . . . . . . . . . . . . . 24
Backing Up Data onto the Computer. . . . . . . . . . . . . . . . . . . . . . . . . . . . . . . . . . . . . . . . . . . 25
Connecting the viewer to the computer . . . . . . . . . . . . . . . . . . . . . . . . . . . . . . . . . . . . . 25
Launching the Epson Link2 software. . . . . . . . . . . . . . . . . . . . . . . . . . . . . . . . . . . . . . . 26
Disconnecting the viewer from the computer. . . . . . . . . . . . . . . . . . . . . . . . . . . . . . . . . 26
Backing Up Data onto Other USB Storage Devices . . . . . . . . . . . . . . . . . . . . . . . . . . . . . . . 27
Copying Backup Files . . . . . . . . . . . . . . . . . . . . . . . . . . . . . . . . . . . . . . . . . . . . . . . . . . 27

3
P-5000 User’s Guide
Copying particular data . . . . . . . . . . . . . . . . . . . . . . . . . . . . . . . . . . . . . . . . . . . . . . . . . 27
Chapter 4 Viewing Images
Copying Data to My Photos/My Videos Folder . . . . . . . . . . . . . . . . . . . . . . . . . . . . . . . . . . . 29
Copying from a computer. . . . . . . . . . . . . . . . . . . . . . . . . . . . . . . . . . . . . . . . . . . . . . . . 29
Copying from Backup Files or Memory Card. . . . . . . . . . . . . . . . . . . . . . . . . . . . . . . . . 29
Photo/Video file formats supported by the viewer . . . . . . . . . . . . . . . . . . . . . . . . . . . . . 30
Viewing Photos and Videos. . . . . . . . . . . . . . . . . . . . . . . . . . . . . . . . . . . . . . . . . . . . . . . . . . 32
How to see the screen. . . . . . . . . . . . . . . . . . . . . . . . . . . . . . . . . . . . . . . . . . . . . . . . . . 32
Switching the contents screen. . . . . . . . . . . . . . . . . . . . . . . . . . . . . . . . . . . . . . . . . . . . 33
Displaying information . . . . . . . . . . . . . . . . . . . . . . . . . . . . . . . . . . . . . . . . . . . . . . . . . . 34
About the Pop Up Menu . . . . . . . . . . . . . . . . . . . . . . . . . . . . . . . . . . . . . . . . . . . . . . . . . . . . 35
Displaying photos or videos. . . . . . . . . . . . . . . . . . . . . . . . . . . . . . . . . . . . . . . . . . . . . . 36
Basic operations while playing videos. . . . . . . . . . . . . . . . . . . . . . . . . . . . . . . . . . . . . . 38
Managing Files and Folders . . . . . . . . . . . . . . . . . . . . . . . . . . . . . . . . . . . . . . . . . . . . . . . . . 39
Displaying photos as a slide show. . . . . . . . . . . . . . . . . . . . . . . . . . . . . . . . . . . . . . . . . 39
Setting folders as Private. . . . . . . . . . . . . . . . . . . . . . . . . . . . . . . . . . . . . . . . . . . . . . . . 39
Changing a folder’s name . . . . . . . . . . . . . . . . . . . . . . . . . . . . . . . . . . . . . . . . . . . . . . . 40
Deleting files or folders . . . . . . . . . . . . . . . . . . . . . . . . . . . . . . . . . . . . . . . . . . . . . . . . . 41
Protecting files or folders . . . . . . . . . . . . . . . . . . . . . . . . . . . . . . . . . . . . . . . . . . . . . . . . 42
Setting a folder thumbnail . . . . . . . . . . . . . . . . . . . . . . . . . . . . . . . . . . . . . . . . . . . . . . . 43
Rating your photos. . . . . . . . . . . . . . . . . . . . . . . . . . . . . . . . . . . . . . . . . . . . . . . . . . . . . 43
Setting the screen saver . . . . . . . . . . . . . . . . . . . . . . . . . . . . . . . . . . . . . . . . . . . . . . . . 44
Chapter 5 Playing Music
Transferring Audio Data from the Computer . . . . . . . . . . . . . . . . . . . . . . . . . . . . . . . . . . . . . 46
Audio file formats supported by the viewer . . . . . . . . . . . . . . . . . . . . . . . . . . . . . . . . . . 46
Starting Playback. . . . . . . . . . . . . . . . . . . . . . . . . . . . . . . . . . . . . . . . . . . . . . . . . . . . . . . . . . 47
Selecting the category . . . . . . . . . . . . . . . . . . . . . . . . . . . . . . . . . . . . . . . . . . . . . . . . . . 47
Resume play . . . . . . . . . . . . . . . . . . . . . . . . . . . . . . . . . . . . . . . . . . . . . . . . . . . . . . . . . 48
Basic operations while playing music . . . . . . . . . . . . . . . . . . . . . . . . . . . . . . . . . . . . . . 48
Repeat and Shuffle Play . . . . . . . . . . . . . . . . . . . . . . . . . . . . . . . . . . . . . . . . . . . . . . . . 48
Using the Features for Music. . . . . . . . . . . . . . . . . . . . . . . . . . . . . . . . . . . . . . . . . . . . . . . . . 49
Audio equalizer setting. . . . . . . . . . . . . . . . . . . . . . . . . . . . . . . . . . . . . . . . . . . . . . . . . . 49
Deleting album tracks from the viewer. . . . . . . . . . . . . . . . . . . . . . . . . . . . . . . . . . . . . . 50
Creating a Playlist on the Viewer. . . . . . . . . . . . . . . . . . . . . . . . . . . . . . . . . . . . . . . . . . . . . . 50
About the Audio Pop Up Menu . . . . . . . . . . . . . . . . . . . . . . . . . . . . . . . . . . . . . . . . . . . . . . . 52
Chapter 6 Customizing Settings
Changing the Viewer Settings . . . . . . . . . . . . . . . . . . . . . . . . . . . . . . . . . . . . . . . . . . . . . . . . 53

4
P-5000 User’s Guide
Chapter 7 Direct Printing
Preparing to Print. . . . . . . . . . . . . . . . . . . . . . . . . . . . . . . . . . . . . . . . . . . . . . . . . . . . . . . . . . 55
Available types of paper. . . . . . . . . . . . . . . . . . . . . . . . . . . . . . . . . . . . . . . . . . . . . . . . . 55
Printing Photos . . . . . . . . . . . . . . . . . . . . . . . . . . . . . . . . . . . . . . . . . . . . . . . . . . . . . . . . . . . 55
Setting the number of prints in the thumbnails screen. . . . . . . . . . . . . . . . . . . . . . . . . . 55
Setting the number of prints in full screen . . . . . . . . . . . . . . . . . . . . . . . . . . . . . . . . . . . 56
Connecting to a printer. . . . . . . . . . . . . . . . . . . . . . . . . . . . . . . . . . . . . . . . . . . . . . . . . . 57
Setting print details . . . . . . . . . . . . . . . . . . . . . . . . . . . . . . . . . . . . . . . . . . . . . . . . . . . . 57
Printing Videos. . . . . . . . . . . . . . . . . . . . . . . . . . . . . . . . . . . . . . . . . . . . . . . . . . . . . . . . . . . . 58
Printer settings. . . . . . . . . . . . . . . . . . . . . . . . . . . . . . . . . . . . . . . . . . . . . . . . . . . . . . . . . . . . 59
Chapter 8 Viewing on a TV
Using A/V Out . . . . . . . . . . . . . . . . . . . . . . . . . . . . . . . . . . . . . . . . . . . . . . . . . . . . . . . . . . . . 60
Chapter 9 Maintenance and Troubleshooting
Cleaning the Viewer. . . . . . . . . . . . . . . . . . . . . . . . . . . . . . . . . . . . . . . . . . . . . . . . . . . . . . . . 61
Preparing the Battery. . . . . . . . . . . . . . . . . . . . . . . . . . . . . . . . . . . . . . . . . . . . . . . . . . . . . . . 61
Installing the battery. . . . . . . . . . . . . . . . . . . . . . . . . . . . . . . . . . . . . . . . . . . . . . . . . . . . 61
Charging the battery . . . . . . . . . . . . . . . . . . . . . . . . . . . . . . . . . . . . . . . . . . . . . . . . . . . 62
Removing the battery. . . . . . . . . . . . . . . . . . . . . . . . . . . . . . . . . . . . . . . . . . . . . . . . . . . 63
Troubleshooting. . . . . . . . . . . . . . . . . . . . . . . . . . . . . . . . . . . . . . . . . . . . . . . . . . . . . . . . . . . 64
Error messages/Icons . . . . . . . . . . . . . . . . . . . . . . . . . . . . . . . . . . . . . . . . . . . . . . . . . . 64
Problems and solutions . . . . . . . . . . . . . . . . . . . . . . . . . . . . . . . . . . . . . . . . . . . . . . . . . 64
Resetting the Viewer . . . . . . . . . . . . . . . . . . . . . . . . . . . . . . . . . . . . . . . . . . . . . . . . . . . . . . . 69
Contacting Customer Support . . . . . . . . . . . . . . . . . . . . . . . . . . . . . . . . . . . . . . . . . . . . . . . . 69
Before Contacting Epson. . . . . . . . . . . . . . . . . . . . . . . . . . . . . . . . . . . . . . . . . . . . . . . . 69
Help for Users in North America . . . . . . . . . . . . . . . . . . . . . . . . . . . . . . . . . . . . . . . . . . 70
Help for Users in Europe . . . . . . . . . . . . . . . . . . . . . . . . . . . . . . . . . . . . . . . . . . . . . . . . 70
Help for Users in Australia. . . . . . . . . . . . . . . . . . . . . . . . . . . . . . . . . . . . . . . . . . . . . . . 71
Help for Users in Singapore. . . . . . . . . . . . . . . . . . . . . . . . . . . . . . . . . . . . . . . . . . . . . . 71
Help for Users in Thailand . . . . . . . . . . . . . . . . . . . . . . . . . . . . . . . . . . . . . . . . . . . . . . . 72
Help for Users in Hong Kong. . . . . . . . . . . . . . . . . . . . . . . . . . . . . . . . . . . . . . . . . . . . . 72
Help for Users in Malaysia. . . . . . . . . . . . . . . . . . . . . . . . . . . . . . . . . . . . . . . . . . . . . . . 73
Help for Users in India . . . . . . . . . . . . . . . . . . . . . . . . . . . . . . . . . . . . . . . . . . . . . . . . . . 74
Help for Users in the Philippines . . . . . . . . . . . . . . . . . . . . . . . . . . . . . . . . . . . . . . . . . . 75
Appendix A Appendix
Standards and Approvals . . . . . . . . . . . . . . . . . . . . . . . . . . . . . . . . . . . . . . . . . . . . . . . . . . . 76
Specifications. . . . . . . . . . . . . . . . . . . . . . . . . . . . . . . . . . . . . . . . . . . . . . . . . . . . . . . . . . . . . 79
About Optional Accessories. . . . . . . . . . . . . . . . . . . . . . . . . . . . . . . . . . . . . . . . . . . . . . . . . . 81
Important Safety Instructions. . . . . . . . . . . . . . . . . . . . . . . . . . . . . . . . . . . . . . . . . . . . . . . . . 81


Copyright and Trademarks 6
P-5000 User’s Guide
Copyright and Trademarks
No part of this publication may be reproduced, stored in a retrieval system, or transmitted in any form or by any
means, electronic, mechanical, photocopying, recording, or otherwise, without the prior written permission of Seiko
Epson Corporation. The information contained herein is designed only for use with this Epson product. Epson is
not responsible for any use of this information as applied to other products.
Neither Seiko Epson Corporation nor its affiliates shall be liable to the purchaser of this product or third parties for
damages, losses, costs, or expenses incurred by the purchaser or third parties as a result of accident, misuse, or
abuse of this product or unauthorized modifications, repairs, or alterations to this product, or (excluding the U.S.)
failure to strictly comply with Seiko Epson Corporation’s operating and maintenance instructions.
Seiko Epson Corporation shall not be liable for any damages or problems arising from the use of any options or
any consumable products other than those designated as Original Epson Products or Epson Approved Products
by Seiko Epson Corporation.
Seiko Epson Corporation shall not be held liable for any damage resulting from electromagnetic interference that
occurs from the use of any interface cables other than those designated as Epson Approved Products by Seiko
Epson Corporation.
EPSON
®
is a registered trademark of Seiko Epson Corporation.
Microsoft
®
and Windows
®
are registered trademarks of Microsoft Corporation in the United States and/or other
countries. Windows Media
®
is registered trademark of Microsoft Corporation in the United States and/or other
countries.
Apple
®
and Macintosh
®
are registered trademarks of Apple Computer, Inc.
SD™ is a trademark.
QuickTime and the QuickTime logo are trademarks or registered trademarks of Apple Computer, Inc., used under
license.
This product is licensed under the MPEG-4 Visual Patent Portfolio License for the personal and non-commercial
use of a consumer for (i) encoding video in compliance with the MPEG-4 visual standard (MPEG-4 Video) and/or
(ii) decoding MPEG-4 Video that was encoded by a consumer engaged in a personal and non-commercial activity
and/or was obtained from a video provider licensed by MPEG LA to provide MPEG-4 Video. No license is granted
or shall be implied for any other use. Additional information including that relating to promotional, internal and
commercial uses and licensing may be obtained from MPEG LA, L.L.C. - see <www.mpegla.com>
This product is licensed under the AVC Patent Portfolio License for the personal and non-commercial use of a
consumer to (i) encode video in compliance with the AVC standard (AVC Video) and/or (ii) decode AVC Video that
was encoded by a consumer engaged in a personal and non-commercial activity and/or was obtained from a video
provider licensed to provide AVC Video. No license is granted or shall be implied for any other use. Additional
information may be obtained from MPEG LA, L.L.C. - see <www.mpegla.com>
MPEG Layer-3 audio coding technology is licensed from Fraunhofer IIS and Thomson.
Any use of this product other than consumer personal use in any manner that complies with the MPEG-2 standard
for encoding video information for packaged media is expressly prohibited without a license under applicable
patents in the MPEG-2 patent portfolio, which license is available from MPEG LA, L.L.C., 250 STEELE STREET,
SUITE 300, DENVER, COLORADO 80206.
DivX, DivX Certified, and associated logos are trademarks of DivX, Inc. and are used under license.

Copyright and Trademarks 7
P-5000 User’s Guide
Adobe
®
, Adobe
®
Photoshop
®
, and Adobe
®
RGB are registered trademarks of Adobe Systems Incorporated in the
United States and/or other countries.
This product is protected by certain intellectual property rights of Microsoft. Use or distribution such technology
outside of this product is prohibited without a license from Microsoft.
General Notice: Other product names used herein are for identification purposes only and may be trademarks of
their respective owners. Epson disclaims any and all rights in those marks.

Introduction 8
P-5000 User’s Guide
Chapter 1
Introduction
Main Features
With the viewer, you can easily save, view, and print images you have taken with a digital
camera. You can also play videos and music. The main features are described below.
❏
Epson Photo Fine Ultra is a high-resolution, wide color gamut (Adobe RGB) liquid
crystal display. You can view images easily in high resolution anywhere, anytime
without a computer or other special device.
❏ You can play videos and music easily anywhere, anytime without a computer or other
special device.
❏ You can print images directly with PictBridge enabled printers.
❏ You can save photo, video, and audio data in the viewer.
Important Notice
The viewer uses the hard disk as its storage medium. Although designed to be resistant
against mechanical and electromagnetic shock, because of the hard disk’s characteristics,
there is a danger that data may be lost or the service life of the viewer may be adversely
affected due to malfunction caused by these factors. Make sure to handle the viewer in
which your valuable image data is stored with care, and store backup copies to your
computer whenever possible.
c
Caution:
❏ Do not expose the viewer to any impact, doing so may cause malfunctions.
❏ Do NOT format the viewer’s hard disk drive from your computer, as this will render the
viewer inoperable. If this happens, you should contact an authorized Epson service
center. Repairs will be chargeable and are not covered by Epson’s warranties.

Getting Started 9
P-5000 User’s Guide
Chapter 2
Getting Started
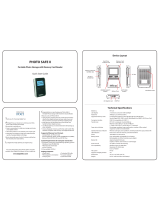
Parts
Front
Back
Hold
CF Card slot
Power switch with
Hold function
Liquid Crystal
Display (LCD)
SD Card slot
CF Card
eject button
Access lamp
Headphones
connector
Strap hook
B
A
T
T
.
Battery cover
A/V Out connector
USB connector (slave)
AC adapter
connector
Speaker
Cover
USB connector (host)
Reset button

Getting Started 10
P-5000 User’s Guide
LCD and control panel
/ key Press to zoom a photo, and adjust the volume.
4-way ring
(Up/ Down/Left/Right
key)
Press to move the cursor or highlight. You can select an item by pressing this
key to the up, down, left, or right.
OK key Press to complete the selection and proceed to the next step.
Back key Press to cancel the selection and return to the previous screen.
Charge lamp Lit green during battery charging.
Lit orange when a battery error has occurred.
Menu key Press to display the pop up menu.
Display key Press to switch the screen mode.
key Press to rate a particular photo and determine the selection. For details, see
“Rating your photos” (page 43).
Illumination lamp
(Blue)
Flashes during operations such as turning the power on, printing, LCD
power-off mode, and so on.
Menu
Display
Charge
OK
Back
OK key
Charge lamp
4-way ring
Menu key
Illumination lamp
Display key
Back key
key
key
key

Getting Started 11
P-5000 User’s Guide
Setting Up the Viewer
This section describes how to turn the power on/off and use the Home screen, and so on.
Turning the power on
Slide the power switch to as shown below. The power switch will return to the original
position.
The Illumination lamp turns on.
When you turn on the viewer for the first time, the Language screen and Date and Time
screen are displayed. Follow the instructions below.
1. The Language screen appears. Select the language to use with the Up or Down key,
and press the OK key.
Note:
If you change the set language, you may not be able to access existing files or folders.
2. After the message saying “Set current Date and Time.” appears, press the OK key to
proceed.
Hold
Illumination
Italiano
Français
Español
English
Nederlands
Pyccko
Deutsch
Language

Getting Started 12
P-5000 User’s Guide
3. Set the date and time using the 4-way ring.
4. After you finish all settings, select Complete using the Right or Left key, then press the
OK key.
Note:
❏ If approximately 24 hours passes after battery power is cut, the date and time settings may be
lost, and will need to be set again.
❏ If the date and time settings are erased, the Date and Time screen is displayed when you turn
on the viewer next time.
❏ After changing the battery, make sure that the date and time is set correctly. If necessary, set
the date and time again.
❏ You can change the settings later. For details, see “Changing the Viewer Settings” (page 53).
Turning the power off
1. Make sure that the Access lamp is off.
2. Slide the power switch to as shown below and hold it down for several seconds until
the shut down display appears. The power switch will return to the original position.
Date and Time
Year
Date Format
Set current Date and Time.
MinuteHourDayMonth
2006 00121212
MM/DD/YYYY Complete
Hold
Illumination lamp

Getting Started 13
P-5000 User’s Guide
Holding the key operations
You can deactivate the keys temporarily by sliding the power switch to Hold as shown
below.
Note:
❏ To release Hold, slide the power switch back to the middle.
❏ Putting the key operations on hold is a useful function when carrying the viewer in your bag
while listening to music with the headphones.
How to use the Home screen
When turning on the viewer, the Home screen appears first. All operations can be started
from this screen.
Battery icon Indicates the remaining charge in the battery.
CF icon Indicates the CF memory card is set.
SD icon Indicates the SD memory card is set.
Hold icon Indicates the key operations are on hold. For details, see “Holding the key
operations” (page 13).
My Music Select to listen to music transferred from the computer. For details, see
“Playing Music” (page 46).
Hold
My Music
View Rated Files
My Videos
My Photos
Backup Files
Memory Card
USB Device
Settings
20122006.001
19122006.002
19122006.001
18122006.001
17122006.001
Home
Battery icon
Hold icon
SD icon CF icon

Getting Started 14
P-5000 User’s Guide
Battery indications:
Using the Software
This section describes how to install the software on your computer. You can transfer data
from the computer to the viewer easily using the Epson Link2 software.
About the software
The viewer uses the following specified software.
Installing the software
You are required to install the data in the viewer. Connect the viewer to the computer, then
install the necessary software. For details about computer connection, see “Connecting the
viewer to the computer” (page 25).
View Rated
Files
Select to display rated files sorted by their rating. For details, see “Rating
your photos” (page 43).
My Videos Select to display files/folders stored in the Videos folder.
My Photos Select to display files/folders stored in the Photos folder.
Backup Files Select to display files/folders backed up from CF/SD memory cards and a
USB device.
Memory Card Select to display files on CF/SD memory cards or store memory card data
onto the viewer.
USB Device Select to transfer data between a USB device and the viewer.
Settings Select to set the viewer’s various settings.
:Indicates sufficient battery power.
:Indicates moderate battery power.
:Indicates low battery power.
:Indicates the AC adapter is connected to the viewer.
Epson Link2 QuickTime

Getting Started 15
P-5000 User’s Guide
For Windows users
Note:
❏ Do not delete the installer (EXE file) in the viewer’s hard disk.
❏ It is recommended to back up the installer onto the computer.
❏ For Windows XP and Windows 2000, you need administrative privileges to install the software.
1. Connect the viewer to the computer.
2. Click Start, select My Computer, then click the viewer’s hard disk drive icon.
3. Double-click the P_XXXX_WIN_SOFTWARE icon.
Note:
P_XXXX is the model name of your viewer.
4. Select Desktop to decompress the files onto, then click Yes.
5. On the software installation screen, click Easy Install.
Note:
If you are prompted to select a language, select your preferred language.
6. When the software license agreement screen appears, read the statement and then
click Agree.
7. Select your country, then follow the on-screen instructions.
8. When a message appears indicating that installation is complete, click Exit or Restart
Now.
Note:
When Restart Now appears, click the button to restart your computer.
For Macintosh users
Note:
❏ It is recommended to back up the installer onto the computer.
❏ You need administrative privileges to install the software.
1. Connect the viewer to the computer.
The viewer’s hard disk icon appears on the desktop.
2. Double-click the P_XXXX_MAC_SOFTWARE icon in the viewer’s hard disk on the
desktop.

Getting Started 16
P-5000 User’s Guide
Note:
P_XXXX is the model name of your viewer.
3. Double-click the MacOSX icon.
4. On the software installation screen, click Easy Install.
Note:
If you are prompted to select a language, select your preferred language.
5. When the software license agreement screen appears, read the statement and then
click Agree.
6. Select your country, then follow the on-screen instructions.
7. When a message appears indicating that installation is complete, click Exit or Restart
Now.
Note:
When Restart Now appears, click the button to restart your computer.

Getting Started 17
P-5000 User’s Guide
Uninstalling the Software
To uninstall the Epson Link2 software, follow the procedure below. Be sure to back up any
viewer installation data before deleting.
For Windows users
1. Click Start, point to All Programs (or Programs), then select EPSON. Select Epson
Link2, then click Epson Link2 Uninstall.
2. After the confirmation dialog box appears, click Yes.
3. After a message appears indicating that uninstallation is complete, click Finish.
Note:
After a message saying “Your computer needs to be restarted.” appears, click Restart Now to
restart your computer.
For Macintosh users
1. Select Custom Install in step 4 of “For Macintosh users” (page 15) in “Installing the
software.”
2. Select Epson Link2.
3. On the software installation screen, select Uninstall.
Note:
After a message saying “Your computer needs to be restarted.” appears, click Restart Now to
restart your computer.

Transferring Data 18
P-5000 User’s Guide
Chapter 3
Transferring Data
Transferring the data of a full memory card or other USB devices to the viewer makes it
possible for you to continue taking pictures.
Setting and Removing CF/SD Memory Cards
The viewer has a CF Card slot and an SD Card slot.
This section describes how to set memory cards to copy data onto the viewer.
c
Caution:
❏ To use a memory card correctly, read the manuals provided with the memory card.
❏ Never remove a memory card while the Access lamp is flashing. Doing so may cause
data in the card or HDD to be lost or damaged.
❏ Do not put stickers on memory cards. The sticker may peel off, preventing the card from
being ejected and damaging the viewer.
❏ Avoid using or storing the card in direct sunlight, or in places that are extremely hot,
humid, or dusty.
Supported types of memory cards
❏ CF (CompactFlash) memory card (Type2 and 3.3 V, including Micro Drive)
❏ SD memory card (up to 2 GB), SD High-Capacity card
❏ MultiMedia Card (up to 1 GB), MultiMedia Card Plus
Note:
Commercially available adapters will be required to use other memory cards (miniSD, RS-MMC,
Memory Stick Duo, Memory Stick PRO Duo, xD-Picture Card, and so on). Contact our customer
support for details.
Inserting a CF memory card into the CF Card slot
You can insert a CF memory card (or other cards with the CF adapter) into the CF Card
slot.

Transferring Data 19
P-5000 User’s Guide
Insert the memory card into the memory card slot with the label side facing the display side
of the viewer, then push it fully into the slot.
Note:
Insert memory cards in the correct direction. Otherwise, the memory card or the viewer may be
damaged.
Removing a CF memory card from the slot
1. Make sure that the Access lamp is off.
c
Caution:
Never remove a memory card while the Access lamp flashes. Doing so may cause data
in the card to be lost or damaged.
2. Push the eject button twice.
The memory card is pushed out.
3. Pull out the memory card.
Note:
❏ When using a memory card set in the CF adapter, do not remove only the memory card.
Disconnect the CF adapter from the viewer.
❏ Be sure to use the viewer with the eject button pushed in to avoid possible damage.

Transferring Data 20
P-5000 User’s Guide
Inserting an SD memory card into the SD Card slot
You can insert an SD memory card, SD High-Capacity card, MultiMedia Card, or
MultiMedia Card Plus into the SD Card slot.
Insert the memory card into the memory card slot with the label side facing the display side
of the viewer, then push it fully into the slot.
Note:
Insert memory cards in the correct direction. Otherwise, the memory card and the viewer may be
damaged.
Removing an SD memory card from the slot
1. Make sure that the Access lamp is off.
c
Caution:
Never remove a memory card while the Access lamp flashes. Doing so may cause data
in the card to be lost or damaged.
2. Push the memory card down slightly.
The memory card is ejected.
3. Pull out the memory card.
/