Alpine HCE-TCAM1-WRA Installation guide

Type
Installation guide

Alpine HCE-TCAM1-WRA is a spare tire camera and light system designed for Jeep Wranglers. It provides a clear view of the area behind your vehicle, enhancing safety and convenience when reversing or navigating tight spaces. The camera also features built-in LED lights, illuminating the area around your vehicle at night or in low-light conditions.

Alpine HCE-TCAM1-WRA is a spare tire camera and light system designed for Jeep Wranglers. It provides a clear view of the area behind your vehicle, enhancing safety and convenience when reversing or navigating tight spaces. The camera also features built-in LED lights, illuminating the area around your vehicle at night or in low-light conditions.

Jeep
SUV 1/14
HCE-TCAM1-WRA
Spare Tire Camera &
Light System
for Jeep Wrangler
Installation Manual
Model: Jeep Wrangler (JK)
Model Year: 2007-UP
* The specifi ed vehicles have been tested and have met compatibility specifi cations at the time
of testing. Compatibility is not guaranteed if the manufacturer has made production changes
to the vehicles listed above.
Introductions
Design and specifi cations are subject to change without notice for improvement.
To Ensure Safe Use, Always Follow These Precautions
The installation of this product requires specialized skills and experience. We recommend that you have the
product installed by an Alpine authorized dealer.
Before you use this product, be sure to carefully read this installation manual and the separate user’s manual
so that you can use the product correctly. Alpine Electronics bears no responsibility for problems that arise as
a result of failure to follow the instructions in the manuals.
This manual includes a number of symbols that are intended to help you use the product safely, to prevent
harm to you and others, and to protect against damage to property. These symbols and their meanings are
listed below. Make sure you fully understand these symbols before you begin reading the main text.
Explanations of Injury and Damage That May Result from Incorrect Use
Warning
Ignoring the content marked by this indication and using the product incorrectly is
expected to lead to death or serious injury.
Caution
Ignoring the content marked by this indication and using the product incorrectly is only
expected to lead to injury or property damage.
336034 HCE-TCAM1-WRA_IM_r5.indd 1336034 HCE-TCAM1-WRA_IM_r5.indd 1 7/20/16 4:02 PM7/20/16 4:02 PM
Spare Tire Camera & Light System for Jeep Wrangler
2/14
Warning
Types of Precautions
Forbidden
Indicates actions that are forbidden
(must not be performed)
Mandatory
Indicates actions that are
mandatory (must be performed)
Forbidden
Indicates that disassembly is
forbidden.
Marks content that should receive
your full attention.
Warning
Do not disassemble or modify the product. Doing so could lead to an accident,  re,
or electric shock.
Forbidden
Store screws and other small objects where small children cannot reach them. If one of these
small objects is swallowed, consult with a doctor immediately.
When replacing fuses, be sure to use fuses with the speci ed current rating. Failing to do so could
lead to an accident or  re.
Forbidden
Mandatory
Only connect the product to a 12 VDC negative ground car. Failing to do so could lead to
an accident or  re.
Mandatory
Before you begin wiring, remove the ground wire from the negative terminal of the battery.
Failing to do so could lead to electric shock or injury.
Do not cut the insulation on a cord and take power from another device. Doing so could
lead to  re or electric shock.
Forbidden
Do not install the product in a location where it will obstruct the driver’s forward view;
interfere with the operation of the steering wheel, gearshift, or the like; or pose a
threat to passengers. Doing so could lead to an accident or injury.
Forbidden
336034 HCE-TCAM1-WRA_IM_r5.indd 2336034 HCE-TCAM1-WRA_IM_r5.indd 2 7/20/16 4:02 PM7/20/16 4:02 PM
Spare Tire Camera & Light System for Jeep Wrangler
3/14
Warning
When making a hole in the vehicle body, be careful to avoid damaging pipes, the fuel tank,
electrical wiring, and the like. This kind of damage could lead to an accident or  re.
When installing and grounding the product, do not use any of the bolts or nuts of the
steering wheel, brakes, fuel tank, or the like. Doing so could make the brakes stop working
or lead to  re.
Forbidden
Do not install the product near the passenger-side airbag. Doing so could interfere with the
operation of the airbag and lead to an accident or injury.
Forbidden
Bundle cords so that they don’t interfere with driving. Wrapping cords around the steering
wheel, gearshift, brake pedal, or the like, could lead to an accident or damage equipment.
Caution
Connect the product properly according to the instructions. Failing to do so could lead
to  re or an accident.
Forbidden
Do not sandwich cords between the seat railing or allow them to touch protrusions.
Resulting breaks or shorts could lead to electric shock or  re.
Do not block vents or heat sinks. Doing so could lead to  re or damage equipment.
Use the accessories according to the instructions, and attach them securely.
Failing to do so could lead to an accident or damage equipment.
Forbidden
Do not install the product where it may be exposed to water or in a place with high levels
of humidity or dust. Doing so could lead to  re or damage equipment.
Forbidden
The installation and wiring of this product requires specialized skills and experience.
Have the product installed and wired by an authorized Alpine dealer.
336034 HCE-TCAM1-WRA_IM_r5.indd 3336034 HCE-TCAM1-WRA_IM_r5.indd 3 7/20/16 4:02 PM7/20/16 4:02 PM
Spare Tire Camera & Light System for Jeep Wrangler
4/14
Installation Kit Parts
Accessory List
Spare Tire Camera & Light Unit Mounting Base Lug Nut Camera Base
Mounting Posts
(Short, Mid, Long)
M4 Hex Socket Cap Screws
(8pcs)
Camera & Light Extension Cable
(7m)
Rubber Grommet Installation Manual Warranty Card and
Quick Start Guide
Camera & Light T-Harness
336034 HCE-TCAM1-WRA_IM_r5.indd 4336034 HCE-TCAM1-WRA_IM_r5.indd 4 7/20/16 4:02 PM7/20/16 4:02 PM
Spare Tire Camera & Light System for Jeep Wrangler
5/14
Tools Required
Panel Removing Tool Pliers T25 Torx
#2 Phillips Screwdriver Wire Cutters Torque Wrench
10 mm Sockets Socket Extension 19 mm Deep Socket
336034 HCE-TCAM1-WRA_IM_r5.indd 5336034 HCE-TCAM1-WRA_IM_r5.indd 5 7/20/16 4:02 PM7/20/16 4:02 PM
Spare Tire Camera & Light System for Jeep Wrangler
6/14
Spare Tire Camera and Light Installation
Glove Box Removal
1 Open the glove box.
2 Push inwards both left and right sides to release the
glove box out.
Removing B-Pillar Panel
1 Remove B-Pillar panel by disengaging 4 clips on
both front and rear passenger sides.
2 Using panel removing tool, unclip the B-Pillar. Be
careful not to damage the panel.
3 Lift the carpet up on both front and rear passenger
sides to expose the OEM cables.
336034 HCE-TCAM1-WRA_IM_r5.indd 6336034 HCE-TCAM1-WRA_IM_r5.indd 6 7/20/16 4:02 PM7/20/16 4:02 PM
Spare Tire Camera & Light System for Jeep Wrangler
7/14
Spare Tire Camera and Light Installation
Removing Rear Right Side Panel
1 Using T25 Torx, remove the screws on the rear right
side panel.
2 Using panel removing tools, pry off seatbelt
cover[#1] and remove the roll cage cover[#2].
2
1
3 Using 10mm socket to remove the panel.
4 Unclip the cigarette lighter socket from the harness.
5 Remove the Rear Right Side Panel.
336034 HCE-TCAM1-WRA_IM_r5.indd 7336034 HCE-TCAM1-WRA_IM_r5.indd 7 7/20/16 4:02 PM7/20/16 4:02 PM
Spare Tire Camera & Light System for Jeep Wrangler
8/14
Spare Tire and Wheel Removal
1 Using 19mm socket, extract the lug nuts.
2 Remove the spare tire center cap.
Pop center
cap out
3 Using panel removing tools, unclip and remove wire
cover on the rear gate.
4 Using panel removing tools, unclip and remove vent
cover on the rear gate.
Camera & Light Extension Cable Installation
1 Connect RCA from the Camera & Light Extension
Cable to the AUX input of the headunit.
Connection Type Connectable Head Unit
A
Direct
Connection
X109-WRA
B
Using Camera
T-Harness
Connection
i109-WRA
X009-WRA
Other iDatalink capable Alpine HU
(X008U, X108U, INE-W957HD,
INE-W967HD)
C
Cutting Camera
T-Harness
for Manual
Connection
All other HU or display devices
- Connection Type A -
If connecting to Alpine X109-WRA, connect 6pin
black connecter on X109-WRA main harness to
gray connector on the Camera & Light Extension
Cable. (See page 14 in detail)
6pin Black
Connector
Grey
Connector
- Connection Type B -
If connecting to iDatalink capable Alpine HU, use
Camera & Light T-Harness to iDatalink Maestro
Module and connect 6pin black connecter to gray
connector on the Camera & Light Extension Cable.
(See page 14 in detail)
6pin Black
Connector
Grey
Connector
To i109-WRA and X009-WRA harness or
Aftermarket iDatalink harnesses (sold separately)
Spare Tire Camera and Light Installation
336034 HCE-TCAM1-WRA_IM_r5.indd 8336034 HCE-TCAM1-WRA_IM_r5.indd 8 7/20/16 4:02 PM7/20/16 4:02 PM
Spare Tire Camera & Light System for Jeep Wrangler
9/14
- Connection Type C –
If connecting to all other HU, cut Camera & Light
T-Harness and manually connect to each wire
located on the passenger’s kick panel, then connect
6pin black connector to gray connector on the
Camera & Light Extension Cable. (See page 14 in
detail)
Connect ACC and GND properly according to the
wiring diagram in page 14. Fail to do so could
damage the product.
2 Route the wires:
A. Start from the head unit harness
B. Behind the glove box
C. Down the passenger kick panel
D. Door sill
E. Along the rear right side panel
F. Along the rear door handle cable
G. Secure to the factory cables.
OPTION 1:
H. Remove OEM grommet. Route the wire out
of an OEM grommet hole. Insert the camera
harness cable and the OEM third brake light cable
through the rubber grommet provided. Cut rubber
grommet by a razor blade if needed.
I. Press the grommet fi rmly into the hole.
Use silicone to fi ll up all gaps around the grommet
and cables to prevent water going into the rear
gate.
Failure to do so may cause moisture to go inside.
J. Along and through the centric hub.
Route the cable so it does not interfere with any
moving parts or safety equipment.
Spare Tire Camera and Light Installation
336034 HCE-TCAM1-WRA_IM_r5.indd 9336034 HCE-TCAM1-WRA_IM_r5.indd 9 7/20/16 4:02 PM7/20/16 4:02 PM
Spare Tire Camera & Light System for Jeep Wrangler
10/14
OPTION 2:
H. Route the wire out of a rear gate vent behind tire
carrier.
I. Along and through the centric hub.
Spare Tire Camera and Light Installation
336034 HCE-TCAM1-WRA_IM_r5.indd 10336034 HCE-TCAM1-WRA_IM_r5.indd 10 7/20/16 4:02 PM7/20/16 4:02 PM
Spare Tire Camera & Light System for Jeep Wrangler
11/14
Spare Tire Camera & Light Unit Installation
1 Choose the length of the mounting post (Short, Mid, Long) based on your wheel depth and offset in order to
see entire camera view.
DEEP MID SHALLOW
WHEEL TYPE
CROSS SECTION
LONG
Camera View
MID
Camera View
SHORT
Camera View
Do not block downward view by wheel or tire.
Post Type Long Mid Short
Length
4-1/4 inch (108.0mm) 3.0 inch (76.2mm) 1-3/4 inch (44.4mm)
Diameter 1-3/4 inch
(44.4mm)
Spare Tire Camera and Light Installation
336034 HCE-TCAM1-WRA_IM_r5.indd 11336034 HCE-TCAM1-WRA_IM_r5.indd 11 7/20/16 4:02 PM7/20/16 4:02 PM
Spare Tire Camera & Light System for Jeep Wrangler
12/14
2 Using M4 hex key, assemble the lug nut camera
base, mounting post, mounting base with the
harness running along the cutout and inside the
post.
Lug nut
camera base
Mounting
post
Mounting
base
3 Position the mounting base assembly over the
factory lug nuts. Ensure that no wires are pinched
or interfered with any parts or safety equipment.
4 Mount the spare tire back on the hub. Make sure the
mount is aligned correctly and connector coming
out of the center cap hole. Secure the spare tire by
tightening all lug nuts.
Description
Torque Spec.
(ft-lbs)
Spare Tire Carrier Lug Nut
(Aluminum Wheel)
54
Spare Tire Carrier Lug Nut (Steel
Wheel)
72
336034 HCE-TCAM1-WRA_IM_r5.indd 12336034 HCE-TCAM1-WRA_IM_r5.indd 12 7/20/16 4:02 PM7/20/16 4:02 PM
Spare Tire Camera & Light System for Jeep Wrangler
13/14
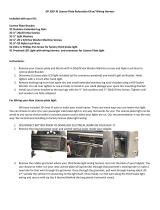
5 Connect the Spare Tire Camera and Light unit.
Do not drop Spare Tire Camera & Light unit on
hard surface. Doing so could damage the unit.
Place fl oor mat or carpet on the ground
underneath the camera to protect Spare Tire
Camera & Light unit from dropping.
6 Press the connector into the slot. Use the rubber
clips on the unit to secure the cable.
7 Using wheel lock, tighten the Spare Tire Camera
and Light unit on the mount. Use threads on the unit
to adjust horizontal angle of the camera.
Recommend
to use wheel
lock to add
protection.
We recommend using a wheel lock to protect your
investment.
Description
Torque Spec.
(ft-lbs)
Spare Tire Camera and Light
Wheel Lock Lug Nut
14
Completed Installation Image
1 Reinstall all panels, covers, carpets, cigarette lighter
socket, and glove box as it was taken out.
2 Reinstall the ground battery cable to the
battery negative post and torque the nut to the
manufacturer’s specifi cation. Reinstall the metal
brace.
Final Clean-Up
1 Clean up the interior of the vehicle so there are no
materials, metal shavings, wire pieces, debris left in
the vehicle.
2 Make a fi nal vehicle inspection to ensure everything
has been properly installed and reconnected to the
manufacturer’s specifi cations.
336034 HCE-TCAM1-WRA_IM_r5.indd 13336034 HCE-TCAM1-WRA_IM_r5.indd 13 7/20/16 4:02 PM7/20/16 4:02 PM
Spare Tire Camera & Light System for Jeep Wrangler
14/14
Wiring Diagram
Connection Type A Direct Connection
Rear View Camera
WARNING!
The use of this connection
is intended for Alpine
HCE-TCAM1-WRA rear
view camera O N LY.
To HCE-TCAM1-WRA
Blue Power Antenna
Blue/White Amp Turn-on
DVD/Display Power
8-pin White Connector
AUX Power
3-pin Black Connector
Black - Ground
Yellow -12V+
Red - Acc 12V+
DISP IN
POWER
HDMI Interface
6-pin White Connector
X109D - DVD/Display
Rear View Camera
6-pin Black Connector
Main Harness
White/Gray Manual Transmission Reverse Input
For manual transmission vehicles ONLY. Connect the
White/Gray wire to the White/Gray wire located
on the passenger side kick panel.
Rear View Camera
WAR NIN G!
The use of this connection
is intended for Alpine
HCE-TCAM1-WRA rear
view camera ONLY.
MANUAL TRANSMISSION VEHICLES
Cut loop when connecting
KCX-630HD HDMI selector
interface.
Connection Type B Using Camera T-Harness Connection
FRONT OUTREAR OUTSW OUT
USB
10
MIC
REMOTE
SWI Remote
Microphone
iDatalink MAESTRO Module
18-pin
Conn
4-pin Blue
Connector
(SW Remote)
10-pin Green
Connector
(Vehicle signals)
3-pin Black
Connector
(Power)
Blue Power Antenna
Blue/White Amp Turn-on
Main Harness
AUX/CAMERA/REMOTE Connector
MANUAL TRANSMISSION VEHICLES
iDatalink MAESTRO Module
10-pin Green
Connector
(Vehicle signals)
3-pin Black
Connector
(Power)
To HCE-TCAM1-WRA
White/Gray Camera
Reverse Trigger
For manual transmis-
sion vehicle ONLY.
Connect the
White/Gray wire to
the White/Gray wire
located on the
passenger’s kick
panel.
Refer to i109-WRA Installation Manual
(Page 11: Wiring Diagram)
Connection Type C Cutting Camera T-Harness for Manual Connection
T
o HCE-TCAM1-WRA
6pin Black Connector
GND
3rd BRAKE LIGHT
ACC
REVERSE LIGHT
12V ILLM
(5: BLACK)
CONNECTOR WIRE
(3: YELLOW/BLACK)
(4: RED)
(1: ORANGE/WHITE)
(2: ORANGE)
(BLACK)
VEHECLE WIRE
(WHITE/BLACK)
(RED)
(WHITE/GRAY)
(WHITE/PURPLE)
CUT
1 2
3 4
5 6
Located on the
passenger’s kick
panel
(Refer to X109-WRA Installation Manual Page 11: Wiring Diagram)
336034 HCE-TCAM1-WRA_IM_r5.indd 14336034 HCE-TCAM1-WRA_IM_r5.indd 14 7/20/16 4:02 PM7/20/16 4:02 PM
  • Page 1 1
  • Page 2 2
  • Page 3 3
  • Page 4 4
  • Page 5 5
  • Page 6 6
  • Page 7 7
  • Page 8 8
  • Page 9 9
  • Page 10 10
  • Page 11 11
  • Page 12 12
  • Page 13 13
  • Page 14 14

Alpine HCE-TCAM1-WRA Installation guide

Type
Installation guide

Alpine HCE-TCAM1-WRA is a spare tire camera and light system designed for Jeep Wranglers. It provides a clear view of the area behind your vehicle, enhancing safety and convenience when reversing or navigating tight spaces. The camera also features built-in LED lights, illuminating the area around your vehicle at night or in low-light conditions.

Ask a question and I''ll find the answer in the document

Finding information in a document is now easier with AI