Page is loading ...

Motoman, Incorporated
805 Liberty Lane
West Carrollton, OH 45449
TEL: (937) 847-6200
FAX: (937) 847-6277
24-Hour Service Hotline: (937) 847-3200
Motoman XRC Controller
Spot Welding
Manual
for MedarTM Integrated
Weld Control
Part Number: 147296-1CD
Revision: 0

The information contained within this document is the proprietary property of Motoman, Inc., and may not be
copied, reproduced or transmitted to other parties without the expressed written authorization of Motoman,
Inc.
©2007 by MOTOMAN
All Rights Reserved
Because we are constantly improving our products, we reserve the right to change specifications without
notice. MOTOMAN is a registered trademark of YASKAWA Electric Manufacturing.
COMPLETE OUR ONLINE SURVEY
Motoman is committed to total customer satisfaction! Please give us your feedback on the technical manuals you
received with your Motoman robotic solution.
To participate, go to the following website:
http://www.motoman.com/forms/techpubs.asp

MOTO
MAN
i SpotWelding Manual for Medar
TABLE OF CONTENTS
Section Page
1 INTRODUCTION
1.1 About this Document .................................................................................................... 1-1
1.2 System Configuration ................................................................................................... 1-2
1.3 System Components..................................................................................................... 1-4
1.3.1 XRC 2001 Controller ...................................................................................... 1-4
1.3.2 Robot .............................................................................................................. 1-4
1.3.3 Servo Robot Gun ............................................................................................ 1-5
1.3.4 Medar Integrated Weld Control ....................................................................... 1-5
1.3.5 Water Cooling System ....................................................................................1-6
1.3.6 Tip Dresser (Optional) .................................................................................... 1-6
1.3.7 Work Cell ........................................................................................................ 1-6
1.4 Equipment and Component Specifications ...................................................................1-6
1.5 Reference to Other Documentation................................................................................ 1-7
1.6 Customer Service Information ......................................................................................1-7
2-1
2 SAFETY
2.1 Introduction .................................................................................................................. 2-1
2.2 Standard Conventions ..................................................................................................2-2
2.3 General Safeguarding Tips............................................................................................ 2-3
2.4 Mechanical Safety Devices ...........................................................................................2-3
2.5 Installation Safety .........................................................................................................2-4
2.6 Programming Safety ..................................................................................................... 2-4
2.7 Operation Safety ...........................................................................................................2-5
2.8 Maintenance Safety....................................................................................................... 2-6
3-1
3 THEORY OF OPERATION
3.1 Resistance Welding Variables....................................................................................... 3-1
3.2 The Weld Cycle............................................................................................................. 3-2
3.3 Critical Factors in Resistance Welding.......................................................................... 3-2
3.3.1 Current ........................................................................................................... 3-2
3.3.2 Voltage ........................................................................................................... 3-3
3.3.3 Ohm’s Law ...................................................................................................... 3-3
3.3.4 Secondary Resistance ..................................................................................... 3-4
3.3.5 Reactance, Resistance, and Power Factor .......................................................3-4
3.3.6 Primary Current .............................................................................................. 3-5
3.4 AC Welding ..................................................................................................................3-5
3.5 DC Welding .................................................................................................................. 3-6
3.6 Spot Welding Theory .................................................................................................... 3-6
3.6.1 Steppers ......................................................................................................... 3-9

SpotWelding Manual for Medar ii
MOTO
MAN
3.7 Current Control Methods............................................................................................ 3-10
3.7.1 Automatic Power Factor ................................................................................ 3-10
3.7.2 Automatic Voltage Compensation Mode ....................................................... 3-10
3.7.3 Constant Current Mode ................................................................................ 3-11
4 SETUP AND OPERATION
4.1 Setting Up Parameters .................................................................................................. 4-1
4.2 Set Up........................................................................................................................... 4-4
4.3 Simple Weld Condition Files ........................................................................................ 4-5
4.4 Enhanced Weld Schedules............................................................................................ 4-6
4.5 Stepper Condition Files ................................................................................................ 4-7
4.6 Monitoring Weld Results .............................................................................................. 4-8
5 TROUBLESHOOTING
5.1 Medar Alarms and Errors.............................................................................................. 5-1
5.2 XRC Alarms and Errors................................................................................................. 5-3
5.3 Troubleshooting Welding Problems .............................................................................5-4
5.4 Tips for Producing Quality Welds ................................................................................. 5-5
5.5 Troubleshooting Dual Port RAM I/O ............................................................................. 5-6
A ROBOT I/O...................................................................................................................................A-1
LIST OF FIGURES
Figure Page
Figure 1-1 XRC and Medar Integrated Weld Control................................................................... 1-2
Figure 1-2 XRC/Medar Board Interface....................................................................................... 1-3
Figure 3-1 The Weld Cycle.........................................................................................................3-2
Figure 3-2 Primary vs. Secondary Voltage.................................................................................. 3-3
Figure 3-3 Reactance, Impedance, and Power Factor ................................................................. 3-4
Figure 3-4 AC Welding............................................................................................................... 3-5
Figure 3-5 Regulating Current....................................................................................................3-6
Figure 3-6 Welding Circuit with Heat Loss.................................................................................3-7
Figure 3-7 Shunting ................................................................................................................... 3-8
Figure 3-8 Normal vs. Mushroomed Electrode Surface .............................................................. 3-8
Figure 3-9 Welding Different Part Thicknesses........................................................................... 3-9
Figure 3-10 Stepper Program.......................................................................................................3-9
Figure 3-11 Automatic Power Factor .......................................................................................... 3-10
Figure 3-12 Automatic Voltage Compensation (AVC)................................................................. 3-11
Figure 3-13 AVC Mode (top) vs. Constant Current Mode........................................................... 3-12
Figure 4-1 Simple Weld Condition File ...................................................................................... 4-6
Figure 4-2 Enhanced Weld Condition File..................................................................................4-7

MOTO
MAN
iii SpotWelding Manual for Medar
LIST OF TABLES
Table Page
Table 1-1 Equipment and Component Specifications ..................................................................1-6
Table 4-1 Medar Timer Parameter List ......................................................................................... 4-1
Table 5-1 Medar Application Errors ............................................................................................. 5-1
Table 5-2 XRC Alarms and Errors ................................................................................................ 5-3
Table 5-3 Welding Troubleshooting Chart ................................................................................... 5-4
Table 5-4 XRC Outputs to Medar Board ....................................................................................... 5-6
Table 5-5 XRC Inputs From Medar Board .................................................................................... 5-7


MOTO
MAN
1-1 SpotWelding Manual for Medar
SECTION 1
INTRODUCTION
1.1 About this Document
This manual provides both general and specific information about Motoman’s spot
welding system using a Medar integrated weld control. This manual is divided into
the following sections:
SECTION 1 - INTRODUCTION
This section provides general information regarding this manual, descriptions of
the integrated weld control and its components, technical specifications,
installation instructions, a list of reference documents, and customer service
information.
SECTION 2 - SAFETY
This section describes the conventions used to identify precautionary text
throughout this manual. The section also contains a list of general cautions and
warnings that apply to many of the procedures described in this manual.
SECTION 3 - THEORY OF OPERATION
This section provides general spot welding principles. The discussion identifies
specific problems and requirements, how the weld control works, and how it
addresses specific welding requirements.
SECTION 4 - OPERATION
This section provides instructions for the proper use and operation of the spot
welding system with the Medar integrated weld control. Instructions provided
include step-by-step procedures to prepare the system for use.
SECTION 5 - TROUBLESHOOTING
The information provided in this section helps the user identify alarms and errors
and remedy problems found during operation and welding. Included are tips and
techniques to overcome specific problems related to spot welding.
APPENDIX A - ROBOT I/O
This appendix identifies contact and coil addresses for the robot inputs and
outputs.

INTRODUCTION
SpotWelding Manual for Medar 1-2
MOTO
MAN
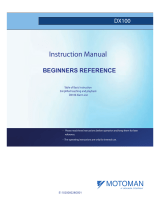
1.2 System Configuration
A spot welding system is an integrated package of tools and components designed
to meet specific welding requirements. A typical system includes the components
and optional equipment listed below. Figure 1-1 shows a typical system
configuration.
Figure 1-1 XRC and Medar Integrated Weld Control
• Motoman robot manipulator and XRC 2001 controller
• 3-Slot CPU rack
• Medar integrated welding board
• Welding equipment, including the following:
• Medar 3006 integrated weld control
• MedWeld cable
• Transgun (air or servo-driven)
• Water circulator/chiller
Options for the welding system include:
• Tip dresser
• Tip changer
The XRC controls the operation of the spot welding system. It coordinates the
operation of the various components of the system through execution of instruction
sequences provided in the robot program or “job” file. As the XRC steps through
the series of instructions, it directs the movement of the robot and operates the
weld control.
XRC ROBOT
CONTROLLER
MEDAR
WELD CONTROL
INCOMING POWER
(CUSTOMER–SUPPLIED)
XRC TO MEDAR
INTERFACE CABLE OUTGOING POWE
R
TO TRANSGUN

INTRODUCTION
MOTO
MAN
1-3 SpotWelding Manual for Medar
The robot moves the spot welding gun and supply lines through a series of
programmed steps. The XRC controls the speed, direction, and position of the
robot as it moves from point to point. The XRC also controls the actuation of the
spot gun. If the gun is pneumatic, the XRC turns on the output to close the gun.
Servo-gun control is more integrated. The robot is programmed to know when the
gun reaches the specified clamping forces, and can synchronize the firing of the
weld timer with gun pressure.
The Medar weld control provides power to the spot welding gun. The XRC
pendant is used to enter program data; however, the programs are executed by the
Medar board installed inside the controller. The Medar board directly controls the
firing of SRC and current flow.
The Medar programs are retained in the XRC memory.When changes are made
through the XRC pendant, the data must be written to the Medar board to take
effect. The Medar programs saved in the XRC memory can be downloaded using
a flash memory card or PC. If necessary, the Medar pendant can be connected to
the Medar board to view the program or change set-up data. See Figure 1-2.
NOTE: Changes made to weld schedules with the Medar pendant are not saved in the XRC memory and
will be lost at power down. Changes to setup parameters made with the Medar pendant can be
saved in XRC memory by toggling the “UPLOAD DYNAMIC DATA” output (OUT 188). These
changes are downloaded to the Medar board when the system restarts.
Figure 1-2 XRC/Medar Board Interface
XRC PENDANT
XRC CPU
MEDAR PENDANT
(OPTIONAL)
HIGH SPEED
DUAL-PORT
RAM
MEDAR INTEGRATED
WELD CONTROL BOARD
• MEDAR programs
downloaded at power up
• Display with weld results
• Shared I/O
– weld output
– schedule select
• MEDAR programs
loaded at power up
• Programs execute
on MEDAR board
• Update changes to
programs or set up
• Average Current, etc.
• Alarm Outputs
MEDWELD
CABLE
MEDLAN PORT
XRC
MEDAR
POWER
SOURCE
OPTIONAL I/O CONTROL
(NOT USED)

INTRODUCTION
SpotWelding Manual for Medar 1-4
MOTO
MAN
1.3 System Components
The following paragraphs contain brief descriptions of each of the spot welding
system components.
1.3.1 XRC 2001 Controller
The spot welding system includes an XRC 2001 controller and a programming
pendant. The XRC 2001 provides the following basic functions:
• Power ON
• Job creation
• Input and edit motion data
• Input and edit process data
• Memory for Medar data
• Playback
• Process sequencing
• Power OFF
• Connection to external devices through the pendant’s serial interface port
• Input/output signal processing
The XRC controls the operation, and monitors the status, of the spot welding
system's components: the manipulator, weld control, and spot welding gun. The
various safety features of the spot welding system and the associated cell operate
through the XRC. Under emergency conditions, the XRC controls the shutdown
of the robot drive power, weld current, positioner, and any other devices connected.
Refer to your XRC Operator’s Manual for more information.
1.3.2 Robot
The standard integrated spot welding package includes a vertically articulated, six-
axis, ES-165 robot with a 165 kg payload. The P-point working envelope is 2650
mm (104 inches). The robot can reach below its own base, and can travel in an arc
approximately 360˚ around the base. However, it is possible to restrict the base
axis with hard stops. Weld cables are routed inside the robot arm instead of along
the outside, which protects the cables from damage that can be caused by robot
motion during welding. These robots can be floor-, wall-, or ceiling-mounted.
Motoman robots use brushless AC servo motors with absolute position encoders.
A combination of capacitance and lithium batteries in both robot and controller
assemblies protects program positional data for up to a year. The life expectancy
for the lithium battery is approximately three years.
Power for the robot manipulator is supplied through the controller. A 4.5 KVA
isolation stepdown transformer converts the 230, 460 or 575V delta input to a
208V wye output. Refer to the manipulator manual that came with your system.
NOTE: UP-Series robots or the ES200 robot are available as options for the standard spot welding
package.

INTRODUCTION
MOTO
MAN
1-5 SpotWelding Manual for Medar
1.3.3 Servo Robot Gun
The Motoman servo gun, when provided with the integrated welding package,
improves productivity and provides high quality welds. The servo motor variable
controls allow operators to program an exact force and ensure that force is accurate
and repeatable for every weld. A servo gun also allows the operator to control the
contact speed, thus minimizing deformation of the sheet metal and protecting the
welding electrodes, which improves weld quality.
Servo-controlled welding guns offer many advantages over pneumatic welding
guns. The electric servo motor runs silently, eliminating noisy exhaust sounds, and
is more energy efficient than the air compressors used with pneumatic guns. Servo-
controlled guns also increase flexibility with multi-position welding.
1.3.4 Medar Integrated Weld Control
The MedWeld 3006 weld control with the Medar integrated weld processing board
provides a single point of programming control from the XRC pendant menu. A
single MedWeld cable provides the interface between the weld control and the
processing board in the XRC controller, eliminating the need for multiple discrete
I/O cables.
The advantages of the Medar integrated weld control are:
• Quicker response time due to elimination of discrete I/O filtering (150 ms/spot)
• 255 weld schedules
• Stepper profile
• Ability to program weld sequences with the XRC pendant
• Reduced wiring, smaller enclosure, and lower cost
• Network capabilities with a MedLan cable
• Identical software and processing board for both AC and MF (mid-frequency)
DC spot welding
• Medar pendant is not required
• Weld schedules and basic setup parameters can be programmed on the
XRC pendant
• All Medar alarms are displayed on the Motoman pendant
• Easy file backup:
• Medar weld schedule is stored in XRC CMOS memory as a spot welding
condition file
• Spot welding condition file can be saved/restored to/from the PCMIA
memory card using the XRC pendant
• Welding condition files can be transmitted to a remote PC via serial or
Ethernet communications
The Medar weld control supports either AC or MFDC (mid-frequency direct
current) welding. AC and MFDC modes are selected by a parameter in the
controller (S2C373). The XRC menus for the two modes are identical, with only
minor changes in nomenclature.

INTRODUCTION
SpotWelding Manual for Medar 1-6
MOTO
MAN
1.3.5 Water Cooling System
The water cooling system circulates water through both the spot weld controller
and the weld gun. It is important that the water temperature not exceed 86° F, as
inadequate cooling could damage the servo weld gun and transformer.
The Medar board supports thermal overload sensors from the transformer and
Medar SCR. External flow sensors may be integrated with the XRC as an interlock
for welding.
1.3.6 Tip Dresser (Optional)
The optional tip dresser is used to remove weld flash, oil, grease, or any other
deposit from the weld tip that may affect the gun’s ability to function properly.
The tip dresser also grinds the contact tip back to its original shape. The servo gun
can vary pressure during tip dress for cut and polish.
1.3.7 Work Cell
In addition to the items above, a complete system typically includes certain work
cell components. These components are not specifically part of the spot welding
package, but are related items that are supplied separately. Some of these items
include light curtains, interlocks, arc screens, fencing, and positioners. The
number and type of components required depend on the specific application.
1.4 Equipment and Component Specifications
Specifications for the typical spot welding system and its components are listed in
Table 1-1. Additional information is provided in the various vendor manuals
supplied with the system.
Table 1-1 Equipment and Component Specifications
Characteristic Specification
Power Requirements
Electrical service (robot)
Electrical service (welding)
Refer to manipulator manual
Refer to Integrated Spot Welding Programming Manual
for MedWeld 3006 (#T99204-01)
Operating Environment
Temperature range
Humidity
Vibration
Other
0 - 40 ˚C
20 - 80% (non-condensing)
Less than 0.5 G
Free from corrosive gases or liquids, explosive gases, and
excessive electrical noise
MedWeld 3006 Weld Control Refer to the Integrated Spot Welder Programming Manual
for MedWeld 3006 (#T99204-01)
Spot Weld Gun Servo motor is controlled by the XRC. Refer to the spot
gun manufacturer’s specifications. Note that when used
with the ES165 robot, the largest spot gun motor that can
be used is a 2 kW.
Water Circulator Varies. See vendor manuals for specific information.

INTRODUCTION
MOTO
MAN
1-7 SpotWelding Manual for Medar
1.5 Reference to Other Documentation
For additional information, refer to the following:
• Motoman Manipulator Manual provided with your system.
• Motoman Operator's Manual for Spot Welding (P/N 142101-1)
•
Motor Gun Function Manual (142972-1)
• Motoman Concurrent I/O Parameter Manual for XRC 2001 (P/N 147626-1)
• Integrated Spot Welding Programming Manual for MedWeld 2006 (#T99204-1)
• Vendor manuals for system components not manufactured by Motoman
1.6 Customer Service Information
If you are in need of technical assistance, contact the Motoman service staff at
(937) 847-3200. Please have the following information ready before you call:
• Robot Type (UP6, ES165, etc.)
• System Type (ArcWorld 1000, FabWorld II, etc.)
• Application Type (palletizing, welding, handling, etc.)
• Robot Serial Number (located on the back side of the robot arm)
• Order No. (located on the front of the controller)

INTRODUCTION
SpotWelding Manual for Medar 1-8
MOTO
MAN
NOTES

MOTO
MAN
2-1 Spot Welding Manual for Medar
SECTION 2
SAFETY
2.1 Introduction
.
We suggest that you obtain and review a copy of the ANSI/RIA National Safety
Standard for Industrial Robots and Robot Systems. This information can be
obtained from the Robotic Industries Association by requesting ANSI/RIA
R15.06. The address is as follows:
Robotic Industries Association
900 Victors Way
P.O. Box 3724
Ann Arbor, Michigan 48106
TEL: 313/994-6088
FAX: 313/994-3338
Ultimately, the best safeguard is trained personnel. The user is responsible for
providing personnel who are adequately trained to operate, program, and maintain
the robot cell.
The robot must not be operated by personnel who have not been
trained!
We recommend that all personnel who intend to operate, program, repair, or use
the robot system be trained in an approved Motoman training course and become
familiar with the proper operation of the system.
This safety section addresses the following:
• Standard Conventions (Section 2.2)
• General Safeguarding Tips (Section 2.3)
• Mechanical Safety Devices (Section 2.4)
• Installation Safety (Section 2.5)
• Programming Safety (Section 2.6)
• Operation Safety (Section 2.7)
• Maintenance Safety (Section 2.8)
It is the purchaser's responsibility to ensure that all local, county,
state, and national codes, regulations, rules, or laws relating to
safety and safe operating conditions for each installation are met
and followed.

SAFETY
Spot Welding Manual for Medar 2-2
MOTO
MAN
2.2 Standard Conventions
This manual includes information essential to the safety of personnel and
equipment. As you read through this manual, be alert to the four signal words:
• DANGER
• WARNING
• CAUTION
•NOTE
Pay particular attention to the information provided under these headings which
are defined below (in descending order of severity).
DANGER!
Information appearing under the DANGER caption concerns the
protection of personnel from the immediate and imminent hazards
that, if not avoided, will result in immediate, serious personal injury
or loss of life in addition to equipment damage.
WARNING!
Information appearing under the WARNING caption concerns the
protection of personnel and equipment from potential hazards that
can result in personal injury or loss of life in addition to equipment
damage.
CAUTION!
Information appearing under the CAUTION caption concerns the
protection of personnel and equipment, software, and data from
hazards that can result in minor personal injury or equipment
damage.
NOTE: Information appearing in a NOTE caption provides additional information which is helpful in
understanding the item being explained.

SAFETY
MOTO
MAN
2-3 Spot Welding Manual for Medar
2.3 General Safeguarding Tips
All operators, programmers, plant and tooling engineers, maintenance personnel,
supervisors, and anyone working near the robot must become familiar with the
operation of this equipment. All personnel involved with the operation of the
equipment must understand potential dangers of operation. General safeguarding
tips are as follows:
• Improper operation can result in personal injury and/or damage to the
equipment. Only trained personnel familiar with the operation of this robot,
the operator's manuals, the system equipment, and options and accessories
should be permitted to operate this robot system.
• Do not enter the robot cell while it is in automatic operation. Programmers
must have the teach pendant when they enter the robot cell.
• Improper connections can damage the robot. All connections must be made
within the standard voltage and current ratings of the robot I/O (Inputs and
Outputs).
• The robot must be placed in Emergency Stop (E-STOP) mode whenever it is
not in use.
• In accordance with ANSI/RIA R15.06, section 6.13.4 and 6.13.5, use
lockout/tagout procedures during equipment maintenance. Refer also to
Section 1910.147 (29CFR, Part 1910), Occupational Safety and Health
Standards for General Industry (OSHA).
2.4 Mechanical Safety Devices
The safe operation of the robot, positioner, auxiliary equipment, and system is
ultimately the user's responsibility. The conditions under which the equipment
will be operated safely should be reviewed by the user. The user must be aware of
the various national codes, ANSI/RIA R15.06 safety standards, and other local
codes that may pertain to the installation and use of industrial equipment.
Additional safety measures for personnel and equipment may be required
depending on system installation, operation, and/or location. The following safety
measures are available:
• Safety fences and barriers
• Light curtains
• Door interlocks
• Safety mats
• Floor markings
• Warning lights
Check all safety equipment frequently for proper operation. Repair or replace any
non-functioning safety equipment immediately.

SAFETY
Spot Welding Manual for Medar 2-4
MOTO
MAN
2.5 Installation Safety
Safe installation is essential for protection of people and equipment. The
following suggestions are intended to supplement, but not replace, existing federal,
local, and state laws and regulations. Additional safety measures for personnel and
equipment may be required depending on system installation, operation, and/or
location. Installation tips are as follows:
• Be sure that only qualified personnel familiar with national codes, local
codes, and ANSI/RIA R15.06 safety standards are permitted to install the
equipment.
• Identify the work envelope of each robot with floor markings, signs, and
barriers.
• Position all controllers outside the robot work envelope.
• Whenever possible, install safety fences to protect against unauthorized entry
into the work envelope.
• Eliminate areas where personnel might get trapped between a moving robot
and other equipment (pinch points).
• Provide sufficient room inside the workcell to permit safe teaching and
maintenance procedures.
2.6 Programming Safety
All operators, programmers, plant and tooling engineers, maintenance personnel,
supervisors, and anyone working near the robot must become familiar with the
operation of this equipment. All personnel involved with the operation of the
equipment must understand potential dangers of operation. Programming tips are
as follows:
• Any modifications to the controller PLC can cause severe personal injury or
death, as well as damage to the robot! Do not make any modifications to the
PLC. Making any changes without the written permission of Motoman will
VOID YOUR WARRANTY!
• Some operations require standard passwords and some require special
passwords. Special passwords are for Motoman use only.
YOUR
WARRANTY WILL BE VOID
if you use these special passwords.
• Back up all programs and jobs onto a floppy disk whenever program changes
are made. To avoid loss of information, programs, or jobs, a backup must
always be made before any service procedures are done and before any
changes are made to options, accessories, or equipment.
• The concurrent I/O (Input and Output) function allows the customer to
modify the internal ladder inputs and outputs for maximum robot
performance. Great care must be taken when making these modifications.
Double-check all modifications under every mode of robot operation to
ensure that you have not created hazards or dangerous situations that may
damage the robot or other parts of the system.
• Improper operation can result in personal injury and/or damage to the
equipment. Only trained personnel familiar with the operation, manuals,
electrical design, and equipment interconnections of this robot should be
permitted to operate the system.

SAFETY
MOTO
MAN
2-5 Spot Welding Manual for Medar
• Inspect the robot and work envelope to be sure no potentially hazardous
conditions exist. Be sure the area is clean and free of water, oil, debris, etc.
• Be sure that all safeguards are in place.
• Check the E-STOP button on the teach pendant for proper operation before
programming.
• Carry the teach pendant with you when you enter the workcell.
• Be sure that only the person holding the teach pendant enters the workcell.
• Test any new or modified program at low speed for at least one full cycle.
2.7 Operation Safety
All operators, programmers, plant and tooling engineers, maintenance personnel,
supervisors, and anyone working near the robot must become familiar with the
operation of this equipment. All personnel involved with the operation of the
equipment must understand potential dangers of operation. Operation tips are as
follows:
• Be sure that only trained personnel familiar with the operation of this robot,
the operator's manuals, the system equipment, and options and accessories
are permitted to operate this robot system.
• Check all safety equipment for proper operation. Repair or replace any non-
functioning safety equipment immediately.
• Inspect the robot and work envelope to ensure no potentially hazardous
conditions exist. Be sure the area is clean and free of water, oil, debris, etc.
• Ensure that all safeguards are in place.
• Improper operation can result in personal injury and/or damage to the
equipment. Only trained personnel familiar with the operation, manuals,
electrical design, and equipment interconnections of this robot should be
permitted to operate the system.
• Do not enter the robot cell while it is in automatic operation. Programmers
must have the teach pendant when they enter the cell.
• The robot must be placed in Emergency Stop (E-STOP) mode whenever it is
not in use.
• This equipment has multiple sources of electrical supply. Electrical
interconnections are made between the controller, external servo box, and
other equipment. Disconnect and lockout/tagout all electrical circuits before
making any modifications or connections.
• All modifications made to the controller will change the way the robot
operates and can cause severe personal injury or death, as well as damage the
robot. This includes controller parameters, ladder, and I/O (Input and Output)
modifications. Check and test all changes at slow speed.

SAFETY
Spot Welding Manual for Medar 2-6
MOTO
MAN
2.8 Maintenance Safety
All operators, programmers, plant and tooling engineers, maintenance personnel,
supervisors, and anyone working near the robot must become familiar with the
operation of this equipment. All personnel involved with the operation of the
equipment must understand potential dangers of operation. Maintenance tips are
as follows:
• Do not perform any maintenance procedures before reading and
understanding the proper procedures in the appropriate manual.
• Check all safety equipment for proper operation. Repair or replace any non-
functioning safety equipment immediately.
• Improper operation can result in personal injury and/or damage to the
equipment. Only trained personnel familiar with the operation, manuals,
electrical design, and equipment interconnections of this robot should be
permitted to operate the system.
• Back up all your programs and jobs onto a floppy disk whenever program
changes are made. A backup must always be made before any servicing or
changes are made to options, accessories, or equipment to avoid loss of
information, programs, or jobs.
• Do not enter the robot cell while it is in automatic operation. Programmers
must have the teach pendant when they enter the cell.
• The robot must be placed in Emergency Stop (E-STOP) mode whenever it is
not in use.
• Be sure all safeguards are in place.
• Use proper replacement parts.
• This equipment has multiple sources of electrical supply. Electrical
interconnections are made between the controller, external servo box, and
other equipment. Disconnect and lockout/tagout all electrical circuits before
making any modifications or connections.
• All modifications made to the controller will change the way the robot
operates and can cause severe personal injury or death, as well as damage the
robot. This includes controller parameters, ladder, and I/O (Input and
Output) modifications. Check and test all changes at slow speed.
• Improper connections can damage the robot. All connections must be made
within the standard voltage and current ratings of the robot I/O (Inputs and
Outputs).
/