Page is loading ...

1
Technical Support
1-800-248-0892
Please read these instructions completely before proceeding with installation
‘90-’97 Honda Accord
Rear Kit Part No. 75660
www.airliftcompany.com
EASYSTREET
MN-547
(03409)
NPR 4762
Warranty Information
1. All goods come with a one year manufacturer’s warranty against defects.
2. Warranty will be void if the strut is altered for any reason and/or adapted to
applications other than those suggested.
3. Any abrasions or rub marks on the spring portion of the strut will not be covered
under warranty. The customer is responsible for all repair charges.
4. Driving at a low PSI can cause the strut to bottom out. Repeated bottoming out can
cause the strut to fail. Failure resulting from repeated bottoming out is not covered
under warranty.
5. The customer is responsible for all shipping costs to Air Lift Company for all warranty
claims.
6. Please call tech support at 1-800-248-0892 before shipping a product to Air Lift
Company.

2
Technical Support
1-800-248-0892
IMPORTANT: Always keep safety in mind when
working on your vehicle. Completely read these
instructions before installing the kit.
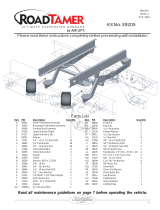
I. Preparing the Vehicle
1. Jack the vehicle up and support the body on jackstands.
2. Remove the rear wheels (Figure 1).
II. Strut Removal
1. Remove the bolt in the lower strut mount and retain for later use
(Figure 2).
2. Remove the O.E.M retaining nut, one flatwasher, and the rubber
bushing from the upper strut mount (Figure 3). Retain for later
use.
NOTE: These are located behind the back-seats on the inside
of the vehicle.
3. Compress the spring and remove the strut assembly from the
vehicle (Figure 4).
NOTE: The use of a spring compressor is helpful in removing
the strut safely from the vehicle.
Figure 1
Figure 2
Figure 3
Figure 4
Hardware
Item P/N Description Qty.
26303 Upper Strut Mount 2
17197 3/8 - 16 x 1” Countersunk Bolt 4
18427 3/8” Lock Washer 4
18430 3/8-16 Hex Nut 4
09191 Rubber Spacer 2
17264 10mm-1.25 x 80mm Bolt GD8 2
18494 10mm Flat Washer 10
35062 Rear Strut Assembly 2
21261 1/4” NPT to 1/2” Tube Straight 2
A
B
C
D
E
F
G
H
I

3
Technical Support
1-800-248-0892
Figure 5
Figure 6
III. Removing the Upper Strut Mounting
Bracket
1. Remove the two nuts from the upper strut mount and discard.
NOTE: These are located behind the back-seat on the inside of
the vehicle.
IV. Installing the Upper Strut Mount
1. Place the upper strut mount (A) with the counter-sunk side
downwards, in place where the O.E.M. mount was previously
located.
2. Place the counter-sunk bolts (B) into the holes and place the
lock washers (C) and hex nuts (D) onto the bolts on the upper
strut tower from the inside of the vehicle . Tighten securely.

4
Technical Support
1-800-248-0892
Figure 8
V. Strut Assembly Installation
1. Place a rubber spacer (E) onto the threaded end of the strut.
2. Place the threaded end of the strut into the upper strut mount
and attach using the O.E.M. rubber bushing and flat washer
and a supplied nylock nut. Tighten securely.
NOTE For Passenger-Side: The air fitting will face towards
the outside of the vehicle and the welded nut on the clevis will
face towards the front.
NOTE For Driver-Side: The air fitting will face towards the
outside of the vehicle and the welded nut on the clevis will face
towards the rear.
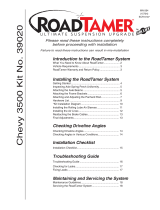
3. Insert the air fitting (I) into the strut.
4. Tighten the fitting finger-tight plus 1 1/2 turns being careful to
tighten on the metal hex nut only.
NOTE: The fitting needs to be turned so that a base of the hex
nut is parallel to the end cap (Figure 9).
5. Insert the previously removed bolt through the strut mount and
using flat washers (G), shim the lower strut clevis between the
mount and the clevis (Figure 7).
NOTE: The bolts (F) and flat washers (G) can be used in the
case of damage to the O.E.M. bolts upon removal of the O.E.M.
strut assembly.
6. Tighten all upper and lower strut mounting hardware at this time
(Figures 5, 7 and 8).
VI. Before Operating
1. Tighten and visually inspect all hardware after 100 miles.
2. The struts for this vehicle come with a nine-position dampening
dial (shown below) for added adjustability. To start, we recommend
setting the dial at the third position for the most versatility.
3. Air Lift part #27741 is highly recommended for this product.
4. Please continue by reading the Maintenance and Operation
section.
Figure 7
Figure 9
Correct Air
Fitting Installation:
Hex Nut edges are
parallel with top
and bottom upper
end cap edges.
Incorrect Air
Fitting Installation:
Hex Nut point extends
over bottom of upper
end cap edge and
could puncture air bag.
9-position
dampening
dial
strut body

5
Technical Support
1-800-248-0892
VII. Maintenance and Operation:
By following these steps, vehicle owners should obtain the longest life and best results from their air-struts.
1. Always maintain Ride Height.
2. Always adjust the air pressure to maintain Ride Height. Increase or decrease pressure from the system as necessary
to attain Ride Height for optimal ride and handling.
3. Should it become necessary to raise the vehicle by the frame or do any service work, make sure the system is at
minimum pressure (10 p.s.i.) for safety and to reduce the tension on the suspension/brake components.
Minimum Pressure Maximum Pressure
10 p.s.i. 150 p.s.i.
Failure to maintain correct minimum pressure (or pressure proportional to load), bottoming
out, overextension, or rubbing against another component will void the warranty.
10
EASYSTREET
10
“The Choice of the Professional Installer”
For Technical Assistance call 1-800-248-0892
Thank you for purchasing Air Lift Products
Mailing Address: Street Address:
AIR LIFT COMPANY AIR LIFT COMPANY
P.O. Box 80167 2727 Snow Rd.
Lansing, MI 48908-0167 Lansing, MI 48917
Local Phone: (517) 322-2144
Fax: (517) 322-0240
Printed in the USA
/