Page is loading ...

1
Technical Support
1-800-248-0892
Ext. 2
MN-334
(05107)
ECN 3603
by
P/N 59526
Please read these instructions completely before proceeding with the installation.
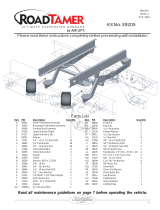
Installation
Tool
Lower
Bracket
Pal Nut-Flange Down
Nylon Nut
Upper
Bracket
1/2" Flat Washer
1/2" HHCS
FORWARD
OUTBOARD
Axle
IMPORTANT: Your vehicle may be equipped with a rear brake proportioning valve. Any type of load assist product could
affect brake performance. We recommend that you check with your dealer before installing this type of product. If your
vehicle does not have a rear brake proportioning valve or is equipped with an anti-lock type brake system, installation of
a load assist product will have no effect on brake system performance.
CAUTION: If not handled properly, compressed air can cause injury and damage to the vehicle and parts.
For your
safety, do not try to inflate the air sleeves until they have been properly secured to the vehicle.
IMPORTANT: This kit contains the new Air Lift installation tool.
This tool is designed to simplify the installation of the kit
for correct mounted height and alignment. The threaded section of the tool will ensure mounting of the air spring within
the correct mounting envelope. The air spring may be mounted anywhere within that range.
IMPORTANT: Air springs will live much longer if they are not the suspension limiter in either compression or extension.
Regardless of the load, the air pressure should always be adjusted so that the Normal Ride Height is maintained at all
times. The shock absorber is usually the limiter on extension. If this is not the case, you should consider the use of
limiting straps, especially if the vehicle is used off-road. The maximum inflated diameter of your air spring is 4.5". You
must check to see that nothing is rubbing against the air spring within this diameter.
Figure 1
Inset A
IMPORTANT: 2000 and up
3
/
4 Ton Suburban and
Avalanche models mount
behind the axle.

2
Technical Support
1-800-248-0892
Ext. 2
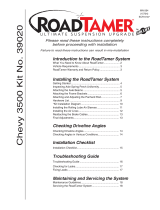
Upper Leaf Spring
Retainer Plate
Leaf Spring
U-Bolt
1/2" Flat Washers
1/2" HHCS Bolt
Lower
Bracket
3/8"
U-Bolt
Nylon Lock Nut
3/8" Flat Washer
Clamp
Bar
Upper
Bracket
3/8"-16x 5" Bolt
3/8"
Flat Washer
Nylon Nut
Swivel Elbow Fitting
Air Line
Frame
3/8" Nylon
Lock Nut
Oversized
Washer
FORWARD
OUTBOARD
I. Raising the Vehicle
1. Determine the Ride Height. This is defined as the distance between the bottom edge of the fenderwell to the center
point of the wheel with the vehicle at the desired height (without a load). Measurements should be taken before
beginning the installation. The distance from the bottom edge of the fenderwell to the center point of the wheel
should be recorded. All of our kits are designed to be installed and operate at normal ride height.
2. Measure the ride height distance. Enter the measurement below:
Ride Height: ________ inches
3. After measuring and recording the ride height, jack up rear of vehicle or raise on hoist. Raise axle or lower frame
until the leaf spring is at ride height (unloaded condition).
4. Measure the distance between the tire and outside of frame rail. You must have a minimum of six (6") inches to
provide clearance for the air spring when fully inflated.
II. Using the Installation Tool
1. Place the upper bracket onto the threaded end of the tool and rest the bracket on the bottom Pal nut (flange down).
Then thread a nylon nut onto the tool to hold the bracket in place (Figure 1).
2. Use a
1
/2" flat washer and the
1
/2" x
7
/8" bolt to attach the lower bracket to the bottom of the installation tool. Leave
just loose enough to adjust in and out (Figure 1).
IMPORTANT: 2000 and up
3
/4 Ton Suburban and
Avalanche models mount
behind the axle.
This drawing represents a typical installation. Your vehicle
may look slightly different due to make, model, or year.
Figure 2

3
Technical Support
1-800-248-0892
Ext. 2
3. Set the preassembled bracket/tool unit on the leaf spring forward
of the axle.
IMPORTANT: For 2000 and up
3
/
4
Ton Sububan and Avalanche
models, mount behind the axle.
4. With the hook end of the lower bracket placed over the existing
U-bolt or Spring Retainer, secure the lower bracket to the leaf
spring with the provided U-bolt, flat washers, and lock nuts.
Torque to 16 ft-lbs (Figure 1 and Inset A).
5. Using the slot in the lower bracket, push the upper bracket against
the frame rail. Use the nuts on the threaded portion of the
installation tool to adjust the upper bracket (up and down) so
that the flanges of the upper bracket are flat against the frame
rail and all four mounting holes are on the flat middle section of
the frame rail.
NOTE: Be sure that none of the holes are directly on the radius
bend of the frame
.
IMPORTANT: There must be at least 1.5" above the upper
bracket for air fitting clearance. The brackets can be mounted
anywhere within the threaded range of the installation tool (Figure
1).
5.
CAUTION: Do not drill holes into the frame until all hydraulic
lines, gas lines, and electrical wires have been moved aside on
both sides of the frame rail.
6. Using the upper bracket as a template, centerpunch one of the
lower mounting holes and drill a
3
/8" hole through the frame.
NOTE: You will need a drill bit with at least 4.25" effective length
for boxed frame vehicles.
7. Install one of the
3
/8"-16 x 5" bolts and a
3
/8" flat washer through
the bracket and frame. Then loosely attach the oversized flat
washer and locknut on the backside.
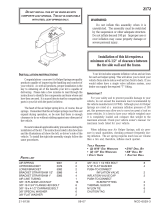
NOTE: All Ford vans and Suburbans require
3
/
8
"-16 x 1.5" washer
head frame bolts for the C-section type frame rail. The oversized
washers are not necessary for these vehicles (Figure 3).
8. Now centerpunch and drill a
3
/8" hole at the
opposite lower
mounting hole location.
Do not
insert the mounting bolt at this
time.
III. Attaching the Upper Bracket
1. Remove the installation tool by removing the nylon nut, loosening
and removing the tool from the bottom bolt (leave in place), and
slightly rotating the upper bracket to allow for enough room to
completely remove the tool.
Channel Frame
Upper
Bracket
3/8"-16x1.5"
Washer Head
Bolts
Flat Washer
3/8" Nylon
Lock Nut
Figure 3

4
Technical Support
1-800-248-0892
Ext. 2
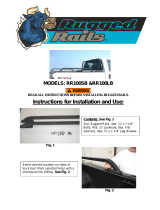
Fig.8 MN 190
Air Line to
Bellows
Star
Washer
Vehicle body
or bumper
Rubber Washer
Flat Washer
Option 1
Option 2
2. Rotate the upper bracket back to the original location and install
the frame bolt, flat washer, and lock nut through the second
hole previously drilled. Tighten both of the installed fasteners to
20 ft-lbs.
3. Centerpunch and drill the other two holes and insert and install
the fasteners (Figure 2). Tighten to 20 ft-lbs.
NOTE: ’95 and Older Chevrolet/GMC Vans
only
require the use
of a self tapping frame bolt in the
upper forward
mounting hole
on the
passenger side only.
Drill a
5
/
16
" hole (no larger) for the
self tapper, but do not install at this time. All other attachments
use the
3
/
8
"
x 5" bolts (Figure 4).
IV. Installing the Sleeve
1. Install the elbow fitting finger tight plus 1
1
/2 turns. Use a
7
/16"
open end wrench being careful to tighten on the metal hex nut
only. Do not over tighten. This fitting is precoated with thread
sealant.
2. Collapse the air spring and guide upper end through the center
mounting hole in the upper bracket. Attach the air spring to the
lower bracket. Carefully hand turn the air spring onto the lower
mounting bolt. Leave loose for later adjustment.
3. Now install the nylon nut onto the upper threadpost of the air
spring. Leave loose for final adjustment.
V. Installing the Air Lines
1. Select a location for the inflation valves in the rear bumper area
or rocker panel flange ensuring that each valve will be protected
and accessible with an air hose (Figure 5).
2. Use a standard tube cutter, a razor blade, or very sharp knife to
cut the air line. A clean square cut will ensure against leaks.
Cut the air line in two equal lengths. Drill
5
/16" hole for inflation
valve and mount as illustrated. Rubber washer on the outside is
for weather seal (Figure 6).
CAUTION: Leave sufficient air line slack to prevent any strain
on the valve stem during normal axle motions.
3. Route air line along frame from the inflation valve location to the
air springs (Figure 5). Use the tie straps or provided clips and
self tapping screws to attach the air line to the frame rail (Figure
7). It is not necessary to drill a hole for this type of self tapping
screw. Simply drive the screw through the frame section. Attach
air line to chassis with the provided plastic straps.
CAUTION: To prevent air line from melting, keep it at least 12"
from the exhaust system.
Oversized
Flat Washer
3/8" Nylon
Lock Nut
FORWARD
Upper
Bracket
3/8"-16x 5" Bolt
3/8"
Flat Washer
1" Self
Tapping
Frame Bolt
Figure 4
Figure 5
Figure 6

5
Technical Support
1-800-248-0892
Ext. 2
Air Line
Hose
Clip
#14 Self Taping
Screws
4. Cut off excess air line squarely. Install the air line into the fitting.
This is a self locking fitting. Push and slightly turn the cut end of
the air line into the fitting as far as it will go. When seated, a
click can be heard/felt. The air line should go in
9
/16".
VI. Securing the Sleeve
1.
VERY IMPORTANT:
With the bottom and top still loose, inflate
the air spring to approximately 10 p.s.i. By using the slotted
adjustment in the lower bracket, align the air spring so that there
is a symmetrical cushion of air around the lower base. This can
be accomplished by pressing all around the air spring and tapping
it inboard or outboard for proper alignment (Figure 7).
2. Tighten the upper nylon nut (4 ft-lbs.).
Do not over tighten.
3. Tighten the bolt on the bottom with an open end wrench.
Do not
over tighten.
VII. Finishing the Installation
1. Inflate to 60 p.s.i. Check all fittings and inflation valve core with
a solution of
1
/5 dish soap to
4
/5 water. Check once again to be
sure you have clearance all around the air spring at its fully
inflated diameter (4.5").
2. Installation for one air spring is now complete. Recheck the
minimum clearance measurements for the other side and
complete sections II through VII for remaining side. Finish with
section VII, step 3.
3. Recheck air pressure after 24 hours. A 2–4 p.s.i. loss after initial
installation is normal. If pressure has dropped more than 5 p.s.i.
retest for leaks with the soapy water solution.
4. Check to see that the sleeve rolls back down over the bottom
piston after the vehicle is lowered (Figure 8 and 9).
5. Please read and follow the Maintenance and Operating tips.
Figure 7
Figure 8
Figure 9

6
Technical Support
1-800-248-0892
Ext. 2
By following these steps, vehicle owners will obtain the longest life and best results from their air
springs.
1. Check the air pressure weekly.
2. Always maintain at least 5 p.s.i. air pressure.
3. If you develop an air leak in the system, use a solution of
1
/5 dish soap to
4
/5 water to check all air line connections
and the inflation valve core before removing sleeve.
4. Inflate your air springs to 60 p.s.i. before adding the payload. After vehicle is loaded, adjust your air pressure to
level the vehicle and for ride comfort. When increasing load, always adjust the air pressure to maintain the Normal
Ride Height. Increase or decrease pressure from the system as necessary to attain Normal Ride Height for
optimal ride and handling. Remember that loads carried behind the axle (including tongue loads) require more
leveling force (pressure) than those carried directly over the axle.
5. When carrying a payload it will be helpful to increase the tire inflation pressure in proportion to any overload
condition. We recommend a 2 p.s.i. increase above normal (not to exceed tire manufacturer maximum) for each
100 lbs. total overload on the axle.
6.
IMPORTANT
: For your safety and to prevent possible damage to your vehicle,
do not exceed maximum Gross
Vehicle Weight Rating (GVWR), as indicated by the vehicle manufacturer.
Although your air springs are rated at a
maximum inflation pressure of 100 p.s.i. The air pressure actually needed is dependant on your load and GVWR,
which may be less than 100 p.s.i. Check your vehicle owners manual and do not exceed the maximum load listed
for your vehicle.
7. Always add air to springs in small quantities, checking the pressure frequently. Sleeves require less air volume than
a tire and inflate quickly.
8.
Should it become necessary to raise the vehicle by the frame, make sure the system is at minimum pressure (5
p.s.i.) to reduce the tension on the suspension/brake components.
Check to see that the sleeve rolls back down
over the bottom piston after the vehicle is lowered (Figure 8). If sleeve fails to roll back down over the piston, add
air pressure until sleeve “pops” back over piston (do not exceed 100 p.s.i.).
Maintenance and Operations
5 p.s.i.
100 p.s.i.
Failure to maintain correct minimum pressure (or pressure proportional to load),
bottoming out, over-extension, or rubbing against another component will void the
warranty.
Maximum Air PressureMinimum Air Pressure
“The Choice of the Professional Installer”
For Technical Assistance call 1-800-248-0892
Thank you for purchasing Air Lift Products
Mailing Address: Street Address:
AIR LIFT COMPANY AIR LIFT COMPANY
P.O. Box 80167 2727 Snow Rd.
Lansing, MI 48908-0167 Lansing, MI 48917
Local Phone: (517) 322-2144
Fax: (517) 322-0240
Printed in the USA

Product Use Information
Frequently asked questions
Q. Will installing air springs increase the weight ratings of a vehicle?
No. Adding air springs will not change the weight ratings (GAWR, GCWR and/or GVWR) of a vehicle. Exceeding the
GVWR is dangerous and voids the Air Lift warranty.
Q. Is it necessary to keep air in the air springs at all time and how much pressure will they need?
The minimum air pressure should be maintained at all times. The minimum air pressure keeps the air spring in shape,
ensuring that it will move throughout its travel without rubbing or wearing on itself.
Q. Is it necessary to add a compressor system to the air springs?
No.Airpressurecanbeadjustedwithanytypeofcompressoraslongasitcanproducesufcientpressuretoservice
the springs. Even a bicycle tire pump can be used, but it’s a lot of work.
Q. How long should air springs last?
Iftheairspringsareproperlyinstalledandmaintainedtheycanlastindenitely.
Q. Will raising the vehicle on a hoist for service work damage the air springs?
No. The vehicle can be lifted on a hoist for short-term service work such as tire rotation or oil changes. However, if
the vehicle will be on the hoist for a prolonged period of time, support the axle with jack stands in order to take the
tension off of the air springs.
Tuning the air pressure
Pressure determination comes down to three things — level vehicle, ride comfort, and stability.
1. Level vehicle
Ifthevehicle’sheadlightsareshiningintothetreesorthevehicleisleaningtooneside,thenitisnotlevel(g.1).
Raise the air pressure to correct either of these problems and level the vehicle.
2. Ride comfort
Ifthevehiclehasaroughandharshrideitmaybeduetoeithertoomuchpressureornotenough(g.2).Trydifferent
pressures to determine the best ride comfort.
3. Stability
Stabilitytranslatesintosafetyandshouldbethepriority,meaningthedrivermayneedtosacriceaperfectlylevel
andcomfortableride.Stabilityissuesincluderollcontrol,bounce,diveduringbrakingandsponginess(g.3).Tuning
out these problems usually requires an increase in pressure.
Continued on pg. 2
Bad headlight aim
Rough ride
Sway and body roll
g. 1
g. 2
g. 3

Thank you for purchasing Air Lift products! For technical support, please call (800) 248-0892.
Air Lift Company • P.O. Box 80167, MI 48908-0167 • (517) 322-2144 • Fax: (517) 322-0240 • www.airliftcompany.com
Guidelines for adding air:
1. Startwiththevehiclelevelorslightlyabove.
2. Whenindoubt,alwaysaddair.
3. Formotorhomes,startwith50-100PSIintherearbecauseitcanbesafelyassumedthatitisheavilyloaded.
4. If the front of the vehicle dives while braking, increase the pressure in the front air bags, if equipped.
5. Ifitiseversuspectedthattheairbagshavebottomedout,increasethepressure(g.4).
6. Adjustthepressureupanddowntondthebestride.
7. If the vehicle rocks and rolls, adjust the air pressure to reduce movement.
8. It may be necessary to maintain different pressures on each side of the vehicle. Loads such as water, fuel,
andapplianceswillcausethevehicletobeheavierononeside(g.5).Asmuchasa50PSIdifferenceisnot
uncommon.
Rev. 4/5/07
Continued from pg. 1
g. 5
g. 4
Bottoming out Unlevel
Level
Air Lift Company warrants its products, for the time periods listed below, to the original retail purchaser against manufacturing defects when
used on catalog-listed applications on cars, vans, light trucks and motorhomes under normal operating conditions for as long as Air Lift
manufactures the product. The warranty does not apply to products that have been improperly applied, improperly installed, used in racing
or off-road applications, used for commercial purposes, or which have not been maintained in accordance with installation instructions
furnished with all products. The consumer will be responsible for removing (labor charges) the defective product from the vehicle and
returningit,transportationcostsprepaid,tothedealerfromwhichitwaspurchasedortoAirLiftCompanyforverication.
AirLiftwillrepairorreplace,atitsoption,defectiveproductsorcomponents.Aminimum$10.00shippingandhandlingchargewillapplyto
allwarrantyclaims.Beforereturninganydefectiveproduct,youmustcallAirLiftat(800)248-0892intheU.S.andCanada(elsewhere,(517)
322-2144)foraReturnedMaterialsAuthorization(RMA)number.ReturnstoAirLiftcanbesentto:AirLiftCompany•2727SnowRoad•
Lansing,MI•48917.
Product failures resulting from abnormal use or misuse are excluded from this warranty. The loss of use of the product, loss of time,
inconvenience, commercial loss or consequential damages is not covered. The consumer is responsible for installation/reinstallation (labor
charges) of the product. Air Lift Company reserves the right to change the design of any product without assuming any obligation to modify
any product previously manufactured.
This warranty gives you specific legal rights and you may also have other rights that vary from state-to-state. Some states do not allow
limitations on how long an implied warranty lasts or allow the exclusion or limitation of incidental or consequential damages. The above
limitation or exclusion may not apply to you. There are no warranties, expressed or implied including any implied warranties of merchantability
andtness,whichextendbeyondthiswarrantyperiod.Therearenowarrantiesthatextendbeyondthedescriptiononthefacehereof.Seller
disclaims the implied warranty of merchantability. (Dated proof of purchase required.)
Air Lift 1000 ............................... Lifetime Limited
RideControl ............................... Lifetime Limited
SlamAir ...................................... Lifetime Limited
LoadLifter 5000*........................ Lifetime Limited
EasyStreet Systems .................... 1 Year Limited
Load Controller (I) ....................... 2 Year Limited
Load Controller (II) ...................... 2 Year Limited
SmartAir ....................................... 2 Year Limited
Wireless AIR................................. 2 Year Limited
Other Accessories ....................... 2 Year Limited
*formerly SuperDuty
Warranty and Returns Policy
/