Page is loading ...

INSTALLATION INSTRUCTIONS
AND
OWNER'S MANUAL
CAST IRON
UNVENTED ROOM HEATER
MODELS
SMALL
VFD(10,20)CC(30,70)(B,F,M)(N,P)-1
MEDIUM
VFD30CC(30,70)(B,F,M,S,W)(N,P)-1
GAS-FIRED
Installer: Leave this manual with the appliance.
Consumer: Retain this manual for future reference.
-
gen) from the room in which it is installed. Provisions
for adequate combustion and ventilation air must be
provided. Refer to page 7 .
WARNING: If not installed, operated and maintained
in accordance with the manufacturer's instructions,
or from fuel combustion which can cause death or
serious illness.
WATER VAPOR: A BY-PRODUCT OF UNVENTED ROOM
HEATERS
of gas input per hour. Refer to page 6.
indicated on the rating plate. This appliance is not
convertible for use with other gases.
WARNING: If the information in these instruc-
-
other appliance.
— WHAT TO DO IF YOU SMELL GAS
neighbor’s phone. Follow the gas supplier’s
instructions.
-
plier.
Page 1

31208-11-0115Page 2
SECTION PAGE
IMPORTANT SAFETY INFORMATION ............................................................................. 3
SAFETY INFORMATION FOR USERS OF LP-GAS ......................................................... 4
INTRODUCTION ............................................................................................................... 5
SPECIFICATIONS ............................................................................................................. 6
WATER VAPOR: A BY-PRODUCT OF UNVENTED ROOM HEATERS .........................6-7
GAS SUPPLY .....................................................................................................................8
CLEARANCES ................................................................................................................... 9
LOG PLACEMENT ..........................................................................................................10
LOG IDENTIFICATION .................................................................................................... 11
PLACEMENT OF GLOWING EMBERS (ROCK WOOL) ................................................. 12
OPERATION INSTRUCTIONS/FLAME APPEARANCE .................................................. 12
OPERATING GUIDELINES ............................................................................................. 13
MILLIVOLT LIGHTING INSTRUCTIONS ......................................................................... 14
10,000 BTU MILLIVOLT LIGHTING INSTRUCTIONS .....................................................15
PILOT FLAME CHARACTERISTICS .......................................................................... 16-17
MILLIVOLT WIRING ....................................................................................................18-19
MILLIVOLT TROUBLESHOOTING .............................................................................20-21
IP OPERATING INSTRUCTIONS .................................................................................... 22
IP WIRING .......................................................................................................................23
IP LIGHTING INSTRUCTIONS ........................................................................................24
IP TROUBLESHOOTING ................................................................................................. 25
IP TROUBLESHOOTING ............................................................................................26-27
MAIN BURNER FLAME CHARACTERISTICS ................................................................ 28
MAINTENANCE ............................................................................................................... 29
PARTS LIST - VFD10CC(30,70) ...................................................................................... 30
PARTS VIEW - VFD10CC(30,70) ....................................................................................31
PARTS LIST - VFD20CC(30,70) ...................................................................................... 32
PARTS VIEW - VFD20CC(30,70) ....................................................................................33
PARTS LIST - VFD30CC(30,70) ...................................................................................... 34
PARTS VIEW - VFD30CC(30,70) ....................................................................................35
CASTING PARTS LIST - VFD(10,20,30)CC(30,70) ........................................................ 36
CASTING PARTS VIEW - VFD(10,20,30)CC(30,70) .......................................................37
MASTER PARTS DISTRIBUTOR LIST............................................................................ 38
HOW TO ORDER REPAIR PARTS .................................................................................. 38
ACCESSORY SIDE SHELVES INSTALLATION INSTRUCTIONS .................................. 39
OPTIONAL STONE INLAY INSTALLATION INSTRUCTIONS......................................... 39
CIB4-1 OPTIONAL BLOWER INSTALLATION INSTRUCTIONS ...............................40-41
CIB3-1 OPTIONAL BLOWER INSTALLATION INSTRUCTIONS ...............................42-43
WARRANTY .....................................................................................................................44
APPLIANCE SERVICE HISTORY ................................................................................... 45
QUICK REFERENCE GUIDE .....................................................................................46-47
TABLE OF CONTENTS

31208-11-0115 Page 3
THIS IS A HEATING APPLIANCE
DO NOT OPERATE THIS APPLIANCE WITHOUT FRONT PANEL INSTALLED.
IMPORTANT SAFETY INFORMATION
DANGER: Indicates a hazardous situation which, if not avoided, will
result in death or serious injury.
WARNING: Indicates a hazardous situation which, if not avoided,
could result in death or serious injury.
CAUTION: Indicates a hazardous situation which, if not avoided,
could result in minor or moderate injury.
NOTICE: Addresses practices not related to personal injury.
6,000 Btu per hour shall not be installed in a bathroom
Btu per hour shall not be installed in a bedroom or bathroom.
ignition.
the same room with the appliance.
appliance.
fresheners, etc. ) while the log set is in operation. Air fresheners
set is in operation. Candles produce a residue in the air that
candles, in general, produce soot. The amount of time burned
of soot produced and deposited.
QUALIFIED SERVICE
PERSON. This appliance should be inspected before use and at
bedding materials, etc. It is imperative that control compartments,
operation.
or bonding agents. These bonding agents are not harmful but
off during initial operation of the appliance. This is a normal
problems with sooting. Sooting, resulting from improper
installation or operation, can settle on surfaces outside the
sensor) which will shut down the heater if adequate fresh air is
not available. See troubleshooting section in the instructions.
WARNING: DO NOT operate this appliance unless all
components including logs, burners, and controls are in good
Log set placement instructions for correct log and twig
positioning.
dealer as indicated in the How to Order Repair Parts section of
the appliance manual.
WARNING
When used without adequate combustion and ventilation air,
-
ous gas.
made for combustion and ventilation air. Consult the writ-
ten instructions provided with the heater for information
concerning combustion and ventilation air. In the absence
of instructions, refer to the National Fuel Gas Code, ANSI
Z223.1/NFPA 54, Air for Combustion and Ventilation, or
applicable local codes.
This heater is equipped with a PILOT LIGHT SAFETY SYS-
TEM designed to turn off the heater if not enough fresh air
is available.
DO NOT TAMPER WITH PILOT LIGHT SAFETY SYSTEM!
control compartment clean.
Get fresh air at
once! Have heater serviced.
Some people — pregnant women, persons with heart or lung
than others.
at its location. If this heater is installed in a structure having a
comfort level in the structure. When a fan is used to circulate
the burner.

31208-11-0115Page 4
SOME POINTS TO REMEMBER
NO ODOR DETECTED - ODOR FADE
LP-GAS WARNING ODOR
-
Do not do anything that could ignite the gas.
IMMEDIATELY.
-
tinue to smell gas, do not turn on the gas again. Do not re-enter
and relight the gas appliance for you.
Some people cannot smell well. Some people cannot smell the
can smell the odorant in propane.
The odorant in LP-gas is colorless, and it can fade under some
circumstances.
some of the odorant out of the gas, reducing its odor intensity.
LP-Gas may stratify in a closed area, and the odor intensity could
go into action as instructed earlier.
Your local LP-Gas
Dealer can give you a "Scratch and Sniff" pamphlet. Use it to
Dealer.
prior to and while lighting pilot lights or performing service or
smell that can cover up the LP-Gas odor. Do not try to light pilot
the conditions are such that you may not detect the odor if there
a time may develop internal rust which will cause odor fade. If
such conditions are suspected to exist, a periodic sniff test of
LP-gas dealer. A periodic sniff test of the
LP
you do detect the odorized LP-Gas.
container valve is left on, the container may draw in some air
new internal rusting could occur. If the valve is left open, then
empty.
SAFETY INFORMATION FOR USERS OF LP-GAS

31208-11-0115 Page 5
safe when installed in accordance with this Installation Manual.
and follow these instructions carefully during installation to insure
Inc.
State of Massachusetts:
Massachusetts.
room heaters shall provide to each purchaser a copy of 527 CMR
30 upon sale of the unit. In the State of Massachusetts, unvented
local codes, with the National Fuel Gas Code, ANSI Z223.1/NFPA 54.*
*Available from the American National Standards Institute, Inc., 11
West 42nd St., New York, N.Y. 10036.
WARNING
ANY CHANGE TO THIS FIREPLACE OR ITS CONTROLS CAN
BE DANGEROUS.
poisoning.
High Altitudes
Always consult your local Building Department regarding regulations,
codes or ordinances which apply to the installation of an unvented
room heater.
state or local codes.
the manufacturer.
This appliance is only for use with the type of gas indicated on the
rating plate.
Instructions to Installer
1. Installer must leave instruction manual with owner after
installation.
card supplied with unvented room heater.
3. Installer should show owner how to start and operate unvented
room heater.
these instructions.
NOTICE:
shipping damage.
odor as the ceramic log is cured.
unless all components including logs, burners, and controls
Refer to Log Placement on pages 10 - 11 for correct log and
twig positioning.
indicated in the Parts Sections on pages 30 through 37.
WARNING
This appliance is equipped for (natural or propane) gas. Field
conversion is not permitted.
WARNING
This unit is not for use with solid fuels.
Important
Notice:
the room in which the unit is installed.
Installation in Residential Garages
Preparation
INTRODUCTION

31208-11-0115Page 6
heater produces approximately one ounce (30 ml) of water for every
(a room) rather than a primary heat source (an entire house). In most
supplemental heat applications, the water vapor does not create a
humidity atmosphere experienced during cold weather.
The following Steps will help insure that water vapor does not
1. Be sure the heater is sized properly for the application, including
help lower the water vapor content of the air.
3. Do not use an unvented room heater as the primary heat source
(an entire house).
WATER VAPOR: A BY-PRODUCT OF UNVENTED ROOM HEATERS
Accessories
FRBC Battery Operated Remote Control
FRBTC Battery Operated Remote Control w/Thermostat
FRBTP
FREC Electric Remote Control
FWS Wall Switch
TMV Millivolt Wall Thermostat - Reed Switch
TRW Remote Wall Thermostat
CIB4 Automatic Blower (VFD(10,20)CC Units)
CIB3 Automatic Blower (VFD30CC Units)
Stone Inlay Replaces Standard Grill Top (Medium Units Only)
CSI-8V Stone Inlay Venetian Gold
CSI-9A Stone Inlay
CSI-10M Stone Inlay Patina Mocha
CSI-11G Stone Inlay Temple Gray
CSI-12A Stone Inlay American Beauty
SPECIFICATIONS
Model VFD10CC
Input BTU/HR (KW/H) Maximum 10,000
Input BTU/HR (KW/H) Minimum 10,000
Height 24 1/8" (612.8 mm)
Width 21 1/2" (546.1 mm)
Depth 15 3/8" (390.5 mm)
Gas Inlet 3/8" (9.5 mm)
Air Shutter Setting (NAT) 1/16"
Air Shutter Setting (LP) 1/4"
Model VFD20CC
Input BTU/HR (KW/H) Maximum (LP) 20,000
Input BTU/HR (KW/H) Minimum (LP) 16,000
Input BTU/HR (KW/H) Maximum (NAT) 20,000
Input BTU/HR (KW/H) Minimum (NAT) 14,500
Height 24 1/8" (612.8 mm)
Width 21 1/2" (546.1 mm)
Depth 15 3/8" (390.5 mm)
Gas Inlet 3/8" (9.5 mm)
Air Shutter Setting (NAT) 1/8"
Air Shutter Setting (LP) 3/8"
Model VFD30CC
Input BTU/HR (KW/H) Maximum (LP) 25,000
Input BTU/HR (KW/H) Minimum (LP) 21,000
Input BTU/HR (KW/H) Maximum (NAT) 25,000
Input BTU/HR (KW/H) Minimum (NAT) 17,500
Height 27 3/4" (704.9 mm)
Width 28 1/16" (712.8 mm)
Depth 17 1/8" (435.0 mm)
Gas Inlet 3/8" (9.5 mm)
Air Shutter Setting (NAT) 1/16"
Air Shutter Setting (LP) 7/16"
Accessories
Model Description
Available on Models
VFD(10,20)CC VFD30CC
CSK-B
Side Shelf
X X
CSK-F
Side Shelf
X X
CSK-M
Side Shelf
Porcelain Mahogany
X X
CSK-S
Side Shelf
Porcelain Sand
X
CSK-W
Side Shelf
Matte Pewter
X

31208-11-0115 Page 7
which supply heated air to areas outside the space must draw return
air from outside the space through tightly sealed return air ducts. A
-
of all appliances in the space.
The following example is for determining the volume of a typical
The maximum input of the VFD30 is 25,000 Btu per hour. Based
minimum
measure the length, width and height of the area. Example: The
area measures 16 feet in length, 10 feet in width and 8 feet in
PROVISIONS FOR ADEQUATE COMBUSTION & VENTILATION AIR
WARNING
unusually tight construction, you must provide additional fresh air.
where:
a. Walls and ceilings exposed to the outside atmosphere have
a continuous water vapor retarder with a rating of one perm
and doors, and
other openings.
-

31208-11-0115Page 8
Recommended Gas Pipe Diameter
Pipe Length Schedule 40 Pipe
Inside Diameter
Outside Diameter
Nat. L.P. Nat. L.P.
0-10 feet
0-3 meters
1/2”
12.7 mm
3/8”
9.5 mm
1/2”
12.7 mm
3/8”
9.5 mm
10-40 feet
4-12 meters
1/2”
12.7 mm
1/2”
12.7 mm
5/8”
15.9 mm
1/2”
12.7 mm
40-100 feet
13-30 meters
1/2”
12.7 mm
1/2”
12.7 mm
3/4”
19 mm
1/2”
12.7 mm
100-150 feet
31-46 meters
3/4”
19 mm
1/2”
12.7 mm
7/8”
22.2 mm
3/4”
19 mm
NOTICE:
NOTICE: Since some municipalities have additional local codes, it
contact your local authorized installer for installation or relocation.
be disconnected from piping at inlet of control valve and pipe
capped or plugged for pressure test. Never pressure test with
inlet. This should consist of a vertical length of pipe tee connected
and foreign particles may collect.
The use of the following gas connectors is recommended:
and Fittings
Than All-Metal Construction
appliance connector cannot exceed three feet in length.
GAS SUPPLY
Figure 1
to the appliance.
disconnected from the gas supply piping system during any
pressure testing of that system at test pressures in excess of
any pressure testing of the gas supply piping system at test
WARNING
result in a hazardous condition.
Natural gas will have a manifold pressure of approximately
minimum input at the pressure regulator outlet with the inlet pressure
for the purpose of input adjustment to a maximum of 10.5" w.c.
the inlet pressure to the pressure regulator from a minimum of 11.0"
NOTICE:
pressure test point, therefore it is not necessary to provide a 1/8"
test point up stream of the control.
A test gauge connection is located downstream of the gas appliance
pressure regulator for measuring gas pressure. The connection is
a 1/8 inch (3 mm) N.P.T. plugged tapping.

31208-11-0115 Page 9
Clearances
When facing the front of the appliance the following minimum
Top of appliance (ceiling) 36 inches
Rear Wall 2 inches
Side Wall 6 inches
Heater Corners (45° angle) to Wall 4 inches
Floor 0 inches
Installation on Rugs and Tile
raised up on a platform to enhance its visual impact. The continu-
CLEARANCES
Figure 2
Figure 3
Figure 4

31208-11-0115Page 10
LOG PLACEMENT
CAUTION
Doing so will cause misalignment of logs.
the rear log shelf.
3. Place the Front Log (C) onto the two Log Locating Exten-
4. Place the Left Log (D) onto the Left Pin on the Rear Log (A).
The end of the Left Log (D) will rest on the Front Log (C).
5. Place the Right Log (E) on the Right Pin on the Rear Log (A).
Front Log (C).
6. This step is optional for 10,000 BTU units. Place the Middle
WARNING
Failure to position the parts in accordance with this diagram or
may result in property damage or personal injury.
Figure 6 - Log Placement
Figure 5 - Burner
Figure 7 - Completed Log Placement

31208-11-0115 Page 11
LOG IDENTIFICATION
Log Photo
Part Number
Letter
Description
VFD10CC VFD20CC VFD30CC
29553 29553 29546 A Rear Log
29554 29554 29547 B Middle Log
29555 29555 29548 C Front Log
29556 29556 29549 D Left Log
29558 29558 29551 E Right Log
29557 29557 29550 F Middle Top Log

31208-11-0115Page 12
not
from Empire Comfort Systems, Inc. Application of excess loose
the heater.
WARNING
reapplication.
NOTICE
Replacement Loose Material
(glowing embers)
Part Number
31104
15998
PE-20-1
NOTICE:
up and down.
is a normal and temporary occurrence.
windows or doors to allow odors to dissipate. Any odors remaining
continued use.
OPERATION INSTRUCTIONS/FLAME APPEARANCE
Figure 8

31208-11-0115 Page 13
Standing Pilot Operation
1. Follow the SAFETY and LIGHTING INSTRUCTIONS for standing
to the appliance.
CAUTION
During the initial purging and subsequent lightings, never
thermostat.
Figure 9
NOTICE: The gas control valve allows you to increase or decrease
3. When the heating season is over, turn the REMOTE/OFF/ON
switch to "OFF" and the control valve to "OFF". The system,
a maximum input of 25,000 Btuh to a minimum input of 17,500
the log set.
Before operating this heater, please review the safety warnings
1. Know what type of ignition system this model has (standing
instructions.
turn gas off to the heater and call a service person or your gas
utility.
CAUTION
on or near the appliance.
WARNING
3. Tampering is DANGEROUS and voids all warranties. Any
approved component.
Initial Lighting
Upon completing the gas line or turning the gas valve "ON" after it
for the lines to purge themselves of this air. Once the purging is
complete, the appliance will light and operate satisfactorily.
if the gas valve is not turned to "OFF."
OPERATING GUIDELINES

31208-11-0115Page 14
MILLIVOLT LIGHTING INSTRUCTIONS
WARNING:
B. BEFORE LIGHTING, smell all around the appliance area
WHAT TO DO IF YOU SMELL GAS
phone. Follow the gas supplier's instructions.
department.
2. Set REMOTE/OFF/ON switch to "OFF."
to "OFF". Do not force.
3. Set REMOTE/OFF/ON switch to
"OFF".
4. Turn off all electric power to the
to
"OFF".
Do not force.
6. Wait ten minutes to clear out any
gas. Then smell for gas, including
STOP! Follow "B" in the safety
smell gas, go to the next step.
gas control. The pilot is located
side.
to "PILOT".
the Piezo Ignitor Button until the pilot is lit. Continue to hold
If it goes out, repeat steps 5 through 9.
-
supplier.
gas supplier.
to "ON".
11. Set REMOTE/OFF/ON switch to desired setting.
FOR YOUR SAFETY READ BEFORE LIGHTING
LIGHTING INSTRUCTIONS
TO TURN OFF GAS TO APPLIANCE

31208-11-0115 Page 15
WARNING:
B. BEFORE LIGHTING, smell all around the appliance area
WHAT TO DO IF YOU SMELL GAS
phone. Follow the gas supplier's instructions.
department.
2. Set REMOTE/OFF/ON switch to "OFF."
to "OFF". Do not force.
3. Set REMOTE/OFF/ON switch to
"OFF".
4. Turn off all electric power to the
to "OFF".
Do not force.
6. Wait ten minutes to clear out any gas. Then
smell for gas, including near the
-
low "B" in the safety information
go to the next step.
gas control. The pilot is located
side.
to "PILOT".
the Piezo Ignitor Button until the pilot is lit. Continue to hold
If it goes out, repeat steps 5 through 9.
-
supplier.
gas supplier.
to "ON".
11. Set REMOTE/OFF/ON switch to desired setting.
10,000 BTU MILLIVOLT LIGHTING INSTRUCTIONS
FOR YOUR SAFETY READ BEFORE LIGHTING
LIGHTING INSTRUCTIONS
TO TURN OFF GAS TO APPLIANCE

31208-11-0115Page 16
PILOT FLAME CHARACTERISTICS
INTERMITTANT PILOT
Correct Pilot Flame Pattern
Figure 12
Incorrect Pilot Flame Pattern
Figure 13
-
not touching the thermocouple or thermopile. This will cause the
thermocouple or thermopile to cool. When the thermocouple cools,
the heater will shut down.
MILLIVOLT PILOT
Correct Pilot Flame Pattern
Figure 10
Incorrect Pilot Flame Pattern
Figure 11

31208-11-0115 Page 17
Cleaning and Pilot Maintenance
Depletion Sensor as follows:
wrench.
Millivolt Pilot
Figure 14
Intermittant Pilot
Figure 15
WARNING
PILOT FLAME CHARACTERISTICS

31208-11-0115Page 18
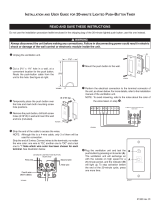
ON/OFF/REMOTE Switch
REMOTE switch which
is located on the wire channel. A wire harness is attached to the
push-ons attach to the ON/OFF/REMOTE switch. At the opposite
ons attach to the gas valve. An additional green wire and the red
thermostat accessory, or, to one of the other accessories that can
Operation of ON/OFF/REMOTE Switch with no Accessories
the PILOT position to the ON position. Turn the ON/OFF/REMOTE
switch from the OFF position to the ON position. The additional green
Operation of ON/OFF/REMOTE Switch with Accessories
750 Millivolt Wall Thermostat
REMOTE switch wire harness to the wall thermostat. Turn the ON/
OFF/REMOTE switch on the wire channel to the REMOTE position.
Set the wall thermostat to the desired temperature.
It is important to use wire of a gauge proper for the length of the
wire:
RECOMMENDED WIRE GAUGES
Maximum Wire
Length Gauge
Wall Switch, FWS-1
OFF/REMOTE switch wire harness to the wall switch. Turn the ON/
OFF/REMOTE switch on the wire channel to the REMOTE position.
TRW, and FRBTC
OFF/REMOTE switch wire harness to the remote receiver that is a
component in the FRBC and FRBTC. Turn the ON/OFF/REMOTE
switch on the wire channel to the REMOTE position. Follow instruc-
tions in the FRBC and FRBTC to complete installation.
NOTICE:
is desired, turn the ON/OFF/REMOTE switch on wire channel from
the REMOTE position to the ON position.
Electric (120 volt) Operated Remote Control, FREC
OFF/REMOTE switch wire harness to the wires on remote receiver
that is a component in the FREC. Turn the ON/OFF/REMOTE switch
on the wire channel to the REMOTE position. Follow instructions in
the FREC to complete installation.
NOTICE: If electric (120 volt) fails in FREC, and immediate heat is
desired, turn the ON/OFF/REMOTE switch on wire channel from
the REMOTE position to the ON position.
Wiring of ON/OFF/REMOTE Switch with 750 Millivolt Wall
REMOTE switch wire harness to the 750 millivolt wall thermostat
AND to the remote receiver that is a component in the FRBC, FREC
OR to the FWS, wall switch.
1. Connect one wire from the 750 millivolt wall thermostat and one
wire from appropriate accessory to the GREEN, stripped and
2. Connect one wire from the 750 millivolt wall thermostat and one
wire from the ON/OFF/REMOTE wire harness.
NOTICE: When the appliance is in the MANUAL mode and the
FREC, and immediate heat is desired, turn the ON/OFF/REMOTE
switch on wire channel from the REMOTE position to the ON
position.
Manual Operation
1. Turn ON/OFF/REMOTE switch on wire channel to REMOTE
position.
2. Turn wall thermostat OFF.
3. Turn accessory, FRBC, FREC, FRBTP, TRW or FWS, ON.
Appliance is now in the manual mode. You must turn the appliance
ON or OFF with appropriate accessory.
Wall Thermostat Operation
1. Turn the ON/OFF/REMOTE switch on wire channel to REMOTE
position.
2. Turn accessory, FRBC, FREC or FWS, OFF.
3. Turn wall thermostat ON and set appropriate temperature. Wall
thermostat will cycle the appliance ON and OFF.
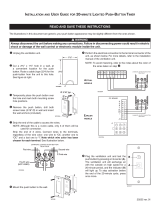
Installation of Remote Receiver
1. Attach, from left to right, the slide-on cover plate onto the remote
receiver. ONOFF
the slide-on cover plate.
3. Attach Velcro loop on the left side of the valve cover support.
TOP on the
cover support.
cover support.
Refer to remote control installation and operating instructions
for more details on remote control.
Figure 16
MILLIVOLT WIRING

31208-11-0115 Page 19
Wiring Diagram
MILLIVOLT WIRING (continued)
Figure 17

31208-11-0115Page 20
SYMPTOMS - POSSIBLE CAUSES AND CORRECTIONS
IMPORTANT:
pilot.
a. Ignitor electrode positioned wrong - Replace ignitor.
f. Bad piezo ignitor - Replace piezo ignitor.
but no ignition.
a. Gas supply turned off or manual shutoff valve closed - Turn
on gas supply or open manual shutoff valve.
to PILOT position.
d. Air in gas lines when installed - Continue holding down control
e. Depleted gas supply - Contact local gas company.
f. ODS/pilot is clogged - Clean ODS/pilot or replace ODS/pilot
g. Gas regulator setting is not correct - Replace gas
regulator.
released.
fully.
to reset. Repeat ignition operation.
d. Manual Shutoff valve not fully open - Fully open manual
shutoff valve.
e. Thermocouple connection loose at control valve - Hand
tighten until snug, then tighten 1/4 turn more.
1) low gas pressure
- Contact local gas company or
clogged ODS/pilot - Clean ODS/pilot or replace ODS/pilot
g. Thermocouple damaged - Replace thermocouple.
h. Control valve damaged - Replace control valve.
4. Main burner does not light after ODS/pilot is lit.
c. Inlet gas pressure is too low - Contact local gas company.
switch "ON."
a. "On/Off" switch, wall switch, remote control or wires defective
comes on, replace defective switch. If OK, place jumper
clean the ODS/pilot.
- Be sure the wire connections from the thermopile at the
gas valve terminals are tight and the thermopile is fully
at TH-TP & TP terminals of the gas valve. The meter should
depressed in the PILOT position, with the pilot lit, and the
ON/OFF switch in the OFF position. Replace the faulty
- With the pilot in the ON position, disconnect the thermopile
terminals. Millivolt meter should read greater than 200
not ignite, replace the gas valve
a. Manifold pressure is too low - Contact local gas company.
blow torch noise).
service person.
-
burner combustion.
MILLIVOLT TROUBLESHOOTING
/