Page is loading ...

Dated receipt required for warranty replacement.
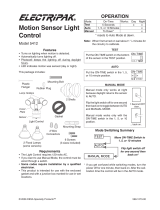
FEATURES
• Automaticallycomesonwhenmotionisdetected.
• Automaticallyturnslightoff.
• Photocell keeps the light off during daylight
hours.
• LEDindicatesmotionwassensed(dayornight).
REQUIREMENTS
• Thelightcontrolrequires120voltsAC.
• If you want to use Manual Override mode, the
controlmustbewiredthroughaswitch.
NOTICE:Nottobeusedonlightdimmerortimer-
controlledcircuits.
• Some electrical codes require installation by a
qualified electrician.
• Thisproductisintendedforusewiththeenclosed
gasketandwithajunctionboxmarkedforusein
wetlocations.
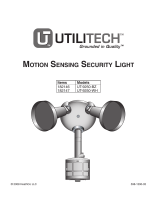
• Thislightxturehasbeentested/certiedusing
Lights of America LED Lamp Model Numbers
2003LEDP38-65K, 2002LEDR30-65K, and
2002LEDP30-65K.
UNPACKING
Besuretoremoveallcontentsfrompackagingand
verifyallitemsarepresentbeforeassemblingthislight
xture.Thispackageincludesthefollowingitems:
• SecurityLight
• TwoLEDPAR38lamps
(LightsofAmericaModel:2003LEDP38-65K)
• Twodecorativelampshells
• MountingStrap
• PlasticHanger
• RubberPlug
• Mountinghardware
• Wirenuts
• Owner’sManual
©2008 598-1360-00
Motion Sensor
Light Control
Model: 9700LED Series
INSTALLATION
Foreasyinstallation,selectanexistinglightwitha
wallswitchforreplacement.
Forbestperformance,mountthextureabout8ft.
(2.4m)abovetheground.NOTE:Ifxtureismounted
higherthan8ft.(2.4m),aimingthesensordownwill
reducecoveragedistance.
For eave mount only:
1. Swingthesensorheadtowardstheclampscrew
joint.
For under eave installation, the sensor head must
be rotatedasshowninthenexttwostepsforproper
operationandtoavoidtheriskofelectricalshock.
Controls
Controls
Controls
Eave Mount
Wall Mount
ClampScrew
2. Thenrotatethesensorheadclockwise180°so
thecontrolsfacedown.
Ifthesensorpopsoutoftheballjoint,loosenthe
clampscrewandpushthesensorbackintotheball
joint.Tightentheclampscrewwhendone.

2
598-1360-00
WIRING THE LIGHT CONTROL
WARNING: Turn power off at circuit breaker
or fuse.
MOUNT THE LIGHT CONTROL
1. Alignthelightcontrolcoverplateandcoverplate
gasket.Securewiththemountingbolt.
2. Alignthethreeslotsinthedecorativeshellwith
thelampholderpins.Pushtheshellinandthen
twistclockwisetolock.Repeatforothershell.
LockNut
Toavoidwaterdamageandelectricalshock,
keeplampholders30°belowhorizontal.
5. Adjustthelampholdersbylooseningthelock
nutsbutdonotrotatethelampholdersmorethan
180°fromthefactorysetting.Whenscrewingin
theoodlamps,donotovertighten.
Keeplampsat
least1"(25mm)
fromthesensor.
Donotallowthe
lampstoblock
thelens.
Lens
3. Pushtherubberplugrmlyintoplace.
4. Ifa wetlocation junctionbox wasnot used,
caulk the wall plate mounting surface with
siliconeweathersealant.
ShellSlot
1. Removetheexistinglightxture.
2. Installthemountingstrapasshownusingtwo
screwsthattyourjunctionbox.
3. Theplastichangercanbeusedtoholdthexture
whilewiring.Thesmallendoftheplastichanger
canbethreadedthroughtheholeinthecenter
ofthecoverplate.Thesmallendthengoesinto
oneoftheslotsonthemountingstrap.
4. Routethelightcontrol’swiresthroughthelarge
gasketholes.
5. Twistthejunctionboxwiresandxturewiresto-
getherasshown.Securewithwireconnectors.
White to WhiteBlack to Black
Junction box ground wire to green ground screw
on fixture.
Gasket
Mounting
Strap
MountingBolt
RubberPlug

3
598-1360-00
TESTING AND ADJUSTMENTS
1. Turn on the circuit breaker and light switch.
MotionMotion
NOTE: If xture ismountedhigher than 8ft. (2.4
m),aimingthesensordownwill reduce coverage
distance.
The detector is less sensitive to motion directly
towardsit.
Maximum Range Maximum
Coverage Angle
RANGE
1051TEST
ON-TIME
Bottom of Sensor
Avoid aiming the control at:
•Objectsthatchangetemperaturerapidly,suchas
heating vents and air conditioners.Theseheat
sourcescouldcausefalsetriggering.
•Areaswherepets or trafficmaytriggerthecon-
trol.
•Nearby large, light-colored objects reecting
lightmaytriggertheshut-offfeature.Donotpoint
otherlightsatthesensor.
70ft.
(21m)
8ft.
(2.4m)
180°
MIN MAX
Least Sensitive Most Sensitive
Sensor
3. Loosen the clamp screw
inthesensorballjointand
gentlyrotatethesensor.
4. Walkthroughthecoverage
areanotingwhereyouare
whenthelightsturnon(also,
the LED will ash several
times when motion is de-
tected). Move the sensor
headup,down,orsideways
to change the coverage
area. Keep the sensor at
least 1" (2.5 cm) away from
the lamps.
5. AdjusttheRANGEasneed-
ed.RANGEsettoohighmay
increasefalsetriggering.
6. Secure the sensor head
by tightening the clamp
screw. Donot overtighten
thescrew.
7. Set the amount of TIME you want the lights
tostayonaftermotionisdetected(1,5,or10
minutes).
WARNING: Risk of fire. Do not aim the
lamps at a combustible surface within 3 ft.
(1 m).
Clamp
Screw
Ball Joint
Aim Sensor
Down for Short
Coverage
Aim Sensor
Higher for Long
Coverage
Note:Sensorhasa1
1
/
2
minute warm up period
beforeitwilldetectmotion.Whenrstturnedon
wait1
1
/
2
minutes.
2. TurntheRANGEcontroltothemediumposition
(halfwaybetweenMINandMAX)andtheON-
TIMEcontroltotheTESTposition.

4
598-1360-00
Note: Whenrstturnedonwaitabout1
1
/
2
minutes
forthecircuitrytocalibrate.
*resetstoSecuritymodeatdawn.
OPERATION
Mode: On-Time Works: Day Night
Test
5Seconds x x
Security
1,5or10Minutes x
Manual
Override
Until Dawn* x
MANUAL MODE
AUTO
TEST
ON-TIME Switch at 1, 5, or
10 minutes
...backon.
1SecondOFF
then...
ManualOverridemodecanonly
be activated at night when the
ON-TIMEswitchissettothe1,
5,or10minuteposition.
Flipthelightswitchoffforonesec-
ondthenbackontochangefrom
SECURITY mode to MANUAL
OVERRIDEmode.
To return to SECURITY mode,
either:
•turnthelightoffforoneminute
thenturniton,or...
•daylightwillautomaticallyreset
thelighttoSECURITYmode.
MODE SWITCHING SUMMARY
Flip light switch off
for one second then
back on*
*Ifyougetconfusedwhileswitchingmodes,turn
thepoweroffforoneminute,thenbackon.Afterthe
calibrationtimethecontrolwillbeintheSECURITY
mode.
MANUAL OVERRIDE MODE
SECURITY
MODE
SPECIFICATIONS
Range ...........................Upto70ft.(21m)[varieswith
surroundingtemperature].
SensingAngle .............. Upto180°
ElectricalLoad ..............Upto 300WattMaximum
Incandescent [Up to 150
Wattmaximumeachlamp
holder]or10WattMaximum
LED(Upto5WattMaximum
eachlampholder).
BulbType ...................... Up to150Watt Maximum
PA R 3 8 Tu n g s t e n
Incandescentor5WattLED
model2003LEDP38-65K.
PowerRequirements .... 120VAC,60Hz
OperatingModes ..........TEST, SECURITY, and
MANUALOVERRIDE
ON-Timer ......................1,5,10minutes
TestTimer ..................... 5Seconds
Manual
OverrideTimer .............. Until Dawn
Range ...........................Adjustable

5
598-1360-00
TROUBLESHOOTING GUIDE
SYMPTOM POSSIBLE CAUSE SOLUTION
Lights will not come
on.
1. Lightswitchisturnedoff.
2. Lampislooseorburnedout.
3. Fuseisblownorcircuitbreakeristurned
off.
4. Daylightturn-offisineffect.
5. Incorrect circuit wiring, if this is a new
installation.
6. Sensorisnotaimedtowarddesiredcover-
agearea.
1. Turnlightswitchon.
2. Checklampandreplaceifburnedout.
3. Replacefuseorturncircuitbreakeron.
4. Recheckafterdark.
5. Verifywiringiscorrect.
6. Re-aimsensortocoverdesiredarea.
Lights come on in
daylight.
1. Lightcontrolmaybeinstalledinarelatively
darklocation.
2. LightcontrolisinTEST.
1. Thextureisoperatingnormallyunderthese
conditions.
2. Setcontrolswitchto1,5,or10minutes.
Lightscomeonforno
apparentreason.
1. Lightcontrolmaybesensingsmallanimals
orautomobiletrafc.
2. Rangeissettoohigh.
1. ReduceRange.Re-aimsensor.
2. ReduceRange.
Lightsstayon
continuously.
1. Thesensormaybepickingupaheatsource
like an air vent, dryer vent, or brightly
painted,heat-reectivesurface.
2. SensorisinManualOverridemode.
1. ReduceRange.Re-aimsensor.
2. Setcontrolswitchto1,5,or10minutes.
Followmanualoverrideinstructionstoreset.
Lights ash on and
off.
1. Heatorlightfromthelampsmaybeturning
thelightcontrolonandoff.
2. Heat being reected from other objects
maybeaffectingthesensor.
3. SensorisintheTestmode.
4. Light may be leaking through the ood
lampreectors
1. Repositionthelampsawayfromthesensor.
2. ReduceRange.Re-aimsensor.
3. WhileinTESTmode,lightonlystaysonfor5
seconds.
4. Makesure the metal lamp protectors are in-
stalled.

6
598-1360-00
TWO YEAR LIMITED WARRANTY
Productwillbefreeofdefectduetoworkmanshipforaperiodoftwo(2)years.Ifproductfailswithinthe
statedlife,returndefectiveproducttoretailerofLightsofAmerica.
Warrantytermsandconditionsofretailerapply.
Warrantyandguaranteevoidifproductismisused.
Ifreplacementproductisnotavailableatretailstore,pleasereturnproductintheoriginalpackage,along
withacopyofthedatedsalesreceipt,descriptionoftheproblem,andyournameandreturnaddressto
themanufacturerattheaddresslistedbelow:
LightsofAmerica
611ReyesDrive
Walnut,CA91789
Attn:ConsumerAffairsDept.
Distributedby:
611ReyesDrive
Walnut,California91789
Tel:(800)321-8100/(909)594-7883
Fax:(909)594-6758
Website:www.lightsofamerica.com

19
598-1360-00
Notes / Notas __________
______________________
______________________
______________________
______________________
______________________
______________________
______________________
______________________
______________________
______________________
______________________
______________________

20
598-1360-00
Notes / Notas __________
______________________
______________________
______________________
______________________
______________________
______________________
______________________
______________________
______________________
______________________
______________________
______________________
/