Page is loading ...

APX
TM
TWO-WAY RADIOS
APX MOBILE
O2 CONTROL HEAD
USER GUIDE


English
m
ASTRO
®
APX™
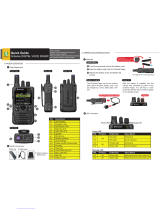
O2 Control Head Mobile Radio
Quick Reference Card
RF Energy Exposure and Product Safety Guide for
Mobile Two-way Radios
ATTENTION!
This radio is restricted to occupational use only to satisfy FCC RF
energy exposure requirements. Before using this product, read
the guide enclosed with your radio which contains important
operating instructions for safe usage and RF energy awareness
and control for compliance with applicable standards and
regulations.
Radio Controls
Radio On/Off
Adjusting Volume
Selecting a Zone
Selecting a Channel
Receiving and Transmitting
Sending an Emergency Alarm
Before using this product, read the operating
instructions for safe usage contained in the Product
Safety and RF Exposure booklet enclosed with your
radio.
!
Power Button
LED Indicators
Emergency
Button*
Multi-function Knob
(MFK)*
Home Button
Menu Select Buttons*
Accessory Port (Microphone)
*These controls/buttons are programmable.
Dimmer Button
Up & Down
Buttons*
Press the Power button to turn the radio on or off.
If volume is set as the primary mode,
1 Turn the MFK clockwise to increase volume or
counterclockwise to decrease the volume.
If volume is not set as the primary mode, press the MFK
once and repeat step 1.
If zone is set as the primary mode,
1 Turn the MFK until the display shows the desired
zone and press the PTT button to begin transmitting
on the displayed zone.
If zone is not set as the primary mode, press the MFK
once and repeat step 1.
OR
2 > or < (on the keypad mic.) to scroll to Zone.
3 Press the Menu Select button directly below Zone.
4 Rotate the MFK or D or U to the desired zone.
5 Press the Menu Select button directly below Sel or
the 3 button (on the keypad mic.) to confirm the
selected zone number.
6 Press the PTT button to begin transmitting on the
displayed zone.
If channel is set as the primary mode,
1 Turn the MFK until the display shows the desired
channel and press the PTT button to begin
transmitting on the displayed channel.
If channel is not set as the primary mode, press the MFK
once and repeat step 1.
OR
2 > or < (on the keypad mic.) to scroll to Chan.
3 Press the Menu Select button directly below Chan.
4 Rotate the MFK or press D or U to the desired
channel.
5 Press the Menu Select button directly below Sel or
the 3 button (on the keypad mic.) to confirm the
channel.
6 Press the PTT button to transmit on the displayed
channel.
1 Take the microphone off the hook.
2 Select zone/channel.
3 Listen for a transmission.
OR
> or < (on the keypad mic.) to Mon then press the
Menu Select button directly below Mon and listen for
activity.
4 Adjust volume, if necessary.
5 Press the PTT button to transmit; release to receive.
1 Press the Emergency button. A tone sounds and the
display alternates Emergency and the home display.
2 A dispatcher acknowledgment Ack received display
follows.
AND, Trunking Only:
A high-pitched tone indicates that the alarm has been
received by the trunked system’s central controller.
*PMLN6193B*
PMLN6193B
MOTOROLA, MOTO, MOTOROLA SOLUTIONS and the Stylized M logo are trademarks or registered trademarks of Motorola
Trademark Holdings, LLC and are used under license. All other trademarks are the property of their respective owners.
© 2012 by Motorola Solutions, Inc. All Rights Reserved. 10/12
1303 East Algonquin Road, Schaumburg, Illinois 60196, U.S.A.

English
To exit emergency at any time, press and hold the
Emergency button.
Sending an Emergency Call (Trunking Only)
To exit emergency at any time, press and hold the
Emergency button.
Sending a Silent Emergency Alarm
If silent emergency alarm is used with emergency call,
pressing the PTT button exits the silent mode and
initiates the emergency call.
Display Status Icons
3 Press and hold the emergency button or the PTT
button to return to normal operation.
1 Press Emergency button.
2 A tone sounds and the display alternates
Emergency and the home display.
OR
A short low-pitched tone sounds when the selected
channel does not support emergency.
3 Press and hold the PTT button. Speak clearly into
the microphone.
4 Release the PTT to end the transmission.
1 Press the preprogrammed Emergency button to
activate the silent alarm feature.
2 The display does not change; the LED does not light
up, and there is no tone.
Receiving a call or data.
Transmitting a call or data.
Received an Individual Call.
u
t
F
The more stripes, the stronger the signal
strength for the current site (trunking only).
Direct radio-to-radio communication or
communication through a repeater.
On = Direct
Off = Repeater
This channel is being monitored.
Voice muting the affiliated trunking talkgroup
or selected channel.
On = Enabled
Off = Disabled
L = Radio is set at Low power.
H = Radio is set at High power.
Scanning a scan list.
Blinking dot = Detects activity on the
Priority-One Channel during
scan.
Steady dot = Detects activity on the Priority-
Two Channel during scan.
Radio is in the view or program mode.
On steady = View mode.
Blinking = Program mode.
V
O
M
K
HOR .
i
j
The vote scan feature is enabled.
On = Secure operation.
Off = Clear operation.
Blinking = Receiving an encrypted voice
call.
On = AES Secure operation.
Off = Clear operation.
Blinking = Receiving an encrypted voice
call.
On = Location feature enabled, and location
signal available.
Off = Location feature disabled.
Blinking = Location feature enabled, but
location signal unavailable.
Inverted = User is currently associated with
the radio.
On = Packet data is activated.
Off = Packet data is deactivated.
Blinking = Device registration or user
registration with the server failed
due to an invalid username or
pin.
Data activity is present.
MFK is in Mode Change feature
Turn the MFK to change channel.
MFK is in Volume Change feature
Turn the MFK to adjust the volume.
k
m
l
G
n
o
Menu Navigation
< or > to Menu Entry
(on the keypad mic.).
g directly below Menu Entry
to select.
H to exit.
U or D to scroll through sub-list.
g directly below Menu Entry to select.

Declaration of Conformity
English
i
Declaration of Conformity
This declaration is applicable to your radio only if your radio is labeled with the FCC logo shown below.
DECLARATION OF CONFORMITY
Per FCC CFR 47 Part 2 Section 2.1077(a)
Responsible Party
Name: Motorola Solutions, Inc.
Address: Motorola Solutions, Inc., 1303 East Algonquin Road Schaumburg, IL60196, U.S.A.
Phone Number: 1-800-927-2744
Hereby declares that the product:
Model Name: APX Mobile
conforms to the following regulations:
FCC Part 15, subpart B, section 15.107(a), 15.107(d) and section 15.109(a)
Class B Digital Device
As a personal computer peripheral, this device complies with Part 15 of the FCC Rules. Operation is subject to the
following two conditions:
1. This device may not cause harmful interference, and
2. This device must accept any interference received, including interference that may cause undesired operation.

Declaration of Conformity
English
ii
Note: This equipment has been tested and found to comply with the limits for a Class B digital device, pursuant to part
15 of the FCC Rules. These limits are designed to provide reasonable protection against harmful interference in a
residential installation. This equipment generates, uses and can radiate radio frequency energy and, if not
installed and used in accordance with the instructions, may cause harmful interference to radio communications.
However, there is no guarantee that interference will not occur in a particular installation.
If this equipment does cause harmful interference to radio or television reception, which can be determined by
turning the equipment off and on, the user is encouraged to try to correct the interference by one or more of the
following measures:
• Reorient or relocate the receiving antenna.
• Increase the separation between the equipment and receiver.
• Connect the equipment into an outlet on a circuit different from that to which the receiver is connected.
• Consult the dealer or an experienced radio/TV technician for help.

Declaration of Conformity
English
iii
Additional FCC Notes to Users
The following FCC information applies to Bluetooth radio options
IC Model Name: PMHN4193A
Description: O2 Bluetooth Option Board
FCC ID: AZ492FT6002
IC: 109U-92FT6002
Conforms to the following regulations: FCC Part 15, Section 15.19, 15.12, and 15.105
Note: Changes or modifications not expressly approved by Motorola may void the users authority, as authorized by the
FCC, to operate this device and should not be made. See 47 CFR Part 15.21. Information to user.The users manual
or instruction manual for an intentional or unintentional radiator shall caution the user that changes or modifications
not expressly approved by the party responsible for compliance could void the user’s authority to operate the
equipment.
This device complies with Part 15 of the FCC Rules. Operation is subject to the following two conditions: (1) This device
may not cause harmful interference, and (2) this device must accept any interference received, including interference that
may cause undesired operation. See 47 CFR Part. 15.19(3).
This device has been tested and found to comply with the limits of Part 15.15 of the FCC rules. Parties responsible for
equipment compliance should note that the limits specified in this part will not prevent harmful interference under all
circumstances.
This equipment has been tested and found to comply with the limits for a Class B digital device, pursuant to part 15 of the
FCC Rules. See Part 15.105b These limits are designed to provide reasonable protection against harmful interference in a
residential installation. This equipment generates, uses and can radiate radio frequency energy and, if not installed and
used in accordance with the instructions, may cause harmful interference to radio communications.

Declaration of Conformity
English
iv
However, there is no guarantee that interference will not occur in a particular installation. If this equipment does cause
harmful interference to radio or television reception, which can be determined by turning the equipment off and on, the user
is encouraged to try to correct the interference by one or more of the following measures:
• Reorient or relocate the receiving antenna.
• Increase the separation between the equipment and receiver.
• Connect the equipment into an outlet on a circuit different from that to which the receiver is connected.
• Consult the dealer or an experienced radio/TV technician for help.
Industry Canada (IC) Statements:
This Class B digital apparatus complies with ICES-003 and Radio Standards Specification (RSS) 210.

Contents
English
v
Contents
Declaration of Conformity . . . . . . . . . . . . . . . . . .i
Important Safety Information . . . . . . . . . . . . . .ix
RF Energy Exposure and Product Safety Guide for
Mobile Two-way Radios . . . . . . . . . . . . . . . . . . . . . .ix
Software Version . . . . . . . . . . . . . . . . . . . . . . . .ix
Notice to Users (FCC and Industry Canada) . . . . . .ix
Informations importantes sur la sécurité . . . . x
GUIDE SUR L’EXPOSITION AUX
RADIOFRÉQUENCES ET LA SÉCURITÉ DU
PRODUIT POUR RADIOS MOBILES
BIDIRECTIONNELLES . . . . . . . . . . . . . . . . . . . . . . x
Version du logiciel . . . . . . . . . . . . . . . . . . . . . . . x
Avis aux utilisateurs (FCC et Industrie Canada) . . . .xi
Computer Software Copyrights . . . . . . . . . . . .xi
Documentation Copyrights . . . . . . . . . . . . . . . .xi
Disclaimer . . . . . . . . . . . . . . . . . . . . . . . . . . . . .xii
Getting Started . . . . . . . . . . . . . . . . . . . . . . . . . .1
How to Use This User Guide . . . . . . . . . . . . . . . . . . 1
Notations Used in This Manual . . . . . . . . . . . . . . . . . 1
Additional Performance Enhancement . . . . . . . . . . . 2
Dynamic System Resilience (DSR) . . . . . . . . . . . . . 2
CrossTalk Prevention . . . . . . . . . . . . . . . . . . . . . . . 2
Encrypted Integrated Data (EID) . . . . . . . . . . . . . . . 2
SecureNet . . . . . . . . . . . . . . . . . . . . . . . . . . . . . . . . 2
What Your Dealer/System Administrator Can
Tell You . . . . . . . . . . . . . . . . . . . . . . . . . . . . . . . . . . 3
Preparing Your Radio for Use . . . . . . . . . . . . . .3
Turning On the Radio . . . . . . . . . . . . . . . . . . . . . . . . 4
Validating Compatibility During Power Up . . . . . . . . 4
Adjusting the Volume . . . . . . . . . . . . . . . . . . . . . . . . 5
Identifying Radio Controls . . . . . . . . . . . . . . . . .5
Radio Parts and Controls . . . . . . . . . . . . . . . . . . . . . 6
O2 Control Head and Microphone . . . . . . . . . . . . . 6
Programmable Features . . . . . . . . . . . . . . . . . . . . . . 7
One Touch Button . . . . . . . . . . . . . . . . . . . . . . . . . . 7
Assignable Radio Functions . . . . . . . . . . . . . . . . . . 7

Contents
English
vi
Assignable Settings or Utility Functions . . . . . . . . . . 9
Accessing the Preprogrammed Functions . . . . . . . 10
Using the Menu Select Buttons . . . . . . . . . . . . . . . 10
Using the Advance Programmable Buttons . . . . . . 11
Using the Navigation Buttons . . . . . . . . . . . . . . . . . 11
Home Button . . . . . . . . . . . . . . . . . . . . . . . . . . . . 12
Dimmer Button . . . . . . . . . . . . . . . . . . . . . . . . . . . . 12
Multi-function Knob . . . . . . . . . . . . . . . . . . . . . . . . 12
The MFK button on your radio is programmable
to the following features : . . . . . . . . . . . . . . . . . . . . 12
Using the Keypad . . . . . . . . . . . . . . . . . . . . . . . . . . 14
Keypad Characters – Uppercase Mode . . . . . . . . . 14
Keypad Characters – Lowercase Mode . . . . . . . . . 15
Keypad Characters – Numeric Mode . . . . . . . . . . . 16
Keypad Characters – Hexadecimal Mode . . . . . . . 17
Push-To-Talk (PTT) Button . . . . . . . . . . . . . . . . . . 18
Identifying Status Indicators . . . . . . . . . . . . . .18
Status Icons . . . . . . . . . . . . . . . . . . . . . . . . . . . . . . 19
Text Messaging Service (TMS) Icons . . . . . . . . . . 21
Status Icons . . . . . . . . . . . . . . . . . . . . . . . . . . . . . . 21
TMS Menu Options . . . . . . . . . . . . . . . . . . . . . . . . . 22
Call Type Icons . . . . . . . . . . . . . . . . . . . . . . . . . . . . 23
LED Indicator . . . . . . . . . . . . . . . . . . . . . . . . . . . . . 24
Multi-function Knob - Concentric Ring LED . . . . . . 24
Intelligent Lighting Indicators . . . . . . . . . . . . . . . . . 25
Alert Tones . . . . . . . . . . . . . . . . . . . . . . . . . . . . . . . 26
General Radio Operation . . . . . . . . . . . . . . . . 31
Selecting a Zone . . . . . . . . . . . . . . . . . . . . . . . . . . 31
Selecting a Radio Channel . . . . . . . . . . . . . . . . . . . 32
Receiving and Responding to a Radio Call . . . . . . 32
Receiving and Responding to a Talkgroup Call . . .33
Receiving and Responding to a Private Call
(Trunking Only) . . . . . . . . . . . . . . . . . . . . . . . . . . . .33
Receiving and Responding to a Telephone Call . . .34
Making a Radio Call . . . . . . . . . . . . . . . . . . . . . . . . 35
Making a Talkgroup Call . . . . . . . . . . . . . . . . . . . . .35
Making a Private Call (Trunking Only) . . . . . . . . . . .36
Making a Telephone Call . . . . . . . . . . . . . . . . . . . .37
Repeater or Direct Operation . . . . . . . . . . . . . . . . . 38
Monitoring Features . . . . . . . . . . . . . . . . . . . . . . . . 38
Monitoring a Channel . . . . . . . . . . . . . . . . . . . . . . .38
Conventional Mode Operation . . . . . . . . . . . . . . . .39
Advanced Features . . . . . . . . . . . . . . . . . . . . . 41
Advanced Call Features . . . . . . . . . . . . . . . . . . . . . 41
Calling a Phone Not in the List . . . . . . . . . . . . . . . .41

Contents
English
vii
Receiving and Making a Selective Call
(Conventional Only) . . . . . . . . . . . . . . . . . . . . . . . .42
Receiving a Selective Call . . . . . . . . . . . . . . . . . . .42
Making a Selective Call . . . . . . . . . . . . . . . . . . . . .42
Using the Talkgroup Call Feature (Conventional
Operation Only) . . . . . . . . . . . . . . . . . . . . . . . . . . . .43
Selecting a Talkgroup . . . . . . . . . . . . . . . . . . . . . .43
Sending a Status Call . . . . . . . . . . . . . . . . . . . . . . .44
Using the Dynamic Regrouping Feature
(Trunking Only) . . . . . . . . . . . . . . . . . . . . . . . . . . . .45
Requesting a Reprogram . . . . . . . . . . . . . . . . . . . .45
Classifying Regrouped Radios . . . . . . . . . . . . . . . .46
Contacts . . . . . . . . . . . . . . . . . . . . . . . . . . . . . . . . . 46
Making a Private Call from Contacts . . . . . . . . . . . .47
Adding a New Contact Entry . . . . . . . . . . . . . . . . . .48
Deleting a Contact Entry . . . . . . . . . . . . . . . . . . . . .49
Adding a Contact to a Call List or Phone List . . . . .50
Editing a Contact in a Call List or a Phone List . . . .50
Editing an Entry Alias . . . . . . . . . . . . . . . . . . . . . . .50
Editing as Entry ID . . . . . . . . . . . . . . . . . . . . . . . . .51
Editing a Call Type . . . . . . . . . . . . . . . . . . . . . . . . .52
Scan Lists . . . . . . . . . . . . . . . . . . . . . . . . . . . . . . . . 52
Viewing a Scan List . . . . . . . . . . . . . . . . . . . . . . . . .52
Editing the Scan List . . . . . . . . . . . . . . . . . . . . . . . .53
Changing the Scan List Status . . . . . . . . . . . . . . . .53
Viewing and Changing the Priority Status . . . . . . . .54
Scan . . . . . . . . . . . . . . . . . . . . . . . . . . . . . . . . . . . . 54
Turning Scan On or Off . . . . . . . . . . . . . . . . . . . . . 54
Turning Scan On While Disregarding the
Squelch Code (Conventional Channels Only) . . . . 55
Transmitting While the Scan is On . . . . . . . . . . . . 55
Radio Programmed for Talkback Scan . . . . . . . . . 55
Radio Programmed for Non-Talkback Scan . . . . . 56
Deleting a Nuisance Channel . . . . . . . . . . . . . . . . 56
Restoring a Nuisance Channel . . . . . . . . . . . . . . . 56
Changing Priorities Status While Scan is On . . . . . 57
Restoring Priorities in a Scan List . . . . . . . . . . . . . 57
Hang Up (HUB) . . . . . . . . . . . . . . . . . . . . . . . . . . . 57
Call Alert Paging . . . . . . . . . . . . . . . . . . . . . . . . . . 58
Receiving a Call Alert Page . . . . . . . . . . . . . . . . . . 58
Sending a Call Alert Page . . . . . . . . . . . . . . . . . . . 59
In-Call User Alert . . . . . . . . . . . . . . . . . . . . . . . . . . 60
Emergency Operation . . . . . . . . . . . . . . . . . . . . . . . 60
Sending an Emergency Alarm . . . . . . . . . . . . . . . . 61
Sending an Emergency Call (Trunking Only) . . . . 61
Sending an Emergency Alarm with Emergency Call 61
Sending a Silent Emergency Alarm . . . . . . . . . . . . 62
Special Considerations for Emergencies . . . . . . . . 63
Automatic Registration Service (ARS) . . . . . . . . . . 64
Selecting or Changing ARS Mode . . . . . . . . . . . . . 64
Accessing the User Login Feature . . . . . . . . . . . . . 65
Logging In as a User . . . . . . . . . . . . . . . . . . . . . . . 65

Contents
English
viii
Logging Out . . . . . . . . . . . . . . . . . . . . . . . . . . . . . 66
Text Messaging Service (TMS) . . . . . . . . . . . . . . . 67
Accessing TMS Feature . . . . . . . . . . . . . . . . . . . . . 67
Composing and Sending a New Text Message . . . 68
Sending a Quick Text Message . . . . . . . . . . . . . . . 69
Using the Priority Status and Request Reply
Features . . . . . . . . . . . . . . . . . . . . . . . . . . . . . . . . . 71
Appending or Removing a Priority Status to a
Text Message . . . . . . . . . . . . . . . . . . . . . . . . . . . . 71
Appending or Removing a Request Reply to a
Text Message . . . . . . . . . . . . . . . . . . . . . . . . . . . . 71
Appending a Priority Status and a Reply Request
to a Text Message . . . . . . . . . . . . . . . . . . . . . . . . . 71
Removing a Priority Status and a Reply Request
from a Text Message . . . . . . . . . . . . . . . . . . . . . . . 72
Managing Text Messages . . . . . . . . . . . . . . . . . . . 72
Receiving a Text Message . . . . . . . . . . . . . . . . . . 72
Viewing a Text Message from the Inbox . . . . . . . . 73
Replying to a Received Text Message . . . . . . . . . 74
Accessing the Drafts Folder . . . . . . . . . . . . . . . . . . 75
Managing Sent Text Messages . . . . . . . . . . . . . . . 75
Viewing a Sent Text Message . . . . . . . . . . . . . . . . 75
Sending a Sent Text Message . . . . . . . . . . . . . . . 76
Deleting Text Messages . . . . . . . . . . . . . . . . . . . . 77
Secure Operations . . . . . . . . . . . . . . . . . . . . . . . . . 77
Managing Encryption . . . . . . . . . . . . . . . . . . . . . . . 77
Loading a Single Encryption Key . . . . . . . . . . . . . . 77
Loading the Group Encryption Keys . . . . . . . . . . . .78
Using the Multikey Feature . . . . . . . . . . . . . . . . . . .78
Selecting an Encryption Key (Conventional Only) .79
Enabling Secure Transmission . . . . . . . . . . . . . . . .79
Accessing the Secure Feature . . . . . . . . . . . . . . . .80
Selecting a Keyset . . . . . . . . . . . . . . . . . . . . . . . . .80
Erasing the Selected Encryption Keys . . . . . . . . . .80
Requesting an Over-the-Air Rekey . . . . . . . . . . . .81
MDC Over-the-Air Rekeying (OTAR) Page . . . . . .81
Infinite UKEK Retention . . . . . . . . . . . . . . . . . . . . .81
Hear Clear . . . . . . . . . . . . . . . . . . . . . . . . . . . . . . .82
The Global Positioning System (GPS) . . . . . . . . . . 82
Understanding the GPS Feature . . . . . . . . . . . . . . .82
Enhancing GPS Performance . . . . . . . . . . . . . . . . .83
The Outdoor Location Feature (Using GPS) . . . . . .83
Accessing the Outdoor Location Feature . . . . . . . .84
Saving a Waypoint . . . . . . . . . . . . . . . . . . . . . . . . .85
Viewing a Saved Waypoint . . . . . . . . . . . . . . . . . . .86
Editing the Alias of a Waypoint . . . . . . . . . . . . . . . .87
Editing the Coordinates of a Waypoint . . . . . . . . . .87
Deleting a Single Saved Waypoint . . . . . . . . . . . . .88
Deleting All Saved Waypoints . . . . . . . . . . . . . . . .89
Measuring the Distance and Bearing from a Saved
Waypoint . . . . . . . . . . . . . . . . . . . . . . . . . . . . . . . .89
Using the Location Feature While in
Emergency Mode . . . . . . . . . . . . . . . . . . . . . . . . . .90
Trunking System Controls . . . . . . . . . . . . . . . . . . . 90

Contents
English
ix
Using the Failsoft System . . . . . . . . . . . . . . . . . . . .90
Going Out-of-Range . . . . . . . . . . . . . . . . . . . . . . . .91
SmartZone® . . . . . . . . . . . . . . . . . . . . . . . . . . . . . .91
Using Site Trunking Feature . . . . . . . . . . . . . . . . . .91
Locking and Unlocking a Site . . . . . . . . . . . . . . . . .92
Viewing and Changing a Site . . . . . . . . . . . . . . . . .92
Viewing the Current Site . . . . . . . . . . . . . . . . . . . .92
Changing the Current Site . . . . . . . . . . . . . . . . . . .93
Trunked Announcement . . . . . . . . . . . . . . . . . . . . .93
Initiating an Announcement . . . . . . . . . . . . . . . . . .94
Ignition Switch Options . . . . . . . . . . . . . . . . . . . . . . 94
Blank . . . . . . . . . . . . . . . . . . . . . . . . . . . . . . . . . . . .94
Tx Inhibit . . . . . . . . . . . . . . . . . . . . . . . . . . . . . . . . .94
PTT Tx Inhibit . . . . . . . . . . . . . . . . . . . . . . . . . . . . .94
Required . . . . . . . . . . . . . . . . . . . . . . . . . . . . . . . . .95
Soft Power Off . . . . . . . . . . . . . . . . . . . . . . . . . . . . .95
Ignition Only Power Up . . . . . . . . . . . . . . . . . . . . . .95
Emergency Power Up . . . . . . . . . . . . . . . . . . . . . . .95
Auto Power Off Timer . . . . . . . . . . . . . . . . . . . . . . .96
Utilities . . . . . . . . . . . . . . . . . . . . . . . . . . . . . . . . . . 96
Viewing Recent Calls List . . . . . . . . . . . . . . . . . . . .96
Selecting the Power Level . . . . . . . . . . . . . . . . . . . .97
Selecting a Radio Profile . . . . . . . . . . . . . . . . . . . . .97
Controlling the Display Backlight . . . . . . . . . . . . . . .98
Turning Keypad Tones On or Off . . . . . . . . . . . . . .98
Turning Voice Mute On or Off . . . . . . . . . . . . . . . . .99
Using the Time-Out Timer . . . . . . . . . . . . . . . . . . . 99
Using the Conventional Squelch Operation
Features . . . . . . . . . . . . . . . . . . . . . . . . . . . . . . . . 100
Analog Options . . . . . . . . . . . . . . . . . . . . . . . . . . 100
Digital Options . . . . . . . . . . . . . . . . . . . . . . . . . . 100
Using the PL Defeat Feature . . . . . . . . . . . . . . . . 101
Using the Digital PTT ID Feature . . . . . . . . . . . . . 101
Using the Smart PTT Feature (Conventional Only) 101
Accessing General Radio Information . . . . . . . . . 102
Accessing Radio Information . . . . . . . . . . . . . . . 102
Viewing IP Information . . . . . . . . . . . . . . . . . . . . 103
Viewing Control Assignments . . . . . . . . . . . . . . . 103
Using Siren, PA and Light . . . . . . . . . . . . . . . . . . 104
Using Keypad as Siren Type Selector . . . . . . . . 104
Using Keypad as Light Type Selector . . . . . . . . . 104
Using the Public Address Button on the Keypad 104
Using the External Public Address Button
on the Keypad . . . . . . . . . . . . . . . . . . . . . . . . . . . 105
Using Optional External Alarms (Horn and Lights) 105
Using Non-Permanent Horn and Lights . . . . . . . 105
Using Permanent Horn and Lights . . . . . . . . . . . 106
Changing the Selected Alarms . . . . . . . . . . . . . . 106
Receiving a Call While Alarms are Turned On . . 107
Turning Off Non-Rearmable External Alarms . . . 107
Turning Off Rearmable External Alarms . . . . . . . 107
Using the Voice Announcement . . . . . . . . . . . . . 108

Contents
English
x
Helpful Tips . . . . . . . . . . . . . . . . . . . . . . . . . . .109
Accessories . . . . . . . . . . . . . . . . . . . . . . . . . . .111
Appendix: Maritime Radio Use in the VHF
Frequency Range . . . . . . . . . . . . . . . . . . . . . .112
Special Channel Assignments . . . . . . . . . . . . . . . 112
Emergency Channel . . . . . . . . . . . . . . . . . . . . . . . 112
Non-Commercial Call Channel . . . . . . . . . . . . . . . 112
Operating Frequency Requirements . . . . . . . . . . 113
Glossary . . . . . . . . . . . . . . . . . . . . . . . . . . . . .115
Commercial Warranty and Service . . . . . . . .119

Important Safety Information
English
ix
Important Safety Information
RF Energy Exposure and Product Safety
Guide for Mobile Two-way Radios
ATTENTION!
This radio is restricted to occupational use only to
satisfy FCC RF energy exposure requirements.
Before using this product, read the guide enclosed with
your radio which contains important operating
instructions for safe usage and RF energy awareness
and control for compliance with applicable standards and
regulations.
For a list of Motorola-approved antennas and other
accessories, visit the following website:
http://www.motorolasolutions.com/APX
Under Industry Canada regulations, this radio transmitter
may only operate using an antenna of a type and
maximum (or lesser) gain approved for the transmitter by
Industry Canada. To reduce potential radio interference
to other users, the antenna type and its gain should be so
chosen that the equivalent isotropically radiated power
(e.i.r.p.) is not more than that necessary for successful
communication.
Software Version
All the features described in the following sections are
supported by the radio's software version R08.05.00 or
later.
Accessing Radio Information on page 102 to
determine your radio's software version.
Check with your dealer or system administrator for more
details of all the features supported.
Notice to Users (FCC and Industry Canada)
This device complies with Part 15 of the FCC rules, Industry
Canada license-exempt RSS standard(s) and RSS 210
of the Industry Canada rules
per the conditions listed below:
1 This device may not cause harmful interference.
2 This device must accept any interference received, including
interference that may cause undesired operation.
Before using this product, read the operating
instructions for safe usage contained in the
Product Safety and RF Exposure booklet
enclosed with your radio.
!

Informations importantes sur la sécurité
English
x
3 Changes or modifications made to this device, not expressly
approved by Motorola, could void the user's authority to
operate this equipment.
Informations importantes sur la
sécurité
Guide sur l’exposition aux radiofréquences
et la sécurité du produit pour radios mobiles
bidirectionnelles
ATTENTION!
Cette radio est réservée à un usage professionnel
seulement pour satisfaire les normes d'exposition
à l'énergie RF de la FCC. Avant d'utiliser ce produit,
lisez le guide inclus avec votre radio, qui contient
d'importantes informations sur le mode d'emploi
sécuritaire du produit ainsi que des informations relatives
à l'énergie de RF et à son contrôle, afin d'assurer la
conformité aux normes et règlements applicables.
Pour obtenir une liste d'antennes et d'autres accessoires
approuvés par Motorola, consultez le site Web :
http://www.motorolasolutions.com/APX
Selon la règlementation d'Industrie Canada, cet émetteur
radio ne peut être utilisé qu'avec une antenne dont le
type et le gain maximal (ou minimal) sont approuvés par
Industrie Canada pour cet émetteur. Afin de limiter les
interférences radio pour les autres utilisateurs, le type et
le gain de l'antenne doivent être choisis de façon à ce
que la puissance isotrope rayonnée équivalente (P.I.R.E.)
ne soit pas plus forte qu'il ne le faut pour établir la
communication.
Version du logiciel
Toutes les fonctionnalités décrites dans les sections
suivantes sont prises en charge par la version du logiciel
R08.05.00 ou ultérieure de la radio.
Vérifiez auprès de votre détaillant ou de l'administrateur
de système pour obtenir des renseignements sur les
fonctionnalités prises en charge.
Avant d'utiliser ce produit, lisez les directives
d'utilisation sécuritaire présentées dans le livret
Sécurité du produit et exposition à l'énergie RF
accompagnant votre radio.
!
Mise en garde

Computer Software Copyrights
English
xi
Avis aux utilisateurs (FCC et Industrie
Canada)
Cet appareil est conforme à la Partie 15 des règlements
de la FCC, normes CNR (cahiers des charges sur les
normes radioélectriques) pour les appareils exempts de
licence d’Industrie Canada et RSS 210 du règlement
d'Industrie Canada selon les conditions énumérées ci-
dessous:
1 Ce dispositif ne doit pas causer d'interférences nuisibles.
2 Cet appareil doit accepter toute interférence reçue, y compris
les interférences qui peuvent perturber le fonctionnement.
3 Les changements ou les modifications apportées à ce
dispositif, non expressément approuvées par Motorola,
peuvent annuler le droit de l'utilisateur à utiliser cet
équipement.
Computer Software Copyrights
The Motorola products described in this manual may
include copyrighted Motorola computer programs stored
in semiconductor memories or other media. Laws in the
United States and other countries preserve for Motorola
certain exclusive rights for copyrighted computer
programs including, but not limited to, the exclusive right
to copy or reproduce in any form the copyrighted
computer program. Accordingly, any copyrighted
Motorola computer programs contained in the Motorola
products described in this manual may not be copied,
reproduced, modified, reverse-engineered, or distributed
in any manner without the express written permission of
Motorola. Furthermore, the purchase of Motorola
products shall not be deemed to grant either directly or by
implication, estoppel, or otherwise, any license under the
copyrights, patents or patent applications of Motorola,
except for the normal non-exclusive license to use that
arises by operation of law in the sale of a product.
Documentation Copyrights
No duplication or distribution of this document or any
portion thereof shall take place without the express
written permission of Motorola. No part of this manual
may be reproduced, distributed, or transmitted in any
form or by any means, electronic or mechanical, for any
purpose without the express written permission of
Motorola.

Disclaimer
English
xii
Disclaimer
The information in this document is carefully examined,
and is believed to be entirely reliable. However, no
responsibility is assumed for inaccuracies. Furthermore,
Motorola reserves the right to make changes to any
products herein to improve readability, function, or
design. Motorola does not assume any liability arising out
of the applications or use of any product or circuit
described herein; nor does it cover any license under its
patent rights, nor the rights of others.

Getting Started
English
1
Getting Started
Take a moment to review the following:
How to Use This User Guide. . . . . . . . . . . . . . . . . . . . . page 1
Notations Used in This Manual . . . . . . . . . . . . . . . . . . . page 1
Additional Performance Enhancement . . . . . . . . . . . . . page 2
What Your Dealer/System Administrator Can Tell You . page 3
How to Use This User Guide
This User Guide covers the basic operation of the APX™
Mobile Radios.
However, your dealer or system administrator may have
customized your radio for your specific needs. Check with your
dealer or system administrator for more information.
Notations Used in This Manual
Throughout the text in this publication, you will notice the use of
WARNING, Caution, and Note. These notations are used to
emphasize that safety hazards exist, and the care that must be
taken or observed.The following special notations identify
certain items:
An operational procedure, practice, or condition,
etc., which may result in injury or death if not
carefully observed.
An operational procedure, practice, or
condition, etc., which may result in damage
to the equipment if not carefully observed.
Note:
An operational procedure, practice, or condition,
etc., which is essential to emphasize.
!
W A R N I N G
!
!

Getting Started
English
2
Additional Performance Enhancement
The following are some of the latest creations designed to
enhance the security, quality and efficiency of APX mobile
radios.
Dynamic System Resilience (DSR)
DSR ensures the radio system is seamlessly switched to a
backup master site dynamically in case of system failure.
DSR also provides additional indication e.g. failure detection,
fault recovery, and redundancy within the system to address to
the user in need. Mechanisms related to the Integrated Voice
and Data (IV & D) or data centric are all supported by DSR.
CrossTalk Prevention
This feature prevents crosstalk scenario from happening,
especially when a wideband antenna is used. This feature
allows the adjustment of the Trident Transmitting SSI clock rate
in the radio to be varied from the Receiving Frequency. This
subsequently reduced the possibilities of radio frequency
interfering spurs and prevents the issues of crosstalk.
Encrypted Integrated Data (EID)
EID provides security encryption and authentication of IV & D
data bearer service communication between the radio and the
Customer Enterprise Network.
SecureNet
SecureNet allows user to perform secured communications on
an Analog or Motorola Data Communication (MDC) channel.
The MDC OTAR feature will allow users to perform OTAR
activities on an MDC channel.
Example Description
Home button
or
H
Buttons and keys are shown in bold print or as
an icon.
PHONE
Menu entries are shown similar to the way they
appear on the radio’s display.
>
This means “Press the right side of the 4-way
Navigation button.” (Using keypad mic)
/