Page is loading ...

Rev: 09.19.2016 Page 1 TI-147
SOLERA® MANUAL AWNING INSTALLATION INSTRUCTIONS
TI-147
AWNINGS
Prior To Installation
NOTE: All screws/rivets supporting awning assembly MUST have a backer within the structure of the wall of
the coach.
Resources Required
• Three people
• Drill or cordless screw gun
• #2 square screwdriver bit
• ⁄" nut driver bit and/or rivet gun
Installation
NOTE: If installing a Pull Strap Awning, refer to TI-163 for instructions to mount heads to roll tube.
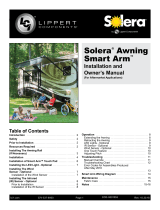
1. Attach the awning heads to the support arm assemblies by screwing the ⁄”-18 x 2 ¼” bolts (266148) into the
ends of the support arms and tightening the bolts (Fig. 1).
2. With two people holding the support arms, one at either end of the awning assembly, a third person needs
to line up the fabric cord with the awning rail that has been installed on the coach. Slide the fabric cord the
length of the awning rail.
NOTE: Do not unravel fabric more than one full revolution for installation or the tension will be too weak to retract
properly.
3. Set the awning assembly to the desired height and attach it to the side of the coach with two #14 x 1 ½” screws
(286576) at the top (Fig. 2) and two #14 x 1 ½” (286576) screws at the bottom (Fig. 3).
NOTE: Make sure the awning assembly is square on the unit prior to mounting the bottom 2 screws.
4. Remove the cotter pin from each head assembly. Extend the awning half way out. Secure the middle of the
wall mounting channel with two #14 x 1 ½” screws (286576) at any of the three locations shown (Fig. 4). Repeat
this process for other side of awning assembly.
NOTE: Four rivets with ⁄" grip range can be used in place of the two middle and two lower screws on laminated
walls.
286576
286576
266148
Possible
screw / rivet
locations
Fig. 1 Fig. 2
Fig. 3
Fig. 4

Rev: 09.19.2016 Page 2 TI-147
MANUAL AWNING INSTALLATION INSTRUCTIONS
TI-147
AWNINGS
Securing The Fabric
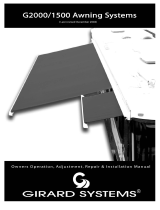
1. Roll the awning in and out several times to ensure that the fabric is square on the roll tube.
2. Secure the fabric in the awning rail by installing a #6 x ½” hex head screw through the fabric cord and
fabric 1” inside the edge of the fabric on both sides (Fig. 5).
NOTE: Seal all wall penetrations to protect against water intrusion (Fig. 6).
NOTE: All Solera Awnings 21' and under DO NOT require a center support or cradle.
Fig. 5
Fig. 6
As a supplier of components to the RV industry, safety, education and customer satisfaction are our primary concerns. Should you
have any questions, please do not hesitate to contact us at (574) 537-8900 or by email at [email protected]. Self-help tips,
technical documents, product videos and a training class schedule are available at www.lci1.com or by downloading the MyLCI app.
/