
HAI KU:
TANK:
When the tank is full
the water stops
and no sound is heard
VALVE:
When valve is off
no flow will happen
the water stops
EMPTY:
when tank is empty
the pressure is low
and the water trickles
PIERCED TUBE:
when hole is small
the water trembles
and little is seen
MEMBRANE SEDIMENT:
when sediment is high
the flow valve is adjusted
or the water slows
SOUND:
when drain tube is high
sound is heard
of water across the room
FILTER CHANGE:
when TDS is high
and the flow recedes
filters change
THE WATER:
when TDS is not
the water is drunk
and bodies smile
LEAKS:
when tape is lacking
tube or connector loose
water drips
TROUBLE SHOOTING:
It's okay to email us but you might get instant results by trying the suggestions below. All
problems are fixable and they all will show up in the first 24-48 hours after the system is
fully charged. We can also call you if you need more extensive help over the phone.
"I have leakage from a push-in fitting” The push-ins almost never leak. Try pushing
the line in harder. Take the line out and check the end of the tube. Is it a clean cut? If not,
take a pair of sharp scissors (or a sharp knife) and cut it cleanly. Push in again... firmly.
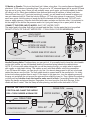
"The system is not making water" This is almost always a psi problem. First question...
"Are you on well water?" If so, then kick the regulator up. Check the psi of the house by
the tank method (described above). 40 psi is about as low as you can go. If the psi is low
it often is a poor hole on the feed water pipe. Drill it out. If you have sufficient psi to the IN
side of the pre-filters, then check the following:
a) Check to see if the flow restrictor is at a 90 degree to the line ("normal position").
b) Check to see if the water is flowing out the yellow discharge line...if so, then the
membrane is getting water.
c) Disconnect the blue line from the in side of the auto shut-off valve (that thing with
four connectors). If water is coming out, the RO is producing and the problem is between
there and the faucet. Maybe a defective auto shut-off valve.
d) If the yellow line is flowing and the blue is not, maybe blocked - check valve at RO
housing. There are two outlets on the out end of the RO Membrane. One goes to the
discharge saddle and the other is purified water.
e) If unit has been in service for a while, the problem is probably clogged filters. Pull
the filters. Test them one at a time by putting them into the first filter position and see if it
flows. Clogged filters are usually only associated with well water or with really turbid
water.
f) The RO Membrane has silted up. Very rare unless very poor feed water. The RO
Membrane is self-flushing. Try flushing the membrane by putting the Flow Restrictor in
the "open" position. This will allow all of the flow to wash the membrane off.
"My filters are leaking" Loose O-Ring. Take housing off and make sure they are
properly aligned. Housing not tight enough...tighten. DO NOT use plumbers gunk here...
the housings are supposed to seal.
"I have leakage from a screw-in connector"
a) Not tight enough...gently apply pressure...too much and you will strip the threads.
b) If that does not work, remove and apply Teflon Tape or Plumber's Joint
Compound.
“I have some leakage coming from the tank valve"
a) If from the top: tighten screw at the top
B) If from the middle: tighten the compression nut all the way
C) If from the bottom: tighten gently, or remove and apply Joint Compound or Teflon
tape the re-install the fitting.
12
2006 VITALBODIES.COM©
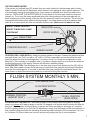
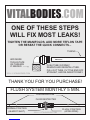
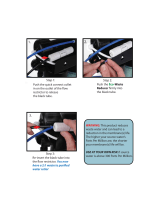
TUBING
PUSH TUBE IN FIRMLY.
REMOVE AND REINSTALL TUBE.
PULL OUT TUBE, CUT THE END OFF
STRAIGHT, AND RE-INSERT FIRMLY
ADD MORE
TEFLON TAPE
ON THREADS
IF NEEDED
ONE OF THESE STEPS WILL FIX MOST LEAKS
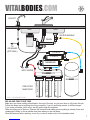
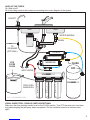
THE MANIFOLDS: The three large, main manifolds simply need to be unscrewed. Think of them like
big caps. The filter wrench will make this easy - it has a round end with a handle. Just slide the round
opening around the manifold and twist counter clockwise. The manifolds will be REALLY full of water,
so plan for some dripping/spilling. If you unscrew them somewhat carefully it shouldn't make too
much of a mess. A pan or big bowl and some towels should be all you need. When you take the
manifolds off, dump out the water, dump out the old filter (without touching it) and clean the manifold.
Then slide in a new filter. EACH FILTER LOOKS DIFFERENT so simply replace them in order. Refer
to your notes as needed. Then simply screw the manifold back on.
RO MEMBRANE: You should not need to change the RO MEMBRANE at this time. It gets changed
about once every three years or when it fails to perform properly. This can help be determined with a
TDS Meter.
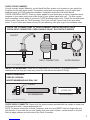
THE DI FILTER AND FINAL TASTE FILTER: The fifth filter is the de-ionizer (DI) and the final 6th
filter is for taste and odors. These come off in a slightly different way. There is a fitting on each end
that screws into the filter. Take the tubes out of the fittings - to do this you press the ring that is around
the tube end (and inside the fitting) down into the fitting, this will allow the tube to easily pull straight
out. Then unscrew the fittings, discard the old filter and screw the fittings into the new filter. Finally,
plug your tubes back in - just be sure to press them in firmly until they seat. If you system came with a
DI housing that is filled with resin, discard the resin not the housing.
Double check that everything is hooked up and the pressure tank is STILL OFF.
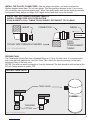
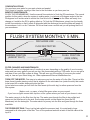
KEEPING THE PRESSURE TANK AND RO CLEAN: If you can, now that you have changed the
filters and hooked up everything, it is helpful to FLUSH water through the three manifolds and out into
a bucket or the drain. To keep the RO membrane and tank clean will require unhooking the line that
goes from the manifolds to the fourth (RO) filter. This tube is what should be put in the sink or bucket
to allow water to flush through. The point of this is to keep the charcoal from the new filters from going
into the RO filter during a filter change or installation. When you first flush water through the NEW
filters in the three manifolds, the filters release a cloud of charcoal. This is normal, just flush the
manifold until the water no longer has black coming out of it. Then simply connect the manifold to the
RO Membrane again. The tank is left turned off to keep it clean. Now that you have routed all
charcoal away from the tank and RO you need to re-connect the water line that comes from the
manifolds to the fourth (RO) filter.
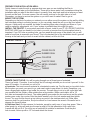
TESTING AND FLUSHING: Double check that everything is hooked up and the pressure tank is
TURNED ON. Check for leaks as you go. They are almost always easy to fix, if there are any. Just
turn off the water again and tighten what is leaking. Usually something is not tight enough or pushed
in enough. Turn the water on and check it again. Next you will need to flush water through the whole
system. To do so make sure the water going to the filter system is on and the little sink faucet is open.
Flush the system for three hours or, if you have a TDS meter, until the meter reads zero or as low as
it seems like it is going to go. When the filters are new there is charcoal and other residues that need
to be rinsed through and you do not want to drink this. Once the systems is flushed flush the tank. To
flush the tank you must turn off the feed water and open the little faucet. The tank pressure will make
the water flow even if the feed water is off. Turn the feed water back on and shut the little faucet to fill
the tank again.
NOTE: You should not need to change the RO Membrane until the TDS meter lets you know the filter
is no longer filtering. You may want to print this page so you can have these instructions at hand. Let
us know if you need any other information.
11
VITALBODIES.COM


 1
1
 2
2
 3
3
 4
4
 5
5
 6
6
 7
7
 8
8
 9
9
 10
10
 11
11
 12
12
 13
13
 14
14
 15
15
 16
16


 Hydrologic Purification Systems Stealth-RO Eco Waste Reducer Owner's manual
Waterdrop -G3P600 Reverse Osmosis Water Filter User manual
 Aquverse AQVR5-K User manual
OmniFilter RO2000 Series B Installation & Service Manual
 Aquasafe Home II COMBO Installation Instructions Manual
US Water Cobalt RO User manual
 Excalibur Water Systems EWR 5075 User manual
 HYDRONIX Hydro Guard HDGT-45 Installation Instructions Manual
 APEC Water Ultimate Installation guide
Proline Gold Installation & Service Manual


