Page is loading ...

Biblioteca Classic
BOOKSHELF WITH STAGGERED SHELVES
RTA-058
Carefully review assembly and care instructions before using this product. Save this document for future reference.
Thank you for choosing Sunnydaze Decor. We stand behind our brand and the quality of the items we sell.
Replacement parts or products will be sent at our discretion within the 1-year warranty period. Proof of purchase, with
the date of purchase as well as photos of the merchandise defect, must be provided. Photos are used to determine
the cause of defects and for future quality control. Register your warranty at https://tiny.cc/SunnydazeWarranty
If you have any questions, comments or concerns, feel free to contact us by phone at 833-982-1977, by email:
customerservice@sunnydazedecor.com, or via our contact us page at https://tiny.cc/SunnydazeContact
Purchase Date: / / Order/Customer Reference Number:
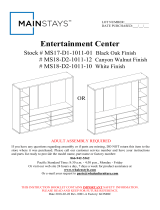
ABottom Panel 1
BLarge Shelf 1
CLeft Panel 1
DRight Panel 1
ELeft Shelf 3
FRight Shelf 3
GTop Back Panel 1
HBottom Back Panel 1
IToe Board 2
JTop Panel 1
KDivider Panel 1
Inspect packaging to ensure all
parts are accounted for before
disposing of packing materials.
1Wood Dowel 40
2Spreading Bolt 20
3Cam Lock 20
4Tack Glide 6
5Cover Cap 20
6Corner Brace 2
7
M6 x 9/16"
Screw 2
85/32" x 1" Screw 2
9Wall Anchor 2
(not included)
Phillips Screwdriver
Rubber Mallet
Power Drill
with 1/4" Drill Bit
CHOKING HAZARD — This item contains small parts that can be swallowed. Keep children and pets away during assembly.
WARNING
Page 1 / 710/2022

INTRODUCTION
Instrucciones
Instructions
Read the manual carefully to ensure you fully understand
all use, care, assembly, and safety information.
Read this manual carefully and
follow the assembly instructions
in the order listed. Pay close
attention to assembly drawings.
Regularly clean with a clean
accumulation.
Do not paint the unit.
Do not use abrasive materials or
cleaners to clean the furniture;
only use a slightly moistened cloth.
Indoor use only.
Do not expose the furniture to
heat or humidity.
When cleaning nearby the
furniture, do not allow contact
with water or cleaners as they
can deteriorate the furniture.
Do not allow metal components
to come in contact with water or
cleaners as it may cause rust and
staining.
dry surface.
Use a soft, protective barrier when
assembling the furniture.
TIP: Use the box carton as a
protective layer to separate and
protect the parts from scratches and
other damage during assembly.
Do not push or drag furniture as
doing so may damage the unit.
Only move furniture when it is empty.
Always ask for help when moving
furniture.
Avoid Accidents - Do not climb, sit
or stand on the furniture.
Do not allow children to play on or
inside the furniture.
Keep sharp objects away as they
may scratch or damage the unit.
Do not use the furniture as a writing
surface without a padded barrier.
Biblioteca Classic
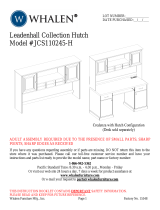
Install wood dowels by gently tapping
them into the designated hole using a
rubber mallet.
pressing them into the hole or gently
tapping with a rubber mallet until the
Align the cam lock opening (arrow)
with the pre-drilled hole on the side
of the panel. Use a screwdriver to
adjust alignment as needed.
Wood Dowel Spreading Bolt Cam Lock
IMPORTANT INSTALLATION INFORMATION
For the stability of the unit, it is important that furniture connectors are installed correctly.
See drawings and tips below for proper installation.
Page 2 / 710/2022

Biblioteca Classic
ASSEMBLY
STEP 1
C: 1
1: 1
2: 5
3: 1
4: 2
Review all steps carefully and understand assembly before beginning.
STEP 2
D: 1
1: 1
2: 5
3: 1
4: 2
STEP 3
A: 1
1: 2
STEP 5
B: 1
1: 2
2: 1
Spreading Bolts (2), one Cam
Lock (3), and two Tack Glides (4)
into Left Panel (C) as shown.
Spreading Bolts (2), one Cam
Lock (3), and two Tack Glides (4)
into Right Panel (D) as shown.
Install two Wood Dowels (1) into
Bottom Panel (A) as shown.
Turn the panel over.
Install two Cam Locks (3) into
Bottom Panel (A) as shown.
Install two Wood Dowels (1), and
one Spreading Bolt (2) into Large
Shelf (B) as shown.
Turn the panel over.
Install two Cam Locks (3) into
Large Shelf (B) as shown.
STEP 6
3: 2
STEP 4
3: 2
Page 3 / 710/2022

STEP 10
F: 3
1: 6
3: 6
STEP 7
G: 1
1: 2
2: 6
STEP 8
3: 2
STEP 9
E: 3
1: 6
3: 6
STEP 11
J: 1
2: 3
Install two Wood Dowels (1) and
six Spreading Bolts (2) into Top
Back Panel (G) as shown.
Turn the panel over.
Install two Cam Locks (3) into Top
Back Panel (G) as shown.
Install two Wood Dowels (1) and
two Cam Locks (3) into Left Shelf
(E) as shown.
Repeat this step for the two
remaining Left Shelves (E).
Install two Wood Dowels (1) and
two Cam Locks (3) into Right Shelf
(F) as shown.
Repeat this step for the two
remaining Right Shelves (F).
Install three Spreading Bolts (2)
into Top Panel (J) as shown.
Install six Wood Dowels (1) and
one Tack Glide (4) into Toe Board
(I) as shown.
Repeat this step with the remaining
Toe Board (I).
Biblioteca Classic
STEP 12
I: 2
1: 12
4: 2
Page 4 / 710/2022

Biblioteca Classic
STEP 14
K: 1
1: 4
STEP 17STEP 16 STEP 18
Install four Wood Dowels (1) into
Bottom Back Panel (H) as shown.
Install four Wood Dowels (1) into
Divider Panel (K) as shown.
Align Bottom Panel (A) with the
dowels in two Toe Boards (I) as
shown.
Place Divider Panel (K) and
Bottom Back Panel (H) onto
Bottom Panel (A) as shown.
With the spreading bolt facing
upward, place Large Shelf (B)
onto Divider Panel (K) and Bottom
Back Panel (H).
Align three Shelves (E) with the
left side of Top Back Panel (G).
Use a screwdriver to turn the cam
lock until it locks onto the head of
the spreading bolt.
Repeat to secure three Right
Shelves (F) to the right side of Top
Back Panel (G).
STEP 13
H: 1
1: 4
STEP 15
NOTE: Components assembled during
Page 5 / 710/2022

Biblioteca Classic
STEP 22
5: 20
6: 2
7: 2
8: 2
9: 2
Cover all cam locks
using Cover Caps (5).
STEP 20
STEP 19 STEP 21
Align the bottom of Top Back
Panel (G) with Large Shelf (B) and
secure the cam lock.
Align Left Panel (C) and Right
Panel (D) with the shelves and
secure all the cam locks.
Place Top Panel (J) onto the top of
the unit and secure the cam locks.
With assistance, lift the unit
upright.
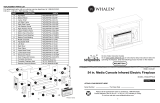
IMPORTANT: The included wall anchor is suitable for drywall.
Select a drill bit that is suited for your wall material and is smaller
than the wall anchor; if the drill bit is too large, the tipover restraint
system will be faulty. If in doubt about installing the tipover restraint,
Carefully measure and mark the location of screw installation and
pilot holes before drilling. Measure twice, drill once!
WARNING: Check for pipes and electrical wiring before drilling.
• Ensuring it is flush with the back of the side panel, and
approximately 95mm from the top of the unit, install one Corner
Brace (6) to Left Panel (C) using one M6 x 9/16" Screw (7).
Repeat this step to install the second brace to Right Panel (D).
• Place the unit against the wall and use a pencil to mark the position
for drilling the pilot holes.
• Move the unit away from the wall.
• Drill the pilot holes to the depth of the wall anchor.
• Insert two Wall Anchors (9) into the pilot holes, ensuring the
openings are flush with the wall.
• Align the unit with the wall anchors and use two 5/32" x 1" Screws
(8) to secure the unit to the wall.
Assistance is recommended for moving furniture.
Assistance recommended for this step.
Tipover System Installation
Page 6 / 710/2022

NOTICE:
Manufacturer and seller expressly disclaim any and all liability from personal injury, property damage
or loss, whether direct or indirect, or incidental, resulting from the incorrect attachment, improper use,
SAFETY STATEMENTS & WARNINGS
• For indoor use only.
• This product is for residential use only; institutional or commercial use will automatically void the warranty.
• Ensure all fittings are tight before use. Periodically check fittings to ensure they remain tight.
• Only use this unit on a flat, level surface.
• Never sit, stand or climb on the unit.
• Never allow children to stand, climb, or hang on the shelves.
• Do not place hot items or liquids directly on the furniture.
• Never use chemical cleaning products or polishes as doing so may damage the finish.
• Do not exceed the weight capacity of the furniture.
• Do not overload shelves as doing so may cause them to sag.
• Always place the heaviest items on the lowest shelves.
• Never put a television on this item.
• Avoid long-term exposure to sunlight.
• Avoid placing the unit near heating or cooling vents as forced air is very drying and can damage the unit.
• Do not use furniture as a writing surface without a padded barrier to protect the surface.
If you experience issues with assembly or the product was damaged during shipping,
please contact our customer service team directly through one of the methods mentioned at the top of page 1.
Please have the item number and order information ready to expedite response time.
Biblioteca Classic Page 7 / 710/2022
/