Page is loading ...

THIS INSTRUCTION BOOKLET CONTAINS IMPORTANT SAFETY INFORMATION.
PLEASE READ AND KEEP FOR FUTURE REFERENCE.
Date 2018-02-28 Rev. 0001-A Factory: KONRIC
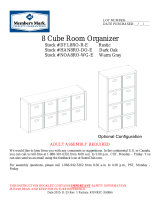
Entertainment Center
Stock # MS17-D1-1011-01 Black Oak Finish
# MS18-D2-1011-12 Canyon Walnut Finish
# MS18-D2-1011-10 White Finish
ADULT ASSEMBLY REQUIRED
If you have any questions regarding assembly or if parts are missing, DO NOT return this item to the
store where it was purchased. Please call our customer service number and have your instructions
and parts list ready to provide the model name, part name or factory number:
866-942-5362
Pacific Standard Time: 8:30 a.m. - 4:30 p.m., Monday - Friday
Or visit our web site 24 hours a day, 7 days a week for product assistance at
www.whalenstyle.com
Or e-mail your request to parts@whalenfurniture.com
LOT NUMBER:
DATE PURCHASED: / /
OR

2
MANUFACTURER: Whalen Furniture Manufacturing
CATALOG: Entertainment Center
MADE IN CHINA
SPECIAL NOTE
Please read the instruction sheets completely before assembly. Examine all packaging
material before discarding carton. Remove any remaining staples from the carton before
discarding. Remove all parts from carton and separate into groups as indicated on part
list. Please ensure all parts are included prior to assembly. Use of power tools to
complete assembly is not recommended.
M A X I M U M R E C O M M E N D E D W E I G H T L O A D S
MAXIMUM LOAD 50 lb. (22.7 kg)
FITS UP TO MOST 55” FLAT PANEL TVs
MAXIMUM LOAD 135 lb. (61.3 kg)
THIS UNIT IS NOT INTENDED FOR USE WITH CRT TVS. USE ONLY WITH FLAT
PANEL TVS AND AUDIO/VIDEO EQUIPMENT MEETING RECOMMENDED SIZE AND WEIGHT LIMITS.
NEVER USE WITH LARGER/HEAVIER THAN RECOMMENDED FLAT PANEL TVS OR EQUIPMENT. TO
AVOID INSTABILITY, PLACE FLAT PANEL TV IN THE CENTER OF THE UNIT; THE BASE OF THE
TELEVISION MUST BE ABLE TO REST ON THE SUPPORTING SURFACE OF THE UNIT WITHOUT
OVER-HANGING THE EDGES. IMPROPERLY POSITIONED FLAT PANEL TVS, OR FLAT PANEL TVS
INCLUDING OTHER EQUIPMENT THAT EXCEED RECOMMENDED SIZE AND WEIGHT LIMITS
COULD FALL OFF OR BREAK THE UNIT, CAUSING POSSIBLE SERIOUS INJURY.
PLACE TV BEHIND THE STOPPER

3
IMPORTANT
Before you begin: Open, identify and count all parts prior to assembly. Lay out parts on a flat and non-
abrasive surface. You will need the parts identified on page 4 and 5 of this instruction manual.
NOTE: IT IS VERY IMPORTANT TO USE GLUE WITH DOWELS. EXCESS GLUE CAN BE WIPED
OFF WITH DAMP CLOTH.
Insert the Dowel at least half way by tapping lightly with a rubber mallet, IF NECESSARY.
CAM LOCK SYSTEM OPERATION
HOW THE KNOCK DOWN (KD) ASSEMBLY SYSTEM WORKS
1. Screw the Cam Bolt into the threaded inserts on the panel. Connect both panels together; making sure Cam
Bolt goes into the pre-drilled hole on the end of panel for Cam Lock.
2. Insert the Cam Lock into the pre-drilled large hole on the panel. Make sure the arrow on the face of Cam
Lock faces out and points towards Cam Bolt.
3. Take a Phillips screwdriver and rotate the Cam Lock clockwise to lock the Cam Bolt in place.
4. Plug the Cam Lock Cover into the cross slot of the Cam Lock to conceal the Cam.
You are now ready to assemble the fireplace.
X
X
FINAL
1 2 43

4
Parts and Hardware List
Please read completely through the instructions and verify that all listed parts and hardware are present
before beginning assembly.
A- Top Panel (Qty. 1) B- Bottom Panel (Qty. 1)
C- Left Side Panel (Qty. 1) D- Right Side Panel (Qty. 1)
E- Large Divider Panel (Qty. 1) F- Small Divider Panel (Qty. 1)
G- Large Fixed Shelf (Qty. 1) H- Back Panel (Qty. 1)
I- Middle Small Fixed Shelf (Qty. 2) J- Top/Bottom Small Fixed Shelf (Qty. 2)
K- Middle Adjustable Shelf (Qty. 2) L- Side Adjustable Shelf (Qty. 2) M- Stop Rail (Qty. 1)

5
Parts and Hardware List
Please read completely through the instructions and verify that all listed parts and hardware are present
before beginning assembly.
(1) Cam Lock (Qty. 24+1 extra) (2) Cam Bolt (Qty. 24+1 extra)
(3) M15 x 40 mm Wood Dowel (4) M6 x 30 mm Wood Dowel
(Qty. 8+1 extra) (Qty. 40+2 extra)
(5) 5/16" x 40 mm Bolt (6) Lock Washer (7) Flat Washer
(Qty. 8+1 extra) (Qty. 8+1 extra) (Qty. 8+1 extra)
(8) Plastic Cap (Qty. 4+1 extra) (9) Shelf Pin (Qty. 16+1 extra) Hex Wrench (Qty. 1)
Glue Touch-up Pen (Qty. 1) Tipping Restraint Hardware Kit (Qty. 2)
(Qty. 1) (Not included for White Finish) (Included in plastic bag)
Tools required: Hex wrench (provided), Phillips screwdriver and hammer (not provided).

6
Assembly Instructions
1. Unpack the unit and confirm that you have all the hardware and required parts. Assemble the unit on a
carpeted floor or the empty carton to avoid any scratch.
2. Securely screw the Cam Bolts (2) into the designated small holes on the Bottom Panel (B) and the Side
Panels (C and D) using a Phillips screwdriver.
Cam Bolt
(10 used in this step)
②
D
C
B
2

7
Assembly Instructions
3. Securely screw six Cam Bolts (2) into the designated small holes on the Large Divider Panel (E) on
both sides.
Cam Bolt
(6 used in this step)
②
2
E
E

8
Assembly Instructions
4. Securely screw four Cam Bolts (2) into the designated small holes on the Large Fixed Shelf (G) on both
sides.
Cam Bolt
(4 used in this step)
②
2
G
G

9
Assembly Instructions
NOTE: According to your wall structure, you can build the tower at left or right side.
5. Depend on the tower configuration you preferred, securely screw four Cam Bolts (2) into the designated
small holes on the Top Panel (A) as shown.
A
A
2
Cam Bolt
(4 used in this step)
②
OR

10
Assembly Instructions
6. Attach two Middle Small Fixed Shelves (I) to the Large Divider Panel (E) with two 30 mm Wood
Dowels (4) and two Cam Locks (1) in each (Refer to page 3 on Cam Lock system operation
supplement).
7. Attach two Top/Bottom Small Fixed Shelves (J) to the Large Divider Panel (E) with four 30 mm Wood
Dowels (4).
8. Repeat the same procedure to attach the Left Side Panel (C) at the opposite end.
J
J
C
E
I
I
4
4
4
4
1
1
1
1
1
1
1
4
4
4
4
4
4
4
UP
Cam Lock
(8 used in this step)
①
M6 x 30 mm Wood Dowel
(24 used in this step)
④

11
Assembly Instructions
9. Attach the Large Fixed Shelf (G) to the Large Divider Panel (E) and Right Side Panel (D) with four 30
mm Wood Dowels (4) and four Cam Locks (1).
G
1
1
4
4
C
E
D
UP
1
1
1
1
4
D
C
E
G
4
1
1
Cam Lock
(4 used in this step)
①
OR
M6 x 30 mm Wood Dowel
(4 used in this step)
④

12
Assembly Instructions
10. Attach the Small Divider Panel (F) to the Large Fixed Shelf (G) with two 30 mm Wood Dowels (4) and
two Cam Locks (1).
UP
C
D
G
F
E
1
4
Cam Lock
(2 used in this step)
①
M6 x 30 mm Wood Dowel
(2 used in this step)
④

13
Assembly Instructions
11. Attach the Back Panel (H) to the Large Fixed Shelf (G) with two 30 mm Wood Dowels (4) as shown.
UP
4
G
F
D
C
E
H
M6 x 30 mm Wood Dowel
(2 used in this step)
④

14
Assembly Instructions
12. Insert four 40 mm Wood Dowels (3) into the bottom holes on the Side Panels (C and D) and insert four
30 mm Wood Dowels (4) into the bottom holes on the Divider Panels (E and F). Position the Bottom
Panel (B) onto the inserted wood dowels and attach to the Divider Panels (E and F) with four Cam
Locks (1).
Cam Lock
(4 used in this step)
①
M6 x 30 mm Wood Dowel
(4 used in this step)
④
M15x 40 mm Wood Dowel
(4 used in this step)
③
3
3
D
H
1
1
UP
C
E
G
F
B
4
4

15
Assembly Instructions
13. Fasten the Bottom Panel (B) to the Side Panels (C and D) with four Bolts (5) and four Washers (6 and 7).
Lock Washer
(4 used in this step)
⑥
Flat Washer
(4 used in this step)
⑦
B
UP
C
E
G
F
D
H
5
6
7
6
7
5
5/16" x 40 mm Bolt
(4 used in this step)
⑤

16
Assembly Instructions
14. Insert four 40 mm Wood Dowels (3) into the top holes on the Side Panels (C and D) and insert four 30 mm
Wood Dowels (4) into the top holes on the Large Divider Panel (E) and the Back Panel (H). Position the
Top Panel (A) onto the inserted wood dowels and attach to the Large Divider Panel (E) with two Cam
Locks (1).
Cam Lock
(2 used in this step)
①
M6 x 30 mm Wood Dowel
(4 used in this step)
④
M15x 40 mm Wood Dowel
(4 used in this step)
③
B
UP
C
E
G
F
D
H
A
3
3
4
4
1
1

17
Assembly Instructions
15. Fasten the Top Panel (A) to the Side Panels (C and D) with four Bolts (5) and four Washers (6 and 7).
16. Cover the countersunk holes on Top Panel (A) by inserting four Plastic Caps (8). Gently tap the Plastic Cap
with a rubber mallet to ensure they are fully seated.
B
UP
E
G
F
D
H
C
A
5
6
7
8
Plastic Cap
(4 used in this step)
⑧
Flat Washer
(4 used in this step)
⑦
5/16" x 40 mm Bolt
(4 used in this step)
⑤
Lock Washer
(4 used in this step)
⑥

18
Assembly Instructions
17. Ask for assistance to stand the unit upright.
18. Fasten the Back Panel (H) to the Top Panel (A) and the Large Fixed Shelf (G) with four Cam Locks (1).
Cam Lock
(4 used in this step)
①
A
H
G
1
1
1
1

19
Assembly Instructions
19. Insert the Shelf Pins (9) into the desired holes in the sides of the compartments. Make sure you place the
four Shelf Pins in the same level so the shelf is not tilted. Tilt and rest the Adjustable Shelves (K and L)
onto the Shelf Pins (9) with the end notches of the Shelf fit onto the Shelf Pins properly.
Shelf Pin
(16 used in this step)
⑨
D
E
F
K
K
L
L
10
9
K/L

20
Assembly Instructions
NOTE: You must install the strip stopper to prevent the TV from tipping when placing your flat panel
television directly on the console.
20. Remove the paper backing from the Stop Rail (M), then properly align the Stop Rail with the top edge
of the stopper template on the Large Fixed Shelf (G). Press down on the Stop Rail to help adhesion.
21. Carefully remove the stopper template from the Large Fixed Shelf (G).
M
M
M
G
G
/