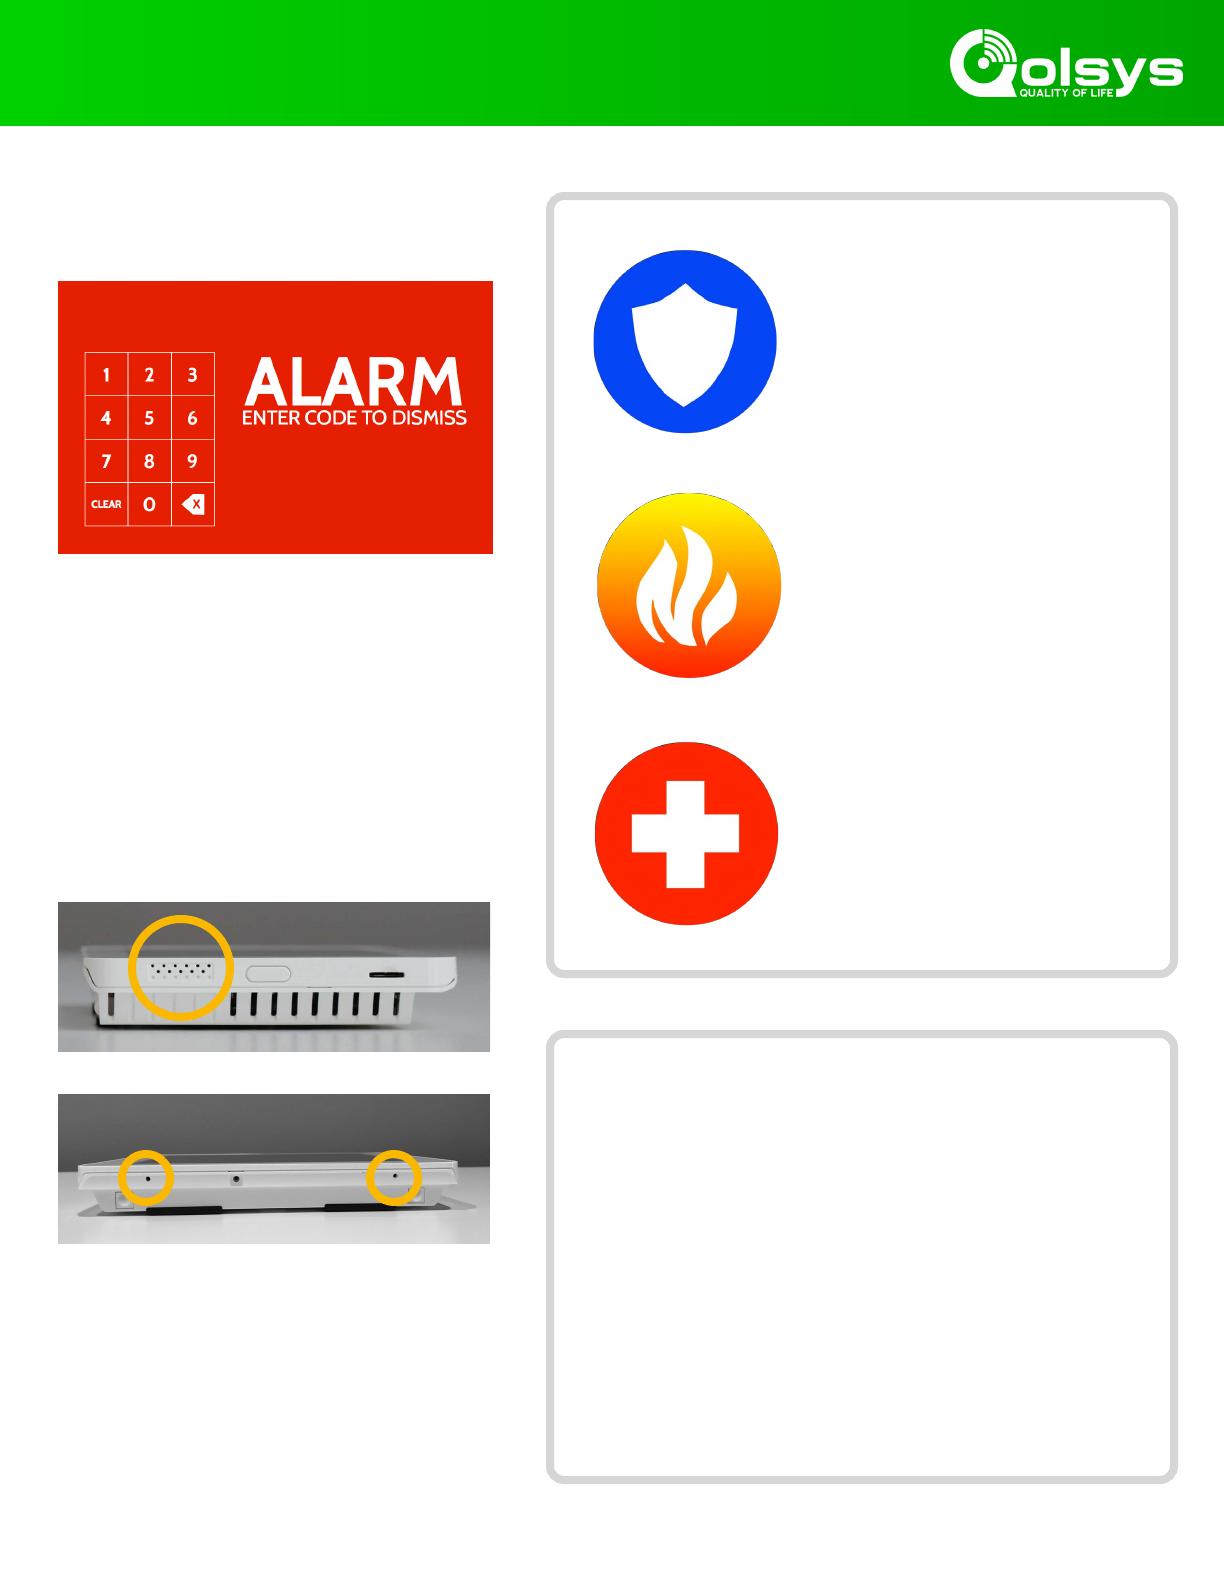
We hope you enjoy your new IQ Panel security and smart home platform. It will serve as the “brain
of your home for many years to come. With it you can control your lights, locks, thermostat, security
and much more.
You won’t need a manual to operate your IQ Panel, but you can use this guide to learn more about
the features of this amazing new device. We hope it will add to your homes decor and make your
home smarter and more energy efficient!
-The Qolsys team
SECURITY &
SMARTHOME
Document: IQP23-8–18
Revised on: 3/23/2020
Software Version: 2.5.1
IQ PANEL USER GUIDE
GETTING STARTED
Let’s start by connecting your power. (Note: If your panel has been professionally installed, skip this page)
Plug in the power connector
Route the wire behind the
retainer clip
Insert the wire into the strain-
relief
Now let’s put on your cover and attach the table stand.
Place the top of the cover onto
the panel’s back plate
Push the cover down until it
snaps in place
Insert the table stand into the
mounting holes and push upward
until it snaps into place
Plug in your panel, power it on
Plug in the power supply
provided with your panel
Push and hold the standby
button on the side of the panel
for 3 seconds
Once the panel powers up, the
home screen will appear.
USING YOUR SYSTEM: BASICS
Swipe down to
access settings
Touch an icon to
view its contents
Swipe a page away
when you are done
Navigation
Move from page to page and
access information on each
page using finger touches,
swipes, and scrolling.
Scroll up/down to reveal
additional content on a page
Dismiss
To dismiss a pop up when
you are done, swipe left or
right to dismiss.
USING YOUR SYSTEM: MESSAGE CENTER
Contact
Easy access to your providers contact information, including phone
number, email, and website.
Video Tutorials
Watch videos to help you understand your system and service better.
To watch a video, touch a thumbnail. Video will begin playing
automatically.
Video controls appear on screen, To exit, touch the “back” button.
Alerts/Alarms
Alerts and alarms from your system like low battery alerts, alarms, and
power failures.
To dismiss, touch the circle to the left of the message and touch “OK” to
remove it from your message center.
You can also remove all messages at once by touching “Acknowledge
All”
11/11/20
Message Center
Access your message center by touching the icon in the upper right corner. Once its open you’ll see three
sections: Contact, Video Tutorials, Alerts/Alarms, and Messages.
(Note: This icon may appear different than shown, depending on your providers settings)
Messages
Messages from your provider will also appear here.
To dismiss, touch the circle to the left of the message and touch “OK” to
remove it from your message center.
You can also remove all messages at once by touching “Acknowledge All”
USING YOUR SYSTEM: EMERGENCY PANIC
Emergency Panic
If you have a police, fire, or medical emergency and your system is not armed or a sensor has not been triggered, you can
send a manual emergency panic by touching the icon in the bottom right corner and selecting the type of emergency you are
experiencing. (Note: based on your location, not all options may appear or be available to you.)
Two-Way Voice
If your provider offers Two-Way Voice service
you’ll be able to speak to the monitoring
agent from the speakers and microphone
built right into your panel.
Theres a
stranger in my
backyard!
To send a police or emergency panic
without sounding the siren, using the
“Silent Alarm” at the bottom of the screen
Alarm Types
Canceling an Emergency Panic
To cancel an emergency panic, touch the “cancel”
button and enter a valid user code.
X
Cancel
Police: When touched it triggers the “Police
siren pattern and sends a police emergency signal
to your provider’s monitoring station.
Fire: When touched it triggers the “Fire” siren
pattern and sends a fire emergency signal to your
providers monitoring station.
Emergency: When touched it triggers the
“Emergency” siren pattern and sends an
emergency signal to your provider’s monitoring
station.
Sensor status:
USING YOUR SYSTEM: ARMING
Arming Options
Quickly choose from “stay” or “away
Touch to access
arming options
Sensor List
Open or active sensors
appear in a scrollable list
on the right. Touch the
icons in the upper right
corner to switch your view
to either “Active” or “All”
sensors.
?
Open
Closed
Active
Idle
Unreachable
Tampered
Synchronizing
See add’l options by touching
the “>>” icon on the right
Additional Arming Options
Select these options before choosing your arming type
Arming Stay
Arms doors and windows only
Arming Away
Arms doors, windows and motions
Additional Options
View additional arming options by touching the “>>”
icon on the right side.
Bypass
Touch the circle next to a sensor to bypass it during
the arming sequence
Exit Sounds
The panel beeps as the timer counts down. Silence
these beeps before you choose the arming type.
Entry Delay
The panel will give you time to disarm once a “delay
door” has been opened. Turn this off with a touch.
USING YOUR SYSTEM: DISARMING
Touch to disarm
panel manually
Disarming your System
When your system is armed, there are multiple ways to disarm:
Disarming Manually
To manually disarm your panel, touch the icon in the center of the
screen. You will be prompted to enter a valid code. Failure to enter a
valid code with the time required will trigger the alarm.
When someone manually disarms the panel the built in camera
will take a photo and save it on the camera page along with the
date, time, and name of the user.
Disarming Remotely
To remotely disarm your panel, login to your mobile app and touch the
disarm” icon.
Disarming Automatically
You can connect your smartphone using Bluetooth and it will
automatically disarm your IQ Panel from an “Armed Away” state when
it comes within range. To connect a phone, follow the steps shown.
*You can connect up to five (5) smartphones for
touchless disarming. You may need to enable this
setting in your Bluetooth settings.
Bluetooth
Touchless
Disarming
Step 1:
Swipe down to
access settings tray
Step 2:
Touch “SETTINGS”
Step 4:
Enter your code
Step 5:
Touch “BLUETOOTH DEVICES”
Step 3:
Touch “ADVANCED SETTINGS”
Pair
Step 7:
Touch “ADD DEVICE” The panel will
begin searching for new devices in
range (It may take up to 60 seconds)
Step 9:
Touch “Pair”
Step 10:
When the messages appear on your
phone and IQ Panel, ensure the numbers
match and touch “Pair” on each.
Bluetooth Pairing Request
“IQ-Panel” would like to pair
with your phone. Confirm that
the code “12345” is shown on
the “IQ-Panel”.
Cancel
Pair
BLUETOOTH PAIRING REQUEST
CANCEL
PAIR
Device: My Phone
Pairing Code: 12345
Step 6:
Put your Bluetooth device in “pairing
mode.
Step 8:
Select your device from the list
Download the
Alarm.com app
in the App store
or Google Play
Note: Remote disarming has not been evaluated by UL/cUL
ALARM EVENTS
Alarms
If the alarm is triggered the IQ Panel will sound the
siren and display a red alarm screen.
Police
When the system is armed and the
alarm is tripped or you touch the
“Police” emergency button the alarm
sounds with the “Intrusion” siren and
then activates the Two-Way Voice
microphone and speaker, if available.
Fire
When a Smoke or Carbon Monoxide
detector is triggered or someone taps
the “Fire” panic on the IQ Panel the
alarm sounds with the “Fire” siren and
then activates the Two-Way Voice
microphone and speaker, if available.
Emergency
When you press an IQ Pendant or
trigger an emergency signal from the
IQ Panel, the alarm sounds with the
“Emergency” siren and then activates
the Two-Way Voice microphone and
speaker.
Speakers are located on each side of the panel
Microphones are located on the bottom of the panel
Two Way Voice
The built in microphones on the bottom of the
panel and the Two-Way Voice speaker on the side
of the panel activate after a connection to the
monitoring station has been made.
If your provider offers monitoring service, the panel
will automatically contact your monitoring center
using the dual path LTE and Wi-Fi connection.
To disarm, touch the screen and enter your passcode.
Preventing false alarms:
False alarms are a terrible waste of your public service resources,
and can erode your relationship with local authorities. In some
areas, authorities even charge a fee for false dispatches.
Here’s some tips for avoiding false alarms:
-Use your system regularly, be comfortable with its operation.
-Make sure everyone who has access to your home has a valid
access code and is familiar with how to use the system.
-Ensure the doors you use the most are set up with delays to give
you enough time to disarm the system when you open a door.
-Test your system regularly
-Develop a routine.
-Use alternative methods for arming and disarming (mobile app,
bluetooth disarming, etc.)
False Alarms
In the event of a false alarm, press disarm and
enter your user code. If your system is monitored,
be ready to provide your verbal password to your
security providers monitoring agent if they contact
you. If you are NOT able to provide the correct
verbal passcode, the authorities may be contacted.
USING YOUR SYSTEM: CAMERA
Camera Page
Your IQ Panel’s built in camera captures photos in a variety of situations:
Disarm Photos
When the panel is disarmed manually, the built in camera takes a
photograph and saves it in the “ARM/DISARM” section. These
photos are accompanied by the username of the individual whos
code was used, the date, and the time.
Settings Photos
When someone attempts to access your panel settings with an
invalid code, the built in camera takes a photograph and saves it in
the “SETTINGS” section. These photos are accompanied by the
date and time.
Alarm Photos
When the alarm is triggered, the built in camera takes a photograph
and saves it in the “ALARMS” section.
1- View Photo
Touch a photo thumbnail on the right to
view it on the left.
2- Full Screen
Touch the photo on the left to view it
full screen. Touch it again to return to
the camera page.
Note: While viewing photos full screen
you can swipe left/right to view
additional photos
Alarm.com/Login
Get your username
and password from
your provider
Photos to your Phone
Click the “Image
Sensor” tab
Click “Rules &
Alerts
Click “Capture Alarm And
Disarm Images” to customize
Note: For supplementary use only, not part of the Fire and Security system
Alarm Videos
When the alarm is triggered, the built in camera will record up to a 4
minute video clip. This video is stored locally on the panel only.
1
2
3
3- Saving Photos to a Micro SD Card
When a Micro SD card is inserted in the panel, a SD card icon will
appear. Tab that icon to see options that will allow you to save
your photos and videos to the SD card. You can select individual
photos and videos or choose to “Save All”. Once you have
selected your photos, select “Copy to SdCard”.
USING YOUR SYSTEM: SETTINGS
Settings Tray
Access common settings by swiping down
from the top of the screen.
Messages & Alerts
Touch to access the message
center including your providers
contact information, video
tutorials, and system messages
Photo Frame
Touch to access the photo
frame where you can
customize the panel’s
screensaver
Clean Screen
Disables the screen for 30 seconds
to allow you to clean it without
accidentally touching anything.
(Touch the “standby” button on the
side of the panel to cancel)
Close Tray
Swipe up to close
the tray
Settings Page
From here you can adjust individual sound settings,
change your weather temperature from Fahrenheit
to Celsius, see the status of your security and
smart home devices, and more.
Advanced Settings
Only the Master code can access this area. From
here you can manage users, run system tests,
reboot your system, connect Bluetooth and Wi-Fi
and more.
HOW TO ACCESS:
SOUND
DISPLAY
SD CARD
WEATHER
TEMPERATURE
STATUS
Z-WAVE DEVICES
STATUS
OTHER Z-WAVE
DEVICES
AUTOMATION
ADVANCED
SETTINGS
ACTIVITY MONITOR
USING YOUR SYSTEM: ADVANCED SETTINGS
Advanced Settings: Can only be accessed using the Master code.
About
View important
information about your
system such as: current
software version, IMEI,
hardware version, etc. This
is a great place to look if
troubleshooting an issue
with Tech Support.
System Tests
Perform various system
test to ensure your system
is working properly. This is
another great place to go if
troubleshooting an
unknown issue with the
system.
Edit Sensor
Don’t like the names of
your sensors? Easily
customize your sensor
names from here. You can
also adjust the chime type
and turn Voice Prompts on
and off from here.
Panel Reboot
Use this option if needing
to restart your panel. If
youre experiencing
problems with your
system, try performing a
panel reboot. Often
times, a system restart
can help a system run
Power Down
Use this option if
needing to shut the
system down for any
reason. Shutting the
system down any other
way can cause potential
issues.
Bluetooth Devices
Easily turn on the
bluetooth radio from here.
This allows you to use the
touch-less disarming
feature. You can add,
delete and edit your
devices from here.
Wi-Fi
Connect the system to an
internet connection to ensure
the panel has a second path
of communication. This will
help speed up the
communication time to the
central station and greatly
improve speed when
controlling home automation.
Sound
From the sound menu,
you can adjust the
volumes to your panel
voices, beeps and
chimes, and video
tutorials. You can also
edit sensor chimes, Z-
Wave device prompts,
Trouble Beeps and
touch sounds.
Important Note
If for some reason you are unable to access the settings
screen and need to reboot the system, you can do a
hard reboot by holding the power button on the side for
30 seconds. This should only be done if absolutely
necessary.
!
For additional help and questions
on Advanced Settings, please
reach out to your security dealer.
IQ Remote Devices
From here, you can test
Remote Wi-Fi signal
strength and rediscover
Remotes that have lost
connection.
Access Point Settings
Enable and disable access
point for use with Wi-Fi
devices. Check with your
dealer before enabling or
disabling or you could cause
devices to loose connection.
User Management
Program up to 242
individual user codes for
each person that needs
access to the system.
Assign a name to each
code so that you know
who disarmed the
system.
Master Settings
Choose your first and
second preferred
languages to be toggled
from the settings tray (see
previous page) and require
dealer or installer
permission to access panel
settings
SETTINGS: PHOTO FRAME
Photo Frame
When your panel is not in use, it turns into a
customizable photo frame.
Touch “ADD”
Delete
Touch a photo to select it. Touch
“Delete” to delete it from your panel
Add Photos
To add your own photos:
1
3
4
Touch each photo you wish to use or choose
“Select All”
3
4
Save your Photos onto a Micro SD card in a
folder called “Photos
2
Insert your SD card into the slot on the side
of the panel
4
5
5
Choose either “Add” or “Replace
Add: Does not delete the photos already on
the panel, only adds the photos you selected
Replace: Deletes the photos already on the
panel and replaces them with the new
photos you selected
6
Wait at least 60 seconds after the photos
have copied to remove the SD Card
Settings
Inside settings you can choose whether you
want photos or a weather clock, if you want the
panel to turn itself off automatically in the
evenings, and more.
SETTINGS: ADDING A USER
Name
User Code
Confirm User Code
Type
Expiration Date
Add User
Enter Name
Please enter User Code
Please confirm User Code
User
Unlimited
Step 1:
Swipe down to access
settings tray
Step 2:
Touch “SETTINGS”
Step 4:
Enter your code*
Step 3:
Touch “ADVANCED
SETTINGS”
Step 5:
Touch “User Management
Add User
Step 6:
Touch “Add User
How to Add a New User
User Types
You can add up to 242 users to your system,
each with a custom name and access level
you allow.
Master: Access panel functions, camera, and
system settings.
User: Access panel functions, camera, but
NOT system settings.
Guest: Used to give arm and disarm access
to those users who will use the panel on a
temporary basis
Expiration Date: Choose a specific date that
will disable a user code automatically.
Notifications
By creating individual users, you can set up custom text
notifications when they access or use your system, keeping
you connected no matter where you are.
Add User Screen
Once on the “Add User” screen you can create a custom
name and user code and indicate whether you want this
person to be a Master, User, or Guest.
*Default master code is 1234. For security purposes this code should be
changed once the system has been installed in your home
SETTINGS: TESTING YOUR SYSTEM
Testing Regularly
You should test your system regularly to ensure it is operating at peak efficiency. The IQ Panel has a number
of tests built in that are easy to perform:
Step 1:
Swipe down to access
settings tray
Step 2:
Touch “SETTINGS”
Step 4:
Enter your master code*
Step 3:
Touch “ADVANCED
SETTINGS”
Step 5:
Touch “System Tests
How to Access System Tests
Wi-Fi Test
Run this test every 30 days or if the IQ Panel’s
Wi-Fi connection seems to be failing.
Encounter a Problem?
If you encounter a problem with your
system, contact your provider right
away.
Touch “Message Center” in the
upper right corner of your panel
to get your provider’s contact
information
Sensor Test
Run this test every 30 days. As you start the
test, open and close your doors, windows,
and move in front of your motion sensors to
ensure they work as expected.
Cellular/LTE Test
Run this test if your panel seems to have lost
its ability to send and receive signals.
Image Sensor Config
Run this test if your image sensors stop
working
Z-Wave Test
A series of Z-Wave tests to optimize your
smart home network. “Reconfigure network
is your most useful test, repairing your
network for you.
Dual Path Test
Run this test if your panel seems to have lost
its ability to send and receive signals.
Panel Glass Break Test
Use this to test your panel’s microphone
Panel Test
Use this every 30 days to test a variety of
panel functions
*Default master code is 1234. For security purposes this code should be
changed once the system has been installed in your home
1
USING YOUR SYSTEM: LIGHTS
Light Control
You can add up to 80 Z-Wave lights, lamp modules, or lightbulbs to your IQ Panel. This will allow you to
control your lights locally on the panel and also from your mobile app. Once your first light is added to your
system, the lights page will appear. Simply swipe over to access it.
Energy
Touch the energy icon to see how much energy the
outlet is currently using
Dimmer
Touch the
slider from left
to right to
adjust the
brightness of a
single dimmer
ON/OFF
Touch a bulb or
outlet icon to
turn it on or off
LIGHT ON
LIGHT OFF
SMART SOCKET ON
SMART SOCKET OFF
Mobile Access
You can also control your lights from your mobile app.
USING YOUR SYSTEM: LOCKS
Lock Control
You can add up to 6 Z-Wave locks to your IQ Panel. This will allow you to control your locks locally on the
panel and also from your mobile app. Once your first lock is added to your system, the lock page will appear.
Simply swipe over to access it. If you have more than one lock swipe up and down to access each one.
LOCK ALL
Touch to lock all
your locks at once
Get Status
Touch the refresh
icon to check the
locks current status
ON/OFF
Touch the key
icon to unlock
or lock it
Change Locks
If you have
more than one
lock, swipe up
and down to
access each
one.
UNLOCKED
Mobile Access
You can also control your
locks from your mobile app.
LOCKED
USING YOUR SYSTEM: THERMOSTAT
Mode
Touch to change this thermostat
from heat to cool (or off) or use
automatic” which switches from
heat to cool as needed to maintain
your target temperature.
Current Temp
Displays the current
temperature in your
home
Fan
Touch to change
to “On” or
Automatic
Up/Down
Touch the
arrows to
adjust the
target
temperature
Switch
If you have
more than one
thermostat,
swipe up and
down to
access each
one.
Mobile Access
You can also control your
thermostat from your mobile app.
Thermostat Control
You can add up to 6 thermostats to your IQ Panel. This allows you to control the temperature in your home
locally on the panel and also from your mobile app. Once your first thermostat is added to your system, the
thermostat page will appear. Simply swipe over to access it. If you have more than one thermostat swipe up
and down to access each one.
Battery level
Displays how much
battery is left in
your thermostat
USING YOUR SYSTEM: GARAGE DOOR
Garage Control
You can add up to 10 Z-Wave overhead garage door controllers to your IQ Panel. This allows you to control
the door from your panel and also from your mobile app. Once your first garage opener is added to your
system, the garage page will appear. Simply swipe over to access it. If you have more than one overhead
garage door swipe up and down to access each one.
GARAGE CLOSED
GARAGE OPEN
Open/Close
Touch the icon
to open or
close the
garage door
Switch
If you have
more than one
garage door,
swipe up and
down to
access each
one.
Open
Touch the icon
to open the
garage door
(not available
when the
garage door is
already closed)
Close
Touch the icon
to close the
garage door
(not available
when the
garage door is
already closed)
OPEN ALL
CLOSE ALL
USING YOUR SYSTEM: LIVE VIEW
Live View
Easily view the live video feed from your Alarm.com video cameras on the 7” panel screen. This page will
appear automatically if cameras are added to the account and the authorization has been given on the
Alarm.com customer website. Supports live view of up to 40 cameras. Supported models: ADC-V521IR, ADC-
V522IR, ADC-V622, ADC-V722W, ADC-VC725, ADC-VC726, ADC-VC825 & ADC-VC826.
Camera View
A thumbnail of
the camera will
be displayed for
the highlighted
camera. Click the
play button to
view full screen.
Cameras List
All supported
cameras that are
on the account
and have been
authorized will
show here. Click
the camera you
would like to
view.
Exit
Click on the
red X icon to
exit full screen
mode.
Camera View
Full screen mode
can be activated
by clicking on
the play button
for each
individual
camera.
Important Note
Cameras will only
push to your panel
if you have
authorized them to
do so from your
Alarm.com
customer website.
This can be found
under Video
Settings.
USING YOUR SYSTEM: LIVE VIEW WITH AUDIO
Live View with Audio
Listen in and speak to any room in the house using the Qolsys Live View with Audio feature. This can be done
from your mobile app or right from the 7” touch screen. If your camera supports two-way audio, the talk
button will automatically appear on the live view page.
Talk
Press and hold
while talking to
to use the two-
way audio
feature built into
your camera.
Listen
Press to turn
on audio.
End
Press this button
to exit.
Hold To Talk
Press and hold
to talk.
LIVE VIEW
~ with Audio ~
ON PANEL
  • Page 1 1
  • Page 2 2
  • Page 3 3
  • Page 4 4
  • Page 5 5
  • Page 6 6
  • Page 7 7
  • Page 8 8
  • Page 9 9
  • Page 10 10
  • Page 11 11
  • Page 12 12
  • Page 13 13
  • Page 14 14
  • Page 15 15
  • Page 16 16
  • Page 17 17
  • Page 18 18
  • Page 19 19
  • Page 20 20
  • Page 21 21
  • Page 22 22
  • Page 23 23
  • Page 24 24
  • Page 25 25
  • Page 26 26
  • Page 27 27
  • Page 28 28

Ask a question and I''ll find the answer in the document

Finding information in a document is now easier with AI