Page is loading ...

Pine Picnic Bench
Width - 130,5cm
Depth - 148cm
Height - 71,4cm
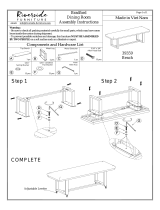
Assembly Instructions - Please keep for future reference
650-4225
Dimensions
Important – Please read these instructions fully before starting assembly
If you need help or have damaged or missing parts, call the Customer Helpline: 08450778888
Issue 1 - 18/01/12


Components - Panels
Please check you have all the panels listed below
3
If you have damaged or missing components,
call the Customer Helpline: 08450778888
4x Table and Seat slats
(1480 x 90 x 25 mm)
4x Table and Seat slats
(1480 x 90 x 25 mm)
Centre rail
(1271 x 65 x 25 mm)
2x diagonal brace
(495 x 65 x 25 mm)
2x leg
(857 x 90 x 25 mm)
2x leg
(857 x 90 x 25 mm)
2x table brace
(645 x 65 x 25 mm)
2x seat braces
(1300 x 90 x 25 mm)
2x seats cleats
(196 x 65 x 15 mm)
table cleat
(640 x 65 x 15 mm)
2x table centre slats
(1480 x 90 x 25 mm)
1
1
2
3
4
4
5
6
7
8
9
Box 1
Box 2

Components - Fittings
Please check you have all the fittings listed below
4
Note : The quantities below are the correct amount to complete the assembly. In some cases more fittings
may be supplied than are required.
B
E
C
F
A
D
Zinc planted Bolt
Ø 8 x L45 mm - 14 pcs
Wood Screws
Ø 3.5 x 45 mm - 40 pcs
Zinc plated washer
- 14 pcs
Wood Screws
Ø 3.5 x 30 mm - 20 pcs
Zinc plated nut
- 14 pcs
Wood Screws
Ø 4.5 x 60 mm - 8 pcs
Tools required
Ruler - Use this ruler to help correctly identify the screws
Phillips screwdriver medium
Drill
Ruler/tape measure
G
Wooden spacer
- 2 pcs

Assembly Instructions
Step 1
Step 2
5
6
4
4
5
6
5
6
4
A
A
C
A
B
C
A
C
B
C
B
B
Place 2 legs , a table
brace and a seat brace
on a flat clean surface.
Connect the table brace and
the seat brace to the legs using
bolts , washers and
nuts as shown in the picture.
Repeat the above described
process for the remaining 2 legs,
table brace and seat brace.

Assembly Instructions
6
Step 3
Step 4
F
F
F
F
C
B
A
A
C
B
F
F
2
2
3
3
3
Attach the center rail to
the assembled sides using
2 wood screws at each
end, as shown in the picture.
Attach the diagonal brace
to the center rail using bolt ,
washer and nut , and
to the seat brace using furniture
screw as shown in the picture.
Repeat this process for the other
side of the bench.

Assembly Instructions
7
Step 5
Step 6
1
1
1
1
9
1
1
9
9
9
1
1
1
1
9
1
1
1
1
D
D
D
D
D
G
G
G
G
D
D
D
D
D
or
or
Using the wooden spacer
provided place the seat slats
onto the seat braces ensuring
that the outer slats are level with
the edge of the braces and
secure using the wood screws
as shown in the picture.
Using the wooden spacer
provided place the table slats
- 4 pcs and table slats
- 2 pcs onto the frame
ensuring that the outer slats are
level with the edge of the table
braces and secure using the
wood screws as shown
in the picture.

Assembly Instructions
8
Step 7
Assembly is complete.
7
7
7
8
8
E
E
E
E
Turn the table upside down
(we suggest two people
perform this operation)
and attach the seat cleat to
the seat slats using wood screw ,
repeat this process for the other
side. Than attach the table cleat
to the table slats using wood
screws as shown in the picture.
Place the table in an upright
position (we suggest two people
perform this operation).
Step 8
/