IKEA Discover Fully Fitted & DIY Kitchens Installation guide

Type
Installation guide

IKEA Discover Fully Fitted & DIY Kitchens offer a wide range of options to suit your needs and budget, from fully fitted kitchens designed and installed by IKEA experts to DIY kitchens that you can install yourself. With a variety of styles, colors, and finishes to choose from, you're sure to find the perfect kitchen for your home. IKEA kitchens are also designed to be functional and efficient, with features like soft-closing drawers and adjustable shelves to make your life easier.

IKEA Discover Fully Fitted & DIY Kitchens offer a wide range of options to suit your needs and budget, from fully fitted kitchens designed and installed by IKEA experts to DIY kitchens that you can install yourself. With a variety of styles, colors, and finishes to choose from, you're sure to find the perfect kitchen for your home. IKEA kitchens are also designed to be functional and efficient, with features like soft-closing drawers and adjustable shelves to make your life easier.

KITCHEN
INSTALLATION
GUIDE
This guide provides tips and step-by-
step instructions to help you install
your kitchen yourself.
IKBE23_N_R1
32
The step-by-step guide Tools
We tell you exactly what tools youll need to install your
new kitchen below. See the assembly instructions for
the tools youll need to use for each specic product.
Wearing safety glasses when using power tools is
recommended.
When your new kitchen arrives, first check you
have everything and nothing is damaged.
Good to know
Plaster, wood or concrete walls can be made of lots of
different materials. Thats why cabinets are not supplied
with fastening hardware (screws and plugs). You can find
what you need at most DIY and hardware stores, which can
also advise you and answer your questions.
Installing your new IKEA kitchen the right way
This brochure is your guide to preparing and installing
your new kitchen. You nd a step-by-step explanation,
tips and ideas. Use this guide along with your IKEA
assembly instructions to make sure you install your
kitchen correctly.
Before you get started
This brochure shows you the dierent steps involved
in installing your new kitchen and what tools you need.
Compare the packages and parts that have been
delivered to your home to what’s on your order form
and your delivery list to be sure you have everything
you need for your new kitchen. Only dismantle your
old kitchen when you have all your new parts and
appliances for the new kitchen.
The worktop and other parts of your kitchen should
be stored indoors at normal room temperature and
humidity.
It’s a good idea to arrange your cabinets in the order
you plan to install them. Use the delivery list and your
IKEA home planner drawing to help you.
Make sure the electricity, water and gas are o before
you start dismantling your old kitchen. Use a qualied
person to disconnect and connect your gas, water and
electricity.
You can do it all yourself but you don’t have to.
Our kitchens are specially designed to be easy to
install and assemble yourself, but we’re happy to
help whenever you need us. We have lots of dierent
services: from planning and delivery to full kitchen
installation. For more details, see the back of this
guide, check out the kitchen section of IKEA.be or
contact your local IKEA store.
Mitre box and saw
Fine-toothed handsaw
Measuring tape
G-clamps
Electric screwdriver/drill
Jigsaw
Circular saw
Level
Awl
Square
Pencil
Rubber
hammer
Hammer
Phillips
screwdriver
Flat
screwdriver
Hole saw -
to cut the hole for the mixing tap
in the sink (35mm).
Or
FIXA 2-piece
tool set.
285.121.00 12.99
Prepare the space Fix the suspension rail
Once you have removed your old kitchen, prepare
the space by checking that walls and oor are even,
and making sure the walls can support your kitchen
cabinets. This is also when you should paint or tile the
walls and change the ooring as needed.
Mark the position of cabinets
Draw a contour of your new kitchen on the wall. Check
this matches the measurements on your plan and
electricity, water, gas and ventilation connections are
where you want them. Also mark where you want to
attach the suspension rails.
Your new IKEA cabinets can be hung directly onto a
suspension rail. That makes it easier to install and adjust
them. Ensure the suspension rail is completely level and
is secured with the right screw type for your wall.
Prepare the space by making sure corners
are even and walls and floor are square and
plumb. Use your square for corners and a
level for walls and floor.
Note down the highest point of the floor and
where corners are not square.
Fix the base rail in place first. Find suitable
points in the wall where the rails can be
fixed and check the rails are level before
you start drilling.
If the wall is uneven, insert filler pieces
between rail and wall to ensure the rail is
flush.
Check the wall is strong enough to support
the suspension rail and cabinets. It’s often
advisable to fix the rail on a stud or a
support beam. That depends on the wall
material. You might find an electronic stud
finder helpful.
Check the rails are perfectly horizontal with
a level.
Double-check that
your plumbing is
where you need it
to be and matches
your kitchen plan.
Kitchen length 208cm
82cm
202cm
Wall cabinet height
60cm
Base cabinet height
80cm
Plinth
height 8cm
Mark off 82cm between the highest
point of your floor and the bottom of
your base suspension rail.
5
4
Fix the rails at the right height
The underside of the suspension rail for the base cabinet (A) must be 82cm above the highest point of
the floor (B). If the height of your kitchen is 208cm, leave 120cm between the underside of the suspension
rail for the base cabinet and the underside of the rail for the wall cabinet.
(If the height of the kitchen is 228cm or 248cm, this space should be 140cm or 160cm.)
B
A
Install the cabinets
In most kitchens its best to install the wall cabinets
rst. That ensures you can continue to work freely
without the base cabinets getting in your way. The only
exception is a one-wall kitchen with a high cabinet at
one end, where you should install the high cabinet rst.
Some cabinets come with ready-made openings
for plumbing and utilities. Otherwise you can cut
openings yourself with a jigsaw. Do this before xing
the cabinet in place. Keep in mind that these openings
can aect the location of drawers in a cabinet.
Always follow the assembly instructions
when assembling wall cabinets. Hold off
from fitting drawers, doors and internal
fittings for now.
Now move on to the base cabinets,
beginning in the corner. Install the other
cabinets in the same way. This is when you
should install any corner carousel in the
cabinet.
Make sure the sink cabinet is aligned with
your plumbing.
Start by installing the corner cabinet,
tightening the screws to fix it firmly into
place. Now install the other cabinets, using
the screws provided. Don’t tighten the
screws yet. You should hold off with this until
youve installed the base cabinets and can
align everything up precisely.
You can adjust the legs to ensure the
cabinets are plumb with each other.
Always follow the assembly instructions
when assembling base cabinets. Attach the
legs in the order you install the cabinets.
Both cabinets can be rested on the same cabinet legs during installation. Use the distance
ring that comes with the legs.
If you are installing a wall cabinet, fix the
cover panel in place first.
Then place the filler piece with the cut edge
against the wall. It should fit perfectly. Mark
the edge of the cabinet on the top and
bottom of the filler piece. Draw a straight
line between these points and saw the filler
piece to size.
Use a level to check whether the wall is
straight. If it is, measure the distance
between wall and cabinet, and mark it at the
top and bottom of the filler piece.
Start by fixing a support strip to the wall to
ensure the filler piece stays in place. Drill
screw holes in the cabinet to fix it to the
filler piece. Slip the filler piece into place.
Insert screws into the holes you drilled.
When all filler pieces are in place, apply
silicone along the edges to seal.
Filler pieces
Use filler pieces between cabinet
and wall for a streamlined look and
to ensure there’s enough room
to open doors and drawers fully.
These are especially useful if your
walls are not perfectly straight.
6
If you’re installing a high cabinet, hold off tightening the screws until all
other cabinets are in place.
7
If the wall is not level and flat, youll need
to cut the filler piece to fit to the shape of
the wall. For this, youll need a filler piece,
a measuring tape, a small block of wood
between 2.5cm and 3.5cm thick, and a
pencil.
Cut the filler piece to the same height as the
cabinet. Place it against the wall. Hold the
block of wood flat against the wall and line
the pencil up along it. Keep pressing them
against the wall while sliding them down
the length of the filler piece. This traces the
shape of the wall on the filler piece. Saw the
filler piece along this line.
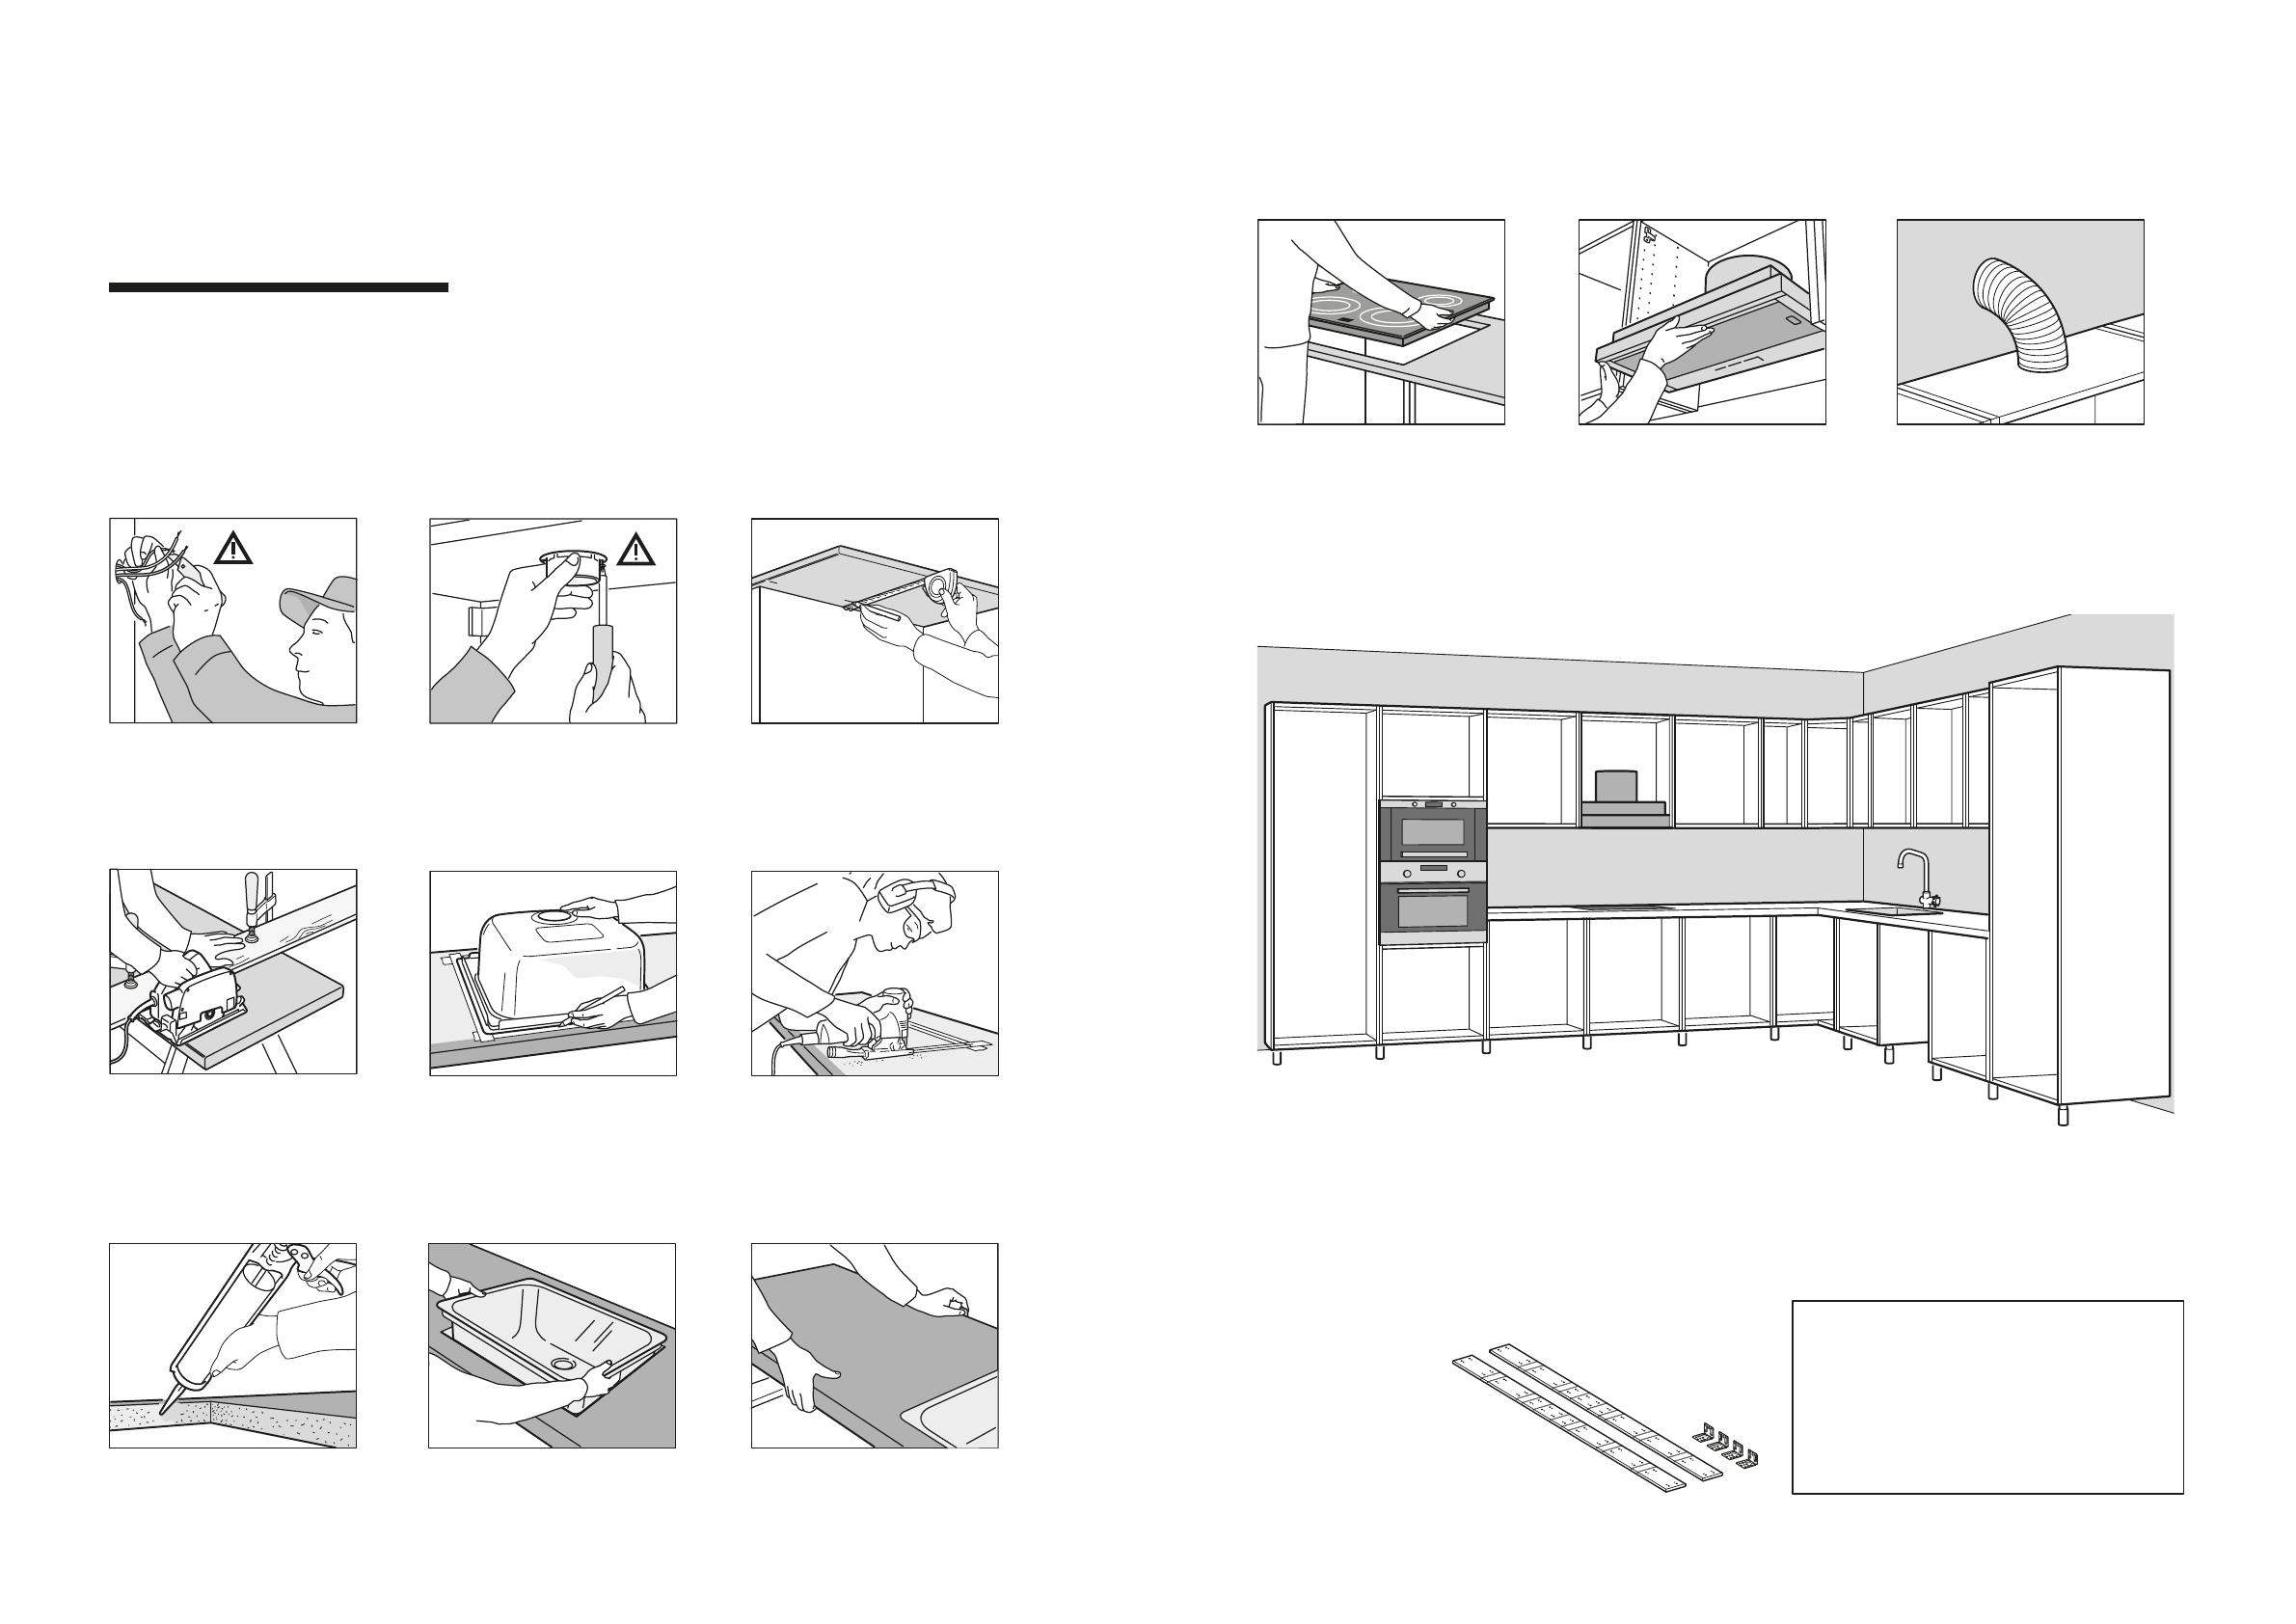
All electrical connections must be done by a
qualified electrician.
Press a ruler against your worktop with a
G-clamp to ensure you saw it to the right
length with a circular saw. Placing your
worktop on a sawhorse will make your
work easier. Tip: have someone hold the
piece you’re sawing off in place to prevent
splintering.
Apply polyurethane silicone along the sawn
edges to prevent moisture from penetrating
the worktop.
Installing lighting and appliances. When
drilling holes, use a piece of wood to
prevent splintering when the bit penetrates
the surface.
Lower the sink into the worktop in
accordance with the assembly instructions.
Measure the worktop again. If you have bought
a standard worktop, you should cut it to the
right length now. When using a circular saw or
a fretsaw, turn the worktop over so the bottom
is facing upwards. When using a handsaw, turn
the worktop the right way up, so the top is
facing upwards.
Place the worktop in its final position to
mark off where the sink will be. Trace the
inside of the base cabinet on the underside
of the worktop to help you align the cut-out
for the sink. Turn the worktop over and trace
the outline of the sink onto masking tape.
Secure the worktop in place in accordance
with the assembly instructions.
Use a jigsaw to saw the cut-out for the
sink. Drilling holes in the corners inside the
outline before you start sawing will help you
make a neater job of it.
Make a cut-out on your worktop for the
hob like you did for the sink. Check the hob
assembly instructions for directions.
Install the extractor hood. IKEA extractor
hoods can be installed in two ways: vented to
the outside, i.e. in extraction mode; or fitted
with a charcoal filter in recirculation mode.
Both options are described in the assembly
instructions that come with the product.
Saw the hole in the back panel or in the
top of the cabinet. Check the assembly
instructions. For the sake of safety and
functionality, you must stick closely to the
instructions for taking measurements when
installing the extractor hood.
Installing a worktop, sink, lighting
and appliances.
Now the cabinets are installed, you can get to work
on your worktop, sink, lighting and appliances. Before
you start, check the worktop has the right dimensions.
If you need to saw cut-outs in your worktop for a sink
or hob, you should do that now. Note! Always use the
assembly instructions as a guide.
Once the worktop is in place, you’re ready to connect
the water, gas, lighting and appliances. All water, gas
and electrical connections must be done by qualied
people in accordance with all local safety regulations.
Kitchen island
Are you installing a kitchen island? We have the fixings you need to firmly
anchor it in the floor. Legs and plinths must then be placed around the
outside.
You can use UTBY legs or the METOD kitchen island assembly kit. The kit is
used to connect the cabinets back to back or attach a cover panel to the back
of the cabinets.
Contact your IKEA store for help with assembly or installation.
98
METOD kitchen island assembly kit. 202.984.10
7,-
Good to know
When installing a kitchen island, you must anchor
it in the floor with UTBY legs or by building a
plinth frame. In that case, the plinth frame must
be anchored in the floor and the cabinets must be
assembled on top of this. Take care with underfloor
heating or water pipes when anchoring the kitchen
island in the floor.
Now the cabinets, worktops and appliances have been
installed, it’s time to attach the drawer runners in the
cabinets. Its important to note that the runners for inner
drawers and standard drawers are attached dierently.
After attaching the runners, you should insert the
drawers before doing the doors and shelves. Last of all,
attach knobs and handles and insert any interior ttings,
like wire baskets.
Note! Always use the assembly instructions as a guide.
Caring for your cabinets
Clean the doors, cabinet interiors and wood surfaces
with a soft, damp cloth. Only use products that are
suited to the material you want to clean. Never use
products containing ammonia, alcohol, bleach or
abrasives. Rinse with clean water and dry with a clean,
dry cloth. Clean up spills immediately.
A sparkling sink day after day
Rub the sink clean after every use with a cloth
or sponge dipped in water or, if needed, a mild
detergent. Rinse with water and dry with a clean cloth.
Avoid scouring powder, steel wool or hard objects
that can scratch the stainless steel surface. A damp
surface can discolour in the event of extended contact
with substances containing iron,
like steel wool, nails and gravel.
Long-lasting worktops
Clean up spills immediately with water or a mild
detergent to keep your worktop in tip-top condition.
Dry after every use. Use BEHANDLA oil for wood
worktops. This protects the wood from marking,
staining and cracking, and prevents water from
penetrating.
Attach the runners, starting with the outer
drawers. Outer runners should be attached
to the outer row of holes in the cabinet.
Attach the door hinges.
When you’ve done the outer runners, move
onto the inner runners. The inner runners
are attached to the inner row of holes in the
cabinet.
Follow the assembly instructions to
assemble the drawers.
Insert the drawers and attach the doors to
the cabinets.
Adjust the screws in the hinge plate to
ensure the doors are the right height and
width.
Now attach any plinth. Follow the assembly
instructions.
Any ventilation plinth should be placed
between two plinth pieces.
Install shelves, drawers,
doors, knobs and handles.
All done! Congratulations on your
new kitchen!
All done!
Time to step back and admire your new kitchen – and congratulate
yourself on saving lots of money by assembling and installing it
yourself! With just a little care, you will keep your new IKEA kitchen
looking its best for many years to come.
10 11
© Inter IKEA Systems B.V. 2022
Our wide range of services gives you the freedom to set the
price of your new kitchen by choosing the products that t
your budget and deciding what you want to do yourself and
what you want to leave to us.
Our services
that make your life easier.
DELIVERY ASSEMBLY
Most of our products are designed
and packaged so you can take them
with you. But, if you prefer, we can
also deliver them to your home
or oce. If you want to take your
kitchen straight home with you, you
can book an express delivery, along
with a picking service if you wish.
Your kitchen can also be delivered
by truck on an agreed date.
You can also ask our assembly
partner to install your
new kitchen. They also take
care of connections to existing
plumbing and electrics. They take
all packaging with them when they
leave to ensure its processed in an
eco-friendly way.
See
IKEA.com/be/en/customer-service/services
for more details
  • Page 1 1
  • Page 2 2
  • Page 3 3
  • Page 4 4
  • Page 5 5
  • Page 6 6
  • Page 7 7

IKEA Discover Fully Fitted & DIY Kitchens Installation guide

Type
Installation guide

IKEA Discover Fully Fitted & DIY Kitchens offer a wide range of options to suit your needs and budget, from fully fitted kitchens designed and installed by IKEA experts to DIY kitchens that you can install yourself. With a variety of styles, colors, and finishes to choose from, you're sure to find the perfect kitchen for your home. IKEA kitchens are also designed to be functional and efficient, with features like soft-closing drawers and adjustable shelves to make your life easier.

Ask a question and I''ll find the answer in the document

Finding information in a document is now easier with AI