Page is loading ...

OUTDOOR KITCHEN Stainless Steel Sets
32”2 Door Stainless Steel
32” 3 Drawer Stainless Steel
33” Insert Grill Stainless Steel
45 Degree Stainless Steel Set
Warning: Excessive weight hazard!
Use two or more people to move, assemble or install cabinets and shelves to avoid back injury.
Do not leave children unattended near cabinets.
65000-Series Cabinets
65005
65004
32” Bar Cart
65007
64” Prep Table
65008
65002
32” Bar Stainless Steel
65003
32” SINK Stainless Steel
65001
65000
90 Degree Shelf Stainless Steel
65006

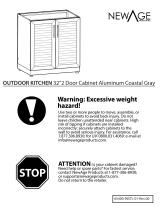
OUTDOOR KITCHEN 32”2 Door Cabinet SS
Warning: Excessive weight hazard!
Use two or more people to move, assemble or install cabinets and shelves to avoid back injury.
Do not leave children unattended near cabinets.
For assistance, call 1.877.306.8930; for UK 0800.031.4069; e-mail at info@newageproducts.com
65000-INSTL-01-Rev.01

56 " Worktop. Fits over 1 Cabinet
32" Worktop. Fits over 1 Cabinet
& Fridge nook.
88" Worktop. Fits over 2 Cabinets
& Fridge nook.
64" Worktop. Fits over 2 Cabinets
96" Worktop. Fits over 3 Cabinets
WorktopsWeight
Capacity
200 lbs.
115 lbs.
115 lbs.
200 lbs.
32" - 2 Door Cabinet
Max 630 lbs.

4 x Handle Bolts
(M4 x 30mm)
4 x Hex Nuts
(M5)
Parts Supplied
Unpacking
• Begin by placing the package on a protected at surface.
• Remove all cardboard, foam packaging material and clear plastic bags.
• Dispose / recycle all packaging materials.
• Verify all the contents in the box and gather the required tools. See “Parts” and “Tools Needed” in the list below.
4 x Height-Adjustable
Aluminum Legs
2 x Plated
Aluminum Handles
1 x Leg Wrench
16 x Hex Bolts
(M6 X 25mm)
8 x Shelf Clips
2 x Full Width
Adjustable
Shelves
4 x Hex Bolts
(M5 x 50mm)
Height-Adjustable Aluminum Legs
Adjustable Shelves
Leg Adjustment Wrench
Shelf Clips
4
16
2
8
1
Hex Bolt ( M5 x 50mm)
4
4
2 Door
Cabinet
Hex Nuts (M5)
Hex Bolt (M6 x 25mm)

Installing the Handles
Parts Needed.
Align handle to holes on doors
or drawers.
Screw in bolts.
1
2
3
Handle Handle Bolt
M4 x 30mm

Installing the Legs
1
Flip cabinet upside down,
locate holes on crossbeam.
2
Stand cabinet upright. To level and
adjust legs go to next step.
Open cabinet, remove any shelves
or loose items.
Repeat step 3 for each corner.
5
4
Parts Needed.
4 X Adjustable
Feet
16 X Hex Washer
Bolt
Align leg with rivet nuts on crossbeam.
Tighten in Hex bolts .
3
1
2
3
4

Levelling the Legs
1
Rotate wrench to lower or raise corner of cabinet.
Repeat step 1-3 for each corner.
Use wrench to level cabinet
and adjust height.
3
Parts Needed.
1 X Glide Wrench
2
Level Cabinet.
4

Installing the Casters(optional)
1
Flip cabinet upside down on protected
surface and locate holes on crossbeam.
2
Stand cabinet upright.
Open cabinet, remove any shelves
or loose items.
Repeat step 3 to install all casters
5
4
Parts Needed.
Align caster with holes on crossbeam.
Tighten in Hex bolts .
3
4 X Casters
16 X Hex
Washer Bolt
1
2
3
4

Fastening Cabinets(to each other)
Align bolts, tighten lightly.
Level cabinets and tighten all bolts.
X4
1
2
X8
Remove plastic caps from cabinets.
3
4
Parts Needed.
4 X Hex Bolt
(M5 x 50mm”)
4 X Hex Nut(M5)

Mounting the Worktop
1
Place worktop over cabinets.
2
Insert the worktop bolt heads
into the keyhole shape slots.
Tighten screws to secure cabi-
nets.
Stand cabinet upright.
3
3
Push worktop in to lock.
4
Optional: Repeat steps 2-5 for mounting
larger worktops.
5

Inserting Cabinet Shelves
1
Insert and position above shelf clips.
Lower shelf down onto shelf clips.
2
Begin with shelf being level.
Install remaining shelves.
Open cabinet doors. Attach
shelf clips to desired height.
4
3
5

Adjusting The Door Hinges
1
A
Using a Philips screwdriver, the doors can be adjusted:
Left, right, forwards and backwards.
To adjust the doors left or right, turn the screw (A) clockwise or counterclockwise.
To adjust the gap between the doors and frame, turn the screw (B)
clockwise or counterclockwise.
2
Thank you for purchasing a NewAge Product!
Please give us a call or visit online if you have any questions.
Call 1.877.306.8930; for UK 0800.031.4069; e-mail at info@newageproducts.com
B

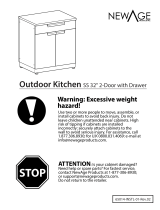
OUTDOOR KITCHEN 32"-3 Drawer Cabinet SS
Warning: Excessive weight hazard!
Use two or more people to move, assemble or install cabinets and shelves to avoid back injury.
Do not leave children unattended near cabinets.
65002-INSTL-01-Rev.01
Tip-over
Hazard
Only open one drawer at a time.
If this Cabinet is installed on its own
please fasten to a permanent structure.

56” Worktop. Fits over 1 Cabinet
& Fridge nook.
88” Worktop. Fits over 2 Cabinets
& Fridge nook.
64” Worktop. Fits over 2 Cabinets
96” Worktop. Fits over 3 Cabinets
WorktopsWeight
Capacity
lbs.
lbs.
75
75
75
lbs.
200 lbs.
32” - 3 Drawer Cabinet
Max 425 lbs.

Handle Bolt
(M4 x 30mm)
Hex Bolt
(M5 x 50mm)
Parts Supplied
Unpacking
• Begin by placing the package on a protected at surface.
• Remove all cardboard, foam packaging material and clear plastic bags.
• Dispose / recycle all packaging materials.
• Verify all the contents in the box and gather the required tools. See “Parts” and “Tools Needed” in the list below.
Height-Adjustable
Aluminium Leveling Legs
Hex
Washer Bolt
(M6 x 25mm)
Handle
Height-Adjustable Aluminum Legs
Leg Adjustment Wrench
4
4
4
1
Aluminum Plated Handles
3
Handle Bolts (M4 x 30mm)
Hex Bolt ( M5 x 50mm)
Hex Bolt (M6 x 25mm)
6
16
3 Drawer
Cabinet
Hex Nuts (M5)
4 X Hex Nut
(M5)
1 x Leg Wrench

Right Side
Left Side
Slide In
Slide Out
Align Rails
Inserting Drawers.
Removing Drawers.
Installing the Drawers

Installing the Handles
Parts Needed.
Align handle to holes on doors
or drawers.
Screw in bolts.
1
2
3
Handles Handle Bolts
(M4 x 30mm)

Installing the Legs
1
Flip cabinet upside down,
locate holes on crossbeam.
2
Stand cabinet upright. To level and
adjust feet go to next step.
Remove Drawers, remove loose
items.
Repeat steps 1-3 for each corner.
5
4
Parts Needed.
4 X Adjustable
Legs
16 X Hex Washer
Bolt
Align foot with rivet nuts on crossbeam.
Tighten Hex bolts .
3
1
2
3
4

Levelling the Feet
1
Rotate wrench to lower or raise corner of cabinet.
Repeat step 1-3 for each corner.
Use wrench to level cabinet
and adjust height.
3
Parts Needed.
1 X Leg Wrench
2
Level Cabinet.
4

Installing the Casters(optional)
1
Flip cabinet upside down,
locate holes on crossbeam.
2
Stand cabinet upright.
Open cabinet, remove drawers or
loose items.
Repeat steps 2-3 for each corner.
5
4
Parts Needed.
Align foot with holes on crossbeam. Screw
in Hex bolts with washer and lock washer.
3
4 X Casters
16 X Hex
Washer Bolt
1
2
3
4
/