
MB1 Mailbox with 2” Round In-Ground Mailbox Post (Model 7680)
Assembly Instructions
Assembly Instructions
Thank you for purchasing this premium mailbox and post. We know you'll be satisfied with the years of service it will provide. If you have any
questions about how to assemble or install this product, or if you need any replacement parts, please call us directly at (800) 464-7491 or
contact us at [email protected].
© 2018, Architectural Mailboxes, LLCRev. E
www.architecturalmailboxes.com (800) 464-7491
R
Hardware (included)
To attach the mailbox to the plate:To join the two post pieces:
x 8, small washers
x 4, small hex bolts
x 4, small hex nuts
1
Phillips head screwdriver
Tools (not included)
Two open end wrenches
- or -
Tools (included)
Hex wrench
x 2, headless set screws
x 1, metal expansion joiner
DO NOT install into ground until both post pieces are securely connected using the expansion joiner.
!
Lay post pieces and the metal expansion
joiner on a flat surface. Then, insert the joiner
into one post piece making sure to align the
screw holes.
Insert the headless set screw into the hole and
tighten with the hex wrench.Tighten the screw
until resistance is felt. Then, tighten at least
another rotation to ensure the joiner is locked in
place as shown in the diagram below.
Correct Post Assembly Incorrect Post Assembly
Set screw
completely
recessed.
a.
b.
c.
Repeat step 1b to properly assemble the
second post piece, making sure to
minimize the gap between the post
pieces.
Expansion joiner is
making contact with
the post.
Set screw is
making contact
with the
expansion
joiner.
Set screw is
not making
contact with the
expansion
joiner.
Install the assembled post into
the ground. Pay particular
attention to the location,
height, and distance from the
street.
Set screw is
exposed.
Expansion joiner is
not making contact
with the post.
31
2
x 2, hole plugs
Mount the mailbox onto the
top bracket and secure with
the 4 hex bolts, 8 washers,
and 4 hex nuts.
Lastly, insert hole plugs to fill
the two joint holes.
x4
x4
hole plugs x2
3
CONTACT THE LOCAL POST OFFICE BEFORE INSTALLING THE MAILBOX TO ENSURE ITS CORRECT PLACEMENT AND HEIGHT AT THE STREET. GENERALLY, MAILBOXES ARE INSTALLED AT A HEIGHT OF 41-45
INCHES FROM THE ROAD SURFACE TO INSIDE FLOOR OF THE MAILBOX OR POINT OF MAIL ENTRY (LOCKED DESIGNS) AND ARE SET BACK 6-8 INCHES FROM THE FRONT FACE OF CURB OR ROAD EDGE TO
THE MAILBOX DOOR.
A concrete footing is highly
recommended. Typical post
depths range from 12”-18” and
may vary based on your
installation application.

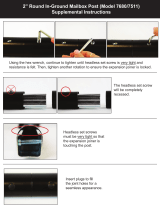
Using the hex wrench, continue to tighten until headless set screw is very tight and
resistance is felt. Then, tighten another rotation to ensure the expansion joiner is locked.
The headless set screw
will be completely
recessed.
2” Round In-Ground Mailbox Post (Model 7680/7511)
Supplemental Instructions
Headless set screws
must be very tight so that
the expansion joiner is
touching the post.
Insert plugs to ll
the joint holes for a
seamless appearance.
-
 1
1
-
 2
2
Architectural Mailboxes 7680RZ Installation guide
- Type
- Installation guide
Ask a question and I''ll find the answer in the document
Finding information in a document is now easier with AI
Related papers
-
 Architectural Mailboxes 7505S-10 Installation guide
-
 Architectural Mailboxes 7511B-10 Installation guide
-
 Architectural Mailboxes 7509RZ-10 Operating instructions
-
Architectural Mailboxes 5504Z Installation guide
-
 Architectural Mailboxes 7507B Operating instructions
-
 Architectural Mailboxes 7507B Installation guide
-
 Architectural Mailboxes 7516P Installation guide
-
 Architectural Mailboxes 5581B7507B Operating instructions
-
 Architectural Mailboxes 7507B Installation guide
-
 Architectural Mailboxes 7511B-10 Installation guide
Other documents
-
 dVault DVJR0060PI-6 Installation guide
-
 dVault DVJR0060-1 Installation guide
-
 Mailbox Post Solutions Return-to-Center SwingAway Mailbox Support Installation guide
-
 Mail Boss 7122 Installation guide
-
Unbranded 2540B-10 Installation guide
-
Gibraltar Mailboxes HCPL10V01 Operating instructions
-
EZ-ACCESS PHD S3248G Operating instructions
-
SIG SIGRC82 User manual
-
EZ-ACCESS TITAN S16 Installation guide
-
SIG SIGRC61 User manual


