Page is loading ...

6999-0006 Rev. A
Forward
6999-0006 Rev. A
All text, photographs, and illustrations in this handbook are based on the most current
product information available at the time of publication. Product improvements or other
changes may result in differences between this handbook and the motorcycle.
Excelsior-Henderson reserves the right to make production changes at any time, without
notice and without incurring any obligation to make the same or similar changes to
motorcycles previously built.
EXCELSIOR-HENDERSON MOTORCYCLE MANUFACTURING COMPANY
805 HANLON DRIVE • BELLE PLAINE, MINNESOTA 56011 • TELE: 612.873.7000/FAX: 612.873.7030
Copyright© 1999 Excelsior-Henderson Motorcycle Manufacturing Company. All rights reserved.
Excelsior-Henderson
, the X & Bar logo,
Super X,
and
Rider’s Handbook
are trademarks of the Excelsior-Henderson Motorcycle Manufacturing Company.
Dunlop
is a registered
trademark of the Dunlop Tire Corporation.
RiderCourse
is a registered trademark of the Motorcycle Safety Foundation.

Forward
6999-0006Rev.A i
Introduction
This
Handbook
has been prepared exclusively for the
Excelsior-HendersonDealerNetwork,andis
designedtobeusedwiththeExcelsior-Henderson
Certificate of Vehicle Setup & Predelivery
(document
partno.6999-0067).
1. Vehicle Setup
is written specifically for the Dealer
ServiceTechnician,andincludesdetailedinstructions
essentialtoproperSetupofExcelsior-Henderson
motorcycles.
2. Owner Predelivery
is designed to assist the Dealer
SalesStaffinsafelyorientingthenewOwnerwith
theirExcelsior-Hendersonmotorcycle.
Werecommendthatyourefertothefollowing
informationoften,asitwillassistyouinmakingsure
thatspecificproceduresarenotoverlooked.
Timeismoney,andwerespectyourtime.Wehave
madeeachofthestepsinthis
Handbook
simple and
completetoreducetheneedtosearchforadditional
informationelsewhere.
Toensurecustomersafetyandsatisfaction,please
readthis
Handbook
thoroughly before you Setup and
PredeliveranExcelsior-Hendersonmotorcycle.
SpecialSymbolsAndTerms
Thehazardsymbolindicatesapotential
hazardtoyourself,others,orthemotorcycle.
Payspecialattentiontoinformationinthe
Handbook
that begins with this symbol.
Thefollowingtermshavespecialmeaninginthe
Handbook.
Be certain you understand the meaning of
eachterm,asthetermscommunicateimportant
informationaboutthemotorcycleanditsoperationand
maintenance.
WARNING
•Indicatesapotentialhazardthatcouldinjureyou
orothers.
Caution
•Indicatesapotentialhazardthatcoulddamage
themotorcycle.
Notice
•Emphasizesimportantinformationthatmight
otherwisebeoverlooked.
Thecheckedboxsymbolisusedthroughoutthis
Handbooktoindicatethecompletionofaspecific
procedure,andtoremindyoutomarktheappropriate
boxonthe
Certificate Of Vehicle Setup & Predelivery.
DealerSupport
North/NortheastRegionalSales
PH1-612-873-7032
FAX1-612-873-7030
West/NorthwestRegionalSales
Phone:1-612-873-7031
Fax:1-612-873-7030
South/SouthwestRegionalSales
Phone:1-612-873-7033
Fax:1-612-873-7030
Ordering
Fax:1-800-873-8121
Technical
Phone:1-800-873-4957
Fax:1-612-873-5951
Warranty
Phone:1-612-873-7034
Fax:1-612-873-5951
ConsumerSupport
Phone:1-612-873-5800
!

1-0 6999-0006 Rev. A
Vehicle Setup 1
Super X -leftsideview
1. HORN
2. HEADLAMP
3. FRONT LEFT TURN SIGNAL/
RUNNING LIGHT
4. CLUTCH LEVER
5. CLUTCH FLUID RESERVOIR
6. LEFT MIRROR
7. LEFT HANDLEBAR
CONTROLS
8. INSTRUMENT POD
9. AIR FILTER
10. FUSES (UNDER SADDLE)
11. RIDER’S SADDLE
12. TANDEM SADDLE
13. LEFT REAR TURN SIGNAL
14. TAIL LIGHT
15. REAR AXLE ADJUSTER
(ONE EACH SIDE)
16. REAR BRAKE CALIPER
17. PASSENGER FOOTREST
18. BATTERY
19. SIDESTAND
20. RIDER FOOTREST
21.GEAR SHIFT PEDAL
22. EVAPORATIVE CANISTER
(CALIFORNIA MODEL ONLY)
23. FRONT BRAKE CALIPER
Super X - right side view
1. RIGHT REAR TURN SIGNAL
2. DRIVE BELT
(UNDER GUARD)
3. TANDEM SADDLE
4. RIDER’S SADDLE
5. REAR SHOCK ABSORBER
(UNDER SADDLE)
6. MAIN SWITCH
7. INSTRUMENT POD
8. THROTTLE CONTROL GRIP
9. RIGHT HANDLEBAR
CONTROLS
10. RIGHT MIRROR
11. FRONT BRAKE FLUID
RESERVOIR
12. FRONT BRAKE LEVER
13. THROTTLE CABLES
14. FRONT RIGHT TURN SIGNAL/
RUNNING LIGHT
15. FUEL CAP
16. FORK LOCK
17. REAR BRAKE FLUID
RESERVOIR
18. REAR BRAKE PEDAL
19. RIDER FOOTREST
20. ENGINE OIL FILTER COVER
21. ENGINE OIL DRAIN PLUGS
(UNDER ENGINE)
22. ENGINE OIL FILL CAP AND
DIPSTICK
23. PASSENGER FOOTREST
24. EXHAUST MUFFLERS
10539
10540

1. Vehicle Setup
6999-0006 Rev. A 1-1
GeneralInformation..............1-2
MovingtheCrate..................1-2
Signing the Bill Of Lading...........1-2
Replacement Parts.................1-2
Modifications.....................1-2
Fastener Information . . . ............1-2
Dealer Installed Accessories ........1-2
Special Tools .....................1-2
OpeningtheCrate................1-3
RemoveMotorcycle ..............1-3
Initial Motorcycle Inspection.........1-4
RemoveSeparateComponents.....1-4
Sidestand.......................1-5
Battery.........................1-5
FillBattery .......................1-5
ChargeBattery....................1-7
RemoveSaddles ..................1-7
InstallBattery.....................1-8
InstallSaddles....................1-8
Tires...........................1-9
Spokes.........................1-9
SteeringHead...................1-9
ForkLock......................1-10
InstallMirrors ..................1-10
Throttle........................1-10
Throttle Control Grip and Cables . . . . 1-10
Adjust Throttle Freeplay ...........1-11
FrontBrake....................1-11
Clutch.........................1-12
RearBrake.....................1-12
Adding Hydraulic Fluid. . . . . . . . . . . 1-13
RearWheelAlignment...........1-13
CheckRearWheelAlignment.......1-13
Adjust Rear Wheel Alignment.......1-14
DriveBeltTension...............1-15
Check Drive Belt Tension ..........1-15
Adjust Drive Belt Tension ..........1-15
EngineOil......................1-16
LowFuelIndicator...............1-16
FuelTank.......................1-17
Evaporative Control System. . . . . . .1-17
Electrical Components . . . . . . . . . . .1-18
MainSwitch .....................1-18
IndicatorLights..................1-18
InstrumentPodLights.............1-20
Odometer/TripMeter..............1-20
Fuel Gauge . .....................1-21
Headlamp . . .....................1-21
TurnSignals.....................1-21
Horn............................1-21
Emergency Flashers . . . ...........1-22
Running Lights...................1-22
BrakeLight......................1-22
StartingtheEngine..............1-22
ElectricStarter...................1-23
IndicatorLights-OFF.............1-23
EngineIdle-Tachometer...........1-23
EngineStop/RunSwitch...........1-24
RoadTest......................1-24
Protective Apparel ................1-24
EngineOperation.................1-24
ClutchOperation.................1-25
TransmissionOperation...........1-25
BrakeOperation..................1-27
MotorcycleHandling..............1-27
Speedometer/Odometer Function . . . 1-28
EngineOilLevel.................1-28
CleaningtheMotorcycle..........1-29
SuperXSpecifications...........1-30
Super X Torque Specifications . . . . .1-32

1-2 6999-0006 Rev. A
Vehicle Setup
General Information
Damage to the motorcycle can occur from the time the motorcycle leaves the factory until it is delivered. Excelsior-
Henderson wants to help you protect your investment and smooth out any bumps in the road. Please pay special
attention to the following general information.
Moving the Crate
The Excelsior-Henderson motorcycle shipping crate is designed to be lifted from a truck or trailer by fork lift from the
end marked “Fork This End” only. Once removed from the truck or trailer, the crate may be lifted by fork lift from either
side or the end marked “Fork This End”.
Signing the Bill Of Lading
Open each packing crate and inspect the motorcycle(s) in the presence of the delivery driver before the delivery
vehicle leaves your Dealership.
Notice
• The Carrier’s responsibility ends when the Bill of Lading is signed.
• Claims against the carrier must be filed at the time of delivery.
Replacement Parts
Replace any items that may have been damaged during shipment or setup with Genuine Excelsior-Henderson
replacement parts only.
Modifications
WARNING
• Do not disable or alter the exhaust, evaporative, or fuel systems on the motorcycle to circumvent federal, state
or local regulations. Environmental and safety systems or devices must be left intact as designed and
manufactured. Changes to the exhaust, evaporative, or fuel systems may void the motorcycles warranty.
• Do not modify the automatic headlight “ON” feature of the motorcycle. Any deliberate action to disable or alter
this system may contribute to an accident and result in personal injury.
Fastener Information
When performing the different setup procedures, keep an eye out for loose or missing fasteners.
If it becomes necessary to retighten a fastener (see Torque Specifications page 1-32).
Notice
• All fasteners come tightened to the correct torque from the factory. If you do not see a problem with a
fastener, it should not be disturbed.
• Some Genuine Excelsior-Henderson threaded fasteners are coated with a thread-locking patch. After remov-
ing and reinstalling the fastener 2 or 3 times, the thread-locking patch wears away and the fastener should be
replaced with the same genuine Excelsior-Henderson fastener.
Dealer Installed Accessories
For model year 1999, all Excelsior-Henderson accessories installed by the Dealer at the time of vehicle delivery are
warranted for 12 months. Excelsior-Henderson accessories installed by the Owner at any time, or those installed by
the Dealer after vehicle delivery are warranted for 90 days.
Special Tools
Rear wheel alignment gauge ---- PartNo.EH-6999-0037
Belttensiongauge--------- PartNo.EH-6999-0038
Rearshockadjustingwrench---- PartNo.EH-6999-0029

Vehicle Setup
6999-0006 Rev. A 1-3
Opening the Crate
Use a flat pry bar to remove the packing crate top.
1. Start the pry bar under any corner of the crate top. Work
all around the crate top until all the fasteners and the top are
completely loose.
2. Remove the packing crate top.
Caution
Make sure the top of the crate does not drop into the
crate, damaging the motorcycle.
1. FLAT PRY BAR 2. CRATE TOP
3. Using the pry bar, start at the top corner of either side of
the packing crate back (rear of motorcycle). Work your way
down to the bottom of the crate until all the fasteners and side
are completely loose. Repeat this procedure for the opposite
side.
4. Complete the removal of the crate back by loosening the
fasteners and bottom edge of the crate back.
5. Remove the protective dust cover. The dust cover should
be given to the Owner when the bike is delivered.
1. FLAT PRY BAR
2. CRATE BACK
3. PROTECTIVE COVER
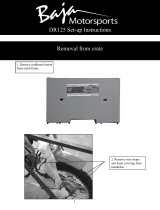
Remove Motorcycle
1. Remove the mounting screws from the board behind the
rear wheel of the motorcycle. This board is installed to hold
the motorcycle in place during shipping.
2. Remove the board from the packing crate. Use this board
as a ramp when removing the motorcycle from the crate.
3. Line up the board with the rear wheel behind the crate.
4. Check the pallet to make sure there are no nails, staples
or screws protruding from the pallet bottom that could
puncture the tires.
5. Mount the motorcycle.
6. Release or cut the front tie-down straps.
7. Release or cut the rear tie-down straps.
Caution
Use care when releasing tie-down straps. The
motorcycle’s front and rear suspension are secured in
a compressed state for shipment. When the straps are
released or cut they will unwind or release rapidly. This
will cause the motorcycle to rise and pitch to the
opposite side.
1. BOARD
(BEFORE REMOVAL)
2. BOARD
(ALIGNED WITH WHEEL)
3. FRONT TIE-DOWN STRAP
4. REAR TIE-DOWN STRAP
10510
10511
10512

1-4 6999-0006 Rev. A
Vehicle Setup
8. Pump the front and rear brakes 3 to 4 times to make sure
they have hydraulic pressure.
9. Pull in the clutch lever.
10. Carefully roll the bike backwards, out of the crate.
11. Park the motorcycle on a flat, firm surface.
Initial Motorcycle Inspection
1. Verify that the Packing List matches the information on
the U.P.C.label attached to the packing crate. Make sure both
documents match the Vehicle Identification Number (V.I.N.) of
the motorcycle.
2. Visually inspect the motorcycle to make sure that no
damage occurred during packing for shipment or during
unpacking from shipment.
(StepCaptionHold) “For demonstration only”
(StepCaptionHold) “These are BLIND (white text)
1. PACKING LIST
2. U.P.C. CODE
3. V.I.N. NUMBER
If any damage to the motorcycle is discovered, you must
submit a warranty claim request form to receive a credit from
the factory. Be sure to include an accurate description of the
damage, and its effect on the motorcycle. (i.e. damage to
front brake line - front brake system leaks).
1. WARRANTY CLAIM REQUEST FORM
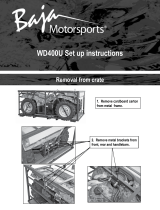
Remove Separate Components
The motorcycle is shipped with the following separately
packaged components:
• Literature Kit
• Battery
• Mirrors
Release the tie-down strap and move all the items into your
work area.
1. TIE-DOWN STRAP
2. LITERATURE KIT
3. BATTERY
4. MIRRORS
10513
10514
10515
10516

Vehicle Setup
6999-0006 Rev. A 1-5
Sidestand
1. Make sure the sidestand locks in the extended (down)
position, holds firmly in the stored (up) position and moves
freely between both positions.
2. Set the sidestand in the extended position. Turn the
handle bars fully to the left. Lean the motorcycle to the left
until the sidestand is in the locked and parked position.
(StepCaptionHold) “For demonstration only”
(StepCaptionHold) “These are BLIND (white text)
1. STORED (UP) POSITION 2. EXTENDED (DOWN)
POSITION
Battery
The battery is supplied dry. It must be filled and properly
charged before it is put into service. Do not fill the battery with
electrolyte until it is to be placed into service.
We recommended you have fully charged batteries on hand
since it requires approximately 16 hours to fully charge a
battery. If you do not have charged batteries on hand, start
charging the battery as soon as possible.
WARNING
• ACID IS POISONOUS
– Contains sulfuric acid. Ventilate the area when filling
or charging batteries.
• ACID CAN CAUSE SEVERE BURNS
– Shield eyes, protect skin and clothing when handling
acid or working near any batteries.
• Keep sparks and open flames away from batteries during
filling or charging.
Antidote:
• EXTERNAL-Flushwithwater.
• INTERNAL - Drink large quantities of water or milk.
Follow with milk of magnesia, beaten eggs, or vegetable
oil and get prompt medical attention.
• EYES - Flush with water for 15 minutes and get prompt
medical attention.
Fill Battery
1. Place the battery on a level surface.
2. Remove the sealing strip from the battery filler ports.
3. Removethe electrolyte container from the protective vinyl
bag.
4. Detach the cap strip from the container and save it. The
cap strip will be used to plug the battery filler ports after the
battery is filled.
1. SEALING STRIP
2. ELECTROLYTE
CONTAINER
3. CAP STRIP
10517
10518
10519

1-6 6999-0006 Rev. A
Vehicle Setup
5. Align the sealed openings of the electrolyte container
with the battery filler ports.
6. Push the container down firmly to break the seals of the
electrolyte container. The electrolyte should start to flow from
the container.
Caution
Do not peel or pierce the six sealed openings of the
electrolyte container by hand.The battery filler ports are
designed to pierce the seals when the container is
pushed into the filler ports.
1. FILLER PORTS
7. Make sure air bubbles are coming up from all of the filler
ports on the battery. If no air bubbles are coming up from a
filler port, tap the bottom of the container two or three times.
Notice
Tipping or tilting the electrolyte container during filling
may stop the flow of electrolyte.
Caution
Removing the container from the battery during filling
may cause the electrolyte to spill.
1. AIR BUBBLES 2. FILLER PORT
8. Make sure all of the electrolyte in each bottle section has
emptied into the cells of the battery.
9. Tap each bottle section to remove any remaining
electrolyte. Make sure each bottle section is completely
empty and the corresponding cells of the battery are filled
before removing the container from the battery.
10. Remove the electrolyte container from the battery. Rinse
empty container sections with water before disposing of the
container.
1. ELECTROLYTE
CONTAINER
2. EMPTY CELLS
11. Install the cap strip into the filler ports of the battery.
When correctly installed, the cap strip should fit tightly and be
level with the top of the battery.
Caution
Once the battery is filled and sealed, never remove any
caps, the cap strip, or try to add water to the battery.
12. Let the battery sit for at least 30 minutes before charging
to allow the plates and separators to absorb all of the acid.
There is should be no flowing acid in the battery.
(StepCaptionHold) “For demonstration only” 1. CAP STRIP 2. TOP OF BATTERY
10520
10521
10522
10523

Vehicle Setup
6999-0006 Rev. A 1-7
Charge Battery
Use a 12 volt 1 amp charger and charge the battery at the
rate shown. If a taper or trickle charger is used, charging
times will be longer.
Notice
You can quick charge the battery with a constant
current charger. Charge at a rate of 9.0 amps for
1 hour.
If the battery gets hot to the touch, stop charging immediately.
Allow the battery to cool down before resuming charging.
Allow the battery to sit 1-2 hours before measuring the
voltage. Battery voltage must be checked before putting the
battery into service.
The battery should produce a minimum of 12.8 volts after
charging. If voltage is not 12.8 volts or more, repeat the
charging cycle.
1. VOLTMETER
Remove Saddles
To gain better access to the battery wires and terminals, we
recommend removing the motorcycle saddles before
installing the battery.
1. Remove the tandem saddle screw.
2. Lift the back of the tandem saddle slightly and pull it to
the rear, out from the tandem saddle posts.
1. TANDEM SADDLE
2. TANDEM SADDLE SCREW
3. TANDEM SADDLE POSTS
4. RIDER’S SADDLE
3. Remove the rider’s saddle screws and tandem saddle
posts.
4. Lift the back of the rider’s saddle slightly and pull it to the
rear, out from the rider’s saddle post.
1. RIDER’S SADDLE
2. RIDER’S SADDLE SCREW
3. TANDEM SADDLE POST
4. RIDER’S SADDLE POST
YTX20L-BS
Battery
Type Rate
Charging
1.8 AMPS 16 HOURS
Using 1 Amp Charger
*Time of Charge
*Charging rate will vary depending on type of charger used
10524
10187
10188

1-8 6999-0006 Rev. A
Vehicle Setup
Install Battery
Before installing the battery, make sure it is fully charged,
clean and dry. If necessary, clean any oxidation from the
cable connectors or battery terminals with a wire brush.
1. Remove the battery box cover strap and the battery box
cover from the motorcycle.
2. Remove the terminal protection label and place the
battery in the battery box with the terminals facing outward.
3. Connect the positive (+) battery cable (black with a
plastic boot covering a red sleeve and the connector).
4. Connect the negative (–) cable (black with an exposed
connector).
WARNING
• Connecting the negative cable first can produce spark
or electric shock that could result in damage or injury.
• Connecting the battery cables to the wrong terminals can
damage the electrical system.
5. Apply a thin coat of grease to the cable connectors.
6. Install the battery box cover and the battery box cover
strap.
1. BATTERY BOX COVER
STRAP
2. BATTERY BOX COVER
3. BATTERY
Install Saddles
1. Slide the front of the rider’s saddle into the rider’s saddle
post at the rear of the fuel tank.
2. Install the tandem saddle posts and the rider’s saddle
screws.
1. RIDER’S SADDLE
2. RIDER’S SADDLE SCREW
3. TANDEM SADDLE POSTS
4. RIDER’S SADDLE POST
3. Slide the front of the tandem saddle into the tandem
saddle posts at the rear of the rider’s saddle.
4. Install the tandem saddle screw.
5. Check the tandem saddle strap to make sure it is secure.
1. TANDEM SADDLE
2. TANDEM SADDLE SCREW
3. TANDEM SADDLE POSTS
4. RIDES SADDLE
10525
10188
10187

Vehicle Setup
6999-0006 Rev. A 1-9
Tires
Check and adjust the front and rear tire pressure. Normal air
pressure for front and rear tires is 36 psi (cold) for loads up to
200 lbs. and 40 psi (cold) on the rear tire only for loads from
200 lbs. up to 440 lbs.
Spokes
Inspect both wheels for loose, bent, broken, or missing
spokes. To identify loose spokes, grasp each spoke and try to
move it side to side or up and down. All spokes should be
equally tight and have the same amount of flex. Tighten loose
spokes or replace bent, broken, or missing spokes.
See the
motorcycle’s Service Handbook.
WARNING
Spokes adjusted or replaced improperly could distort
the wheel, making the motorcycle difficult to handle
causing the rider to lose control of the motorcycle.
Steering Head
1. Mount the motorcycle and bring it to an upright position.
Turn the handlebars from side to side (stop to stop). The
action should be smooth but not loose. There should be no
interference from the wires, control cables, or turn signals.
10543
10541
10538

1-10 6999-0006 Rev. A
Vehicle Setup
2. Position the motorcycle on level ground in an upright
position. Raise the front wheel off the ground with an
appropriate motorcycle lift or by placing a block of wood or
steel securely under the frame.
3. With the front wheel straight, hold the lower end of the
front forks near the axle and try to move the forks forward and
backward. The forks should have no freeplay (forward and
backward movement).
4. If any freeplay is present, the steering head bearings
should be adjusted.
See the motorcycle’s Service Handbook.
Fork Lock
1. Turn the handlebars fully to the left. Insert the key into the
fork lock and turn it clockwise. Remove the key and make
sure the handlebars are locked.
2. Reinsert the key and turn it counterclockwise. Remove
the key and make sure the handlebars turn freely from side to
side.
1. FORK LOCK
Install Mirrors
1. To install both right and left mirrors, insert the threaded
end of the mirror into the threaded receiver on either right or
left hydraulic fluid reservoirs.
2. Thread each mirror all the way into the receiver, then
back each mirror out until it faces the rear of the motorcycle.
3. Tighten the locking nut on the mirror shaft to lock the
mirror in place.
4. Adjust the mirrors as necessary.
1. LOCKING NUT
Throttle
Throttle Control Grip and Cables
1. Rotate the throttle control grip. It should rotate smoothly
from its rest position to its completely open position and back
again. It should return to its rest position quickly when
released.
2. Throttle freeplay — the amount of throttle control grip
movement from the rest position to the point of cable
resistance should be between 1/16” and 3/16”.
3. Adjust throttle freeplay as necessary.
10479
10497
10545
10544

Vehicle Setup
6999-0006 Rev. A 1-11
Adjust Throttle Freeplay
1. Slide the rubber covers off both cable adjusters, and
loosen both adjuster jam nuts.
2. Turn both cable adjusters into the cable as far as
possible.
3. Turn the cable adjuster on the throttle opening cable out
until the throttle freeplay is between 1/16” and 3/16”.
4. Hold the throttle control grip at the fully closed position
and turn the cable adjuster on the throttle closing cable out
until resistance is felt.
5. Tighten the adjuster jam nuts on both cables, and
reinstall both rubber covers.
1. RUBBER COVER
2. ADJUSTER JAM NUT
3. CABLE ADJUSTER
1. RUBBER COVER
2. ADJUSTER JAM NUT
3. CABLE ADJUSTER
4. OPENING CABLE
5. CLOSING CABLE
Front Brake
1. Inspect all hoses and hose connections for dampness or
stains from leaking or dried hydraulic fluid.
2. Bring the motorcycle to an upright position. Turn the
handlebars until the reservoir is horizontal.
3. The fluid should be clear and at a level above the “Lower”
marking on the reservoir. Add hydraulic fluid if necessary,
(see Adding Hydraulic Fluid page 1-13)
.
1. LOWER MARK
4. Squeeze the front brake lever toward the handlebar and
release it. It should move freely and smoothly and should
return to its rest position quickly when released. You should
feel a firm resistance in the lever within 3/4” of lever travel. If
the brake lever does not function as described,
see the
motorcycle’s Service Handbook.
10546
10547
10548
10549

1-12 6999-0006 Rev. A
Vehicle Setup
Clutch
1. Inspect all hoses and hose connections for dampness or
stains from leaking or dried hydraulic fluid.
2. Bring the motorcycle to an upright position. Turn the
handlebars until the reservoir is horizontal.
3. View the hydraulic fluid through the sight glass. The fluid
should be clear and at a level above the “Lower” marking on
the reservoir. Add hydraulic fluid if necessary, (see Adding
Hydraulic Fluid page 1-13).
1. LOWER MARK
4. Squeeze the clutch lever toward the handlebar and
release it. It should move freely and smoothly and should
return to its rest position quickly when released. If the clutch
lever does not travel all the way to the handlebar,
see the
motorcycle’s Service Handbook.
Rear Brake
1. Inspect all hoses and hose connections for dampness or
stains from leaking or dried hydraulic fluid.
2. Bring the motorcycle to an upright position with an
appropriate motorcycle lift or a block of wood or steel placed
securely under the frame.
3. View the hydraulic fluid through the sight glass. The fluid
should be clear and at a level above the sight glass on the
reservoir. Add hydraulic fluid if necessary, (see Adding
Hydraulic Fluid page 1-13).
1. LOWER MARK
4. Press and release the rear brake pedal. It should move
freely and smoothly and should return to its rest position
quickly when you release it. You should feel a firm resistance
in the lever within 3/4” of lever travel. If the brake pedal does
not function as described,
see the motorcycle’s Service
Handbook.
10550
10527
10527
10551

Vehicle Setup
6999-0006 Rev. A 1-13
Adding Hydraulic Fluid
1. Wipe the area around the reservoir cover clean.
2. Wipe the hydraulic fluid container clean.
3. Remove the reservoir cover, gasket plate, and gasket.
4. Carefully add enough fluid to bring the level above the
sight glass on the reservoir.
5. Reinstall the reservoir gasket, gasket plate, and cover.
WARNING
• Use only DOT 5 hydraulic fluid from a sealed, clean
container. Using the wrong hydraulic fluid, or allowing
contaminants into the hydraulic system, can damage
the system seals, resulting in a system failure and the
rider could lose control of the motorcycle.
• Do not operate any hydraulic system while its reservoir
cover is removed. Fluid could overflow from the reservoir
and cause air to enter the fluid system. Air in the
hydraulic fluid system could cause a system malfunction
and the rider could lose control of the motorcycle.
• Hydraulic fluid can cause irritation to skin and eyes, and
can be harmful if swallowed. If hydraulic fluid is
swallowed, induce vomiting and call a doctor. In case of
contactwithskinoreyes,flushwithwater.
1. RESERVOIR COVER
2. GASKET PLATE
3. GASKET
4. SIGHT GLASS
Rear Wheel Alignment
Notice
Checking the rear wheel alignment involves using the
Excelsior-Henderson rear wheel alignment gauge, part
no. EH-6999-0037.
A skewed rear axle can damage the drive belt, causing it to
fail. Rear wheel alignment is also critical to drive belt tension
and should be checked to make sure the rear wheel is in
proper alignment.
1. ALIGNMENT GAUGE
Check Rear Wheel Alignment
1. Place the open end of the rear wheel alignment gauge
over either swing cage pivot bolt.
2. Loosen the pointer thumb screw and slide the pointer
along the rod until pointer tip rests in the center dimple of the
rear axle. Tighten the pointer thumb screw.
3. Move the alignment gauge to the same location on the
other side of the motorcycle. If the rear axle is the same
distance from the swing cage pivot bolt on both sides of the
motorcycle, the rear wheel is in proper alignment.
1. ALIGNMENT GAUGE
2. SWING CAGE PIVOT BOLT
3. POINTER
10528
10529
10552

1-14 6999-0006 Rev. A
Vehicle Setup
Adjust Rear Wheel Alignment
Notice
Adjusting the rear wheel alignment involves using the
Excelsior-Henderson rear wheel alignment gauge, part
no. EH-6999-0037.
1. Remove and discard the rear axle cotter pin.
2. Loosen the rear axle castle nut enough to allow the rear
axle to slide back and forth in the swing cage.
1. COTTER PIN
2. CASTLE NUT
3. ADJUSTER JAM NUT
4. REAR AXLE ADJUSTER
5. ADJUSTER COLLAR
3. Place the open end of the rear wheel alignment gauge
over either swing cage pivot bolt.
4. Loosen the pointer thumb screw and slide the pointer
along the rod until pointer tip rests in the center dimple of the
rear axle. Tighten the pointer thumb screw.
5. Move the alignment gauge to the opposite location on the
other side of the motorcycle.
6. Loosen the adjuster jam nuts.
1. ALIGNMENT GAUGE 2. POINTER
7. Turn the rear axle adjuster in or out until the dimple in the
rear axle aligns with the pointer tip. Make sure the rear axle
adjusters are seated against the adjuster collars.
8. Repeat steps 1-4 on alternate sides of the wheel until the
distance from the swing cage pivot bolt to the rear axle center
dimple is equal on both sides of the motorcycle.
9. Check the drive belt tension and adjust it if necessary
(see Check Drive Belt Tension page 1-15).
10. Tighten the adjuster jam nuts.
11. Tighten the rear axle castle nut.
Torque: 111 ft-lbs
1. ADJUSTER JAM NUT 2. CASTLE NUT
12. Recheck drive belt tension, and install a new rear axle
cotter pin.
WARNING
Do not reuse a cotter pin because it may fail, causing
the rear wheel to loosen and the rider to lose control of
the motorcycle.
1. COTTER PIN
10553
10552
10554
10555

Vehicle Setup
6999-0006 Rev. A 1-15
Drive Belt Tension
Notice
Checking the drive belt tension involves using the
Excelsior-Henderson belt tension gauge, part no.
EH-6999-0038. This procedure can be performed from
either the right or left side of the motorcycle.
1. SMALL O-RING
2. PLUNGER
3. BASE OF BRACKET
4. BODY
5. LARGE O-RING
Check Drive Belt Tension
1. Mount the motorcycle and bring it to an upright position.
2. Position the small O-ring on the belt tension gauge
directly over the 10 lb. mark on the plunger.
3. Have an assistant complete steps 4–5.
4. Place the base of the tension gauge bracket squarely
against the lower strand of the drive belt at the front of the
lower belt guard. On the lower belt guard, mark the position of
the base of the tension gauge bracket. This mark represents
zero force.
1. LOWER BELT GUARD 2. TENSION GAUGE
5. Push the plunger upward until the small O-ring touches
the tension gauge body. Make sure the tension gauge is
seated squarely against the drive belt, and move the large
O-ring until it aligns with the
zero force
mark you made on the
lower belt guard.
6. Remove the belt tension gauge and measure the
distance between the base of the tension gauge bracket and
the large O-ring. If the measurement is between 1/4” and 3/
8”, the drive belt tension is correct.
7. Adjust belt tension as necessary.
1. DRIVE BELT
Adjust Drive Belt Tension
1. Remove and discard the rear axle cotter pin. Loosen the
rear axle castle nut enough to allow the rear axle to slide
back and forth in the swing cage.
2. Turn both rear axle adjusters an equal amount until the
drive belt tension is correct, making sure the adjusters are
firmly seated against the adjuster collars.
3. Tighten the adjuster jam nuts.
4. Tighten the rear axle castle nut.
Torque: 111 ft.-lbs
1. COTTER PIN
2. CASTLE NUT
3. ADJUSTER JAM NUT
4. REAR AXLE ADJUSTER
5. ADJUSTER COLLAR
10556
10469
10035
10553

1-16 6999-0006 Rev. A
Vehicle Setup
5. Recheck drive belt tension, and install a new rear axle
cotter pin.
WARNING
Do not reuse a cotter pin because it may fail, causing
the wheel to loosen and the rider to lose control of the
motorcycle.
1. COTTER PIN
Engine Oil
The motorcycle comes from the factory filled with the correct
amount of 15W-40 mineral based break-in oil. No additional
oil should be required for starting and road testing the
motorcycle.
The oil level should be checked while the engine is at it’s
normal operating temperature. Since you will be road testing
the motorcycle later in the vehicle setup (consequently
heating the engine to normal operating temperature)
instructions for checking the oil level follow the Road Test.
Low Fuel Indicator
Check the low fuel indicator before filling the
motorcycle with fuel. There must be less than 1 gallon
of fuel in the tank to actuate the low fuel indicator.
1. Insert the key into the main switch and turn the key to the
unlocked (horizontal) position and remove the key.
2. Turn the main switch to the Acc (Accessories) position.
The low fuel level indicator should illuminate.
3. Turn the main switch to the Off position.
1. UNLOCKED 2. LOW FUEL INDICATOR
10555
10560
10561

Vehicle Setup
6999-0006 Rev. A 1-17
Fuel Tank
Fill the motorcycle with the recommended fuel (see Super X
Specifications page 1-30) and check the fuel system for
leaks.
1. With the motorcycle on the sidestand and on level
ground, remove the right fuel cap.
2. Fill the fuel tank to a level aprox. 3/4” below the bottom of
the fuel filler insert.
WARNING
• Overfilling the fuel tank may cause fuel to overflow
when it expands.
• Fuel may leak from an improperly sealed or tightened
fuel cap. Tighten the fuel cap until you hear one or more
distinct clicks. Be certain the fuel cap is properly sealed
and tightened before starting the engine.
Caution
Fuel can damage painted surfaces and plastic parts.
Wipe spilled fuel immediately from the motorcycle
using a clean, dry, soft cloth.
1. FUEL FILLER INSERT 2. FUEL FILL HEIGHT
3. Inspect the fuel hose and its connection to the fuel pump
and to the fuel rail. Check for dampness or stains from
leaking or dried fuel.
1. FUEL HOSE 2. FUEL PUMP
Evaporative Control System
(California Only)
Visually inspect all hoses and connections. Make sure all
connections are tight. Also, inspect the evaporative canister
to make sure it has not been damaged.
1. EVAPORATIVE CANISTER
10562
10563
10564
/