Page is loading ...

Full User Manual
for Yeskamo Wireless PTZ Camera

CONTENTS
Ⅰ. Device Overview ............................................................ 1
Ⅱ. Connection Guide ...................................................... 2
Ⅲ. Operation on Device Interface .............................. 9
Ⅳ. Camera Installation ...................................................... 14
Ⅴ. Statement ........................................................................ 16
Ⅵ. Safety Caution .................................................................. 17
Ⅶ. Product Specification ................................................ 18
Ⅸ. FAQ .................................................................................... 20
X. Support .............................................................................. 25

-1-
RJ45
Reset Button
Power input
SD Card Slot
Light Sensor
Lens
IR Light
Microphone
Loudspeaker
Ⅰ. Device Overview
5
6
7
8
9
1
2
3
4

-2-
Camera Router Mobile
1. Wireless Connect Camera
Light Sensor: plug the camera, the red light will turn on, and
be off in a minute.
Lens: 3.6mm, 2MP/3MP
IR Light: auto switch at night
Microphone: pick up audio
Loudspeaker: transmit sound
RJ45: Ethernet port, hard wire camera with router
Reset Button: Press and hold reset button about 10-12
seconds to restore camera to factory setting
Power input: connect with provided 5V 1.5A plug for power
supply
SD Card Slot: Insert SD card (The package doesn’t include)
for video storage. Support max 128G, in FAT32 format.
Please turn off the device when insert or remove a card.
Ⅱ. Connection Guide
1
2
3
4
5
6
7
8
9

-3-
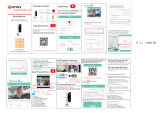
QR MIPC
Download MIPC APP on iOS or Android mobile/iPad
Always make sure that your camera has the latest
firmware as listed on MIPC app.
Before connecting to your camera, please confirm
your home Wi-Fi network is 2.4Ghz, and the camera
is less than 10 meters away from the router.
Meanwhile the camera and your phone should be
connected to the same WIFI.
Tips:
Scan the QR code or search "MICP" in App Store or Google
play, and download the APP.
Step 1: Download app and register new account

-4-
Tap “+” in the upper
left corner
Select the PTZ
Camera type.
Step 2: Add ID on phone app
Connect the camera to the power source, the red light will turn
on. (when the red light turn off, you will get "tick" sound)
1 2 3
Scan the QR code
which is on the
bottom of the
camera
Manually add ID and
password (admin)to
enter the “add a new
device” screen.

-5-
Step 3: Wi-Fi Setup for camera
Select WIFI
connection.
Press the reset
button for about 1-2
second, you will hear
the voice that starts
receiving wireless
configuration.
NOTE: Long press
for 10-12 seconds
restores the factory
setting
Input WIFI password.
4 5 6

-6-
WIFI Connection
(it will take about
1 minute to
connect)
Change password,
(Never use the
default password for
your camera. Always
ensure that your
password is at least
8 characters long
and contains a
combination of
lowercase charac-
ters, uppercase
characters as well as
numbers.NO special
character).
Now you can enjoy
the real-time preview.
7 8 9

-7-
Camera Router Mobile
2. Wired Connect Camera (Option)
The most stable way to connect camera
Select Ethernet.Connect
the camera to the router
through network cable.
1 2
Change Password
( Never use the default password for your camera.
Password is at least 8 characters long and contains a
combination of lowercase characters, uppercase
characters as well as numbers. NO special character ).

-8-
Input WIFI password.
Now you can enjoy the
real-time preview.
43

-9-
1. Playback
Calendar: This panel allows users to select the date that would
like to playback.
And here you can check all the snapshots and video notifica-
tion.
Ⅲ. Operation on Device Interface

-10-
2. Device Settings

-11-
About
Day/Time
System Upgrade
Device Password
Notifications
Record
SD Card
Users can find the device Nickname, device model,
firmware version and device ID.
This feature allows the user to check the time and
change the time zone.
The feature enables the user to update the camera
firmware version
This feature allows the user to change password and
set up guest password for their friends and families so
that they can add the camera and monitor it.
Type of Alarm:Motion Detection.
This feature enables the user to check the inserted
SD cards status, capacity, and activate. The user can
format the SD card on the MIPC app.
Note:
Please note that the SD card is not included in our
packages.
To use SD card, please insert the SD card into the
camera when it is power off.
Customize set up the recording and mode function. In
this tab, users can set it to continuous recording and
event recording(motion detection record only).
Note:
1. The record function only works when the following
storage ways is available.
SD Card
Cloud Storage

-12-
3. Resolution
This allows users to change the resolution of the live video
watching. There are four choices: HD1080P/3MP, Standard,
Smooth, Auto.
Flip the screen
OSD
Sound
Motion Detection
When the camera is installed on the ceiling, the
video will be upside down. Enable the "Flip" option
to make it right.
This feature allows the user to choose the display
text and the format of displaying date/time.
This feature allows the user to adjust the camera
speaker and mic volume so that have a better
experience of Two Way Audio.
This feature allows the user to switch on/off motion
detection smart tracking and adjust day and night
motion sensitivity

-13-
4. Record, Speaker and Sensitivity
Selection 1:
This icon allows users to record video
manually. The video will be saved in
the Account Settings-My documents.
Selection 2:
Press and hold the microphone. talk
loudly and then you can hear the
voice from the camera side.
Note: Guest users will not have the
right to use this feature.
Selection 3:
Click this button to enable or disable
audio output from the camera.
This feature allows the user to listen
in the audio from the camera side.
Selection 4:
This button is for image adjustment,
which allows the user to adjust
brightness, contrast, saturation,
sharpness and camera mode.

-14-
5. About Cloud Storage
Our camera support cloud storage service, but it is a paid
service. You can pay for this service in the App if you need.
Note: If you’d like to buy cloud storage service, please notice
that the payment couldn’t be canceled, and the payment is paid
for the cloud service company. We suggest that you can have a
trial order for the cloud service before you decide to buy for a
long time.
6. Function of PTZ
Pan-Tilt-Zoom
The PTZ allows users to change the direction of the camera.
With this feature, users can control the camera to left, right, up
and down. These controls are only available as slipping your
fingers to the left, right, up and down. When you double click or
move two touching fingers to apart on the phone screen, the
user can zoom in the picture. Instead, users can zoom out the
picture.
The camera comes with a mounting bracket and screw
packages for use in mounting the camera onto a stable surface.
Note: Before installation, please ensure that the installation
environment can support at least a triple weight of the camera.
Ⅳ. Camera Installation

-15-
You can put it on any flat place:
table, wall, floor, etc. Fix the
bracket to the wall with screws
Easily to take the camera off or
adjust install angle
Attach part of the camera back to
bracket and installation finished.
3
2
1

-16-
Ceiling Wall mount Vertical
Thank you for purchasing YESKAMO Wireless Security
Camera!
1. Though we apply all efforts to make the manual complete and
accurate, there could still be some discrepancies due to
products’ timely update.
2. The content in this manual is only for users’ reference. We
don’t promise it’s exactly the same with the products you
purchase. Detailed information is in accordance with the final
products.
Ⅴ. Statement

-17-
1.Please read the manual carefully and operate the camera
under the instructions.
2.Please do not transform or modify the product, do not open
the case or disassemble the product.
3.Please use the product under its standard working tempera-
ture and humidity.
4.Please test before installation. Do not apply power to the
camera before completing installation. Do not place objects
on top of the camera.
5.Avoid mud, sand, water, drops, bumps, etc., Also, avoid
setting up the device on that environment and condition as it
can lead to failures or damage. Conditions of Fire,
earthquake, lightning, wind and flood damage, other
disasters or external factors (such as pollution or voltage
disturbances) that could cause malfunction or damage, do
not use this product.
6.Malfunctions or damages due to bracket failures (storage in
hot and humid places, battery leakage, etc.) or improper
protection. We assume no responsibility.
Ⅵ. Safety Caution

-18-
Specifications 2MP 3MP
Main CPU
Image Sensor
Lens
Visual angle
Minimum illumination
Audio Input/output
Audio compression
Video compression
Lighting frequency
Image frame rate
Display resolution
Image adjustment
White balance, BLC
Night vision
Wireless networks
Ethernet
1/2.9" CMOS
f: 3.6mm, 2MP
H:80°; V:45°; D:92°
0.01Lux
AAC
Smart H.264
50Hz, 60Hz
Max 30fps
Brightness, Contrast, Saturation, Sharpness
Automatically
1/2.8" CMOS
f: 3.6mm, 3MP
4:3 H60°; V50°; D78°
16:9 H89.6°; V51°; D103°
Built-in microphone (-36dB) and speaker (8Ω/1W),
support two-way audio
1 dot matrix infrared lights ( 28MIL,850nM
wavelength), IR distance: 10meters
2.4G Wi-Fi(IEEE802.11b/g/n),Built in PCB board
2DB antenna
ARM
10/100Mbps
1920*1080 2048*1536/2540*1440
Ⅶ. Product Specification
/