Page is loading ...

PERGO XP Install Instructions
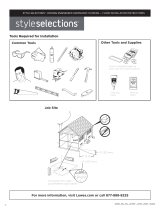
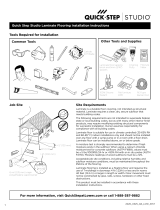
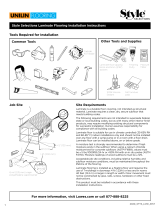
Tools Required for Installation
Common Tools
Wood
Glue
Carbide
40T Blade
Other Tools and Supplies
M
A
D
E
I
N
T
H
E
U
S
A
1
F
L
O
Z
(
3
3
.
5
m
l
)
PREMIUM
SYSTEM
COMPONENT
S
P
E
C
I
A
L
L
Y
D
E
V
E
L
O
P
E
D
F
O
R
L
A
M
I
N
A
T
E
F
L
O
O
R
I
N
G
Finishing
Putty
PREMIUM
SYSTEM
COMPONENT
Finishing
Putty
SILICONE
CAULK
SILICONE
CAULK
SILICONE
CAULK
Mildew-resistant
silicone
Felt furniture
pads
Moisture
Meter
ON
Non Destructive Moisture
dlfwej dtra
djflsv
dlfwe vtra
alskdjf
vmwjc
Concrete
Encounter
Plus
0
1
2
3
4
5
6
0
50
100
150
200
250
Moisture
Meter
S
p
a
c
e
r
s
5
m
m
S
p
a
c
e
r
s
5
m
m
Laminate floor tapping
block and 5mm (
3
/16")
spacers
10' (3 m)
> 5" (130 mm)
6 mil (0.15 mm) virgin
polyethelene vapor barrier
ground
> 8" (200 mm)
Job Site
Site Requirements
Laminate is a durable floor covering, not intended as
structural material. Laminate requires a clean, dry, secure
subfloor that meets building codes.
Laminate floor is suitable for use in climate controlled (35-
65% RH and 60-85° F) indoor installations only and should
not be installed in rooms with floor drains or sump pumps.
Laminate floor can be installed above, on or below grade.
A moisture test is strongly recommended to determine if
high moisture exists in the subfloor. When using a calcium
chloride moisture test for concrete subfloors (ASTM 1869),
values must be ≤ 5 lbs/1000ft²/24-hr or <80% with an in situ
probe (ASTM F2170). Moisture readings of wood subfloors
must be ≤ 12%.
Acceptable job site conditions, including relative humidity
and subfloor moisture conditions, must be maintained
throughout the lifetime of the flooring.
Laminate flooring is installed as a floating floor and requires
the use of T-moldings in doorways 4 ft (1.22m) or less and
in rooms 40 feet (12.2 m) or larger in length or width. Floor
movement must not be constrained by glue, nails, screws,
hardware or other fixed obstructions.
This product must be installed in accordance with these
installation instructions.
For more information, call 1-800-33-PERGO

Site and Material Preparation
A) Remove carpet and padding. Also remove any wood flooring installed on concrete. Do not remove products unless
they are asbestos-free.
B) Undercut door frame and wallbase. Slide the flooring at least
1
/4" underneath the door frame and wallbase. Also
leave a concealed
3
/8" minimum expansion space under each.
C) Remove bumps or peaks in subfloor and fill depressions with floor leveling compound to ensure no more than
3
/16"
unevenness per 10-foot span.
D) Acclimate unopened product before installation.
E) Clean debris from subfloor before installation.
F) For concrete subfloors, install vapor barrier with overlapped seams of 8" or more.
G) For planks without attached underlayment, install over single layer of underlayment appropriate for laminate floors.
PERGO XP Install Instructions
Site and Material Preparation
A
Door
Frame
Cutting Line
Wallbase
Casing
1 inch
(2,5 cm)
B
%
48 hours
60° – 85° F
15° – 29° C
35% – 65% RH
C
G
subfloor
6 mil (0.15 mm) virgin
polyethelene vapor barrier
> 8" (200 mm)
D
E F

14
15 16
WOOD
GLUE
17
10
11
13
12
7
8
9
1
2
3
4
4
PERGO XP Install Instructions
5
1 3 5 5
2
4
6
5
6
6
> 12 in
> 30 cm
6
2
3
1
Left
Right

Flooring Installation
1. Inspect each plank.
2. For the first row along straight walls, remove the tongue on all long side joints and on the short side of the 1st plank
only.
3. For uneven walls, trace contour on tongue-side of plank and cut.
4. Assemble the first row tongue side toward wall. Insert the end tongue into the end groove and rotate downward to
assemble. Keep the planks aligned and the joints closed.
5. Two spacers thick side to thick side =
3
/8".
6. Provide a
3
/8" space for expansion on all sides. First piece must be at least 8" long. Start new rows with pieces
trimmed from previous row. Ensure at least a 12" end joint oset.
7. At a slight angle, insert the tongue of plank 2 into the groove of plank 1 until the laminate edges meet, and then
rotate down until the joints lock.
8. Join the short end of the plank first. There will be a gap on the long side joints when the plank is rotated down.
9. Raise the outside edge of the plank upward approximately 1". Maintain this angle as you push the plank in until
the laminate edges meet. Rotate downward on the plank until the joint locks. Repeat these steps to complete the
installation.
Installation Tip: Place a carton of planks across the end of the row being installed to keep installed planks in place
during installation.
10. Alternate Tap Method: Align the tongues into the grooves of the long and short sides of the planks. Install the long
side first by placing a tapping block no closer than 8" from either end and tap lightly along the long side until the
joint is closed tightly. Then tap the end using the tapping block to into a locked position. Note: Uneven tapping or
use of excessive force may damage the joint.
11. Ensure there will be a
3
/8" gap (after the joint is closed) to the wall for expansion.
12. For the last row, align the plank to be used on top of the 2nd to last row. Using a full width plank as a spacer, trace
wall contour and cut plank.
13. For the last row, install the long side tongue into the groove with the end joint aligned. Using a pull bar and hammer,
work evenly along the length of the plank and lightly tap the joint closed.
14. After tapping the long side joint closed, tap the short side closed, using a tapping block or a pull bar.
Installation Under Doorway Frames
15. Slide plank under pre-cut door frame.
16. Tap the long side joint closed first. Then tap the end joint closed.
Installation Around Fixed Objects (such as Pipes)
17. Allow
3
/8" expansion space around pipes or other fixed objects.
Care and Cleaning
A) Place felt floor protectors under legs of moveable furniture. Chair casters should be rubber – not plastic or metal.
B) Place walk-o mats at entrances.
C) Dust mop or damp mop only. NO wet mopping. Use 1 cup of vinegar per gallon of water OR
1
/3 cup ammonia
per gallon of water. Do not use abrasive cleaners, detergents, soaps, waxes or polishes. Use correct hard surface
vacuum tools. DO NOT use rotating beater bars, floor scrubbers, steamers, jet mops or similar products. DO NOT
allow liquids to stand on the floor. Wipe up spills immediately. DO NOT allow moisture to be on the floor for longer
than 30 minutes.
A
B
C
PERGO XP Install Instructions
2015_03_XP_SML
/