Page is loading ...

1
January 1, 2020
Please contact 800-273-1143 for further assistance.
LifeProof Vinyl Plank
INSTALLATION INSTRUCTIONS
Product Description
Rigid Vinyl Plank
Grade Levels
Above Grade / On Grade /
Below Grade
Installation Method
Click lock
Click this link or search for your product on
homedepot.com to nd instructional videos
KEY INSTALLATION CONSIDERATIONS
• LifeProof Vinyl Plank is intended for interior use only and is suitable for above grade, on grade, and
below grade applications. DO NOT install in any outside areas, saunas, seasonal porches, camping
trailers,boats,RVs,lanais,roomsthatarepronetoooding,orroomsorhomesthatarenottemperature-
controlled.
• LifeProofVinylPlankisaoatingoorandshouldbeallowedtoexpandandcontractfreely.Itmust
notbeglued,nailed,orfastenedtothesuboorinanyway.Permanentcabinets,vanities,islandsand
similaritemsshouldbeinstalledrst.Then,installLifeProofVinylPlankaroundthem,leavingtheproper
expansiongap.LifeProofVinylPlankcanbeinstalledundervanitieswithlegs.LifeProofVinylPlankcan
beinstalledundertoilets;leaveproperexpansionspacearoundtheangeanduseapremiumwaterproof
100% silicone caulk. Do not anchor toilet through the material.
• LifeProofVinylPlankisawaterproofoatingoor,butitshouldnotbeusedtosealanexistingoorfrom
moisture. It cannot inhibit the growth of mold or prevent structural problems associated with, or caused
byooding,excessivemoisture,alkalisinthesuboor,orconditionsarisingfromhydrostaticpressure.
Regardless of location, always remove standing water, urine and other liquids promptly. Job site moisture
issuesshouldbeaddressedandcorrectedpriortoinstallation.Fillexpansionspacesaroundpotentialwet
areas only with premium waterproof 100% silicone caulk.
• Long-termexposuretodirectsunlightcanpotentiallydamageLifeProofVinylPlank,causingittodiscolor,
fade,orbuckle.ProtectLifeProofVinylPlankfromexposuretodirectsunlightviatheuseofwindow-
treatmentsorUV-tintingonwindows.
• Iftheooringistobeinstalledbyathirdparty,thenitissuggestedthatthehomeownerbepresentduring
the installation for consultation/ direction. The owner and installer should discuss installation and layout
tomaximizesatisfaction.Ifthisisnotpossible,consultationshouldoccurpriortoinstallation.Theowner/
installer assumes all responsibility for quality of completed installation.
BEFORE STARTING
Before beginning a LifeProof Vinyl Plank installation project, it is critical that you 1) fully acquaint yourself with
thedetailedinstallationinstructionsforyourspecicooringandsuboortypeand2)conductacompletejob
site evaluation.
• For appropriate installation information, review this guide and the assembly instructions provided on each
cartonofooringyoupurchased.
• Make a complete job site evaluation to assure that environmental conditions are acceptable for LifeProof
Vinyl Plank installation. Conditions between 50°F to 100°F (10°C to 37°C) are required before and during
installation. For more detail, please reference the “Installation Prep” section of this guide.
• DeterminethequantityofLifeProofVinylPlanks,ooringtransitionsandwalltrimneededforyour
installation. It is recommended that you add an additional 10% to your square footage for standard
installations to account for cuts. For diagonal installations, add 15%.
• Make sure you have the appropriate installation tools. A list of recommended installation tools can be
found in the “Tools Required for Installation” section of this guide.
• Cartonsshouldbeevenlystackednomorethanvecartonshighonaatsurfaceandawayfromany
heating/cooling ducts or direct sunlight.

2
January1,2020
Pleasecontact800-273-1143forfurtherassistance.
TOOLS REQUIRED FOR INSTALLATION
• Tape Measure
• Utility Knife
• Eye Protection
• Gloves
• Tapping Block
• Soft Faced Hammer
• Pull Bar
• ¼" Spacers
• Level
• Reciprocating Saw (optional)
• Miter or Circular Saw (optional)
• Knee Pads (optional)
SITE PREPARATION
1”
6’
A B C
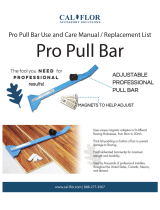
Priortoinstallation,thehomeownerorinstallermustensurethatjobsiteconditions(includingsuboor/
substrate,ambienttemperatureandrelativehumidity)willnotnegativelyaecttheoor.Themanufactureris
not responsible for damages associated with improper installation or poor site conditions.
A. Thesurfaceofthesuboormustbeat.Theatnessrequirementisdenedasfollows:themaximum
dierencebetweentwohighpointsandtheintermediatelowpointis1/4"ina10'radius.Surfaceatness
mustalsonotvarymorethan1/16"whenmeasuredwitha3'straightedge.Additionally,thesuboormust
notslopemorethan1"in6'.
B. Highareascanbesanded,grounddownoroatedoverwithanapprovedself-levelingcompound.Fill
excessivevoidsorlowareasusinganon-gypsum,cementitiousbasedlevelingcompound.Allowthe
leveling compound to dry thoroughly before beginning the LifeProof Vinyl Plank installation. Follow the
manufacturer’s instructions to be sure it is appropriate for the application.
C. Suboorsmustbestructurallysoundwithoutdeection.

3
January1,2020
Pleasecontact800-273-1143forfurtherassistance.
G H I
J
D E F
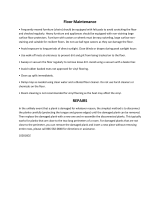
D. CrawlSpaces:Concreteslaborgroundmustbedry.Ensurethatcrawlspaceshaveopenventsyear-
roundtoensureproperaircirculationandpreventmoisturebuild-up.Thegroundinthecrawlspacesmust
be completely covered using 6 mil polyethylene. Crawl space clearance between the earth and underside
ofjoistsshouldbenolessthan18"(45.7cm)andtheperimeterventareashouldbeequalto1.5%ofthe
total square footage of the crawl space or as mandated by code.
E. Carefullyremoveanyexistingquarterroundorbaseboardmolding.
F. Always remove carpet, carpet pad and tack strips.
G. Removeanyexistingoatingorun-adheredooring.
H. Besurethesurfaceofthesuboorisat,clean,dryandsoundbeforestarting.
I. Inspect every plank for any shipping damage when removing from the carton.
J. Kitchencabinetsmustbeinstalledbeforetheoorisinstalled.DonotinstallcabinetsontopofLifeProof
Vinyl Plank.

4
January 1, 2020
Please contact 800-273-1143 for further assistance.
APPROVED SUBFLOORS:
Concrete, Plywood, OSB, Particleboard, Chipboard, Hardwood (Solid, Engineered, Parquet), Tile (Ceramic,
Terrazzo,Stone,Asbestos,PeelandStick),Non-CushionSheetVinyl,Metal,VCT,DRIcore
AllsuboorrequirementsnotedbelowmustbemetpriortotheinstallationofLifeProofVinylPlank.
Concrete Suboor Prep
• Performmoisturetestsatlocationsaroundexteriordoorways,nearwallscontainingplumbing,nearfoun-
dation walls and in the center of the room.
• Highspotscanberemovedbygrinding;depressionscanbelledwithpatchingcompoundformulatedfor
useinoorinstallation.
• Cureforatleast90days(appliestonewly-laidconcreteslabs).
• Can be either sealed or unsealed.
• Moisturelevelsofconcreteslabsbefore,duringandafterinstallationmustbe≤8lbs/1000ft2/24-hrusing
an anhydrous calcium chloride test according to ASTM F1869 and pH must be between 5.0 and 9.0; or,
ifusingASTMF2170IN-SituProbes,shouldbelessthan90%RH(relativehumidity).Alwaysmeasure,
record and keep your testing results.
Wood (Plywood, OSB, Particleboard, Chipboard, Solid Hardwood, Luan) Suboors
• WoodsuboorsmustbeA.P.A.approvedwithaminimumgradeof“BB”or“CC”.Forreference,A.P.A.is
theacronymforanorganizationoriginallyknownasthe“AmericanPlywoodAssociation”,andthatisnow
known as “The Engineered Wood Association”.
• Perform moisture tests using a reliable moisture meter in multiple locations. Moisture readings should
neverexceed14%forplywood,OSB,particleboard,chipboardandsolidhardwoodsuboors.Ifmoisture
readingsexceed14%,itshouldbecorrectedatthejobsitebeforeinstallingLifeProofVinylPlank.
Other Suboor Prep
• Adheredandsoundvinylsheetgoods,linoleumandresilient(VCT)tiles:Oldvinylandlinoleumtilesor
sheet goods normally do not need to be removed if they are fully bonded and free of any notable damage.
Some older vinyl sheet goods and tile contain asbestos. Should it contain asbestos special precautions
must be taken for your safety. Contact a professional immediately for inspection and removal.
• Ceramictilesandterrazzo:Oldatceramictilesnormallydon’tneedtoberemoved.Groutjointswider
than¼"mustbelled.Usually,LifeProofVinylPlankproductscanbeinstalleddirectlyoverceramictiles
andterrazzoprovidingtheyarefullyadhered,smooth,soundanddry.Theseooringmaterialsmustbe
smoothandattowithin1/4"ina10'radiusandmustnotvarymorethan1/16"whenmeasuredwitha3'
straight edge.
• Do not install over more than one layer of vinyl.
Radiant Flooring Heating Prep
• Aftermarketradiantheatedoorsmustbeapprovedbythemanufacturerforusewithresilientooring
applications.Thesuboortemperatureshouldnotexceed85°F(29°C).
NON-APPROVED SUBFLOORS:
• Carpeting/Carpet Pad
• Cushioned Vinyl Flooring
• Floating Floors
• Laminate
• Parquet Over Concrete
• Cork
• Engineered Hardwood Over Concrete
• Sleeper Substrates
• Hardwood Over Concrete
• Rubber
RemovetheoorsnotedaboveandremoveoldadhesivebeforeinstallingLifeProofVinylPlank.

5
January1,2020
Pleasecontact800-273-1143forfurtherassistance.
GENERAL LIFEPROOF VINYL PLANK INSTALLATION INSTRUCTIONS
• LifeProof Vinyl Plank products are intended for indoor use only.
• Temperatureswithintheroommustbemaintainedbetween0°Fto140°F(-18°Cto60°C).
• Theseextremerangesbetween0°Fto50°F(-18°Cto10°C)and100°Fto140°F(37°Cto60°C)are
for unoccupied environments only. Occupied areas as well as the installation need to be controlled
between 50°F to 100°F (10°C to 37°C).
• A1/4"(6mm)expansionspacemustbeprovidedaroundtheperimeteroftheroomandanyxedobjects
such as pipes or columns.
• Use approved safety equipment to provide proper protection based on each given task.
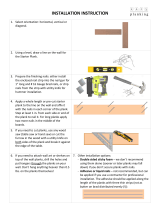
• Door-jambsandcasingsmustbeundercutsothattheplankcanslide
underneath.A1/4"(6mm)expansionspacemustalsobeincludedaround
the undercut jambs and casings. A reciprocating saw is recommended to
create the necessary undercut. Never undercut metal door casings.
Cutting Tip :Toundercutthecasting,layascrappieceofooringnextto
thecastingandlaythesawatontopoftheooringsothatthesaweasily
cuts to the height of the plank.
1 inch
(2.5 cm)
Casing
Wallbase
Cutting Line
Door Frame
• Important—Always inspect each plank to make sure it is not damaged prior to installation. Check the
tongue and groove to assure it is free of debris or damage.
• Wheninstallingooringfromtwoormorecartons,checkthepattern,colorandbatchnumbersonthe
cartontoensuretheyareallthesame.Thisinformationislistedontheexteriorlabelofeachcarton.Itis
recommendedtoblendooringfrommultiplecartonsduringinstallation.
• Cartonsshouldbeevenlystackednomorethanvecartonshighonaatsurfaceandawayfromany
heating/cooling ducts or direct sunlight.
• Excessooringshouldbestoredinaprotectedclimatecontrolledenvironmentforfuturerepairsif
necessary.
• The HVAC system must be on and functional before, during and after installation.
• Power tools can be dangerous. Operate in strict accordance with manufacturer’s operating instructions
and safety precautions. Unsafe and improper use can cause serious injuries. Avoid inhalation and
exposuretoairborneparticlesbywearingpersonalprotectiveequipment,including:NIOSHorOSHA
approved dust masks, safety goggles and work gloves.
1 2 3 3a
LIFEPROOF VINYL PLANK CLICK LOCK INSTALLATION INSTRUCTIONS
1. Inspect each plank. Floor should be installed blending planks from several cartons at the same time to
ensuregoodcolorandshademixturethroughouttheinstallation.
2. It is recommended that installation begin in a corner of the room with the tongue facing the wall. Between
therstrowofooringandthewall,insertspacerssothata¼"(6mm)gapiscreated.
3. Wheninstallingtherstrow,inserttheshortedgeofoneplankintotheshortedgeofanotherplankata
slight angle and rotate downward. Continue to complete the starter row maintaining a straight edge for the
following row.

6
January 1, 2020
Please contact 800-273-1143 for further assistance.
4. Use a tapping block and soft faced hammer to close any gaps between the planks.
5. Onceyoureachtheendoftherstrow,measureandcutthenalplanksothatitcompletestherowwhile
alsoleavingthenecessary¼"expansiongap.Lastplanksofrowsmustbeatleast8"long.
Note: Use a spare plank to create a straight edge at the cut line. Use a utility knife to score the top of the
pattern and snap the panel. It will be necessary to cut the foam underlayment after snapping the
panel.
6. Startthesecondrowofooringbytrimmingaplanktoalengthdierentfromtherstplankintherst
row. First and last pieces must be at least 8" long. End joints should be staggered a minimum of 6".
7. Ataslightangle,insertthelongedgetongueoftherstplankinrow2intothelongedgegrooveofthe
plank in row 1 until the plank edges meet, and then rotate down until the joints lock.
8. Whenjoiningthenextplanktotherstplankintherow,jointheshortsideedgesrst.Therewillbeagap
on the long side joints when the plank is rotated down.
9. Raisetheoutsidelongedgeoftheplankupwardapproximately1".Thiswillraisetheoutsidelongedgeof
planks in that row. Maintain this angle as you push the plank in until the long edge of the plank meets the
longedgeoftherstrow.Rotatedownwardontheplankuntilthejointlocks.
10. After tapping the long side joint closed, close the short edge joints using a tapping block or pull bar.
11. Repeat these steps to complete the installation.
12. After each row is complete, ensure there will be a ¼" (6 mm) gap (after the joints are closed) to the wall for
expansion.
13. Forthelastrow,aligntheplanktobeusedontopofthe2ndtolastrow.Usingafullwidthplankasa
spacer, trace the wall contour. Use a full plank as a straight edge to cut the plank. Insert the long edge
tongue in to the long edge groove and use a pull bar and hammer to close the gap.
14. After tapping the long side joint closed, close the short edge joints using a tapping block or pull bar.
8 97 10
13b13a
10a 11 12 13
4 5 5a
>6 in
> 30 cm
6
14

7
January 1, 2020
Please contact 800-273-1143 for further assistance.
Installing Under Doorway Frames
15. Whenthenewooringmeetsathresholdoradoorway,werecommendundercuttingthedoorjamb.To
securetherightcut,turnaplankupsidedownandplaceitontheooruptothedoorframe.Thenplacea
reciprocatingsawatagainsttheplankandsimplycutthroughtheframe.Removethecut-outpieceand
vacuumawaydebris.Slideplankunderpre-cutdoorframe.Doorframeshouldbecutsothata¼"(6mm)
gap is located from the edge of the plank under the casing to the wall.
16. Tapthelongsidejointclosedrst,thentaptheendjointclosed.
15 16
Installing Around Fixed Objects
17. Allow¼"(6mm)expansionspacearoundpipesorotherxedobjects.
18. Inrowswherethereisapipe,makesurethepipefallsexactlyinlinewiththeshortsideoftwoplanks.
Selectadrillbitwiththesamediameterasthepipeplus1/2inch(13mm).Clicktheplankstogetheron
the short side and drill a hole centered on the joint between the two planks. Then install the planks.
19. Foradoublepipe,drillaholeequivalenttothediameterofthepipeplus1/2inch(13mm)ateachofthe
markedpoints.Iflocatedonthelongsideoftheplank,makea45ºcutfromeachholetotheedgeofthe
plank. Then, using an appropriate glue along the cut edges of the piece you cut out, glue the piece in
place.Besurenogluecomesbetweenthecut-outpieceandthesuboor.
17 18 18a
19 19a 19b 19c

8
January 1, 2020
Please contact 800-273-1143 for further assistance.
CARE AND CLEANING
Preventative Maintenance
• Preventindentationsandscratchesbyusingnon-stainingoorprotectorsonthelegsofchairs,
appliances and all heavy furniture. Floor protectors should be at least 1" in diameter. Periodically clean
protectors to remove grit that may become embedded and cause scratching.
• Chair casters should be rubber – not plastic or metal – and should be kept clean.
• Placewalk-omatsatentrances.Matsshouldhaveanon-rubberizedbackingandbemarkedasnon-
staining.
• Werecommendtheuseofahardsurface(non-studded),non-rubberchairmattoprotectyouroorfrom
ocechairswithcasters.Light,rollingfurnitureshouldbeoutttedwithbroad-surface,non-staining
castersthathavebeenengineeredforhardsurfaceoors.Suchcastersshouldbeaminimumof1"
(2.5cm)wideandatleast2"(5.1cm)indiameter.
• Keep pets’ nails trimmed.
• Removeshoeswithcleats,spikesorexceptionallypointyheelsbeforewalkingontheoor.
Cleaning & Maintenance
• Sweeptheoorregularlywithasoftbristlebroomtoremoveloosedirt.
• Washtheoorwithnon-abrasive,neutralPHoorcleanerapprovedforvinyloors.
• Foreverydaycleaning,amopmoistenedwithwarmwaterwillsuce.
Do Not Use the Following on LifeProof Vinyl Plank
• Detergent based cleaners
• Abrasive or mop and shine products
• Ammonia or bleaches
• Vacuum cleaner with a rotating beater bar engaged
NOTE: Always read the cautionary information on all cleaners prior to use.
IMPORTANT: Neverpush,pullordragfurniture,appliancesorotheritemsacrosstheoor.Whenmoving
furniture or heavy items, always lift and carry the items.
Finishing the Installation
20. Remove all spacers.
21. Fillanyexpansionspacesaroundpotentiallywetareas(suchasrefrigerators,tubs,etc.)withpremium,
waterproof 100% silicone caulk.
22. Remember,theuseofcoordinatingT-MoldsisrequiredwheninstallingLifeProofVinylPlankinaroom
orareathatislargerthan100linealfeet(30.5meters)inanydirection,sothattheoorisseparatedinto
sectionsthatarenolargerthan100ft.x100ft.(30.5metersx30.5meters)persection.
23. Installmoldingstocovertheexpansiongap.Wheninstallingmoldings,neverallownailsorscrewsto
entertheLifeProofVinylPlankortheexpansionzonearoundtheooringperimeter.Allmoldingsand
transitionstripsneedtoprovidea¼"(6mm)expansionspaceaswell.(Note:Coordinatedmoldingscan
be purchased on homedepot.com. Follow molding installation instructions for proper installation.)
20 21 22 23
/