Page is loading ...

OWNER'S MANUAL
CDMA PORTABLE
CELLULAR TELEPHONE
SCH-200F
ELECTRONICS
Printed in Korea
Code No.: GH68-60559A
BASIC.
456
12
3
78
0
9
GHI
JKL
MNO
.QZ
ABC
DEF
PRS
ALPH
TUV
OPR
WXY
LOCK
PWR
STO
RCL
FCN
SEND
CLR
END

2 3
The use of cellular phones in an aircraft:
Is dangerous to aircraft operations.
May disrupt the cellular network.
Is illegal.
Failure to observe in-flight regulations
may lead to the suspension of cellular
services and/or legal action.
NEVER use your phone while driving,
even if hands free operation is allowed.
ALWAYS park your vehicle first.
In some countries, it is illegal to use
mobile and radio telephones while
driving.
You are advised to turn off the phone
when at a gas station.
NEVER store or carry inflammable gas,
liquids or explosive materials in the
same compartment as your cellular
phone.
DO NOT use the power adapter if:
The power cord is damaged.
The phone has been dropped or
undergone a shock.
Have an authorized service center
repair the phone. NEVER try to repair
the phone yourself.
The illustrations below indicate the safety
precautions to be taken when using your cellular
telephone.
Safety Precautions
Symbols
Press/Push
= Step number
Important Note
1

4 5
Useful Features
Turning Tones On and Off ......................................................... 39
Sending Your Own Phone Number ........................................... 42
Displaying Your Own Phone Number ........................................ 42
Choosing Analog or Digital Mode ............................................. 43
System Selection ...................................................................... 44
Message Service ....................................................................... 46
Key Lock .................................................................................... 51
Setting Alarm ............................................................................ 52
DTMF Dialing ............................................................................ 55
Timers ........................................................................................ 57
Call Reservation Alert ............................................................... 62
Advanced Features
Automatic Feature Setup .......................................................... 65
Changing Greeting Message .................................................... 68
Restricting the Use of the Phone ............................................... 69
Changing Lock Code .................................................................. 72
Locking the Phone ..................................................................... 73
Warning Beep Generation ........................................................ 74
Choosing NAM .......................................................................... 75
Setting the Phone to Send PIN ................................................. 76
System Reset ............................................................................ 78
Miscellaneous
Cleaning Your Cellular Phone ................................................... 79
Battery Safety Precautions ....................................................... 80
Accessories ............................................................................... 82
Troubleshooting ........................................................................ 84
LCD Messages .......................................................................... 87
Summary ................................................................................... 89
Front View of the Phone ................................................................. 6
Rear View of the Phone ................................................................. 7
LCD Display and Indicators ............................................................ 8
Preparation
Installing the Battery Pack .......................................................... 9
Charging the Battery Pack ......................................................... 10
Tips on Battery Charging ........................................................... 11
Checking the Battery Charge Level ........................................... 13
Basic Operation
Turning the Phone On and Off ................................................... 14
Extending the Antenna .............................................................. 15
Making a Call ............................................................................ 16
Receiving Calls .......................................................................... 18
Adjusting Volumes .................................................................... 19
Mute .......................................................................................... 20
Choosing Alert Type .................................................................. 21
Choosing Ringer Bell ................................................................. 22
Redialing the Last Numbers ...................................................... 23
Memory Dialing
Finding an Empty Memory Location .......................................... 25
Storing Numbers in Memory ..................................................... 26
Entering Name in Memory ........................................................ 28
Correcting a Name or Number .................................................. 29
Storing Numbers into Numeric Group ...................................... 30
One-Touch Dialing ..................................................................... 31
Two-Touch Dialing .................................................................... 31
Secret Number Dialing .............................................................. 32
Searching for Numbers in Memory ........................................... 33
Erasing Numbers in Memory .................................................... 37
Contents
Contents (continued)
MiscellaneousAdvanced FeaturesPreparation Basic Operation Memory Dialing Useful Features

6 7
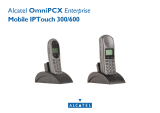
Front View of the Phone Rear View of the Phone
Battery lock/unlock button
Battery
Battery terminals
456
123
78
0
9
GHI JKL MNO
.QZ ABC DEF
PRS
ALPH
TUV
OPR
WXY
LOCK
STO
RCL FCN
SEND
CLR
END
PWR
PWR: turns power on and off
STO: stores names and numbers
in memory
RCL: recalls stored memory
entries
FCN: helps access special
features
SEND: makes a call
CLR: clears messages on LCD
END: ends a call
Antenna
Speaker
LCD display
Number keypad
Receiving lamp
Strap hole
adjusts volume or
scrolls options menu
Buzzer
Microphone
Cover

8 9
LCD Display and Indicators
2
1. To attach the battery pack after
charging, align it with the phone
about 1cm (1/2") away from its place
so that the two arrows on the phone
are seen, the battery charge contacts
pointing downward.
2. Slide the battery pack upwards until
it clicks firmly into position.
Result: Your phone is now ready to
be turned on.
3
3. To remove the battery pack, release
it by pressing the button on the rear
of the phone.
4
4. Slide the battery pack downward
about 1cm (1/2") and lift it away from
the phone.
Your phone comes with rechargeable standard and
extended-life batteries. A medium battery is
available as an option. Contact your supplier.
Installing the Battery Pack
INUSE NO ROAM FM CDMASVC
INUSE
blinks while your phone selects a channel
and lights up when the line is connected.
displays the dialed
numbers and the
current status
NOSVC
SVC
NOSVC: no service area
SVC: service area
ROAM
lights up when your phone is out of the
home area.
FM: analog mode
CDMA: digital mode
displays the signal strength level with
the number of bars.
displays the battery charge level status
with the number of blocks.
indicates you have voicemail or text
messages.
indicates the vibration mode.
indicates silent mode (lamp mode).
lights up when a call reservation feature
is set.
FM
CDMA
Preparation

10 11
1. Plug the power cord of the charger
into an appropriate wall socket.
When the power is connected
correctly, the yellow lamp on the
charger flickers once.
2. To charge the battery pack, insert the
battery pack into the rear slot of the
charger.
The lamp marked BATT on the
front panel of the charger lights
up red.
3. If you do not wish to use your phone
while charging the battery, you can:
Leave the battery pack attached
to the phone.
Place the phone in the front slot
of the charger. The lamp marked
PHONE on the front panel of the
charger lights up red.
Digital
When you purchase the product, the battery is not fully
charged. Please charge the battery fully before you
operate your phone.
Charging the Battery Pack
The lamp color indicates the charging status as follows:
Tips on Battery Charging
1
2
3
If the lamp blinks yellow, the battery pack is not properly
inserted or the contact of the charging terminal is stained or
rusty. When this occurs, remove the battery pack, check the
charging terminal and reinsert the battery pack. If this does not
work properly, replace the battery pack with a new one.
The full charging time is different according to the battery type
as follows:
If both the front and rear slots are occupied, the charging
time may be longer.
When both the front and rear slots are occupied, the front
slot charges first.
It is normal for the battery pack to become warm during
charging.
Charging Completed
red
green
Standby
(off)
red
Front
(phone
charging lamp)
Rear (battery
charging lamp)
Status
Slot
greenyellow
Standard Extended
about 120
about 180
Medium
about 150
about 90
Front
Rear
Battery
Slot
about 150about 120
(min)
Preparation
Preparation

1312
The number of blocks represent the
battery charge level.
Example:
Battery fully charged
Battery low
HK HUTCHISON
01/04 3:15P
INUSE FM CDMASVC
The battery charge level is displayed at the left corner of
the LCD display.
Checking the Battery Charge Level
When fully charged, the new battery will last as
follows:
The operating time varies according to the service mode you
are using.
If you use the phone set to the digital mode where only
analog service is available, or stay in no-service area for a
long time, the operating time may be shorten.
The standby time in digital mode is different according to the
service type provided from the supplier.
The battery is a consumable product, so that the battery life
will be reduced. We guarantee the battery for 3 months.
When the battery life is reduced by half, purchase new
battery.
Medium Extended
Talk mode
Talk mode
Standby
Slot 1 17-19 hr
25-27 hr
36-38 hr
50-55 hr
57-60 hr
Slot 0 10-12 hr 22-24 hr 38-40 hr
85-90 hr
Standby
Slot 2
150 min
Standard
70 min
250 min
100 min
50 min
170 min
10-12 hr
5-6 hr
16-18 hr
Digital
mode
Analog
mode
Battery
Status
When the battery drops to a low level,
the phone beeps and the battery icon
turns to .
If any button is pressed in the
low battery status, the LCD
backlight lamp is not turned on.
If the battery is fully discharged,
a warning tone sounds three
times and the power is turned
off.
HK HUTCHISON
01/04 3:15P
INUSE FM CDMASVC
Preparation
Preparation

The phone can only place and receive calls when it is
turned on.
1514
Turning the Phone On and Off
For best performance, extend the antenna fully when you
use the phone.
Extending the Antenna
1.To turn on the phone, press PWR and
hold.
Result:
The phone
Beeps
displays the greeting
message, your phone
number, and current time
(In digital mode).
When the message READY
is displayed, you can place
and receive calls.
If the phone is locked, the
message READY is replaced by
LOCKED. You must enter the
lock code. You can place a 3-digit
emergency call when the phone
is locked.
READY
HK HUTCHISON
01/04 3:15P
INUSE FM CDMASVC
456
123
78
0
9
GHI JKL MNO
.QZ ABC DEF
PRS
ALPH
TUV
OPR
WXY
LOCK
STO
RCL FCN
SEND
CLR
END
PWR
2. To turn off the phone, press PWR
until you hear a beep tone.
1. Grasp the knob on the end of the
antenna and carefully pull the
antenna out to its full extension.
Result:
Reception quality is
improved.
2. When you have finished the call,
push the antenna back in.
The signal strength is indicated on the display:
Strong signal
Weak signal
456
123
78
0
9
GHI JKL MNO
.QZ ABC DEF
PRS
ALPH
TUV
OPR
WXY
LOCK
STO
RCL FCN
SEND
CLR
END
PWR
1
2
1
2
Basic Operation
Basic Operation

16 17
You can only make a call when the phone is turned
on.
Making a Call
1. Open the cover, and enter desired
telephone number, including the area
code.
Result:
The number entered is
displayed.
456
123
78
0
9
GHI JKL MNO
.QZ ABC DEF
PRS
ALPH
TUV
OPR
WXY
LOCK
STO
RCL FCN
PWR
456
123
78
0
9
GHI JKL MNO
.QZ ABC DEF
PRS
ALPH
TUV
OPR
WXY
LOCK
STO
RCL FCN
SEND
CLR
END
PWR
2. If you make a mistake:
Press CLR once or more until
the incorrect digit or digits are
cleared.
Continue entering your number.
To clear the whole number, press
CLR and hold.
456
123
78
0
9
GHI JKL MNO
.QZ ABC DEF
PRS
ALPH
TUV
OPR
WXY
LOCK
STO
RCL FCN
SEND
CLR
END
PWR
00:01
28079011
INUSE CDMASVC
3. When you have entered the whole
number, press SEND.
Result:
The number is dialed.
The Inuse indication is
displayed.
If the connect tone feature is set,
you can hear the connect tone
when your phone is connected to
the basestation system to make a
call.
4. If the other party answers, begin the
conversation.
Result:
Call time is displayed. For
further details, see 'Call Time
Display' under 'Automatic
Feature Setup' on page 61.
1
2
3
5. When you have finished the call:
Close the cover.
or
Press END.
If your party does not answer your call and you turn on the
automatic redial feature (see page 60), INUSE flickers and
REDIAL appears on the LCD. Your phone is automatically
redialing the number. When a call is connected using automatic
redialing, the phone rings once to alert you so that you may
begin conversation. If you do not want the number to be
redialed, press END.
456
123
78
0
9
GHI JKL MNO
.QZ ABC DEF
PRS
ALPH
TUV
OPR
WXY
LOCK
STO
RCL FCN
SEND
CLR
END
PWR
5
Basic Operation
Basic Operation

456
123
78
0
9
GHI JKL MNO
.QZ ABC DEF
PRS
ALPH
TUV
OPR
WXY
LOCK
STO
RCL FCN
SEND
CLR
END
PWR
4
18 19
CALL
01/04 3:15P
CDMASVC
1. When there is an incoming call, the
phone rings.
You can choose the alert type;
bell, lamp, or vibration (option).
For details, see page 21.
2. To answer the call:
If the cover is... Do...
Closed Open the cover
or
Press
or .
Already opened Press any button
except PWR.
3. Begin the conversation.
4. When you have finished the call:
Close the cover
or
Press END.
You can only receive calls when the phone is turned
on.
Receiving Calls
1. Press or until you reach the
desired volume level.
You can adjust the volume of the sounds generated
on your phone by using the volume buttons (
)
on the left side of the phone.
Keytone Volume
This function is only available in standby mode.
Adjusting Volumes
Key Volume
CDMASVC
123
QZ ABC DEF
SEND
CLR
END
1. Press or until you reach the
desired volume level.
Earphone Volume
This function is only available during a telephone conversation.
Voice Volume
INUSE CDMASVC
1. Press:
FCN
followed by
Numeric button 5
2. Press or until you reach the
desired volume level.
Ringer Volume
This function is only available in standby mode.
Alert Volume
CDMASVC
If 'Incoming call restrict' feature is activated and there is an
incoming call, the message PAGE RESTRICTED is
displayed and you can not answer the call.
1
Basic Operation
Basic Operation

2. Press numeric button 2.
Result:
The message MUTE is
displayed. The person you're talking
to can no longer hear you, but you
can hear your correspondent.
3. Press FCN and numeric button 2
again when you wish to resume the
conversation with your party.
Result:
The message MUTE
disappears on the display and you
can speak with your party.
20 21
456
123
78
0
9
GHI JKL MNO
.QZ ABC DEF
PRS
ALPH
TUV
OPR
WXY
LOCK
STO
RCL FCN
SEND
CLR
END
PWR
1. Press FCN while you are over the
phone.
MUTE
INUSE CDMASVC
456
123
78
0
9
GHI JKL MNO
.QZ ABC DEF
PRS
ALPH
TUV
OPR
WXY
LOCK
STO
RCL FCN
SEND
CLR
END
PWR
1
2
3
3
1. Press:
FCN
followed by
Numeric buttons 2 and 1.
Result:
The alert type currently
selected is displayed.
LAMP
Alert Type
INUSE CDMASVC
2. Press or until the desired mode
is displayed.
Result:
The alert types you can
choose are displayed:
BELL : the bell sounds and the
receiving lamp flickers.
VIBRATOR (option): the phone
vibrates and the receving lamp
flickers.
LAMP : the receiving lamp flickers.
VIB+BELL(option) : the phone
vibrates three times, then the bell
sounds and the receving lamp
flickers.
3. Press STO.
Result:
appears if the LAMP mode
is selected.
appears if the VIBRATOR or
VIB+BELL mode is selected.
This feature allows you to mute the phone's
microphone, so you can have a private conversation
with someone without the person at the other end
listening.
This function is only available during a telephone conversation.
Mute
You can choose a call alert type that informs you of
an incoming call. There are bell, lamp indication, or
vibration (option) modes.
Choosing Alert Type
• When you use the hands-free kit, you cannot choose the
VIBRATOR or LAMP indication modes.
• The VIBRATOR mode is not available in some countries.
456
123
78
0
9
GHI JKL MNO
.QZ ABC DEF
PRS
ALPH
TUV
OPR
WXY
LOCK
STO
RCL FCN
SEND
CLR
END
PWR
1
1
1
SEND
CLR
END
456
123
78
0
9
GHI JKL MNO
.QZ ABC DEF
PRS
ALPH
TUV
OPR
WXY
LOCK
STO
RCL FCN
SEND
CLR
END
PWR
2
3
Basic Operation
Basic Operation

22 23
456
123
78
0
9
GHI JKL MNO
.QZ ABC DEF
PRS
ALPH
TUV
OPR
WXY
LOCK
STO
RCL FCN
SEND
CLR
END
PWR
456
123
78
0
9
GHI JKL MNO
.QZ ABC DEF
PRS
ALPH
TUV
OPR
WXY
LOCK
STO
RCL FCN
SEND
CLR
END
PWR
Select 6
INUSE CDMASVC
Alert Tone
1. Press FCN.
2. Press numeric button 2 twice.
456
123
78
0
9
GHI JKL MNO
.QZ ABC DEF
PRS
ALPH
TUV
OPR
WXY
LOCK
STO
RCL FCN
SEND
CLR
END
PWR
4. Press STO.
3. Press or repeatedly until you
find the desired ringer bell.
Result:
Each time you press or
, a different ringer bell sounds.
You have a choice of nine different ringer bells to
inform you of an incoming call.
Choosing Ringer Bell
1
2
4
1. Press RCL twice.
Result:
The last called number and
the time you called are displayed.
456
123
78
0
9
GHI JKL MNO
.QZ ABC DEF
PRS
ALPH
TUV
OPR
WXY
LOCK
STO
RCL FCN
SEND
CLR
END
PWR
SEND
CLR
END
2. Press or until the desired
number is displayed.
Result:
The last called number is
stored in 'LAST 0'. The 10 recently
called numbers are displayed from
'LAST 0' to 'LAST 9'.
456
123
78
0
9
GHI JKL MNO
.QZ ABC DEF
PRS
ALPH
TUV
OPR
WXY
LOCK
STO
RCL FCN
SEND
CLR
END
PWR
LAST1
12/12 11:35A
28079011
INUSE FM CDMASVC
3. To... Press...
Redial the number SEND
in the display
Exit this function END
Redialing is a special type of memory dialing that
lets you easily dial a busy or unanswered number
again. You can search the history of 10 recently
called numbers.
To Scan and Redial
Redialing the Last Numbers
1
2
3
3
Basic Operation
Basic Operation

456
123
78
0
9
GHI JKL MNO
.QZ ABC DEF
PRS
ALPH
TUV
OPR
WXY
LOCK
STO
RCL FCN
SEND
CLR
END
PWR
2
1
Empty Location Under a Specified Group
You can search an empty location under a specified
group. For details, see 'Storing Numbers into
Numeric Group' on page 30.
24 25
456
123
78
0
9
GHI JKL MNO
.QZ ABC DEF
PRS
ALPH
TUV
OPR
WXY
LOCK
STO
RCL FCN
SEND
CLR
END
PWR
456
123
78
0
9
GHI JKL MNO
.QZ ABC DEF
PRS
ALPH
TUV
OPR
WXY
LOCK
STO
RCL FCN
SEND
CLR
END
PWR
1. Press:
FCN
followed by
Numeric button 0
Result:
You are asked to enter the
lock code.
2. Enter the current lock code.
The lock code is preset to 0000.
An asterisk (
) is displayed for
each digit entered.
3. Press numeric button 8.
4. Press or to choose 'YES'.
YES
Clr Last #?
INUSE FM CDMASVC
5. Press STO.
Result:
The messages WAIT, and
then LAST CALLS ARE
CLEARED are displayed.
To Erase All Numbers in Redial Memory
456
123
78
0
9
GHI JKL MNO
.QZ ABC DEF
PRS
ALPH
TUV
OPR
WXY
LOCK
STO
RCL FCN
SEND
CLR
END
PWR
1
1
2
3
You can search an empty memory location before
you store the phone numbers into the memory.
Any Empty Location
Finding an Empty Memory Location
1. Press:
RCL
followed by
Result: The message SEARCHING
EMPTY MEMORY is displayed,
then empty locations are displayed.
EMPTY
01 02 03 04
05 06 07 08>
INUSE CDMASVC
456
123
78
0
9
GHI JKL MNO
.QZ ABC DEF
PRS
ALPH
TUV
OPR
WXY
LOCK
STO
RCL FCN
SEND
CLR
END
PWR
2. Press or to display the other
available locations.
1
1
1. Press RCL.
2. Press:
Group number (0-9)
followed by
Example:
To search for an empty location from
20 to 29, press numeric button 2.
3. Press or to display the other
available locations.
Basic Operation
Memory Dialing

26 27
You can store the numbers that you dial frequently
in the memory for a convenient dialing.
Up to 100 numbers can be stored in memory location 00-99.
Memory locations from 00 to 09 are used for one-touch dial.
Memory locations from 90 to 99 are used to store confidential
phone numbers.
To help identify the numbers stored in the memory, you can
associate a name with each one.
Storing Numbers in Memory
1. Enter the desired telephone number
of up to 36 digits including the area
code.
Result:
The numbers entered are
displayed.
456
123
78
0
9
GHI JKL MNO
.QZ ABC DEF
PRS
ALPH
TUV
OPR
WXY
LOCK
STO
RCL FCN
SEND
CLR
END
PWR
2. Press STO.
Result:
The LCD displays a message
to enter a memory location number.
456
123
78
0
9
GHI JKL MNO
.QZ ABC DEF
PRS
ALPH
TUV
OPR
WXY
LOCK
STO
RCL FCN
SEND
END
PWR
Sto:07
Name?
ABC
INUSE FM CDMASVC
456
123
78
0
9
GHI JKL MNO
.QZ ABC DEF
PRS
ALPH
TUV
OPR
WXY
LOCK
STO
RCL FCN
PWR
3. To... Press...
Assign a specific 2-digit location
location number between
00 through 89
Store the number
in the first
available location
Store a number 2-digit location
into secret number between
memory 90 through 99
4. To enter the name, press the button
marked with the desired letter.
For details on entering name,
see 'Entering Name in
Memory' on page 28.
If you do not wish to enter a
name, just skip over this step.
456
123
78
0
9
GHI JKL MNO
.QZ ABC DEF
PRS
ALPH
TUV
OPR
WXY
LOCK
STO
RCL FCN
PWR
1
2
3
4
5. Press STO.
If you are selecting a location between 0 and 9, precede that
number with a zero (0).
If there is no empty location, the message MEM.(00-89)
IS FULL is displayed.
If the message Memory Used! Store? YES is displayed,
a number has already been stored in the memory location
chosen. Press
or :
To... Choose...
Replace it with the new one
YES, then STO
Assign another location NO, then STO
The customer service phone number is prestored to the
location 00 at factory. If you do not modify the location, you
can see CUSTOMER SVR and the service phone number in
the display while you are searching for numbers in memory.
For details on 'Searching for Numbers in Memory', see page
33.
Memory Dialing
Memory Dialing
456
123
78
0
9
GHI JKL MNO
.QZ ABC DEF
PRS
ALPH
TUV
OPR
WXY
LOCK
STO
RCL FCN
SEND
CLR
END
PWR
5

28 29
Names of up to 12 letters can be stored together
with phone numbers in the memory.
Entering Name in Memory
1. Start when the LCD prompts to enter
name.
456
123
78
0
9
GHI JKL MNO
.QZ ABC DEF
PRS
ALPH
TUV
OPR
WXY
LOCK
STO
RCL FCN
PWR
2. Press the number button marked with
the desired letter.
Result:
The first letter marked on the
button is displayed. For example
press 5 for the letter 'J'.
3. If necessary, press the same button
until you find the desired letter.
4. When the desired letter appears,
press another number button marked
with the next desired letter.
Result:
The cursor moves to right
and displays the next letter chosen.
5. Repeat steps 3 and 4 for each letter.
If you press and #, the cursor
moves to the left and right. Use
these buttons to correct a wrong
letter or insert a space between
the letters.
Sto:00
Name?
_
INUSE FM CDMASVC
456
123
78
0
9
GHI JKL MNO
.QZ ABC DEF
PRS
ALPH
TUV
OPR
WXY
LOCK
STO
RCL FCN
PWR
456
123
78
0
9
GHI JKL MNO
.QZ ABC DEF
PRS
ALPH
TUV
OPR
WXY
LOCK
STO
RCL FCN
PWR
Sto:00
Name?
KI
INUSE FM CDMASVC
5
456
123
78
0
9
GHI JKL MNO
.QZ ABC DEF
PRS
ALPH
TUV
OPR
WXY
LOCK
STO
RCL FCN
SEND
CLR
END
PWR
1. To correct a letter or digit:
Press CLR once or more until the
incorrect letter or digit is cleared.
Continue entering your name or
number.
1
456
123
78
0
9
GHI JKL MNO
.QZ ABC DEF
PRS
ALPH
TUV
OPR
WXY
LOCK
STO
RCL FCN
SEND
CLR
END
PWR
2. To clear the whole name or number,
press CLR for more than one second.
2
2
3
If you make a mistake while entering a name or
number, you can correct it in the following way.
Correcting a Name or Number
Memory Dialing
Memory Dialing

30 31
You can store the associated numbers in a group.
Example:
individual phone numbers ; 00-09
office phone numbers ; 10-19
business phone numbers ; 20-29
Storing Numbers into Numeric Group
1. Enter the desired telephone number,
including the area code.
Result:
The number entered is
displayed.
456
123
78
0
9
GHI JKL MNO
.QZ ABC DEF
PRS
ALPH
TUV
OPR
WXY
LOCK
STO
RCL FCN
S
PWR
456
123
78
0
9
GHI JKL MNO
.QZ ABC DEF
PRS
ALPH
TUV
OPR
WXY
LOCK
STO
RCL FCN
SEND
CLR
END
PWR
2. Press STO.
Result:
The LCD prompts to enter
memory location number.
456
123
78
0
9
GHI JKL MNO
.QZ ABC DEF
PRS
ALPH
TUV
OPR
WXY
LOCK
STO
RCL FCN
S
PWR
456
123
78
0
9
GHI JKL MNO
.QZ ABC DEF
PRS
ALPH
TUV
OPR
WXY
LOCK
STO
RCL FCN
SEND
CLR
END
PWR
3. Enter the location group number (0-9).
0: From 00 to 09
1: From 10 to 19
2: From 20 to 29
8: From 80 to 89
9: From 90 to 99
4. Press .
If there is no empty location,
the message
MEM.(X0-X9)
IS FULL is displayed.
If you want to enter a name,
enter the name. For details, see
'Entering Name in Memory' on
page 28.
5. Press STO.
1
2
3
4
5
1. Press and hold the second digit of
the memory location containing the
number to be dialed.
For example:
Location no.09
Press 9 and hold.
Result:
The number stored is
Displayed
Dialed
Memory locations 00 to 09 are special one-touch
locations. You can dial the phone numbers stored in
the memory from 00 to 09 simply by pressing one
button.
One-Touch Dialing
456
123
78
0
9
GHI JKL MNO
.QZ ABC DEF
PRS
ALPH
TUV
OPR
WXY
LOCK
STO
RCL FCN
S
PWR
1
1. Press the first digit briefly, then hold
down the second digit of the memory
location.
For example:
Location no.23
Press 2 briefly and hold
down 3.
Result:
The number stored is
Displayed
Dialed
Once you have stored phone numbers in the
memory, you can dial them easily whenever you
want.
Two-Touch Dialing
456
123
78
0
9
GHI JKL MNO
.QZ ABC DEF
PRS
ALPH
TUV
OPR
WXY
LOCK
STO
RCL FCN
S
PWR
1
Memory Dialing
Memory Dialing

456
123
78
0
9
GHI JKL MNO
.QZ ABC DEF
PRS
ALPH
TUV
OPR
WXY
LOCK
STO
RCL FCN
SEND
CLR
END
PWR
32 33
456
123
78
0
9
GHI JKL MNO
.QZ ABC DEF
PRS
ALPH
TUV
OPR
WXY
LOCK
STO
RCL FCN
SEND
CLR
END
PWR
Rcl:99
-Secret-
ABC
INUSE FM CDMASVC
1. Press RCL.
2. Enter the desired location number
(90-99).
Result:
The message -Secret- is
displayed.
The name (if any) is displayed.
456
123
78
0
9
GHI JKL MNO
.QZ ABC DEF
PRS
ALPH
TUV
OPR
WXY
LOCK
STO
RCL FCN
SEND
PWR
3. Enter the lock code.
The lock code is preset to 0000.
4. To... Press...
Make the call SEND
Exit the function END
You can dial the secret phone number stored in
memory locations from 90 to 99 the same as 'Two-
Touch Dialing' on page 31. Only difference when
you dial the secret number is
Phone number is not displayed
Name (if stored) is displayed
If you want to see the phone number stored in
secret memory, do as follows:
Secret Number Dialing
4
4
1. Press RCL.
2. Enter the number of the memory
location at which you wish to start
the scan.
Result:
The phone number and
associated name (if any) are
displayed.
If the location is empty,
LOCATION EMPTY is
displayed.
If you do not remember which telephone numbers
have been stored in the various memory locations,
you can scan through the locations until you find
the one you are looking for.
By Location Number
Searching for Numbers in Memory
1
3
456
123
78
0
9
GHI JKL MNO
.QZ ABC DEF
PRS
ALPH
TUV
OPR
WXY
LOCK
STO
RCL FCN
SEND
CLR
END
PWR
456
123
78
0
9
GHI JKL MNO
.QZ ABC DEF
PRS
ALPH
TUV
OPR
WXY
LOCK
STO
RCL FCN
SEND
CLR
END
PWR
456
123
78
0
9
GHI JKL MNO
.QZ ABC DEF
PRS
ALPH
TUV
OPR
WXY
LOCK
STO
RCL FCN
S
PWR
SEND
CLR
END
4
4
1
3
2
3. To display the... Press...
Next memory location
Previous memory
location
4. When you have found the desired
number:
To... Press...
Make the call SEND
Exit the function END
Memory Dialing
Memory Dialing

2. Enter all or part of the name to
search by using the number button
marked with the desired letter.
Example:
Enter A to find all names
beginning with the letter A.
3. Press RCL.
Result:
The number of the name
matching the request is
displayed.
The first name is displayed with:
The memory location number
The telephone number
If the message NAME NOT
FOUND is displayed, the
name matching the request is
not in the memory.
If the message NO STORED
NAME is displayed, the
number stored with the name
is not in the memory.
34 35
456
123
78
0
9
GHI JKL MNO
.QZ ABC DEF
PRS
ALPH
TUV
OPR
WXY
LOCK
STO
RCL FCN
SEND
CLR
END
PWR
1. Press:
FCN
followed by
Result: The messages SORT
NAMES and then ENTER NAME
are displayed.
ENTER NAME
A
INUSE FM CDMASVC
456
123
78
0
9
GHI JKL MNO
.QZ ABC DEF
PRS
ALPH
TUV
OPR
WXY
LOCK
STO
RCL FCN
SEND
CLR
END
PWR
1
1
5. When you have found the desired
number.
To... Press...
Make the call SEND
Exit the function END
SEND
CLR
END
4. To display the... Press...
Next name
Previous name
456
123
78
0
9
GHI JKL MNO
.QZ ABC DEF
PRS
ALPH
TUV
OPR
WXY
LOCK
STO
RCL FCN
SEND
CLR
END
PWR
4
5
5
3
By Name
Memory Dialing
Memory Dialing

36 37
456
123
78
0
9
GHI JKL MNO
.QZ ABC DEF
PRS
ALPH
TUV
OPR
WXY
LOCK
STO
RCL FCN
SEND
CLR
END
PWR
456
123
78
0
9
GHI JKL MNO
.QZ ABC DEF
PRS
ALPH
TUV
OPR
WXY
LOCK
STO
RCL FCN
SEND
END
PWR
456
123
78
0
9
GHI JKL MNO
.QZ ABC DEF
PRS
ALPH
TUV
OPR
WXY
LOCK
STO
RCL FCN
SEND
CLR
END
PWR
1. Press CLR and hold.
Result:
The number on the display is
erased.
2. Enter part of the phone number you
remember.
123
SEND
CLR
END
4. To display the... Press...
Next number
Previous number
5. When you have found the desired
number.
To... Press...
Make the call SEND
Exit the function END
3. Press RCL.
Result:
The first number matching
the request is displayed with:
memory location number
name (if any)
'NO MATCH NUMBER' is
displayed if there is no number
matching the request.
1
2
4
1. Press CLR and hold.
Result:
The telephone number on the
display is erased.
456
123
78
0
9
GHI JKL MNO
.QZ ABC DEF
PRS
ALPH
TUV
OPR
WXY
LOCK
STO
RCL FCN
SEND
CLR
END
PWR
456
123
78
0
9
GHI JKL MNO
.QZ ABC DEF
PRS
ALPH
TUV
OPR
WXY
LOCK
STO
RCL FCN
SEND
CLR
END
PWR
3. Enter the location number under
which the phone number you want to
erase is stored.
2. Press STO.
Sto:07
Memory Used!
Clear? YES
INUSE FM CDMASVC
4. Press or :
To... Choose...
Erase the location
YES
Choose another location NO
5. Press STO.
Result:
The stored phone number is
erased and the message CLEARED
is displayed.
If you store a new number into an occupied
location, the new number replaces the old number
automatically. If you want to delete the old number
without storing a new one, do the following:
To Erase a Specific Number
Erasing Numbers in Memory
1
2
4
By Partial Phone Number
3
Memory Dialing
Memory Dialing

456
123
78
0
9
GHI JKL MNO
.QZ ABC DEF
PRS
ALPH
TUV
OPR
WXY
LOCK
STO
RCL FCN
SEND
CLR
END
PWR
38 39
YES
Clr Memory?
INUSE FM CDMASVC
456
123
78
0
9
GHI JKL MNO
.QZ ABC DEF
PRS
ALPH
TUV
OPR
WXY
LOCK
STO
RCL FCN
SEND
CLR
END
PWR
456
123
78
0
9
GHI JKL MNO
.QZ ABC DEF
PRS
ALPH
TUV
OPR
WXY
LOCK
STO
RCL FCN
PWR
1. Press:
FCN
followed by
Numeric button 0.
2. Enter the lock code.
The lock code is preset to 0000.
An asterisk (
) is displayed for
each digit entered.
456
123
78
0
9
GHI JKL MNO
.QZ ABC DEF
PRS
ALPH
TUV
OPR
WXY
LOCK
STO
RCL FCN
SEND
CLR
END
PWR
3. Press numeric button 7 to choose 'Clr
Memory' function.
4. Press or :
To... Choose...
Erase all numbers YES
Cancel this operation NO
5. Press STO.
Result:
The message ALL
MEMORIES ARE CLEARED is
displayed.
To Erase All Numbers in Memory
1
1
3
2
2
1. Press FCN while you are over the
phone.
SILENT
INUSE FM CDMASVC
4. To turn on the keytone, press:
FCN
followed by
Numeric button 3.
Result:
The message SILENT
disappears and the keytone sounds.
If you want to call for ARS
service or pager, you have to turn
on the keytone.
2. Press numeric button 3.
Result:
The message SILENT is
displayed.
3. Enter the desired number.
Result:
You and your party are not
annoyed with the keytone.
456
123
78
0
9
GHI JKL MNO
.QZ ABC DEF
PRS
ALPH
TUV
OPR
WXY
LOCK
STO
RCL FCN
SEND
CLR
END
PWR
Keytone
You can press a number during conversation
without transmitting the annoying beep tones to the
person to whom you are speaking.
This function is only available during a telephone conversation.
Turning Tones On and Off
1
4
4
Memory Dialing
Useful Features
/