Page is loading ...

Page 1 of 6
RECOMMENDED TOOLS
• Screwdriver with phillips head
(cordless optional)
• Level
• Tape measure
• Stud Finder
• Hammer drill w/ 1/4" bit for
masonry anchor (for installa-
tions on masonry walls)
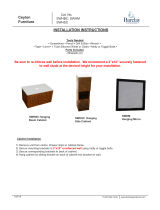
Installation Instructions
For Models:
DK-ADS001 (Glove / Towel / Cup Dispenser)
RECOMMENDED FASTENERS
(NOT SUPPLIED)
Stud Walls (Standard)
Use #12 x 2" long round head wood screws
(course threaded). The screws must be driven
into the wall studs or backing. It may be
necessary to use washers to keep the head of
the screws from pulling through the holes in the
hanging bracket. (Use sheet metal screws for
steel studded walls). In studded walls where
backing is not provided, it will be necessary to
use 3/16" short mollies, or other types of
commercial expansion fasteners.
Hollow Tile or Masonry Walls
Use 1/4" machine screw expansion anchors of
adequate length. A 3/16" short molly or other
type of expansion fastener may be used if the
installers predrill the hole.
Rough Solid Concrete or Brick Wall
Use #12 round head wood screws or a special-
ized masonry fastener.
MA446201
Next
Style A

Page 2 of 6
DISPENSER CABINET INSTALLA-
TION
NOTE:
The recommended position of
the dispenser is centered on
wall above sink and faucet
with bottom of dispenser 18
in. (45.7 cm) above
countertop.
A - Determine where dispenser
cabinet will be located.
B - Position dispenser cabinet in
desired position on wall and
then level the cabinet.
C - Secure dispenser cabinet to
wall with four fasteners (not
supplied - see cover page for
recommended fasteners).
Figure 1
A
B
MA446500
C
Back
Next

Page 3 of 6
DISPENSER CABINET DOORS AD-
JUSTMENT AND DISPENSER TRAY
INSTALLATION.
A - Check to see if door needs
adjusted vertically or horizon-
tally.
B - Adjust door vertically (door
should be even with bottom of
cabinet frame) by loosening
screws (B) on both hinges of
door. After adjusting, re-
tighten screws.
C - Adjust door horizontally (so
door doesn't have too large of
a gap between edge of door
and edge of cabinet frame) by
loosening screws (C) on both
hinges of door. After adjust-
ing, retighten screws.
D - Install dispenser tray into
bottom of dispenser cabinet
by pressing tray firmly into
place.
Figure 2
C
B
A
D
MA446301
Back
Next

Page 4 of 6
DISPENSER CABINET USE
A - Open dispenser cabinet door to
gain access to refill gloves,
towels, or cups.
B - To refill an empty glove box,
simply remove empty glove box
and insert a new glove dis-
penser container in the empty
slot. The retaining clip (1)
provides spring tension to hold
any size glove box in place.
C - To refill an empty cup dis-
penser, simply insert a stacked
column of standard 5 ounce
cups into the cup dispenser.
D - To refill an empty towel dis-
penser with "C" style towels,
install dividers (2) into outside
slots (3). Then, place a stack
of "C" style towels face down
into towel dispenser.
E - To refill an empty towel dis-
penser with "Z" style towels,
install dividers (2) into inside
slots (4). Then, place a stack
of "Z" style towels face down
into towel dispenser.
Figure 3
A
3
D
2
B
1
2
MA446400
E
C
4
Back
Next

Page 5 of 6
KNIGHT DENTAL CASEWORK LIMITED WARRANTY
Extension of Warranty:
Midmark
Ò
Corporation (Midmark) warrants to the original purchaser its
Knight Dental Casework, manufactured by Midmark, to be free from de-
fects in material and workmanship under normal interior use and service.
Midmark's obligation under this warranty is limited to the repair or replace-
ment, at Midmark's option, of the parts or the products the defects of which
are reported to Midmark within the applicable warranty period and which
upon examination by Midmark prove to be defective.
Applicable Warranty Period
The applicable warranty period, measured from the date of delivery to the
original user, shall be as follows:
(a) Five (5) years for all products and components (except for the
shorter periods in (b and c)), including plastic laminate top surfaces, door
and drawer fronts, castors, and electrical components such as task lights
and cords.
(b) Three (3) years for task light ballast.
(c) One (1) year for plastic laminate top surfaces and accessories.
Exclusions
Midmark's warranty does not cover sinks, faucets, and plumbing acces-
sories. Any warranties on these items are extended directly by the manu-
facturer of these items to the original purchaser. Information on these
manufacturers warranties will be enclosed with the applicable products.
Also, Midmark will furnish copies of any of the warranties extended by any
such manufacturers upon request.
This warranty does not cover and Midmark shall not be liable for: (1)
repairs and replacements required because of misuse, abuse, negli-
gence, alteration, accident, freight damage, or tampering; (2) matching of
color, grain, or texture except to commercially acceptable standards; (3)
changes in color caused by natural or artificial light; (4) products which are
not installed, used, and properly cleaned as required in Midmark's written
Installation Manual; (5) specially manufactured products; (6) products
considered to be of a consumable nature such as light bulbs and surge
suppression product; (7) accessories or parts not manufactured by
Midmark; (8) charges by anyone (including Midmark's authorized Knight
Dental Casework dealers) for adjustments, repairs, replacement parts,
installation, or other work performed upon or in connection with such
products which is not expressly authorized in writing in advance by Midmark.
Exclusive Remedy
Midmark's only obligation under this warranty is the repair or replacement
of defective parts. Midmark shall not be liable for any direct, special,
indirect, incidental, exemplary, or consequential damages or delay.
No Authorization
No person or firm is authorized to create for Midmark any other obligation
or liability in connection with the products.
THIS WARRANTY IS MIDMARK'S ONLY WARRANTY AND IS IN LIEU OF
ALL OTHER WARRANTIES, EXPRESS OR IMPLIED. MIDMARK MAKES
NO IMPLIED WARRANTIES OF ANY KIND INCLUDING ANY WARRAN-
TIES OF MERCHANTABILITY OR FITNESS FOR ANY PARTICULAR
PURPOSE. THIS WARRANTY IS LIMITED TO THE REPAIR OR RE-
PLACEMENT OF DEFECTIVE PARTS.
Back
Next

Page 6 of 6
© Midmark Corporation 1998
003-0915-00 Rev. C (2/05)
FAX (937) 526-5542(937) 526-3662
Midmark Corporation, Versailles, Ohio 45380 U.S.A.
R
Back
/