Page is loading ...

Page
1 of 4
Collection Container
and Recycling Kit
Part Number: APREC
Replacement Instructions
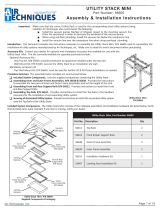
Figure 1. Collection Container and Recycling Kit, Part Number APREC
Introduction
This document provides the instructions to replace the Collection Container of an Acadia Plus Amalgam Separator using
Collection Container Recycling Kit, Part Number APREC. The use period for a Collection Container on either an existing Dry
Vacuum System or Liquid Ring Pump System is 12 months or less depending on the capacity of the system. Included are
procedures to replace and package the filled Collection Container for recycling. This replacement should be performed only by
authorized Air Techniques Dealer service personnel.
Replacement Kit Components- Supplied
As shown by Figure 1, each kit contains a Container Locking Lid, A1355; Shipping Container, A1365; Collection Container, A1630;
and Recycling Cap, A1642. A Prepaid Shipment Label is supplied with the kit. Canadian Recycling Literature is also included.
Important: The Collection Container is not to remain in use for a period longer than 12
months (one year) from the date of installation.
Dental Waste Handling
Collection Containers collect waste materials from dental procedures. All maintenance personnel must be familiar with
the procedures and practices for handling such dental waste and exercise every precaution to ensure personnel safety.
Additionally, personnel must follow all local, state and/or federal laws and regulations for the proper disposal of dental waste
containing mercury. Any operation, procedure or practice, which, if not strictly observed, may result in injury or long-term health
hazards to personnel. Filled Collection Containers being sent for recycling should be handled, stored and disposed of according
to regulations applying to dental waste containing mercury.
Proper Disposal of Amalgam Collector
After installation by an authorized Air Techniques Dealer, the Collection Container will trap mercury-containing materials. Mercury
is a defined and regulated “hazardous substance” under many local, state, and/or federal regulations. Accordingly, at the end of
the use period, arrangement must be made for proper disposal of the Collection Container and its contents in accordance with
all local, state and/or federal laws and regulations.
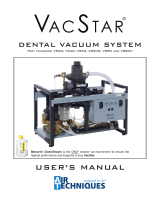
Kit Components Supplied
Item Description Part No. Item Description Part No.
1Container Locking Lid A1355 7 2 Adhesive Liners (not shown) A1413
2Shipping Container (bucket) A1365 8 Top Shipping Ring A1644-1
3Collection Container A1630 9 Bottom Shipping Ring A1644-2
4Recycling Cap A1642 10 Canadian Recycling Literature A1418
5Ziploc Container Disposal bag 9929-139 11 Replacement Instructions A1647
6Prepaid Shipment Label A1425
45
3
8
9
2
1
11
10
6
(Item 7 not shown)

Page
2 of 4
CAUTION: DO NOT use Chlorine Bleach or solutions of sodium Hypochlorite to clean or disinfect the
vacuum system or disposable Collection Container. Sodium Hypochlorite (Bleach) will reduce
effectiveness of the Container.
WARNING: Make sure to wear skin and eye protection when performing the following replacement procedures.
Collection Container Replacement Procedure
This replacement procedure provides instructions to replace the Container to return the Acadia Plus to service; and to package
the filled Collection Container for recycling. The replacement procedures are accomplished with the vacuum system running. All
hand piece and suction devices must also be turned off during the entire Container change out procedure to maintain constant
vacuum system pressure.
Important: Keep the vacuum system running and maintain constant vacuum pressure by not
working on patients or opening any hand piece or suction devices during the entire
collection Container change out procedure
Container Replacement Procedure. Replacement of the Collection Container consists of removing the used Container from the
Acadia Plus separator unit and installing in its place the replacement Container provided in the kit. Make sure to wear skin and eye
protection when performing the following replacement procedures. Keep the Container bagged and upright to prevent spills. It is also
recommended to wait until the liquid has drained down into the Collection Container to be removed before proceeding. Replace
the Collection Container used on the Acadia Plus separator unit by performing the following Container removal and installation
procedures.
Container Removal. With the vacuum system running, remove the used (filled) Collection Container from the Acadia Plus
separator unit as follows:
1. Open the supplied Ziploc Disposal Bag and slip it up and over the Collection Container to be removed.
2. With the Container in the Ziploc bag, carefully remove the Container by turning it to the left and lowering away from the
Acadia Plus separator unit.
3. Set the removed Container aside and immediately install the replacement Container in accordance with the procedure below.
Container Installation. Install the Collection Container onto the Acadia Plus separator unit by performing the following steps.
1. Remove the replacement Container from the protective bag and discard bag.
2. Lift the replacement Container into place and secure by turning to the right.
3. Make sure the replacement Container is properly installed before releasing.
4. Record the installation date on the label.
5. Ship the used Container to the recycling service provider by performing the Container Pack and Ship Procedure on the next
page.
Unpacking Replacement Container
Refer to Figure 2 and unpack the replacement Collection Container
as follows.
1. Open both shipping cartons and remove the Shipping Container
(bucket).
2. Remove the Cartridge from the Shipping Container.
3. Make sure that all components shown by Figure 1 were received.
4. Discard the Outer Shipping Carton and set aside the
Replacement Container, Shipping Container, Interior Carton,
and all packaging necessary to pack the used (filled) Collection
Container for reshipment to recycling service provider.
5. Place the new replacement Container aside for later use in the
Collection Container replacement procedure.
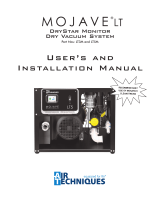
Figure 2. Unpacking Replacement Container
Collection
Container
Cartridge
Shipping
Container Lid
Replacement
Container
Shipping
Container
(Bucket)
Interior Shipping
Carton
Outer Shipping
Carton
Bottom Shipping
Ring
Top Shipping
Ring
Recycling
Cap

Page
3 of 4
Container Pack and Ship Procedure .
Refer to Figure 4 and pack the Collection Container for shipment by performing the following steps.
1. Push the Recycling Cap onto Collection Container and twist clockwise to secure. Make sure that the two ledges on the edge
of the cap are tucked under the tabs on top of the container.
2. Close the Ziploc Disposal Bag containing the Container removed from the Acadia Plus separator unit and place in the
shipping container (bucket) in between the top and bottom shipping rings.
3. Replace lid on the white bucket and twist securely closed.
4. After securing the lid, place one of the supplied adhesive liners from the lid to the side of the shipping container.
5. Place the closed shipping container into the interior carton and seal with the remaining supplied adhesive liner.
6. Fill out the shipping return label. This information is mandatory. Upon request, a Certificate of Recycling will be returned using
the information on the label.
Important: Refer to the Acceptable - Non-Acceptable Materials List supplied with the kit for the acceptable
materials allowed for shipment to the recycling vendor.
Figure 3. Collection Container Replacement
Remove Used Collection Container
1Record new installation
date on label
2Install Replacement Collection Container
3
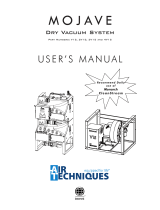
Figure 4. Packing Container for Shipment to Recycling Vendor
Important:
Make sure to install and
secure Recycling Cap onto
Collection Container.
2
1
Important:
Make sure to pack Container
with supplied shipping rings.
Shipping
Container Lid
Replacement
Container
Shipping
Container
(Bucket)
Interior Shipping
Carton
Bottom Shipping
Ring
Top Shipping
Ring
Recycling
Cap

Page
4 of 4
© 2017 Air Techniques, Inc. • PN A1647 Rev. A • March 2020
Digital Imaging
• Digital Radiography
• Intraoral Camera
• Caries Detection Aid
• Intraoral X-ray
• Film Processors
Utility Room
• Dry Vacuums
• Wet Vacuums
• Air Compressors
• Amalgam Separator
• Utility Accessories
• Utility Packages
Merchandise
• Evacuation System Cleaner
• Imaging Accessories
• Chemistry
• Processor Accessories
For over 50 years, Air Techniques has been a leading innovator and manufacturer of dental
products. Our priority is ensuring complete satisfaction by manufacturing reliable products
and providing excellent customer and technical support. Whether the need is digital imaging,
utility room equipment or merchandise, Air Techniques can provide the solution via our network
of authorized professional dealers. Proudly designed, tested and manufactured in the U.S., our
products are helping dental professionals take their practices to the next level.
Air Techniques’ family of quality products for the dental professional include:
Corporate Headquarters
1295 Walt Whitman Road | Melville, New York 11747- 3062 | Phone: 800-247-8324 | Fax: 888-247-8481
www.airtechniques.com
/