Page is loading ...

Install Guide 2014 page 2Version 1.2
THE LOOK YOU LOVE
THE LOOK YOU LOVE
NOTES
• The product must be installed and used in
accordance with all applicable specifications
and instructions.
• Failure to do so may result in both injury or
death or property damage.
• Add the shelves and drawer boxes beginning
from the bottom up.
• The product must not bear abnormal weight
loads - please refer to the packaging for the
recommended weight loads for individual items.
• Prior to installation, the material must be stored
indoors in a dry and clean environment that is
enclosed and protected from the elements.
• Where appropriate the correct tools must be
used to install the product - please refer to the
packaging for tools required.
• The products must not be painted over.
• Do not allow children to climb or play in, on or
around this product.
• Use this product for its intended purpose only.
• Do not use shelves, drawers or accessories as a
step ladder.
• Distribute all weight loads evenly.
• Two or more persons must work together to
install the system. Do not attempt to install the
system by yourself.
• Make sure the floor and ceiling bolts are tightly
fastened before the unit is used.
• Check the floor and ceiling bolts periodically and
tighten them if necessary.
• Please ensure that the correct floor and ceiliing
fasteners are used for you installation. If in
doubt or if any questions, please contact your
local hardware store for the correct screws/
fastening method.
Space Pro USA Inc.
Spares (Toll Free) 855-263-1954
Sales & Marketing 704-602-5170
Email: [email protected]
www.spacepro.com

page 3 Install Guide 2014 Version 1.2
THE LOOK YOU LOVE
THE LOOK YOU LOVE
CONTENTS:
PAGE 3: WHAT YOU WILL NEED
PAGE 4: HOW TO INSTALL
PAGE 5-6: FLOOR TO WALL POSTS
PAGE 7-8: MINI WALL SUPPORT
PAGE 9: SHELF BRACKET & SHELVES
PAGE 10: SHOE RACK 48”
PAGE 11: CLOSET ROD 48”
PAGE 12: DRAWER BOX BRACKETS
PAGE 13-14: DRAWER BOX
PAGE 15: NOTES

page 4 Install Guide 2014 Version 1.2
THE LOOK YOU LOVE
THE LOOK YOU LOVE
WHAT YOU WILL NEED: TOOLS REQUIRED
2mm

page 5 Install Guide 2014 Version 1.2
THE LOOK YOU LOVE
THE LOOK YOU LOVE
• We do not include wall fixings, please ensure that the correct wall fixings are specified
for your installation.
• If in doubt please contact your fixings supplier for the correct fixing specification for your wall.
HOW TO INSTALL

page 6 Install Guide 2014 Version 1.2
THE LOOK YOU LOVE
THE LOOK YOU LOVE
• 88in (2240mm) high
• 10
7
/
8
in (276mm) deep
• Cut to size as required
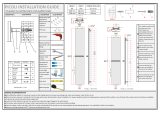
HOW TO INSTALL: FLOOR TO WALL POSTS
• Using an additional wall support means you don’t have to measure out from the
wall as this will act as your spacer.
• The maximum load that we recommend is 150kg per post.
• As the weight of the load has a downward force, the posts must be vertically
plumb to function correctly.
• Maximum recommended spacing between stanchions is 48in (1220mm).
• Cutting the posts will create sharp edges and caution must be taken
• PROTECTIVE CLOTHING IS RECOMMENDED.
A.
B.
C.
CUT TO SIZE
Xin (Xmm)
10in (250mm)
INFORMATION
30/66lbs
(inl.Drawer Box)
MAX
25kg
(55lbs)
MAX
150kg
(330lbs)
MAX
15kg
(33lbs)
MAX
8kg
(17.5lbs)
MAX
70kg
(160lbs)
MAX
88in (2240mm) – Xin
(Xmm) = height

page 7 Install Guide 2014 Version 1.2
THE LOOK YOU LOVE
THE LOOK YOU LOVE
HOW TO INSTALL: FLOOR TO WALL POSTS
10in (250mm)
5.4.
6.
Attach the wall tie-back piece to the
upright piece and tighten with a
5
⁄
64
in (2mm) Allen key.
2.
1.
3.

page 8 Install Guide 2014 Version 1.2
THE LOOK YOU LOVE
THE LOOK YOU LOVE
HOW TO INSTALL: MINI WALL MOUNTED POSTS
The mini version is perfect for use with a single
shelf or hanger bar.
• 6in (150mm) inc’ top and bottom cover caps.
MINI WALL MOUNTED POST
5
250mm
50mm max
50mm max
50mm max
50mm max
50mm max
50mm max
50mm max
50mm max
250mm
50mm max
100mm max
100mm max
1
31
⁄
32
in (50mm)
1
31
⁄
32
in (50mm)

page 10 Install Guide 2014 Version 1.2
THE LOOK YOU LOVE
THE LOOK YOU LOVE
HOW TO INSTALL: SHOE RACK 48”
1. 2.
Cutting to size: W -
1
/
2
inch (12mm) = B
• The shoe racks can be stacked facing in or out to maximise space.
• Cutting the bars will create sharp edges and caution must be taken.
PROTECTIVE CLOTHING IS RECOMMENDED.
*Main illustration above shows X2 Shoe Racks
w
B
3.
14
Evolution_Elite_Relax
Coperture montante
La copertura montante può essere inserita
su tutti i lati del montante ed è facilmente
accorciabile a misura con un seghetto per
metallo.
Oltre che svolgere una funzione estetica,
la copertura, ha la funzione di copri-fili.
La copertura si incastra a pressione.
Morsetto sostegno ripiano
SSE-2263
Il morsetto può essere fissato
indifferentemente su tutti i lati del
montante a qualsiasi altezza.
Il fissaggio avviene tramite l'avvitamento
di una brugola che, facendo ruotare una
piastrina, incastra il morsetto al montante
(vedi fig.1)
L’apertura della morsa è regolabile
attraverso la brugola posta nella parte
inferiore del morsetto.
L’apertura va da 0 a 30 mm.
I gommini neri posti all’interno della
morsa del morsetto possono essere tolti
a piacimento.
(fig.1)
Bordatura per ripiano
SSE-2025-AN
Il ripiano può essere fissato mediante
l’utilizzo di bordature in alluminio.
Dopo avere fissato il morsetto sostegno
ripiani (SSR-1928)
al montante, aprite la morsa in modo
tale da stringere la bordatura
e appoggiatevi sopra il ripiano.
La bordatura porta ripiani fino
a 30 mm di spessore e può essere
facilmente ridotta in lunghezza grazie
ai tappi asportabili.
La bordatura aumenta la portata del
ripiano da 20 a 25 kg.
Attenzione: l’uso delle bordature
aumenta di 26 mm l’ingombro
in larghezza del ripiano: tenerne conto
in fase di progettazione.
5
⁄
32
in Allen Key/Hex
Key required
5
⁄
32
in Allen Key/Hex
Key required
INFORMATION
30/66lbs
(inl.Drawer Box)
MAX
25kg
(55lbs)
MAX
150kg
(330lbs)
MAX
15kg
(33lbs)
MAX
8kg
(17.5lbs)
MAX
70kg
(160lbs)
MAX

page 11 Install Guide 2014 Version 1.2
THE LOOK YOU LOVE
THE LOOK YOU LOVE
HOW TO INSTALL: SHELF BRACKET & SHELF
1. 2.
3.
• Ensure they are correctly installed as shown above.
• The weight bearing depends entirely on the length and thickness of the
shelf material used.
• Make sure that the washer is fully turned and locked into the post.
14
Evolution_Elite_Relax
Coperture montante
La copertura montante può essere inserita
su tutti i lati del montante ed è facilmente
accorciabile a misura con un seghetto per
metallo.
Oltre che svolgere una funzione estetica,
la copertura, ha la funzione di copri-fili.
La copertura si incastra a pressione.
Morsetto sostegno ripiano
SSE-2263
Il morsetto può essere fissato
indifferentemente su tutti i lati del
montante a qualsiasi altezza.
Il fissaggio avviene tramite l'avvitamento
di una brugola che, facendo ruotare una
piastrina, incastra il morsetto al montante
(vedi fig.1)
L’apertura della morsa è regolabile
attraverso la brugola posta nella parte
inferiore del morsetto.
L’apertura va da 0 a 30 mm.
I gommini neri posti all’interno della
morsa del morsetto possono essere tolti
a piacimento.
(fig.1)
Bordatura per ripiano
SSE-2025-AN
Il ripiano può essere fissato mediante
l’utilizzo di bordature in alluminio.
Dopo avere fissato il morsetto sostegno
ripiani (SSR-1928)
al montante, aprite la morsa in modo
tale da stringere la bordatura
e appoggiatevi sopra il ripiano.
La bordatura porta ripiani fino
a 30 mm di spessore e può essere
facilmente ridotta in lunghezza grazie
ai tappi asportabili.
La bordatura aumenta la portata del
ripiano da 20 a 25 kg.
Attenzione: l’uso delle bordature
aumenta di 26 mm l’ingombro
in larghezza del ripiano: tenerne conto
in fase di progettazione.
INFORMATION
30/66lbs
(inl.Drawer Box)
MAX
25kg
(55lbs)
MAX
150kg
(330lbs)
MAX
15kg
(33lbs)
MAX
8kg
(17.5lbs)
MAX
70kg
(160lbs)
MAX

page 13 Install Guide 2014 Version 1.2
THE LOOK YOU LOVE
THE LOOK YOU LOVE
HOW TO INSTALL: DRAWER BOX BRACKETS
• When the drawer box is fixed in place - for added support you can also fix
the Drawer Box to the back wall. This can be done using the recommended
screws and/or wall plugs for your wall.
• We suggest placing these additional wall fixings at the top left and right hand
corners of the drawer box.
Home Décor Innovations
www.hdhc.com
V2_HD 11.12
Home Décor Innovations
www.hdhc.com
V2_HD 11.12
DRAWER BRACKET
SSR-2282X-AN
a
b
a
b
a
* Help. When the Drawer Box is in place - for added
support we recommend that you fix the Drawer Box to
the wall for additional support. This can be done using
the recommended screws and/or wall plugs for your wall.
a
b
a
a
4mm Allen/Hex
key required
1
a
b
b
a
a
a
3
b
a
65mm
2a
a
b
b
a
a
a
4
a
b
b
a
b
a
b
a
a
a
a
b
b
a
b
a
a
DRAWER BRACKET
INSTRUCTION
TOOLS REQUIRED:
TOP TIP:
2 & 4mm Allen/Hex
3a 3b
* Fitting to the Stanchions. When attaching the brackets to the
Stanchion ensure the washer, which sits within the Stanchion
groove is rotated enough for a secure fitting (3a -3b).
• Measure down from the pencil
marks in step 2 and make a
second mark on both posts.
• Now install the upper
brackets to both posts.
• Place the carcass back
on the brackets.
Home Décor Innovations
www.hdhc.com
V2_HD 11.12
Home Décor Innovations
www.hdhc.com
V2_HD 11.12
DRAWER BRACKET
SSR-2282X-AN
a
b
b
a
b
a
b
a
a
a
* Help. When the Drawer Box is in place - for added
support we recommend that you fix the Drawer Box to
the wall for additional support. This can be done using
the recommended screws and/or wall plugs for your wall.
a
b
b
a
b
a
b
a
a
a
4mm Allen/Hex
key required
1
a
b
b
a
b
a
b
a
a
a
3
a
b
b
a
b
a
b
a
a
a
65mm
2a
a
b
b
a
b
a
b
a
a
a
4
a
b
b
a
b
a
b
a
a
a
a
b
b
a
b
a
b
a
a
a
2
DRAWER BRACKET
INSTRUCTION
TOOLS REQUIRED:
TOP TIP:
2 & 4mm Allen/Hex
3a 3b
* Fitting to the Stanchions. When attaching the brackets to the
Stanchion ensure the washer, which sits within the Stanchion
groove is rotated enough for a secure fitting (3a -3b).
5
⁄
32
in Allen/
Hex key
required
1.
• Place the carcass onto the
brackets and ensure its level.
• Mark a line on the posts at
the top edge of the drawer
box, on both posts.
• Place the carcass back on
the lower brackets.
• Fix screws through both
upper and lower brackets.
a
b
b
a
b
a
b
a
a
a
• Remove the carcass.
• Drill through the pilot holes
in the side of the carcass
on both sides with an
5
⁄
16
in (8mm) drill bit.
• Install the two
lower brackets
to both posts.
Home Décor Innovations
www.hdhc.com
V2_HD 11.12
Home Décor Innovations
www.hdhc.com
V2_HD 11.12
DRAWER BRACKET
SSR-2282X-AN
a
b
b
a
b
a
b
a
a
a
* Help. When the Drawer Box is in place - for added
support we recommend that you fix the Drawer Box to
the wall for additional support. This can be done using
the recommended screws and/or wall plugs for your wall.
a
b
b
a
b
a
b
a
a
a
4mm Allen/Hex
key required
1
a
b
b
a
b
a
b
a
a
a
3
a
b
b
a
b
a
b
a
a
a
65mm
2a
a
b
b
a
b
a
b
a
a
a
4
a
b
b
a
b
a
b
a
a
a
a
b
b
a
b
a
b
a
a
a
2
DRAWER BRACKET
INSTRUCTION
TOOLS REQUIRED:
TOP TIP:
2 & 4mm Allen/Hex
3a 3b
* Fitting to the Stanchions. When attaching the brackets to the
Stanchion ensure the washer, which sits within the Stanchion
groove is rotated enough for a secure fitting (3a -3b).
29
⁄
16
in
Home Décor Innovations
www.hdhc.com
V2_HD 11.12
Home Décor Innovations
www.hdhc.com
V2_HD 11.12
DRAWER BRACKET
SSR-2282X-AN
a
b
a
b
a
* Help. When the Drawer Box is in place - for added
support we recommend that you fix the Drawer Box to
the wall for additional support. This can be done using
the recommended screws and/or wall plugs for your wall.
a
b
a
a
4mm Allen/Hex
key required
1
a
b
b
a
a
a
3
b
a
65mm
2a
a
b
b
a
a
a
4
a
b
b
a
b
a
b
a
a
a
a
b
b
a
b
a
a
DRAWER BRACKET
INSTRUCTION
TOOLS REQUIRED:
TOP TIP:
2 & 4mm Allen/Hex
3a 3b
* Fitting to the Stanchions. When attaching the brackets to the
Stanchion ensure the washer, which sits within the Stanchion
groove is rotated enough for a secure fitting (3a -3b).
a
b
b
a
b
a
b
a
a
a
2.
5.
3.
5.
4.
*Note: leave about a
13
⁄
64
in gap
between the wall and the back of
the carcass.
14
Evolution_Elite_Relax
Coperture montante
La copertura montante può essere inserita
su tutti i lati del montante ed è facilmente
accorciabile a misura con un seghetto per
metallo.
Oltre che svolgere una funzione estetica,
la copertura, ha la funzione di copri-fili.
La copertura si incastra a pressione.
Morsetto sostegno ripiano
SSE-2263
Il morsetto può essere fissato
indifferentemente su tutti i lati del
montante a qualsiasi altezza.
Il fissaggio avviene tramite l'avvitamento
di una brugola che, facendo ruotare una
piastrina, incastra il morsetto al montante
(vedi fig.1)
L’apertura della morsa è regolabile
attraverso la brugola posta nella parte
inferiore del morsetto.
L’apertura va da 0 a 30 mm.
I gommini neri posti all’interno della
morsa del morsetto possono essere tolti
a piacimento.
(fig.1)
Bordatura per ripiano
SSE-2025-AN
Il ripiano può essere fissato mediante
l’utilizzo di bordature in alluminio.
Dopo avere fissato il morsetto sostegno
ripiani (SSR-1928)
al montante, aprite la morsa in modo
tale da stringere la bordatura
e appoggiatevi sopra il ripiano.
La bordatura porta ripiani fino
a 30 mm di spessore e può essere
facilmente ridotta in lunghezza grazie
ai tappi asportabili.
La bordatura aumenta la portata del
ripiano da 20 a 25 kg.
Attenzione: l’uso delle bordature
aumenta di 26 mm l’ingombro
in larghezza del ripiano: tenerne conto
in fase di progettazione.
2X
2X
Upper Drawer Bracket
(Sold in pairs)
Lower Drawer Bracket
INFORMATION
30/66lbs
(inl.Drawer Box)
MAX
25kg
(55lbs)
MAX
150kg
(330lbs)
MAX
15kg
(33lbs)
MAX
8kg
(17.5lbs)
MAX
70kg
(160lbs)
MAX
/