Page is loading ...

30 Color RGB LED Controller With RF Wireless Touchpad
Model # RGB8KEY-RF
Precision dimming and color control for RGB color-changing LED lighting.
Professional grade, easy-to-use RGB LED
color controller. Works with Armacost
Lighting’s RibbonFlex Pro component-based
RGB LED tape lighting system. Design custom
color and color-changing lighting installations to fi t any need. Using
radio frequency (RF) technology, the wireless touchpad transmitter works
through walls and doors up to 100 ft., eliminating the need to run extra
wires – useful where installing new cabling can be diffi cult.
Choose from warm, radiant glows to playful accents to dynamic color-
changing effects – or simply select a color to suit your mood.
The color controller is preprogrammed with a full spectrum of 30 designer
colors, from pastels to vivid bright color mixes. Colors, including fi ve
shades of white ranging from ultra warm to very cool bright white color
temperatures, are arranged in common color groupings for easy navigation.
All colors are fully dimmable.
The six color-changing effects are preprogrammed with desirable cross-
fading of colors. Effect speed is fully adjustable, from quick changing
colors to ultra slow dissolves where colors morph from one to another.
WIRING AND CONNECTING
■
For use only with 12V DC or 24V DC low voltage 3-channel RGB
LED lighting requiring 4 wire connections. Never connect this device
to 120V AC current.
■
Do not connect more than one RGB color controller receiver to a power
supply in the same circuit. Doing so will cause the lights to fl icker.
■
Suitable for RV and boat interior applications; this device can
be direct wired to an on-board 12V or 24V battery. Mount in dry
location, keep from spraying water.
■
Do not exceed 12 amp load (144 watts when used with 12V LEDs
or 288 watts when used with 24V LEDs).
■
All wiring must be in accordance with national and local electrical
codes, low voltage Class 2 circuit. If you are unclear as to how to
install and wire this product, contact a qualifi ed electrician.
■
Use only insulated staples or plastic ties to secure cords and wires.
■
Route and secure wires so they will not be pinched or damaged.
■
For wire runs inside of walls, use certifi ed CL2 or better cabling and
appropriate mounting hardware.
■
Do not install Class 2 low voltage wiring in the same runs as
AC main power. If AC and low voltage wires cross, keep them at
90-degree angles.
Always maintain polarity
Low voltage wires from the power supply connect to the left side or
12-24V input as indicated on the white case. Be sure to maintain + / –
polarity. Red wires are V+ (positive) black wires are V– (negative).
The V+ RGB four-conductor wires from your RGB LED tape light connect
to the controller’s right output side. Be sure to maintain polarity: red
to red, green to green, blue to blue. The white or sometimes black wire
connects to the V+ positive anode terminal screw on receiver. Tinning
of stripped wire leads is always recommended. Do not leave any copper
strands lose from any wires or shorting may occur. Be sure all screws are
snug, but do not over-tighten.
For better color consistency, keep RGB LED tape oriented in the
same direction
RGB LED tape viewed from one side or the other will always have a color
shift due to the red, green and blue chips in the LED. For better color
consistency, especially when used in cove lighting, keep the LED tape
strip oriented in the same direction, e.g., logo markings on tape should
always be pointed or facing the same way.
For better LED brightness, keep voltage drop to a minimum
Voltage drop is a natural occurrence in all low voltage lighting systems. It
is the gradual decrease in voltage that occurs from your power supply to
your LED lighting. Voltage drop only becomes undesirable if you notice
the brightness in one area of your lighting is objectionably different than
in another area. As a practical approach to installing LED tape lights,
test your lighting prior to fi nal installation. If voltage drop appears to
be a concern, use shorter lengths of DC power feed wires or switch to a
thicker gauge wire (lower AWG number).
For an online voltage drop calculator, visit armacostlighting.com/installation.
WIRELESS TOUCHPAD TRANSMITTER INSTALLATION
Designer-style wireless touchpad transmitter can easily be surface
mounted or installed in-wall. It comes with a switch plate, mounting
screws and drywall anchors. Also included is one 12V alkaline battery
(27A). The touchpad design will blend with existing residential and
commercial switches and dimming décor.
Easily mount to any
wall or fl at surface
(screws and anchors
included).
Can be installed in wall in
some electrical boxes.
Designer-style wall plate
and screws included.
Tabs are
break-away
removable
for some
installations
Minimum
unobstructed
box or bracket
opening:
1
7
/8" (47mm) X
2
7
/8" (72mm)
Touchpad may not fi t some smaller
electrical boxes. See minimum
size dimensions
and choose an
appropriate
electrical box or
mounting bracket.
Some installations
may require the
removal of tabs
as shown, simply
break away with
wire cutters.
Note: Compatible with some, but
not all, switch plates made by other
manufacturers.
Typical Low
Voltage Wall Plate
Mounting Bracket
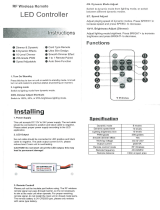
OPERATION
After switching on your power supply, check that the green power LED
is lit on the front of the case which indicates the controller is receiving
power. Press the power on/off key and the RGB lights will turn on.
Using the function keys, you can use the color controller receiver or the
wireless touchpad transmitter to control your RGB LED lighting. Each
unit has the same 8 function keys. The touchpad transmitter comes
preprogrammed on the same wireless frequency code as the receiver and
should work immediately after the battery has been properly installed. If
not, please follow the instructions under Pairing and Multi-Zone Lighting to
re-program your transmitter to match the receiver.
Memory and Reset Function Key
The unit will remember the settings for brightness and speed for each color
and each effect. For instance, if one color is dimmed, the unit will maintain
that setting for that color until changed, even if the power is turned off.
This RGB controller is designed with a unique reset function key. Pressing
the reset key will take the RGB controller to the #1 sequence position
which is a very warm white color. At the same time, it will automatically
return the brightness settings on all colors to 100% full brightness and any
programmed effect speeds will return to the medium speed setting.
When lit, indicates RGB
controller is receiving
voltage from the power
supply. Light will remain lit
while power supply is ON.
BRIGHTNESS
Controls the light level for
static colors and jump and
strobe effects. Brightness is
not adjustable in any color
fade effects. (Green signal
will not fl ash.)
Displays color
mixture signals
being delivered
to the RGB
LED lights.
Green fl ashing light indicates unit
is receiving an RF signal from
transmitter touchpad. When you
press and hold EFFECT SPEED or
BRIGHTNESS, the light will contin-
uously fl ash until unit has reached
either the upper or lower range
setting. Useful for determining when
LED lights are at full brightness.
EFFECT SPEED
Controls the speed
of all color-changing
effects. Arrow up
for faster, down for
slower.
COLOR/MODE
Press forward
arrow to advance
to next static color
or color-changing
effect. Press back
arrow to return to
previous color or
effect displayed.
RESET key will
take unit to the
#1 sequence
warm white
color. At the
same time,
it will return
brightness
settings on all
colors to 100%.
Effect speeds
will return to
the medium
speed setting.
Power ON/OFF
Colors and effects
Pressing the reset key will take you to the #1 static color position which
is a very warm white color. All colors are arranged in common color
groupings for easy navigation, colors are fully dimmable.
1-5 Shades of white 31 White strobe
6-12 Shades of blue 32 Full color cross fade
13-17 Shades of green 33 Red, white and green cross fade
18-21 Shades of yellow
34 Red, white and blue cross fade
22-26 Shades of red
35 Red and white cross fade
27-30 Shades of purple
36 Red, gold and green cross fade
Power Off Memory
If the power goes out, or power is turned off to your power supply, when
the power is restored, the unit will go to your last color or effects setting.
PAIRING AND MULTI-ZONE LIGHTING
This color controller features RF pairing technology for expandability and
multi-zone lighting control. One touchpad transmitter can be paired to control
multiple RGB color controller receivers within the same area or range. Or,
individual color controller receivers and transmitters can be programmed to
work together independently in the same area without interference.
Pairing and RF code technology can greatly reduce the need for extra wiring.
Common Code Pairing Unique Code Pairing
Pairing instructions
Before pairing, be sure the battery in the transmitter is strong. In a
darkened room, you should see a visible red LED light glowing through the
front touchpad when you press any function key. If this glow is diminished
or not visible, replace battery with a 12V 27A alkaline battery.
1. Turn on the RGB color controller receiver and
LED lights. Set mode to any static color.
2. Shut off power to the receiver unit by
unplugging the power supply – do not use the
power OFF key. Wait at least 5 seconds.
3. Restore power to the receiver unit, the LEDs
should light. Within 2 seconds after restoring
power, press and hold the power and brightness
down keys simultaneously for about 2 seconds.
This action will pair the two devices.
4. A green signal light on the receiver should
fl ash once to confi rm successful pairing.
To pair multiple receivers to the same single transmitter, simply repeat
the steps above with each additional receiver. The transmitter’s unique
code will be programmed to the additional receiver units.
To synchronize the colors and brightness levels of all receivers,
simply press the reset key on the transmitter touchpad. All RGB
LED lighting will reset to the #1 warm white color position.
Note: you can also “un-pair” the RGB controller by following the process
above but press the brightness up and brightness down keys.
IMPORTANT
■
Do not connect multiple receivers to one power supply.
Each receiver must have its own power supply.
■
Only static colors will synchronize. Color-changing effects will
not synchronize due to the various cycling speeds of each unit.
■
If you repeatedly press any of the touchpad keys too fast, the
RGB controllers will lose their synchronization. To re-synchronize,
press the reset key on the touchpad transmitter.
■
For effective synchronization, all receivers must be within range
of the single wireless touchpad.
If you would like to purchase additional RGB color controller receivers
or wireless transmitters, visit the retailer where you made your purchase
or armacostlighting.com.
TROUBLESHOOTING
LED tape light strip does not light, fl ickers, or there is limited or
inconsistent colors
Make sure the power supply and RGB color controller are turned on and
receiving power. Confi rm you have maintained correct polarity on all wire
connections (V+, red to red, green to green, blue to blue) when joining
RGB LED strips as well as when connecting wires to the RGB color
controller and to the power supply.
Press the reset key. If any other color appears other than a warm/yellow
white, then you have a bad connection or polarity is not correct. Check
to be sure all connections are secure. If you have a failed connector, you
can easily solder wires to the LED tape and solder splice connections.
Soldering is the surest method for making extra reliable electrical
connections. Never use connectors in RV or boat applications due to
possible vehicle vibrations. To learn about best soldering practices visit
armacostlighting.com/installation.
The wireless touchpad is not working.
Be sure the touchpad is in range of your receiver. Try moving the touchpad
closer to the receiver. The transmitter is a radio frequency (RF) device and,
as such, the range of the wireless remote control is dependent on many
factors. Actual operational distance will vary based on walls and line of
sight obstructions, and other nearby electronic devices.
Be sure your battery is good. To check battery, press the on/off key in a
dark room/location. When pressed, you should see a red LED indicator
light glowing from behind the surface of the touchpad. If you do not see
this glowing red light, replace the battery (Alkaline 27A 12V). A battery
will last from 6 months up to 2 years, depending on usage.
The receiver may need to be paired again with your transmitter. If your
dimmer receiver is functioning properly, and you know your transmitter
battery is fresh, yet the transmitter will not control your lighting, please
revisit the pairing instructions.
Static colors display uneven brightness or a color shift.
This may be due to voltage drop. Shorten the length of your RGB lighting
installation or reduce the length of RGB power wire and/or use thicker wires.
Refer to your RibbonFlex Pro specifi c model’s Installation Guidelines for
options on other installation confi gurations that may reduce voltage drop.
For help with larger LED lighting installations, email [email protected].
SPECIFICATIONS
Input voltage ................................................................................... 12V-24V DC
Output current............................................................ 12A (4A per RGB channel)
Max load with12V DC lighting .............................................................. 144 watts
Max load with 24V DC lighting ............................................................. 288 watts
Working temperature (receiver only, non wireless) ............ 5 to 130°F (-15 to 55°C)
Working temperature (using wireless function) .................. 40 to 130°F (4 to 55°C)
Wireless working frequency ............................................................... 433.92MHz
Transmitter battery ................................................................... Alkaline 27A 12V
Listings ..............................................................................CE, RoHS, FCC, CSA
FCC ID ....................................................................................... NWKHF10008
Country of origin ....................................................................................... China
Limited 1-year warranty. This product is for dry
location use only. Improper installation, improper
powering, abuse, or failure to use this device for
its intended purpose will void warranty. Proof of
purchase is required for all returns. Questions?
Email [email protected].
This item is a Radio Frequency Device (RF), and as such the range of the remote control is
dependent on many factors. Actual operational distance will vary based on walls and line of
sight obstructions, and other nearby electronic devices.
This device complies with Part 15 of the FCC Rules. Operation is subject to the following
two conditions: (1) this device may not cause harmful interference, and (2) this device must
accept any interference received, including interference that may cause undesired operation.
Changes or modifi cations to this unit not expressly approved by the party responsible for
compliance could void the user authority to operate the equipment.
© 2012-15 Armacost Lighting. All rights reserved.
140 Baltic Avenue, Baltimore, MD 21225
141203
12 or
24V DC
STANDARD
ELECTRONIC DC OUTPUT
POWER SUPPLY
Plug in or direct wire
RGB CONTROLLER
RECEIVER
RGB LED TAPE LIGHT
12 or
24V DC
WIRELESS
TRANSMITTER
120V
AC
Low voltage safe, the color controller receiver is direct wired inline and connects anywhere between your low voltage power supply and the RibbonFlex Pro
Color RGB LED Tape Lighting. Note: The lighting can be connected and tested while the controller is installed and powered on.
MASTER RGB
COLOR CONTROLLER
AUXILIARY 12V
POWER SUPPLY
RGB LED TAPE LIGHTRGB LED TAPE LIGHT
(Section length depends
on tape light model)
AUXILIARY 12V
POWER SUPPLY
RGB
SIGNAL
REPEATER
RGB
SIGNAL
REPEATER
RGB LED TAPE LIGHT
Fully expandable to control virtually endless lengths of RGB LED lighting when used with Armacost Lighting’s RGB signal repeaters and additional, auxiliary
LED power supplies. Be sure to read and follow the instructions included with your particular RGB LED lighting to learn your model’s section length limitation.
Save these instructions!

30 Color RGB LED Controller With RF Wireless Touchpad
Model # RGB8KEY-RF
Precision dimming and color control for RGB color-changing LED lighting.
Professional grade, easy-to-use RGB LED
color controller. Works with Armacost
Lighting’s RibbonFlex Pro component-based
RGB LED tape lighting system. Design custom
color and color-changing lighting installations to fi t any need. Using
radio frequency (RF) technology, the wireless touchpad transmitter works
through walls and doors up to 100 ft., eliminating the need to run extra
wires – useful where installing new cabling can be diffi cult.
Choose from warm, radiant glows to playful accents to dynamic color-
changing effects – or simply select a color to suit your mood.
The color controller is preprogrammed with a full spectrum of 30 designer
colors, from pastels to vivid bright color mixes. Colors, including fi ve
shades of white ranging from ultra warm to very cool bright white color
temperatures, are arranged in common color groupings for easy navigation.
All colors are fully dimmable.
The six color-changing effects are preprogrammed with desirable cross-
fading of colors. Effect speed is fully adjustable, from quick changing
colors to ultra slow dissolves where colors morph from one to another.
WIRING AND CONNECTING
■
For use only with 12V DC or 24V DC low voltage 3-channel RGB
LED lighting requiring 4 wire connections. Never connect this device
to 120V AC current.
■
Do not connect more than one RGB color controller receiver to a power
supply in the same circuit. Doing so will cause the lights to fl icker.
■
Suitable for RV and boat interior applications; this device can
be direct wired to an on-board 12V or 24V battery. Mount in dry
location, keep from spraying water.
■
Do not exceed 12 amp load (144 watts when used with 12V LEDs
or 288 watts when used with 24V LEDs).
■
All wiring must be in accordance with national and local electrical
codes, low voltage Class 2 circuit. If you are unclear as to how to
install and wire this product, contact a qualifi ed electrician.
■
Use only insulated staples or plastic ties to secure cords and wires.
■
Route and secure wires so they will not be pinched or damaged.
■
For wire runs inside of walls, use certifi ed CL2 or better cabling and
appropriate mounting hardware.
■
Do not install Class 2 low voltage wiring in the same runs as
AC main power. If AC and low voltage wires cross, keep them at
90-degree angles.
Always maintain polarity
Low voltage wires from the power supply connect to the left side or
12-24V input as indicated on the white case. Be sure to maintain + / –
polarity. Red wires are V+ (positive) black wires are V– (negative).
The V+ RGB four-conductor wires from your RGB LED tape light connect
to the controller’s right output side. Be sure to maintain polarity: red
to red, green to green, blue to blue. The white or sometimes black wire
connects to the V+ positive anode terminal screw on receiver. Tinning
of stripped wire leads is always recommended. Do not leave any copper
strands lose from any wires or shorting may occur. Be sure all screws are
snug, but do not over-tighten.
For better color consistency, keep RGB LED tape oriented in the
same direction
RGB LED tape viewed from one side or the other will always have a color
shift due to the red, green and blue chips in the LED. For better color
consistency, especially when used in cove lighting, keep the LED tape
strip oriented in the same direction, e.g., logo markings on tape should
always be pointed or facing the same way.
For better LED brightness, keep voltage drop to a minimum
Voltage drop is a natural occurrence in all low voltage lighting systems. It
is the gradual decrease in voltage that occurs from your power supply to
your LED lighting. Voltage drop only becomes undesirable if you notice
the brightness in one area of your lighting is objectionably different than
in another area. As a practical approach to installing LED tape lights,
test your lighting prior to fi nal installation. If voltage drop appears to
be a concern, use shorter lengths of DC power feed wires or switch to a
thicker gauge wire (lower AWG number).
For an online voltage drop calculator, visit armacostlighting.com/installation.
WIRELESS TOUCHPAD TRANSMITTER INSTALLATION
Designer-style wireless touchpad transmitter can easily be surface
mounted or installed in-wall. It comes with a switch plate, mounting
screws and drywall anchors. Also included is one 12V alkaline battery
(27A). The touchpad design will blend with existing residential and
commercial switches and dimming décor.
Easily mount to any
wall or fl at surface
(screws and anchors
included).
Can be installed in wall in
some electrical boxes.
Designer-style wall plate
and screws included.
Tabs are
break-away
removable
for some
installations
Minimum
unobstructed
box or bracket
opening:
1
7
/8" (47mm) X
2
7
/8" (72mm)
Touchpad may not fi t some smaller
electrical boxes. See minimum
size dimensions
and choose an
appropriate
electrical box or
mounting bracket.
Some installations
may require the
removal of tabs
as shown, simply
break away with
wire cutters.
Note: Compatible with some, but
not all, switch plates made by other
manufacturers.
Typical Low
Voltage Wall Plate
Mounting Bracket
OPERATION
After switching on your power supply, check that the green power LED
is lit on the front of the case which indicates the controller is receiving
power. Press the power on/off key and the RGB lights will turn on.
Using the function keys, you can use the color controller receiver or the
wireless touchpad transmitter to control your RGB LED lighting. Each
unit has the same 8 function keys. The touchpad transmitter comes
preprogrammed on the same wireless frequency code as the receiver and
should work immediately after the battery has been properly installed. If
not, please follow the instructions under Pairing and Multi-Zone Lighting to
re-program your transmitter to match the receiver.
Memory and Reset Function Key
The unit will remember the settings for brightness and speed for each color
and each effect. For instance, if one color is dimmed, the unit will maintain
that setting for that color until changed, even if the power is turned off.
This RGB controller is designed with a unique reset function key. Pressing
the reset key will take the RGB controller to the #1 sequence position
which is a very warm white color. At the same time, it will automatically
return the brightness settings on all colors to 100% full brightness and any
programmed effect speeds will return to the medium speed setting.
When lit, indicates RGB
controller is receiving
voltage from the power
supply. Light will remain lit
while power supply is ON.
BRIGHTNESS
Controls the light level for
static colors and jump and
strobe effects. Brightness is
not adjustable in any color
fade effects. (Green signal
will not fl ash.)
Displays color
mixture signals
being delivered
to the RGB
LED lights.
Green fl ashing light indicates unit
is receiving an RF signal from
transmitter touchpad. When you
press and hold EFFECT SPEED or
BRIGHTNESS, the light will contin-
uously fl ash until unit has reached
either the upper or lower range
setting. Useful for determining when
LED lights are at full brightness.
EFFECT SPEED
Controls the speed
of all color-changing
effects. Arrow up
for faster, down for
slower.
COLOR/MODE
Press forward
arrow to advance
to next static color
or color-changing
effect. Press back
arrow to return to
previous color or
effect displayed.
RESET key will
take unit to the
#1 sequence
warm white
color. At the
same time,
it will return
brightness
settings on all
colors to 100%.
Effect speeds
will return to
the medium
speed setting.
Power ON/OFF
Colors and effects
Pressing the reset key will take you to the #1 static color position which
is a very warm white color. All colors are arranged in common color
groupings for easy navigation, colors are fully dimmable.
1-5 Shades of white 31 White strobe
6-12 Shades of blue 32 Full color cross fade
13-17 Shades of green 33 Red, white and green cross fade
18-21 Shades of yellow
34 Red, white and blue cross fade
22-26 Shades of red
35 Red and white cross fade
27-30 Shades of purple
36 Red, gold and green cross fade
Power Off Memory
If the power goes out, or power is turned off to your power supply, when
the power is restored, the unit will go to your last color or effects setting.
PAIRING AND MULTI-ZONE LIGHTING
This color controller features RF pairing technology for expandability and
multi-zone lighting control. One touchpad transmitter can be paired to control
multiple RGB color controller receivers within the same area or range. Or,
individual color controller receivers and transmitters can be programmed to
work together independently in the same area without interference.
Pairing and RF code technology can greatly reduce the need for extra wiring.
Common Code Pairing Unique Code Pairing
Pairing instructions
Before pairing, be sure the battery in the transmitter is strong. In a
darkened room, you should see a visible red LED light glowing through the
front touchpad when you press any function key. If this glow is diminished
or not visible, replace battery with a 12V 27A alkaline battery.
1. Turn on the RGB color controller receiver and
LED lights. Set mode to any static color.
2. Shut off power to the receiver unit by
unplugging the power supply – do not use the
power OFF key. Wait at least 5 seconds.
3. Restore power to the receiver unit, the LEDs
should light. Within 2 seconds after restoring
power, press and hold the power and brightness
down keys simultaneously for about 2 seconds.
This action will pair the two devices.
4. A green signal light on the receiver should
fl ash once to confi rm successful pairing.
To pair multiple receivers to the same single transmitter, simply repeat
the steps above with each additional receiver. The transmitter’s unique
code will be programmed to the additional receiver units.
To synchronize the colors and brightness levels of all receivers,
simply press the reset key on the transmitter touchpad. All RGB
LED lighting will reset to the #1 warm white color position.
Note: you can also “un-pair” the RGB controller by following the process
above but press the brightness up and brightness down keys.
IMPORTANT
■
Do not connect multiple receivers to one power supply.
Each receiver must have its own power supply.
■
Only static colors will synchronize. Color-changing effects will
not synchronize due to the various cycling speeds of each unit.
■
If you repeatedly press any of the touchpad keys too fast, the
RGB controllers will lose their synchronization. To re-synchronize,
press the reset key on the touchpad transmitter.
■
For effective synchronization, all receivers must be within range
of the single wireless touchpad.
If you would like to purchase additional RGB color controller receivers
or wireless transmitters, visit the retailer where you made your purchase
or armacostlighting.com.
TROUBLESHOOTING
LED tape light strip does not light, fl ickers, or there is limited or
inconsistent colors
Make sure the power supply and RGB color controller are turned on and
receiving power. Confi rm you have maintained correct polarity on all wire
connections (V+, red to red, green to green, blue to blue) when joining
RGB LED strips as well as when connecting wires to the RGB color
controller and to the power supply.
Press the reset key. If any other color appears other than a warm/yellow
white, then you have a bad connection or polarity is not correct. Check
to be sure all connections are secure. If you have a failed connector, you
can easily solder wires to the LED tape and solder splice connections.
Soldering is the surest method for making extra reliable electrical
connections. Never use connectors in RV or boat applications due to
possible vehicle vibrations. To learn about best soldering practices visit
armacostlighting.com/installation.
The wireless touchpad is not working.
Be sure the touchpad is in range of your receiver. Try moving the touchpad
closer to the receiver. The transmitter is a radio frequency (RF) device and,
as such, the range of the wireless remote control is dependent on many
factors. Actual operational distance will vary based on walls and line of
sight obstructions, and other nearby electronic devices.
Be sure your battery is good. To check battery, press the on/off key in a
dark room/location. When pressed, you should see a red LED indicator
light glowing from behind the surface of the touchpad. If you do not see
this glowing red light, replace the battery (Alkaline 27A 12V). A battery
will last from 6 months up to 2 years, depending on usage.
The receiver may need to be paired again with your transmitter. If your
dimmer receiver is functioning properly, and you know your transmitter
battery is fresh, yet the transmitter will not control your lighting, please
revisit the pairing instructions.
Static colors display uneven brightness or a color shift.
This may be due to voltage drop. Shorten the length of your RGB lighting
installation or reduce the length of RGB power wire and/or use thicker wires.
Refer to your RibbonFlex Pro specifi c model’s Installation Guidelines for
options on other installation confi gurations that may reduce voltage drop.
For help with larger LED lighting installations, email [email protected].
SPECIFICATIONS
Input voltage ................................................................................... 12V-24V DC
Output current............................................................ 12A (4A per RGB channel)
Max load with12V DC lighting .............................................................. 144 watts
Max load with 24V DC lighting ............................................................. 288 watts
Working temperature (receiver only, non wireless) ............ 5 to 130°F (-15 to 55°C)
Working temperature (using wireless function) .................. 40 to 130°F (4 to 55°C)
Wireless working frequency ............................................................... 433.92MHz
Transmitter battery ................................................................... Alkaline 27A 12V
Listings ..............................................................................CE, RoHS, FCC, CSA
FCC ID ....................................................................................... NWKHF10008
Country of origin ....................................................................................... China
Limited 1-year warranty. This product is for dry
location use only. Improper installation, improper
powering, abuse, or failure to use this device for
its intended purpose will void warranty. Proof of
purchase is required for all returns. Questions?
Email [email protected].
This item is a Radio Frequency Device (RF), and as such the range of the remote control is
dependent on many factors. Actual operational distance will vary based on walls and line of
sight obstructions, and other nearby electronic devices.
This device complies with Part 15 of the FCC Rules. Operation is subject to the following
two conditions: (1) this device may not cause harmful interference, and (2) this device must
accept any interference received, including interference that may cause undesired operation.
Changes or modifi cations to this unit not expressly approved by the party responsible for
compliance could void the user authority to operate the equipment.
© 2012-15 Armacost Lighting. All rights reserved.
140 Baltic Avenue, Baltimore, MD 21225
141203
12 or
24V DC
STANDARD
ELECTRONIC DC OUTPUT
POWER SUPPLY
Plug in or direct wire
RGB CONTROLLER
RECEIVER
RGB LED TAPE LIGHT
12 or
24V DC
WIRELESS
TRANSMITTER
120V
AC
Low voltage safe, the color controller receiver is direct wired inline and connects anywhere between your low voltage power supply and the RibbonFlex Pro
Color RGB LED Tape Lighting. Note: The lighting can be connected and tested while the controller is installed and powered on.
MASTER RGB
COLOR CONTROLLER
AUXILIARY 12V
POWER SUPPLY
RGB LED TAPE LIGHTRGB LED TAPE LIGHT
(Section length depends
on tape light model)
AUXILIARY 12V
POWER SUPPLY
RGB
SIGNAL
REPEATER
RGB
SIGNAL
REPEATER
RGB LED TAPE LIGHT
Fully expandable to control virtually endless lengths of RGB LED lighting when used with Armacost Lighting’s RGB signal repeaters and additional, auxiliary
LED power supplies. Be sure to read and follow the instructions included with your particular RGB LED lighting to learn your model’s section length limitation.
Save these instructions!
/