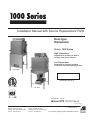
Champion 1000 Series LT Installation guide
- Category
- Dishwashers
- Type
- Installation guide
This manual is also suitable for

Door-type
Dishwasher
Models: 1000 Series
High Temperature
Pumped Rinse sanitizing w/ built-in
stainless steel electric booster
Low Temperature
Pumped Rinse chemical sanitizing
w/ 3 built-in chemical dispensing pumps
Installation Manual with Service Replacement Parts
2674 N. Service Road, Jordan Station
Ontario, Canada L0R 1S0
905/562-4195 Fax: 905/562-4618
Toll-free: 800.263.5798
P.O. Box 4149
Winston-Salem, NC 27115
336/661-1556 Fax: 336/661-1660
Toll-free: 800.858.4477
Issue Date: 3.25.07
Manual P/N 114313 rev. A
For machines beginning with S/N D2466 and above
Printed in the USA
High Temp
Low Temp
File: DTVC0214.6
Dishwasher serial no.
C US
C US

COPYRIGHT © 2006 All rights reserved Printed in the USA
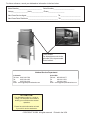
For future reference, record your dishwasher information in the box below.
Model Number__________________________ Serial Number_______________________
Voltage________________Hertz_____________ Phase__________________
Valu-Clean Service Agent __________________________________ Tel:______________________
Valu-Clean Parts Distributor _________________________________ Tel:______________________
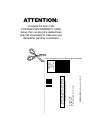
ATTENTION:
The dishwasher model no., serial no.,
voltage, Hz and phase are needed to
identify your machine and to answer
questions.
Please have this information on-hand
if you call for service assistance.
For all models:
The data plate mounts to the
right-side of the top-mounted
control cabinet.
National Service Department
In Canada: In the USA:
Toll-free: 800/ 263-5798 Toll-free: 800/ 858-4477
Tel: 905/ 562-4195 Tel: 336/ 661-1556
Fax: 905/ 562-4618 Fax: 336/ 661-1660

ATTENTION:
$PNQMFUFUIFCBDLPGUIF
1045"(&1"*%8"33"/5:$"3%
CFMPXUIFODVUBMPOHUIFEBTIFEMJOFT
BOENBJMJNNFEJBUFMZUPNBLFTVSFZPVS
EJTIXBTIFSXBSSBOUZJTBDUJWJBUFE
/01045"(&
/&$&44"3:
*'."*-&%
*/5)&
6/*5&%45"5&4
#64*/&443&1-:."*-
'*345$-"44."*-1&3.*5/08*/450/4"-&./$
1045"(&8*--#&1"*%#:"%%3&44&&
.0:&3%*&#&-
10#09
8*/450/4"-&./$

8"33"/5:3&(*453"5*0/$"3%
.0%&- 4&3*"-
%BUFPG*OTUBMMBUJPO@@@@@@@@@@@@@@@@@@@@@@@@
0XOFST-PDBUJPO $PNQBOZ@@@@@@@@@@@@@@@@@@@@@@@@@@@@@@@@@@@@@@@@@@@@@@@@@@@@@@@@@
"EESFTT@@@@@@@@@@@@@@@@@@@@@@@@@@@@@@@@@@@@@@@@@@@@@@@@@@@@@@@
"EESFTT@@@@@@@@@@@@@@@@@@@@@@@@@@@@@@@@@@@@@@@@@@@@@@@@@@@@@@@
5FMFQIPOF@@@@@@@@@@@@@@@@@@@@@@@@@@@@@@@@@@@@@@@@@@@@@@@@@@@@@
$POUBDU/BNF@@@@@@@@@@@@@@@@@@@@@@@@@@@@@@@@@@@@@@@@@@@@@@@@@@
1VSDIBTFEGSPN %FBMFS@@@@@@@@@@@@@@@@@@@@@@@@@@@@@@@@@@@@@@@@@@@@@@@@@@@@@@@@@
5FMFQIPOF@@@@@@@@@@@@@@@@@@@@@@@@@@@@@@@@@@@@@@@@@@@@@@@@@@@@@
$POUBDU/BNF@@@@@@@@@@@@@@@@@@@@@@@@@@@@@@@@@@@@@@@@@@@@@@@@@@
/PUFJO64"UIJTDBSENVTUCFSFUVSOFEUPWBMJEBUFXBSSBOUZ
*.1035"/5*.1035"/5

iii
____________________ Revisions to this manual
This is where we record changes to the manual. A revision might be a part number
change, new instructions, or information that was not available at print time.
We reserve the right to make changes to this manual without notice and without
incurring any liability by making the changes..
Dishwasher owners may request a revised manual, at no charge, by calling
(800.858.4477) in the USA or (800.263.5798) in Canada.
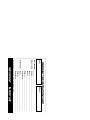
1000 Series - Revisions to this manual
Revision Revised Serial Number Revision
Date Pages Effectivity Description
03.14.06 All D2466 Releasedrstedition
02.15.07 All D5937 Revisions to consolidate manuals

iv
Dear Owner:
Thank you for choosing our dishwasher.
We appreciate your business.
This manual covers:
High Temp High temperature door-type dishwasher with standard built-in booster in
40° F/22° C rise or an optional 70° F/39° C rise booster.
Low Temp Low temperature chemical sanitizing door-type dishwasher with built-in
chemical dispensing pumps for detergent, rinse-aid, and sanitizer.
The installation, and initial start-up of your dishwasher
must be performed by qualied electricians, plumbers,
and authorized service technicians who are trained in
commercial dishwashers.

v
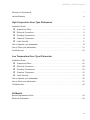
Revisions to this manual i
Limited Warranty iv
High Temperature Door-Type Dishwasher
Installation Guide . . . . . . . . . . . . . . . . . . . . . . . . . . . . . . . . . . . . . . . . . . . . . . . . . . . . . . . . . . .
Unpack and Place . . . . . . . . . . . . . . . . . . . . . . . . . . . . . . . . . . . . . . . . . . . . . . . . . . . . .
Electrical Connection . . . . . . . . . . . . . . . . . . . . . . . . . . . . . . . . . . . . . . . . . . . . . . . . . . .
Plumbing Connections . . . . . . . . . . . . . . . . . . . . . . . . . . . . . . . . . . . . . . . . . . . . . . . . . .
Chemical Dispensers . . . . . . . . . . . . . . . . . . . . . . . . . . . . . . . . . . . . . . . . . . . . . . . . . .
Initial Start-Up . . . . . . . . . . . . . . . . . . . . . . . . . . . . . . . . . . . . . . . . . . . . . . . . . . . . . . .
How to Operate your dishwasher . . . . . . . . . . . . . . . . . . . . . . . . . . . . . . . . . . . . . . . . . . . . .
How to Clean your dishwasher . . . . . . . . . . . . . . . . . . . . . . . . . . . . . . . . . . . . . . . . . . . . . . .
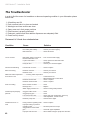
Troubleshooter . . . . . . . . . . . . . . . . . . . . . . . . . . . . . . . . . . . . . . . . . . . . . . . . . . . . . . . . . . .
Low Temperature Door-Type Dishwasher
Installation Guide . . . . . . . . . . . . . . . . . . . . . . . . . . . . . . . . . . . . . . . . . . . . . . . . . . . . . . . . . .
Unpack and Place . . . . . . . . . . . . . . . . . . . . . . . . . . . . . . . . . . . . . . . . . . . . . . . . . . . .
Electrical Connection . . . . . . . . . . . . . . . . . . . . . . . . . . . . . . . . . . . . . . . . . . . . . . . . . .
Plumbing Connections . . . . . . . . . . . . . . . . . . . . . . . . . . . . . . . . . . . . . . . . . . . . . . . . .
Chemical Dispensers . . . . . . . . . . . . . . . . . . . . . . . . . . . . . . . . . . . . . . . . . . . . . . . . .
Initial Start-Up . . . . . . . . . . . . . . . . . . . . . . . . . . . . . . . . . . . . . . . . . . . . . . . . . . . . . . .
How to Operate your dishwasher . . . . . . . . . . . . . . . . . . . . . . . . . . . . . . . . . . . . . . . . . . . . .
How to Clean your dishwasher . . . . . . . . . . . . . . . . . . . . . . . . . . . . . . . . . . . . . . . . . . . . . . .
Troubleshooter . . . . . . . . . . . . . . . . . . . . . . . . . . . . . . . . . . . . . . . . . . . . . . . . . . . . . . . . . . .
All Models
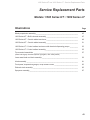
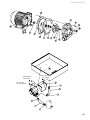
Service Replacement Parts . . . . . . . . . . . . . . . . . . . . . . . . . . . . . . . . . . . . . . . . . . . . . . . . .
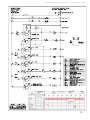
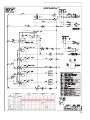
Electrical Schematics . . . . . . . . . . . . . . . . . . . . . . . . . . . . . . . . . . . . . . . . . . . . . . . . . . . . . .
1000 Series - Table of Contents
1
2
5
6
9
17
19
21
23
25
26
29
30
32
33
36
37
40
43
69

vi
1000 Series - Limited Warranty
Valu-Clean, Champion or Moyer Diebel (hereinafter referred to as the Company), P.O. Box 4982, Winston-Salem, North
Carolina 27115 & 2674 N. Service Road, Jordan Station, Canada, L0R 1S0, warrants machines, & parts, as set out below.
Warranty of Machines: warrants all new machines of its manufacture bearing the name and
installed within the United States and Canada to be free from defects in material and workmanship for a period of one
(1) year after the date of installation or fifteen (15) months after the date of shipment by , whichever occurs
first. [See below for special provisions relating to glasswashers.] The warranty registration card must be returned to
within ten (10) days after installation. If warranty card is not returned to within such period, the
warranty will expire after one year from the date of shipment.
will not assume any responsibility for extra costs for installation in any area where there are jurisdictional
problems with local trades or unions.
If a defect in workmanship or material is found to exist within the warranty period, , at its election, will
either repair or replace the defective machine or accept return of the machine for full credit; provided, however, as to
glasswashers, ’s obligation with respect to labor associated with any repairs shall end (a) 120 days after
shipment, or (b) 90 days after installation, whichever occurs first. In the event that elects to repair, the labor
and work to be performed in connection with the warranty shall be done during regular working hours by a
authorized service technician. Defective parts become the property of . Use of replacement parts not authorized
by will relieve of all further liability in connection with its warranty. In no event will
warranty obligation exceed charge for the machine. The following are not covered by warranty:
a. Lighting of gas pilots or burners.
b. Cleaning of gas lines.
c. Replacement of fuses or resetting of overload breakers.
d. Adjustment of thermostats.
e. Adjustment of clutches.
f. Opening or closing of utility supply valves or switching of electrical supply current.
g. Cleaning of valves, strainers, screens, nozzles, or spray pipes.
h. Performance of regular maintenance and cleaning as outlined in operator’s guide.
i. Damages resulting from water conditions, accidents, alterations, improper use, abuse, tampering, improper
installation, or failure to follow maintenance and operation procedures.
j. Wear on pulper cutter blocks, pulse vanes, and auger brush.
Examples of the defects not covered by warranty include, but are not limited to: (1) Damage to the exterior or interior
finish as a result of the above. (2) Use with utility service other than that designated on the rating plate. (3) Improper
connection to utility service. (4) Inadequate or excessive water pressure. (5) Corrosion from chemicals dispensed
in excess of recommended concentrations. (6) Failure of electrical components due to connection of chemical
dispensing equipment installed by others. (7) Leaks or damage resulting from such leaks caused by the installer,
including those at machine table connections or by connection of chemical dispensing equipment installed by others.
(8) Failure to comply with local building codes. (9) Damage caused by labor dispute.
Warranty of Parts: warrants all new machine parts produced or authorized by to be free
from defects in material and workmanship for a period of 90 days from date of invoice. If any defect in material and
workmanship is found to exist within the warranty period Valu-Clean will replace the defective part without charge.
DISCLAIMER OF WARRANTIES AND LIMITATIONS OF LIABILITY. VALU-CLEAN’S WARRANTY IS ONLY TO
THE EXTENT REFLECTED ABOVE. VALU-CLEAN MAKES NO OTHER WARRANTIES, EXPRESS OR IMPLIED,
INCLUDING, BUT NOT LIMITED, TO ANY WARRANTY OF MERCHANTABILITY, OR FITNESS OF PURPOSE.
VALU-CLEAN SHALL NOT BE LIABLE FOR INCIDENTAL OR CONSEQUENTIAL DAMAGES. THE REMEDIES
SET OUT ABOVE ARE THE EXCLUSIVE REMEDIES FOR ANY DEFECTS FOUND TO EXIST IN VALU-CLEAN
DISHWASHING MACHINES AND VALU-CLEAN PARTS, AND ALL OTHER REMEDIES ARE EXCLUDED,
INCLUDING ANY LIABILITY FOR INCIDENTALS OR CONSEQUENTIAL DAMAGES.
does not authorize any other person, including persons who deal in dishwashing machines,
to change this warranty or create any other obligation in connection with Dishwashing Machines.
Limited Warranty
Company
The Company
the Company
The Company
the Company
Company
Company
the Company the Company the Company’s
the Company’s the Company’s
The Company
The Company the Company’s
the Company’s
the Company
the Company
the Company
the Company the Company

vii
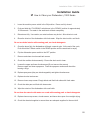
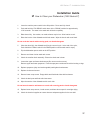
1000 Series HT - Installation Guide
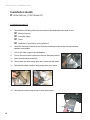
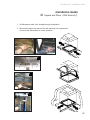
1. Check the corrugated box that protected the dishwasher during shipment for
punched holes or impact marks.
2. Inspect the shipping pallet for splintered or broken boards.
3. Inspect the exterior of the dishwasher while still mounted on the pallet for signs
of damage.
4. Contact the freight company immediately if damage is found and save all packing
for inspection to verify your damage claim.
5. Report the damage to your equipment supplier. They will contact our factory
for repair or replacement of damaged components.
6. If no damage is found, proceed with lifting the dishwasher from its pallet.
Be careful to lift the dishwasher by the main frame if using a forklift.
7. Makesurethefourlegsarescrewedrmlyinplaceafterlandingthemachine.
8. Check the packing list to ensure all accessories are with the dishwasher.
9. Open the doors and remove the dishracks inside the machine.
10. Move the dishwasher close to its permanent location.
11. Locate the Quick Check Installation Card glued on the front door of the
dishwasher. The card has a check list to familiarize the installer with the
dishwasher installation procedures detailed in this manual.
12. Remove the protective covering from the dishwasher and identify the
utility connections. Information cards and stickers must not be removed from
the dishwasher until the installation is complete.
13. Locate but do not remove the set of 2 keys attached to the back of the top-
mounted control cabinet.
1
Installation Guide
Unpack and Place (1000 Series HT)

2
1. Theinstallationofyourdishwashermustbeperformedbyqualiedservicepersonnel.
2. ProblemsduetoimproperinstallationarenotcoveredbytheWarranty.
3. Comparetheutilitiesattheinstallationsitewiththespecicationslistedoneach
model'sspecicationsheets(SeeAppendixAattheendofthismanual)
4. Thedishwasherdataplateislocatedontheleft,rear-cornerofthetop-mounted
controlcabinet.
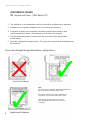
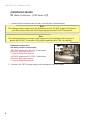
5. Studythecongurationdiagramsbelow.Theyshowthe2waysthatthedishwashermay
be positioned.
Cornerandstraight-throughdishwashercongurations
Installation Guide
Unpack and Place (1000 Series HT)
1000 Series HT - Installation Guide
Note:
Thecorrectcornerinstallationplacesthedishwasherso
thetop-mountedcontrolsareeasytoreach.
Theminimumdistancefromwalltodishwasheris
4"[103mm].Themaximumdistanceis6"[129].
Theroomceilingheightmustbeaminimum
of80"[2032mm]sothedoorscanberemoved
completely.

3
Installation Guide
1000 Series HT - Installation Guide
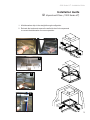
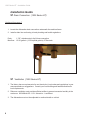
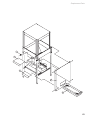
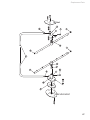
1. Alldishwashersshipinthestraight-throughconguation.
2. Relocatethetracksandremovethewall-sidedoorlinkcomponents
toconvertthedishwasherforcorneroperation.
Move Part 2
Move Part 1
Remove Interior Door Bracket
Remove Door Linkage
Adjust Door Spring Tension
1
4
5
Unpack and Place (1000 Series HT)
3
2
1
2
wall
wall

4
Installation Guide
Unpack and Place (1000 Series HT)
1. Comparethedishwasherandsiteutilityconnections.
2. Levelthedishwasherbyadjustingthebulletfeet.
3. Raisethedoorsandcheckthedoorclearancetotheceiling.
4. Movethedishwashertoitspermanentlocation.
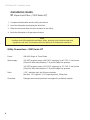
Utility Connections - 1000 Series HT
Power: 208-240VSingleorThreePhase
Watersupply: 3/4"NPThotwatersupply(140°F/60°Cminimum)for40°F/22°Crisebooster
(35psi/241KPastaticpressure)7-10psi/63-69Kpaowpressure
3/4"NPThotwatersupply(110°F/43°Cminimum)for70°F/39°Crisebooster
(35psi/241KPastaticpressure)7-10psi/63-69Kpaowpressure
Drain: 1-7/8"stainlesssteel,slip-thoseconnection
Maxow:15Usgal/min.(13.5Imperialgal/min)57liters/min.
Chemicals: Detergentandrinse-aidproductsaresuppliedbyachemicalsupplier
Note:
Installersmustfollowapplicablesanitation,safety,plumbing,andelectricalcodesand
regulations;andworkinaccordancewithbestpracticesfordishwasherinstallation.
1000 Series HT - Installation Guide

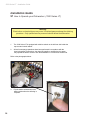
5
Installation Guide
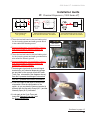
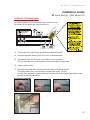
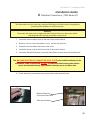
1. Locatethecontrolcabinetkeysontherearofthecontrolcabinet.
2. Remove1keytounlockthecabinet;donotremovetheotherkey.
3. Unlockthecontrolcabinetandremovethecover.
4. Locatethepowercableknockoutandmainterminalblockontheleft-sideofthecabinet.
5. LocatetheMachineElectricalConnectionDataPlatemountedneartheterminalblock.
6.Connecttheelectricservicetothedishwasher.
Warning:
Disconnectthemainelectricsupplyandplaceatagatthefuseordisconnectswitch
indicatingthatworkisbeingperformedonthatcircuit.
Warning:
Thedishwashermustbeelectricallygroundedaccordingtoalllocalcodesand
regulationsgoverningtheinstallationofelectricalservice.
Cableknock-out
MachineElectrical
ConnectionDataPlate
Mainterminalblock
ATTENTION
ELECTRICIAN
The Model VC-1000HT dishwasher must not be turned ON at the dishwasher's
power switch located on the front of the top-mounted control cabinet without performing an Initial
Start-up at the same time. Powering the dishwasher without performing the Initial Start-up
may damage the dishwasher's electrical circuits.
1000 Series HT - Installation Guide
Electrical Connection (1000 Series HT)
The MACHINE ELECTRICAL CONNECTION DATA PLATE is the certied authority for the dishwasher power
requirements. DO NOT use electrical data from any other sourceunless an authorized factory representative
instructs you to use other data.

6
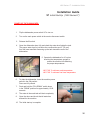
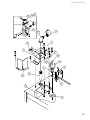
1. Locatethebuilt-instainlesssteelboosterontheleft-sideofthedishwasher.
2. Connecta3/4”NPThotwatersupplytothedishwasheratthelinestrainer.
Installation Guide
Water Connection (1000 Series HT)
Dishwasher temperature
and water pressure requirements:
140°F/60°Cminimumfor40°F/22°Crisebooster
(35psi/241KPastaticpressure)
7-10psi/48-69Kpaowpressure
110°F/43°Cminimumfor70°F/39°Crisebooster
(35psi/241KPastaticpressure)
7-10psi/48-69Kpaowpressure
Note:
Theinstallingplumbermustconnectawatersupplylinetothedishwasherthatisequaltoor
greaterthan3/4"NPTinsizeanda3/4"pressureregulatingvalve,PRV,(notsupplied).
Note:
Theexistinghotwatersupplylinestothedishwashermustbe3/4"NPTorlarger.Tothebestof
yourabilityinspect,andverifythatallsupplypipingmeetsthe3/4"NPTrequirement.
1000 Series HT - Installation Guide

7
This page
intentionally
left blank
Blank page

8
Installation Guide
Drain Connection (1000 Series HT)
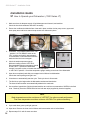
1. Locatethedishwasherdrainconnectionunderneaththemachineframe.
2. Installadrainlineconformingtolocalplumbingandhealthregulations.
Drain: 1-7/8"stainlesssteel,slip-thoseconnection
Maxow: 15USgal/min.(13.5Imperialgal/min)57liters/min.
Ventilation (1000 Series HT)
1. Thefactoryhasnorequirementsforventhoods;but,localcodesandregulationsinyour
areasupersedeoursuggestions.Consultyourlocalbuildingandhealthauthoritiesfor
localrequirements.
2. Dishroomventilationmustprovidesufcientairowtopreventexcessivehumidityinthe
workarea.200-400cfm/5.6-11.3kLiters/min-issufcient.
3. Thedishwashermustnotbesubjectedtocontinualdraftsorcoldair.
Continued from page 7
1000 Series HT - Installation Guide

9
Installation Guide
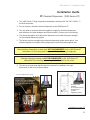
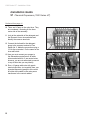
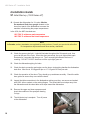
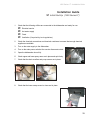
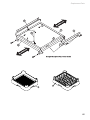
1. The1000SeriesHThightemperaturedishwashersanitizeswith180-195°F/82-91°C
hotnalrinsewater.
2. Donotconnectasanitizerchemicaldispensertothe1000SeriesHT.
3. Youmaywishtocontactachemicalsuppliertosupplythechemicaldispensers
andchemicalsforliquiddetergentandliquidrinse-aid.(Consultyourlocallistings).
4. Thechemicalsuppliermustadjusttheirdispenserstoprovidetheproperdosages
fortheinstalleddispensingsystem.
5. Thefactorymayhavesuppliedthechemicaldispensingsystemasanoption.Your
chemicalsuppliermustadjustfactorydispensersforthechemicalssuppliedalso.
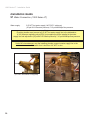
6. Thefactoryrecommendsthatthechemicalinjectorsbeinstalledintheright
backcornerofthehoodasshownbelow.
Note:
Manualdosingofdetergentorrinse-aidisNOT RECOMMENDEDforthe1000SeriesHT
dishwasher.Poorwashingresultsmayresultifmanualdosingisemployed.
Note:
CartridgedetergentsystemsareNOT RECOMMENDEDforthe1000SeriesHT
dishwasher.Poorwashingresultsmayresultifinstalledonthismodel.
Continued on page 10
Recommended
locations
forchemicalinjectors
fordispensing
systems
supplied by others.
1000 Series HT - Installation Guide
Factory installed injection points
Chemical Dispensers (1000 Series HT)

10
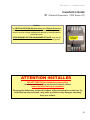
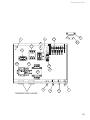
1. Unlockthetop-mountedcontrolcabinetwiththekey.twokeysshouldbestowedbehindthe
controlcabinet.Theinstallingelectricianusedonekeyduringtheirinstalllation.
2. Locatethecycletimermountedintheright-rearcornerofthecontrolcabinet.
3. Refertothe1000SeriesHTelectricalschematiclocatedattheendofthismanual.
4. Findthefollowingcomponentsshownontheelectricalschematicatendofthismanual.
Installation Guide
Chemical Dispensers (1000 Series HT)
115VAC Power Connections for Chemical Dispensers
FOR QUALIFIED INSTALLERS ONLY
Continued from page 9
Caution:
Connectingchemicaldispensersatpointsotherthanthoserecommendedbythefactorymay
damagethedishwasherelectricalsystem.
.
Warning:
Disconnectthemainelectricsupplyandplaceatagatthefuseordisconnectswitchindicatingthat
workisbeingperformedonthatcircuit.
Warning:
Chemicaldispensersmustbeelectricallygroundedincompliancewithapplicableelectriccodes.
1000 Series HT - Installation Guide

11
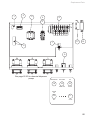
Installation Guide
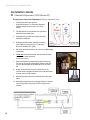
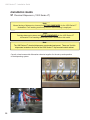
L1 L2
1 2 3
L2
GND
208VAC/3PH/60/3
Mainterminalblock Detergentdispensingpump&cycle Rinse-aiddispensingpump&cycle
andgroundlug TimercamNo.6withtimermicroswitch timercamNo.7withtimermicroswitch
1000 Series HT - Installation Guide
Chemical Dispensers (1000 Series HT)
5. The main terminal board is the termination point
fortheincomingpowerandearthgroundwhich
isalsocalledthechassisground.
6.Chemicaldispensers(notsuppliedbyFactory)
mustbegroundedtochassistoprotectthe
dishwashercircuitsifpossible.
5. The main terminal board is the termination point
fortheincomingpowerandearthgroundwhichis
alsocalledthechassisground.
6.Chemicaldispensers(notsuppliedbyFactory)
mustbegroundedtochassistoprotectthe
dishwashercircuitsifpossible.
7.Thedetergentsignalandtherinse-aidsignal
terminalsforyourchemicaldispensingpumps
areprovidedonthecommonterminalofeach
TimerCammicroswitch(Seediagramsabove).
CamNo.5operatesthedetergentmicroswitch
CamNo.7operatestherinse-aidmicroswitch
8.Looktotherightforthephotoofatimercam
microswitch.Notethecongurationofthe
switch,doyouseehowthecommonterminalis
differentthantheNormallyClosed(N.C.)andthe
NormallyOpen(N.O.)terminals?
9.LookagainattheCycleTimerand
locatetheDetergentCamNo.5 and
the Rinse-aidcamNo.7.
Continued on page 12
Earth Ground
also called
Chassis Ground

12
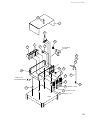
10. Thereare8Camsonthecycletimer.They
arenumbered1-8startingatthetimer
motor side of the assembly.
11. Lookattheundersideofthedetergentand
theRinse-aidtimermicroswitchesand
identifythecommonterminals.
12. Connectthehotleadforthedetergent
pumptothecommonterminalofCam
SwitchNo.5.Maketheconnectionusinga
12-14slip-onterminal.Dothesameforthe
rinse-aidswitch.
13.Nowyoumustconnectyourpumpsto
thedishwasherneutralreturn.Allwhite
wiresmarkedwithNo.2areneutralwires;
however,youarenotauthorizedtoconnect
to any #2 wire that you may identify.
14. Runa12gaugewhitewirewithspade
terminalconnector(not supplied) from your
chemicaldispensingpumpstotheneutral
#2whitewirelocatedonthemainpower
transformerinthecontrolcabinet.
Installation Guide
Chemical Dispensers (1000 Series HT)
Continued from page 11
1000 Series HT - Installation Guide
Page is loading ...
Page is loading ...
Page is loading ...
Page is loading ...
Page is loading ...
Page is loading ...
Page is loading ...
Page is loading ...
Page is loading ...
Page is loading ...
Page is loading ...
Page is loading ...
Page is loading ...
Page is loading ...
Page is loading ...
Page is loading ...
Page is loading ...
Page is loading ...
Page is loading ...
Page is loading ...
Page is loading ...
Page is loading ...
Page is loading ...
Page is loading ...
Page is loading ...
Page is loading ...
Page is loading ...
Page is loading ...
Page is loading ...
Page is loading ...
Page is loading ...
Page is loading ...
Page is loading ...
Page is loading ...
Page is loading ...
Page is loading ...
Page is loading ...
Page is loading ...
Page is loading ...
Page is loading ...
Page is loading ...
Page is loading ...
Page is loading ...
Page is loading ...
Page is loading ...
Page is loading ...
Page is loading ...
Page is loading ...
Page is loading ...
Page is loading ...
Page is loading ...
Page is loading ...
Page is loading ...
Page is loading ...
Page is loading ...
Page is loading ...
Page is loading ...
Page is loading ...
Page is loading ...
Page is loading ...
Page is loading ...
Page is loading ...
-
 1
1
-
 2
2
-
 3
3
-
 4
4
-
 5
5
-
 6
6
-
 7
7
-
 8
8
-
 9
9
-
 10
10
-
 11
11
-
 12
12
-
 13
13
-
 14
14
-
 15
15
-
 16
16
-
 17
17
-
 18
18
-
 19
19
-
 20
20
-
 21
21
-
 22
22
-
 23
23
-
 24
24
-
 25
25
-
 26
26
-
 27
27
-
 28
28
-
 29
29
-
 30
30
-
 31
31
-
 32
32
-
 33
33
-
 34
34
-
 35
35
-
 36
36
-
 37
37
-
 38
38
-
 39
39
-
 40
40
-
 41
41
-
 42
42
-
 43
43
-
 44
44
-
 45
45
-
 46
46
-
 47
47
-
 48
48
-
 49
49
-
 50
50
-
 51
51
-
 52
52
-
 53
53
-
 54
54
-
 55
55
-
 56
56
-
 57
57
-
 58
58
-
 59
59
-
 60
60
-
 61
61
-
 62
62
-
 63
63
-
 64
64
-
 65
65
-
 66
66
-
 67
67
-
 68
68
-
 69
69
-
 70
70
-
 71
71
-
 72
72
-
 73
73
-
 74
74
-
 75
75
-
 76
76
-
 77
77
-
 78
78
-
 79
79
-
 80
80
-
 81
81
-
 82
82


Champion 1000 Series LT Installation guide
- Category
- Dishwashers
- Type
- Installation guide
- This manual is also suitable for
Ask a question and I''ll find the answer in the document
Finding information in a document is now easier with AI
Related papers
-
Champion 1000 User manual
-
-
-
-
-
Champion UL-100/U-1352 User manual
-
Champion TUW-15 User manual
-
Champian UH-200B Specification
-
-
Other documents
-
Moyer Diebel DF1-M6 Owner's manual
-
-
Hobart Dishwasher User manual
-
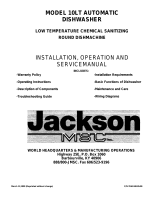 Jackson / Dalton Dishwasher 10LT User manual
-
AMERICAN BUILT PRO WMSP-1Und User manual
-
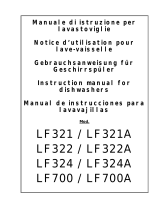 COMENDA LF321 User manual
-
-
-
-
Jackson / Dalton Dishwasher 66CERPW User manual

