
Rev. 00
Company Confidential Optoma_______________________ Delta____________
1
2008/07/02
Service Manual
DLP Digital Projector
Model Name: EX774/EW674

Rev. 00
Company Confidential Optoma_______________________ Delta____________
2
2008/07/02
Revision Description Date
Rev.00 Preliminary 07/02/2008

Rev. 00
Company Confidential Optoma_______________________ Delta____________
3
2008/07/02
CONTENTS
1.COMPLIANCE OF SAFE REPAIR............................................…….............4
1-1.Cautions During Disassembling And Assembling........…….......4
1-2.Lamp..................……….......................................................4
1-3.Lens............……………............…..........................................4
2.SPECIFICATIONS..............…………..........................................…..5
2-1.Summary Specifications.........……………............................................5
2-2.Input/output connectors........………………….........................................6
2-3.Description of Wire Connection....………………......................................7
2-4.Remote Control keypad............………........................................10
2-5.Control Key Pad and LED........…………......................................12
2-6.BLOCK DIAGRAM..........……................................................13
3.TROUBLE SHOOTING..........………………...............................................14
4.DISASSEMBLY AND ASSEMBLY...........................................................20
5.Firmware..........……………………………………....................................................29
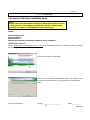
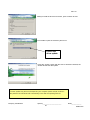
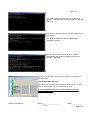
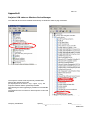
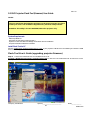
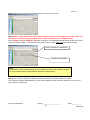
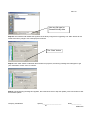
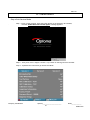
5-1.Projector USB Drivers Installation Guide.................................................29
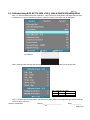
5-2.DLP Projector Flash-Tool (firmware) User Guide............................….38
5-3.DLP Projector Flash-Tool (splash logo) User Guide........................................42
5-4.Security Timer………………………………...................................................47
5-5.Starting and Shutting down the Projector……………………………………..48
5-6.Setting an Access Password (Security Lock).......................................49
6.Calibration……..……………………………………………………………………..51
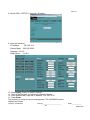
6-1.Calibrate Analog RGB.........…….............................................................52
6-2.Calibrate Analog YUV…………………….……………………………………….53
6-3.Color Wheel Index, DMD Contrast and Brightness Adjustment @ RGB source..54
6-4.Display Test……………………..……………..…………………………………….55
6-5.Logo Advanced………………………………………………………………….…..56
6-6.Color Border Adjustment…………………………………………………………..57
7.How To Program By RS232.......……………....................................................58
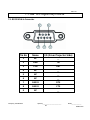
7-1.RS232 VGA-In Connector…………………………………………………………….58
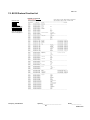
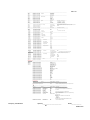
7-2.RS232 Protocol Function List…………………………………………………….59
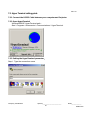
7-3.Hyper Terminal setting guide…………….………………………………………….61
8.LAN_RJ45 (RJ45 models only)…………………………………………………………….65
9.Projection Lamp…………………………………………………………………………..70
9-1.Replacing the Projection Lamp………………………………………………70
9-2.Resetting the Lamp………………………………………………………………71
9-3.Ceiling Installation………….……………………………………………………72
10.SERVICE NOTE..........……………………………...................….........................73
10-1.Cleaning...........………………………….........................…...............................73
10-2.Remote Control For Battery Replacement.....……………….........................75
10-3.Power & READY LED Blink Code Message......……………............….….76
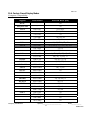
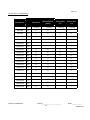
10-4.Factory Preset Display Modes...........…………….....................................77
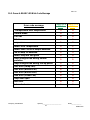
10-5.Spare parts list .................…………........................................................79
10-6.Carton.....................……………...........................................................81

Rev. 00
Company Confidential Optoma_______________________ Delta____________
4
2008/07/02
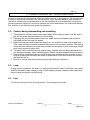
1. COMPLIANCE OF SAFE REPAIR
Be sure to read this Service Manual before providing services. In the projector, full consideration
is taken to ensure the safety for a fire, electric shock, injury, harmful radiation, and substance.
Therefore, observe the notice described in this Service Manual so that the safety is kept when
providing services. Moreover, be sure to observe the notice described in the Instruction Manual.
Pay attention to the following during service inspection.
1-1. Cautions during disassembling and assembling
1. This equipment contains parts under high voltage. When making repairs, etc. Be sure to
pull out the power plug beforehand to insure safety.
2. Parts may be very hot immediately after use. Make sure the equipment has cooled off
sufficiently before carrying out repairs.
3. Make sure that parts and screws and wiring, etc. are returned to their original positions.
Tube, tape and other insulation materials have been used for safety reasons. The internal
wiring has been designed to avoid direct contact with hot parts or parts under high voltage
when using clamps or other tools.
4. The parts used in this device have special safety features such as flame-resistance and
anti-voltage properties. When replacing parts, always use parts supplied from the factory.
5. After finishing operations make sure that all parts and wires have been returned to their
original position and that there has been no deterioration of the area around the location
that was worked on.
6. Be sure to use an earth band (wrist band) during repair and inspection.
1-2. Lamp
During current conduction, the lamp is in the high-temperature state. In this case, pay careful
attention because a high voltage is used. When replacing a lamp, replace it after confirming
that the lamp has gotten cold sufficiently.
1-3. Lens
Do not look through a lens during projection. This damages your eyes.

Rev. 00
Company Confidential Optoma_______________________ Delta____________
5
2008/07/02
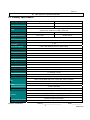
2. SPECIFICATIONS
2-1. Summary Specifications
Model EX774_DP-3633 EW674_DP-7626
Display type "TI" DMD 12∘, 0.7" x 1, XGA "TI" DMD 12∘, 0.65" X1, WXGA
Resolution XGA 1024x768 Native WXGA 1280 x 800 Native
Color Graphic: 24-bit 16.7M color (UXGA@60Hz)
Video: 27-bit 134M color (1080p) 16-bit 64k
Projection distance 1m to 11.2m 1m to 10m
Projection screen size 23.4"~300" 26.68"~307.5"
Projection lens Zoom Lens (manual)
Zoom Ratio 1.15:1
Vertical keystone
correction +/- 30°
Projection methods Front / Rear-Desktop & Front / Rear-Ceiling
Data compatibility IBM PC or compatibles (VGA, SVGA, XGA, SXGA, UXGA), Mac
SDTV/EDTV/ HDTV 480i/576i, 480p/576p, 720p, 1080i
Video compatibility NTSC/NTSC 4.43, PAL/PAL-M/PAL-N,SECAM
H-Sync 15, 31~90KHz
V-Sync 50 - 85 Hz
Safety certification UL, CUL, TUV-GS, CCC, FCC class B, ICES-003, CE Class B, CB, EK, PSB
Operation temperature 5~ 40 °C
Dimensions / Weight 300mm x 244mm x 100.5mm(8.2 lb)
AC Input AC Universal 110 ~ 240 @50~60Hz , Typical @110 VAC (100~240)/±10%
Power consumption Typical 350W (standard mode); Typical 300W (ECO mode)
Stand By < 5 watts @ 110Vac
Lamp Osram E20.6, 280W
Audio speaker 3 w mono speaker (SPL <= 5W)
VGA in (Compatible with HDTV component YPbPr / SCART)
PC DVI in (DVI-I connector accept DVI-D and DVI-A signal)
Composite video (RCA X 1)
Video S-Video (Mini DIN)
Audio Input: R / L (RCA X 2), Mini-Jack X 1 Out: Mini-Jack X 1
USB (USB-B mouse + keypad emulation + Flash upgrade)
RS-232 (Room Control)
RJ45 management (RJ45)
Control
Screen Control (12v relay)
Security Kensington lock

Rev. 00
Company Confidential Optoma_______________________ Delta____________
6
2008/07/02
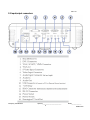
2-2 Input/output connectors

Rev. 00
Company Confidential Optoma_______________________ Delta____________
7
2008/07/02
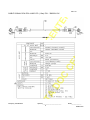
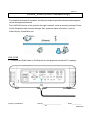
2-3. Description Of Wire Connection
2-3-1 Accessories List
1. AC Power Cord x 1 (US 1.8m)
2. Computer Cable VGA to VGA (1.8m)
3. USB Cable, A to B (1.8m)
4. Composite cable RCA * 1 (1.8m)
5. WEEE card
6. Remote Controller with laser pointer
7. Quick start card
8. Carrying case with Optoma Logo
9. Warranty card
10. User's Manual (CD) (23 languages)
2-3-2 Accessories Wire Description
USB Cable (1.8m) 308140490X
SHELL DRAIN SHELL
4 BLACK 4
3 GREEN 3
2 WHITE 2
1 RED 1
J2 WIRE COLOR J2
WIRE CONNECTION TABLE

Rev. 00
Company Confidential Optoma_______________________ Delta____________
8
2008/07/02
CABLE SIGNAL D-SUB D-SUB L1800 BLK (RGB CABLE 1.8m) P/N:308140500X

Rev. 00
Company Confidential Optoma_______________________ Delta____________
9
2008/07/02
CABLE SIGNAL RCA RCA L1800 YEL (1.8m) P/N:308030110X

Rev. 00
Company Confidential Optoma_______________________ Delta____________
10
2008/07/02
2-4. Remote Control Keypad

Rev. 00
Company Confidential Optoma_______________________ Delta____________
11
2008/07/02

Rev. 00
Company Confidential Optoma_______________________ Delta____________
12
2008/07/02
2-5. Control Key Pad and LED

Rev. 00
Company Confidential Optoma_______________________ Delta____________
13
2008/07/02
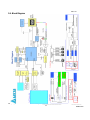
2-6. Block Diagram

Rev. 00
Company Confidential Optoma_______________________ Delta____________
14
2008/07/02
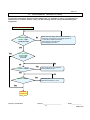
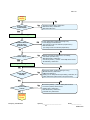
3. TROUBLE SHOOTING
By checking operations during normal usage time, it is possible to carry out judgments on
malfunction to a certain extent. Carry out the following checks before disassembling the
equipment.
Yes
Waiting
Power On
Yes
POWER: 7 Blinks •Lamp Cover A’ssy is not attached
•Switch (CN852) is open
No
POWER: 8 Blinks •DMD chip error.
•DMD Board PWB Ass’y check.
Yes
No No
No
No
Connect the power cord
POWER: Light
READY : Light
Standy-by-ready
• Cable of Power Supply Unit and thermostat Ass’y.
• Check the connection of Power Supply (CN201 of
Power BD to CN900 of Main BD)
• Power Supply Unit malfunction
• Check keypad connection
Yes
Press “power key”
POWER: Light
READY : OFF
Power ON
Yes

Rev. 00
Company Confidential Optoma_______________________ Delta____________
15
2008/07/02
Yes
Yes
Yes
No
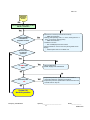
LAMP:3 Blinks
LAMP:2 Blinks
Yes No
No
No
No
No
LAMP:1 Blinks
Yes
No
No
No
No
LAMP:4 Blinks
Yes
POWER: 4 Blinks
POWER: 6 Blinks
POWER: 7 Blinks
• Connector CN801 of Fan disconnected
• Ballast fan malfunction
•Thermal Break Sensor error
•Thermal Break Sensor disconnected.
• Connector CN905 of Fan disconnected
• Burner fan malfunction
•Lamp Cover is not attached.
•Switch (CN852) is open
POWER: 9 Blinks
Lamp does not light:No lighting operation sound (ignition sound) exists.
• Flexible cable of Color Wheel Ass’y is disconnected (CN650) o
r
broken.
• Color Wheel Ass’y malfunction (does not rotate).
• Main Board Ass’y malfunction (Color Wheel Ass’y does not rotate).
• Power Supply Unit malfunction.
• Index board malfunction (color wheel turns fast).
• C/W sensor PWB Ass’y (CN103) / MB PWB (CN850) is disconnected
or broken.
POWER: 5 Blink Lamp does not light:lighting operation sound (ignition sound) exists.
• Main Board and Ballast Board Ass’y malfunction
• Ballast Connector (CJ4) or LVPS unit (CJ1) or MB(CN530)disconnected
• Lamp failure (Lamp is broken, damaged, or burst)
The lamp is ON
Turn the
power ON
Image
Display
• Connector CN800 of Fan disconnected
• Lamp fan malfunction
• Connector CN802 of Fan disconnected
• Burner fan malfunction

Rev. 00
Company Confidential Optoma_______________________ Delta____________
16
2008/07/02
Confirmation with none-signal state
Projector logo
screen dis
p
la
y
• CW Sensor Board
Ass’y malfunction
• Main Board
Ass’y malfunction
• DMD Set malfunction
Still dark after the
lamp is on for
more than 1min
• Lamp deterioration (malfunction/usage time)
• Power Supply Unit malfunction
(No change occurs even after lamp replacement.)
• DMD Set malfunction
(No change occurs even after lamp replacement.)
Menu display • Remote controller set malfunction, Low battery,
and outside operation rang
• Main Board Ass’y malfunction
• Connector (CN451)、(CN101 of IR PWB) disconnected
• IR PWB Ass’y malfunction
• Check the pattern generator setting is wrong
• Main Board Ass’y malfunction
• DMD Set malfunction
• Setting on PC side(external output setting, resolution, etc.)
• Cable malfunction
(
disconnection and
p
ins broken
)
• Connector (CN705)、(CN8 of IO BD) disconnected
• Connector (CN704) disconnected
• Speaker Ass’y malfunction
• Main Board Ass’y malfunction
• IO Board Ass’y malfunction
Check the
projection
Screen
Image display
normally
Input each signal
Speaker work
normally
Image
Display
Yes
No
No
No
Yes
No
Yes
Yes
No
Yes
Yes
Yes No
No
No
No
No

Rev. 00
Company Confidential Optoma_______________________ Delta____________
17
2008/07/02
Yes
Yes
Yes
• Lamp malfunction
• Power Supply Unit malfunction
• Black lines on screen (horizontal and vertical)
→ DMD Set malfunction
• Missing pixels (Missing white: 1 or more, missing black: 5 or
more, or sequence missing pixels)
→ DMD Set malfunction
• Shadows on screen
→ Dirt on DMD/projection lens surface
• Bluish shadows on corners of screen (during white screen
display)
→ Shifted optical axis of Lens Base Unit
Check the
projection
Screen
Check using all black/white screens
with PC connection
Are abnormalities
noticeable on
projection screen?
Does the lamp
go off during
operation?
Over Temp LED:
ON
Is LAMP Light
again?
System OK
Normal operation
• Temperature protector operated due to the increase in
temperature based on operating environment
• Temperature protector operated due to blocked suction and
exhaust holes or dirty fan
Yes
No
No
No
No
Yes
Yes No
No
No

Rev. 00
Company Confidential Optoma_______________________ Delta____________
18
2008/07/02
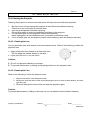
Image Problems
No image appears on-screen
Ensure all the cables and power connections are correctly and securely connected as
described in the Installation section.
Ensure all the pins of connectors are not bent or broken.
Check if the projection lamp has been securely installed. Please refer to the Replacing the
lamp section.
Make sure you have removed the lens cap and the projector is switched on.
Partial, scrolling or incorrectly displayed image
Press “Re-Sync” on the remote.
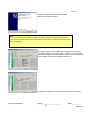
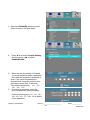
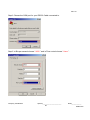
If you are using a PC:
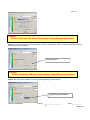
For Windows 95, 98, 2000, XP:
1. Open the My Computer icon, the Control Panel folder, and then double click on the
Display icon.
2. Select the Settings tab.
3. Verify that your display resolution setting is lower than or equal to UXGA (1600 x 1200).
4. Click on the Advanced Properties button.
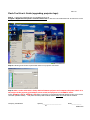
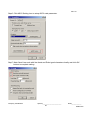
If the projector is still not projecting the whole image, you will also need to change the
monitor display you are using. Refer to the following steps.
5. Verify the resolution setting is lower than or equal to UXGA(1600 x 1200).
6. Select the Change button under the Monitor tab.
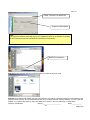
7. Click on Show all devices. Next, select Standard monitor types under the SP box; choose
the resolution mode you need under the “Models” box.
8. Verify that the resolution setting of the monitor display is lower than or equal to UXGA
(1600 x 1200). (*)
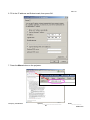
If you are using a Notebook:
1. First, follow the steps above to adjust resolution of the computer.
2. Press the toggle output settings. Example: [Fn]+[F4]
If you experience dif
fi
culty changing resolutions or your monitor freezes,
restart all equipment including the projector.

Rev. 00
Company Confidential Optoma_______________________ Delta____________
19
2008/07/02
The screen of the Notebook or PowerBook computer is not displaying your
presentation
If you are using a Notebook:
Some Notebooks may deactivate their own screens when a second display device is in use.
Each has a different way to be reactivated. Refer to your computer’s manual for detailed
information.
Image is unstable or
flickering
Use Phase to correct it.
Change the monitor color setting on your computer.
Image has vertical
flickering
bar
Use Frequency to make an adjustment.
Check and
reconfigure
the display mode of your graphic card
to make it compatible with the projector.
Image is out of focus
Make sure the lens cap is removed.
Adjusts the Focus Ring on the projector lens.
Make sure the projection screen is between the required distances from the projector.
The image is stretched when displaying 16:9 DVD title
When you play anamorphic DVD or 16:9 DVD, the projector will show the best image in 16:9
format on projector side. If you play 4:3 format DVD title, please change the format as 4:3 in
projector OSD.If the image is still stretched, you will also need to adjust the aspect ratio by
referring to the following:
Please setup the display format as 16:9 (wide) aspect ratio type on your DVD player.
Image is too small or too large
Adjust the Zoom Ring on the top of the projector.
Move the projector closer to or further from the screen.
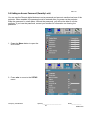
Press [Menu] button on the remote control or projector panel, go to Display | Format and try
the different settings.
Image has slanted sides
If possible, reposition the projector so that it is centered on the screen and below the bottom
of the screen. Press [Keystone +/-] button until the sides are vertical on the remote control.
Image is reversed
Select Setup | Projection from the OSD and adjust the projection direction.
Intermission Problems
The projector stops responding to all controls
If possible, turn off the projector, then unplug the power cord and wait at least 60 seconds
before reconnecting power.
Lamp burns out or makes a popping sound
When the lamp reaches its end of life, it will burn out and may make a loud popping sound. If
this happens, the projector will not turn on until the lamp module has been replaced.

Rev. 00
Company Confidential Optoma_______________________ Delta____________
20
2008/07/02
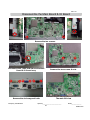
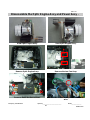
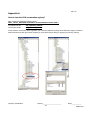
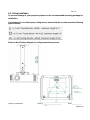
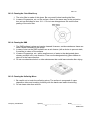
4. DISASSEMBLY AND ASSEMBLY
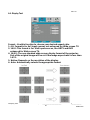
Removing the Lamp Module and Lamp Cover
Look at Top Case side. Loose the two screws.
Open the lamp cover. Loose the two screws and then take out
the lamp module by the ring-pull.
Lamp module views. Lamp holder views.
Page is loading ...
Page is loading ...
Page is loading ...
Page is loading ...
Page is loading ...
Page is loading ...
Page is loading ...
Page is loading ...
Page is loading ...
Page is loading ...
Page is loading ...
Page is loading ...
Page is loading ...
Page is loading ...
Page is loading ...
Page is loading ...
Page is loading ...
Page is loading ...
Page is loading ...
Page is loading ...
Page is loading ...
Page is loading ...
Page is loading ...
Page is loading ...
Page is loading ...
Page is loading ...
Page is loading ...
Page is loading ...
Page is loading ...
Page is loading ...
Page is loading ...
Page is loading ...
Page is loading ...
Page is loading ...
Page is loading ...
Page is loading ...
Page is loading ...
Page is loading ...
Page is loading ...
Page is loading ...
Page is loading ...
Page is loading ...
Page is loading ...
Page is loading ...
Page is loading ...
Page is loading ...
Page is loading ...
Page is loading ...
Page is loading ...
Page is loading ...
Page is loading ...
Page is loading ...
Page is loading ...
Page is loading ...
Page is loading ...
Page is loading ...
Page is loading ...
Page is loading ...
Page is loading ...
Page is loading ...
Page is loading ...
-
 1
1
-
 2
2
-
 3
3
-
 4
4
-
 5
5
-
 6
6
-
 7
7
-
 8
8
-
 9
9
-
 10
10
-
 11
11
-
 12
12
-
 13
13
-
 14
14
-
 15
15
-
 16
16
-
 17
17
-
 18
18
-
 19
19
-
 20
20
-
 21
21
-
 22
22
-
 23
23
-
 24
24
-
 25
25
-
 26
26
-
 27
27
-
 28
28
-
 29
29
-
 30
30
-
 31
31
-
 32
32
-
 33
33
-
 34
34
-
 35
35
-
 36
36
-
 37
37
-
 38
38
-
 39
39
-
 40
40
-
 41
41
-
 42
42
-
 43
43
-
 44
44
-
 45
45
-
 46
46
-
 47
47
-
 48
48
-
 49
49
-
 50
50
-
 51
51
-
 52
52
-
 53
53
-
 54
54
-
 55
55
-
 56
56
-
 57
57
-
 58
58
-
 59
59
-
 60
60
-
 61
61
-
 62
62
-
 63
63
-
 64
64
-
 65
65
-
 66
66
-
 67
67
-
 68
68
-
 69
69
-
 70
70
-
 71
71
-
 72
72
-
 73
73
-
 74
74
-
 75
75
-
 76
76
-
 77
77
-
 78
78
-
 79
79
-
 80
80
-
 81
81


Ask a question and I''ll find the answer in the document
Finding information in a document is now easier with AI
Related papers
Other documents
-
BenQ GP100 Important information
-
ViewSonic PX706HD User guide
-
BenQ TH690ST Important information
-
-
Ideal Heavy-Duty Workbench Owner's manual
-
-
Acer X110 User manual
-
Sanyo PDG-DWL100 - WXGA DLP Projector User manual
-
-
Hitachi CP-DX300 guide User manual