Toro 36in Sprayer, Spray Master User manual

Category
Spreader
Type
User manual
FormNo.3438-940RevB
36inSpreader/Sprayer
SprayMaster
ModelNo.34231—SerialNo.400000000andUp
Registeratwww.Toro.com.
OriginalInstructions(EN)
*3438-940*B
ItisaviolationofCaliforniaPublicResourceCode
Section4442or4443touseoroperatetheengineon
anyforest-covered,brush-covered,orgrass-covered
landunlesstheengineisequippedwithaspark
arrester,asdenedinSection4442,maintainedin
effectiveworkingorderortheengineisconstructed,
equipped,andmaintainedforthepreventionofre.
Theenclosedengineowner'smanualissupplied
forinformationregardingtheUSEnvironmental
ProtectionAgency(EPA)andtheCaliforniaEmission
ControlRegulationofemissionsystems,maintenance,
andwarranty.Replacementsmaybeorderedthrough
theenginemanufacturer.
WARNING
CALIFORNIA
Proposition65Warning
Theengineexhaustfromthisproduct
containschemicalsknowntotheStateof
Californiatocausecancer,birthdefects,
orotherreproductiveharm.
Batteryposts,terminals,andrelated
accessoriescontainleadandlead
compounds,chemicalsknownto
theStateofCaliforniatocause
cancerandreproductiveharm.Wash
handsafterhandling.
Useofthisproductmaycauseexposure
tochemicalsknowntotheStateof
Californiatocausecancer,birthdefects,
orotherreproductiveharm.
Introduction
Thisstand-onspreadersprayerisintendedforuse
bytrainedoperatorsinresidentialandcommercial
applications.Themachineisprimarilydesignedfor
chemicaldistributionusedforturfcareorsnow/ice
removalatresidentialgrounds,parks,sportselds,
andoncommercialgrounds.Usingthisproductfor
purposesotherthanitsintendedusecouldprove
dangeroustoyouandbystanders.
Readthisinformationcarefullytolearnhowtooperate
andmaintainyourproductproperlyandtoavoid
injuryandproductdamage.Youareresponsiblefor
operatingtheproductproperlyandsafely.
Visitwww.Toro.comforproductsafetyandoperation
trainingmaterials,accessoryinformation,helpnding
adealer,ortoregisteryourproduct.
Wheneveryouneedservice,genuineToroparts,or
additionalinformation,contactanAuthorizedService
DealerorT oroCustomerServiceandhavethemodel
andserialnumbersofyourproductready.Figure1
identiesthelocationofthemodelandserialnumbers
ontheproduct.Writethenumbersinthespace
provided.
Important:Withyourmobiledevice,youcan
scantheQRcode(ifequipped)ontheserial
numberplatetoaccesswarranty,parts,andother
productinformation.
g311361
Figure1
1.Modelandserialnumberlocation
ModelNo.
SerialNo.
©2020—TheToro®Company
8111LyndaleAvenueSouth
Bloomington,MN55420
2
Contactusatwww.Toro.com.
PrintedintheUSA
AllRightsReserved
Contents
Safety.......................................................................4
Safety-AlertSymbol............................................4
GeneralSafety...................................................4
SafetyandInstructionalDecals..........................5
Setup......................................................................12
1CheckingtheTireAirPressure.......................12
2CheckingtheEngine-OilLevel.......................12
3CheckingtheHydraulic-FluidLevel................12
4ConnectingtheBattery..................................13
ProductOverview...................................................14
Controls...........................................................14
MachineControls..........................................14
EngineControls............................................15
SpreaderControls.........................................15
SprayerControls...........................................16
Specications..................................................17
BeforeOperation.................................................18
BeforeOperationSafety...................................18
PerformingDailyMaintenance..........................19
FuelSpecication.............................................19
UsingStabilizer/Conditioner.............................20
FillingtheFuelTank..........................................20
DuringOperation.................................................20
DuringOperationSafety...................................20
OperatingtheMachine.....................................23
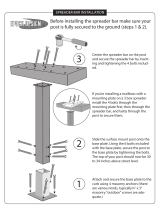
OperatingtheSpreader....................................25
OperatingtheSprayer......................................33
AfterOperation....................................................40
AfterOperationSafety......................................40
CleaningandLubricatingtheSpreader.............41
CleaningtheSprayer........................................42
TransportingtheMachine.................................45
Maintenance...........................................................47
MaintenanceSafety..........................................47
RecommendedMaintenanceSchedule(s)...........48
NotationforAreasofConcern...........................49
Pre-MaintenanceProcedures..............................49
PreparingtheMachine......................................49
AccessingtheMachine.....................................49
Lubrication..........................................................51
GreaseSpecication........................................51
GreasingtheCasterPivots...............................51
LubricatingtheCaster-AxleBearings................52
GreasingtheBeltTensioner..............................52
EngineMaintenance...........................................53
ServicingtheAirCleaner..................................53
EngineOilSpecication....................................53
CheckingtheEngine-OilLevel..........................54
ChangingtheOilFilterandEngine
Oil.................................................................55
ServicingtheSparkPlug...................................57
FuelSystemMaintenance...................................58
ReplacingtheFuelFilter...................................58
ElectricalSystemMaintenance...........................59
ServicingtheBattery.........................................59
RemovingandInstallingtheBattery..................61
Jump-StartingtheMachine...............................62
ServicingtheFuses..........................................63
DriveSystemMaintenance..................................64
CheckingtheTirePressure...............................64
CheckingtheWheel-LugNuts..........................64
CheckingtheWheel-HubNut...........................64
BrakeMaintenance.............................................65
AdjustingtheParkingBrake..............................65
BeltMaintenance................................................65
CheckingtheBeltforWear...............................65
ReplacingtheBelt............................................65
AdjustingtheBeltTension.................................66
ControlsSystemMaintenance.............................67
AdjustingtheMaximumForwardSpeed............67
AdjustingtheMotion-ControlLinkage...............67
AdjustingtheMotionControlTracking...............69
HydraulicSystemMaintenance...........................69
HydraulicFluidSpecication.............................69
CheckingtheHydraulicFluidLevel...................69
ChangingtheHydraulicFluidand
Filter..............................................................70
PurgingAirfromtheHydraulicSystem..............71
CheckingtheHydraulicSystemFittings............71
MaintainingtheChassis.......................................72
CheckingtheMachineforLoose
Hardware......................................................72
MaintainingtheSprayerandSpreader
Systems........................................................72
CheckingtheSprayerSystem...........................72
CheckingtheSpreaderSystem........................72
Cleaning..............................................................73
CleaningtheEngineandtheExhaust
SystemArea.................................................73
CleaningtheDebrisfromtheMachine...............73
CleaningtheEngineDebrisGuard....................73
WasteDisposal.................................................74
Storage...................................................................75
Short-TermStorage..........................................75
PreparingtheMachineforExtendedor
WinterStorage..............................................75
Troubleshooting......................................................76
TheChargingSystem.......................................76
Schematics.............................................................82
3
Safety
ThefollowinginstructionsarefromANSIstandard
B71.4-2017.
Safety-AlertSymbol
Thesafety-alertsymbol(Figure2)isusedbothin
thismanualandonthemachinetoidentifyimportant
safetymessagesthatyoumustfollowtoavoidan
accident.
ThissymbolmeansAttention!BecomeAlert!Your
SafetyIsInvolved!
g000502
Figure2
Safety-alertsymbol
Thesafety-alertsymbolappearsaboveinformation
whichalertsyoutounsafeactionsorsituationsandis
followedbythewordDanger,Warning,orCaution.
Dangerindicatesanimminentlyhazardoussituation
which,ifnotavoided,willresultindeathorserious
injury.
Warningindicatesapotentiallyhazardoussituation
which,ifnotavoided,couldresultindeathorserious
injury.
Cautionindicatesapotentiallyhazardoussituation
which,ifnotavoided,mayresultinminorormoderate
injury.
Thismanualuses2otherwordstohighlight
information.Importantcallsattentiontospecial
mechanicalinformationandNoteemphasizesgeneral
informationworthyofspecialattention.
GeneralSafety
Thismachineiscapableofamputatinghandsandfeet
andofthrowingobjects.T orodesignedandtestedthis
machinetoofferreasonablysafeservice;however,
failuretocomplywithsafetyinstructionsmayresultin
injuryordeath.
Read,understand,andfollowallinstructionsand
warningsintheOperator’sManualandother
trainingmaterials,onthemachine,theengine,and
attachments.Alloperatorsandmechanicsshould
betrained.Iftheoperator(s)ormechanic(s)cannot
readthismanual,itistheownersresponsibilityto
explainthismaterialtothem;otherlanguagesmay
beavailableonourwebsite.
Onlyallowtrained,responsible,andphysically
capableoperatorswhoarefamiliarwiththesafe
operation,operatorcontrols,andsafetysignsand
instructionstooperatethemachine.Neverallow
childrenoruntrainedpeopleoperateorservicethe
equipment.Localregulationsmayrestricttheage
oftheoperator.
Alwaysuseappropriatepersonalprotective
equipment(PPE)toguardagainstcontactwith
chemicals.
Donotoperatethemachineneardrop-offs,
ditches,embankments,water,orotherhazards.
Donotputyourhandsorfeetnearmoving
componentsofthemachine.
Neveroperatethemachinewithdamagedguards,
shields,orcovers.Alwayshavesafetyshields,
guards,switchesandotherdevicesinplaceandin
properworkingcondition.
Stopthemachine,shutofftheengine,andremove
thekeybeforeservicing,fueling,orunclogging
themachine.
4
SafetyandInstructionalDecals
Keepallsafetysignslegible.Removeallgrease,
dirt,anddebrisfromsafetysignsandinstructional
labels.
Replaceallworn,damaged,ormissingsafety
signs.
Whenyouinstallreplacementcomponents,ensure
thatcurrentsafetysignsareafxedtothose
components.
Ifyouhaveinstalledanattachmentoraccessory,
ensurethatcurrentsafetysignsarevisible.
Familiarizeyourselfwiththefollowingsafetysigns
andinstructionlabels.Theyarecriticaltothesafe
operationofyourmachine.
decal115-9625
115-9625
1.Parking
brake—disengaged
2.Parkingbrake—engaged
decal126-2055
126-2055
1.Wheellugnut—torqueto129N∙m(95ft-lb).
2.Wheelhubnut—torqueto319N∙m(235ft-lb).
3.ReadtheOperator’sManualbeforeperforming
maintenance;checkthetorqueaftertherst100hoursand
every500hoursafter.
decal142-4366
142-4366
1.Spraypressure—Decrease5.Centernozzlespray—Off
2.Spraypressure—Increase6.Centernozzlespray—On
3.Leftnozzlespray—Off7.Rightnozzlespray—Off
4.Leftnozzlespray—On8.Rightnozzlespray—On
5
decal135-6398
135-6398
1.ReadtheOperator’s
Manual.
3.Onlyuseblue-colored
10W-50engineoil.
2.Onlyusegreen-colored
15W-50hydraulicuid.
decal135-6420
135-6420
decal135-6424
135-6424
6
decal135-6430
135-6430
1.Pressandholdthefoot
pedaltolockthecaster
wheelsinthestraight
position.
2.Releasethefootpedalto
unlockthecasterwheels
toallowturning.
decal135-6725
135-6725
1.Cutting/dismembermenthazardofhand,spinner—stay
awayfrommovingparts.
decal135-6728
135-6728
1.Pressandholdfootbutton
toturnonspray.
2.Releasefootbuttontoshut
offspray.
decal135-7911
135-7911
1.Hydrooillevel—Full2.Hydrooillevel—Add
7
4 MPH 5 MPH
3 MPH 4 MPH 5 MPH
30 VC 0.13 17 9.7 7.7 0.29 0.22 0.18
40 VC 0.15 19 11.1 8.9 0.34 0.26 0.20
50 VC 0.17 22 12.6 10.1 0.39 0.29 0.23
60 C 0.18 23 13.4 10.7 0.41 0.31 0.24
30 VC 0.17 22 12.6 10.1 0.39 0.29 0.23
40 VC 0.20 26 14.9 11.9 0.45 0.34 0.27
50 VC 0.22 28 16.3 13.1 0.50 0.37 0.30
60 VC 0.24 31 17.8 14.3 0.54 0.41 0.33
30 VC 0.22 28 16.3 13.1 0.50 0.37 0.30
40 VC 0.25 32 18.6 14.9 0.57 0.43 0.34
50 VC 0.28 36 21 16.6 0.63 0.48 0.38
60 VC 0.31 40 23 18.4 0.70 0.53 0.42
30 XC 0.26 33 19.3 15.4 0.59 0.44 0.35
40 VC 0.30 38 22 17.8 0.68 0.51 0.41
50 VC 0.34 44 25 20 0.77 0.58 0.46
30 XC 0.35 45 26 21 0.79 0.60 0.48
40 XC 0.40 51 30 24 0.91 0.68 0.54
50 VC 0.45 58 33 27 1.00 0.77 0.61
30 XC 0.43 55 32 26 0.97 0.73 0.58
40 XC 0.50 64 37 30 1.10 0.85 0.68
50 VC 0.56 72 42 33 1.30 0.95 0.76
30 XC 0.52 67 39 31 1.20 0.88 0.71
40 XC 0.60 77 45 36 1.40 1.00 0.82
50 VC 0.67 86 50 40 1.50 1.10 0.91
4 MPH 5 MPH
3 MPH 4 MPH 5 MPH
15 VC 0.61 78 45 36 1.40 1.00 0.83
20 VC 0.71 91 53 42 1.60 1.20 0.97
30 C 0.87 111 65 52 2.00 1.50 1.20
40 C 1.00 128 74 59 2.30 1.70 1.40
15 XC 0.92 118 68 55 2.10 1.60 1.30
20 XC 1.06 136 79 63 2.40 1.80 1.40
30 VC 1.30 166 97 77 2.90 2.20 1.80
40 C 1.50 192 111 89 3.40 2.60 2.00
*NOTE: Always double check your application rates.
Tabulations are based on spraying water at 70 ∞ F (21 C) Coarse Very Coarse Extremely Coarse
117-5839
HIGH VOLUME SPRAY CHART (XRC TIPS)
Drop
Size
CAPACITY
ONE NOZZLE
IN GPM
__HIGH VOLUME SPRAYING (SPACING)__
/\ 20" /\
GPA
GALLONS PER 1,000 SQ. FT.
PSI
Drop
Size
CAPACITY
ONE
NOZZLE
IN GPM
_______SPACING________
/\ 20" /\
GPA
142-3307
GALLONS PER 1,000 SQ. FT.
142-3306
142-3308
142-3309
142-3310
142-3311
142-3312
*Grey tips are to be used ONLY the 4 tip booms*
PSI
135-8413
At 15 PSI
(1 bar)
Pressure
At 60 PSI
(4 bar)
Pressure
1 4.75
2 5.5
3 6.0
2 4.75
4 5.5
6 6.5
2 5
4 6.25
6 7.25
2) Begin to spread the product. As you are spreading you should be able to see the spread pattern in front of you.
Generally, all spreaders will tend to throw fertilizer heavy to the right. As you continue to spread, pull the Accuway
control towards you very slowly ( small increments ) until you begin to bring the spread pattern directly centered
in front of you.
3) Once you have the spread pattern centered, lock the Accuway cable in place. There should be no reason to reset
the Accuway for that product unless you see that the spread pattern has changed due to bumping the lever. If it has
changed slightly, simply re-adjust the pattern while you’re spreading.
Accuway
Accuway balances the spread pattern, by shifting the product placement on the spinner. Placing the product on the
impeller close to the shaft or the center will cause the spread pattern to be heavier to the right as it rides the impeller
for a longer period. If the product is placed on the outer edge of the impeller, the spread pattern will be heavier to the
left ( because the spinner is turning clockwise ).
1) Start with the Accuway control cable all the way forward or in (this is home base ).
Spreader / Sprayer Calibration:
Mixing of liquid or dry product should be in accordance to manufacturers labels. Remember this is designed
for low volume spraying so the mix will be more concentrated.
Remember that your machine is factory set to put down 1/3 gallon of liquid per 1,000 sq. ft (at 5MPH and
40PSI ). For instance, some products call for 1.1 to 1.5 oz per 1,000 sq. ft. We would recommend using 1.3
(median value of 1.1 to 1.5). Since you are using a 1/3 gallon tip, you need to multiply by 3, then multiply that
amount by the number of gallons put in the tank.
1.3 (median value of 1.1 to 1.5) X 3 (1.3 gallon tip) X gallons of water needed. If you were filling a 30 gallon tank your
equation would look like this: 1.3 X 3 X 30 = 117 ounces in 30 gallons of water.
Approximate Granular Calibration
Throw fertilizer back to the center of tire tracks
5.0
6.0
6.5
Small Pellets
2
4
6
4.25
5.5
5.75
Product
Lbs. per
1,000 sq ft
Full Rate
Fine Pellets
1
2
3
4.75
5.25
5.5
Nitrogen Pellets Med.
Med. Pellets & Granules
Large Heavy Pellets
Mixed Fine Pellets
2
4
6
*Calibrated at 5 MPH
Fine
Mixed Fine
Small
Small/Med
Medium
Heavy
142-4373
decal142-4373
142-4373
8
decal142-4365
142-4365
1.SpreadOn-Pullhandleup.5.SpreadLock-Rotate
counterclockwiseto
unlock;rotateclockwiseto
lock.
2.SpreadOff-Pushhandle
down
6.Deector-Pullknobupto
open
3.Spreadpatterncontrol-Pull
handleupifheavyonleft
side
7.Deector-Pushknobdown
toclose
4.Spreadpattern
control-Pushhandle
downifheavyonrightside
9
decal142-4183
142-4183
1.Fast
14.Parkbrake—Off
2.Slow15.Spreaderspeed
3.Neutral
16.Spreaderspeed—Increase
4.Reverse
17.Spreaderspeed—Decrease
5.Warning—ReadtheOperator’sManual;DoNotoperatethis
machineunlessyouaretrained.Wearhearingprotection.
18.Spraypumpswitch—On
6.Warning—Stayawayfrommovingparts;keepallguards
inplace.Stopengineandremovekeybeforeadjusting,
servicing,orcleaning.
19.Spraypumpswitch—Off
7.Warning—Disengagesprayercontrols,movedriveleverto
neutralposition,engageparkingbrake,andstopengine
beforeleavingtheoperator’sposition.
20.Throttle—Fast
8.Crushing/dismembermenthazardofbystanders—DoNot
carrypassengers,lookforwardanddownwhenoperatingthe
machine,lookbehindanddownwhenreversing.
21.Continuousvariablesetting
9.Thrownobjecthazard—keepbystandersaway.
22.Throttle—Slow
10.Warning—operateacrossslopesnotupanddown.Loads
mayshiftonslopesorwhenturning.DoNotoperateonwet
slopes–useextremecautionwhenoperatingonslopes.
23.Hourmeter
11.Causticliquid/chemicalburnandtoxicgasinhalation
hazard—wearhand,skin,eye,andrespiratoryprotection.
24.Engine—Off
12.Warning—Usefresh,cleanwater:
-forrst-aidwashing
-forrinsingthetank.
25.Engine—On
13.Parkbrake—On26.Engine—Start
10
decal142-3919
142-3919
1.Readtheinstructionsbeforeservicingorperforming
maintenance
5.Checktireandcasterwheelpressure(4locations)
2.Timeinterval
6.Greaseidlerpivot;refertotheOperator'smanualforfurther
instructions
3.Checkengineoillevel7.Greasecasterpivots;refertotheOperator’smanualfor
furtherinstructions(2locations)
4.Checkhydraulicoillevel;refertotheOperator'smanualfor
furtherinstructions
11
Setup
LooseParts
Usethechartbelowtoverifythatallpartshavebeenshipped.
ProcedureDescription
Qty.
Use
4
Nopartsrequired
Connectthebattery.
MediaandAdditionalParts
Description
Qty.
Use
Operator'sManual
1
Readbeforeoperatingthemachine.
Key2
Startthemachine.
1
CheckingtheTireAir
Pressure
NoPartsRequired
Procedure
Checktheairpressureinthefrontandreartires,and
ifnecessary,addairtotheappropriatepressure;refer
toCheckingtheTirePressure(page64).
2
CheckingtheEngine-Oil
Level
NoPartsRequired
Procedure
Theenginecomeswithoil;checktheengine-oillevel
and,ifnecessary,addtotheappropriatelevel;referto
EngineOilSpecication(page53)andCheckingthe
Engine-OilLevel(page54).
3
Checkingthe
Hydraulic-FluidLevel
NoPartsRequired
Procedure
Thehydraulictankcomeswithuid;check
hydraulic-uidlevelinthehydraulictank,andif
necessary,addtotheappropriatelevel;referto
CheckingtheHydraulicFluidLevel(page69).
12
4
ConnectingtheBattery
NoPartsRequired
Procedure
Installthenegativebatterycabletothenegative(–)
batteryterminalwithacarriageboltandanged
locknut(Figure3).
g311995
Figure3
1.Flangelocknut3.Negativebatteryterminal
2.Negativebatterycable
4.Carriagebolt
13
ProductOverview
g317512
Figure4
1.Spraywand
7.Motion-controllevers
2.Fuel-tankcap
8.Controlpanel
3.Hoppercover
9.Platform
4.Hopper
10.Sprayer-tankcap
5.Spreadercontrols11.Sprayernozzles
6.Referencebar
12.Battery
Controls
MachineControls
g317350
Figure5
1.Motion-controllevers
2.Sprayerandinformation
display
Motion-ControlLevers
Usethemotion-controlleverstodrivethemachine
forward,reverse,andturneitherdirection(Figure5).
SprayerandInformationDisplay
Thesprayerandinformationdisplayislocatedto
therightofthethrottle,atthebottomofthecontrol
console(Figure5).
Thesprayerandinformationdisplayshowsthe
followinginformation:
Sprayercontrollerrmwareversion
Hourmeterfortheengine
Hourmeterforthesprayer-pumpmotor
Batteryvoltage
Spray-systempressure
Faultcodes
14
CasterWheel-LockPedal
Pressandholdthecasterwheel-lockpedal(Figure
6)tolockthecasterwheelsinthestraightposition.
Releasethecasterwheel-lockpedaltounlockthe
casterwheels,andallowthemachinetofreely
turn.
g311617
Figure6
1.Brakefootpedal(parking
brake)
2.Caster-lockpedal
ParkingBrakes
Pushtheleftandrightbrakefoot-pedals(Figure6)
downtoengagethebrakes.
Pushtheleftandrightbrakefoot-pedalsupto
disengagetheparkingbrakes.
EngineControls
g317354
Figure7
1.Throttlecontrol3.Hourmeter
2.Chokecontrol
4.Ignitionswitch
IgnitionSwitch
Theignitionswitchislocatedattheleftsideofthe
controlconsole(Figure7).
Usetheignitionswitchtostartandrun,orshutoffthe
engine.Theignitionswitchhas3positions:STOP,
RUNandSTART.
Note:Youmustengagetheparkingbraketostart
theengine.
ThrottleControl
Thethrottlecontrolstheenginespeed,andithasa
continuous-variablesettingfromtheSLOWtoFAST
position(Figure7).
ChokeControl
Usethechokecontroltostartacoldengine.
HourMeter
Thehourmeterdisplaysthetotalhoursofengine
operation.Thehourmeter(Figure7)startstofunction
wheneveryourotatethekeyswitchtotheONposition
oriftheengineisrunning.
SpreaderControls
g317353
Figure8
1.Impeller-speedcontrol
3.Diffusercontrol
2.Deectorcontrol
4.Hopper-doorcontrol
Impeller-SpeedControl
Usetheimpeller-speedcontrol(Figure8)tosetthe
speedofthehydraulicmotorforthespreader.
Hopper-DoorControl
Thehopper-doorcontrol(Figure8)opensandcloses
thedoorinsidethebaseofthehopper
DeectorControl
Thedeectorcontrol(Figure8)pivotsthedeector
intothespreaderpattern.
15
DiffuserControl
Thediffusercontrol(Figure8)shiftstheproduct
placementoftheimpellereithertotheedgeofthe
impellerortothemiddleoftheimpeller.
Drop-rateCamandLinkage
Thedrop-ratecamandlinkagearelocatedatthefront
ofthemachineandbelowthehopperonthespreader
(Figure9).
g027033
Figure9
1.Slot–maximumposition
2.Linkage
Usethedrop-ratecamtosetthemaximumamountof
granularmaterialdispensedthroughtheimpellergate
andontotheimpeller.
Theslotinthecam,aftersetting9onthecam,
allowsyoutoopentheimpellergatetothemaximum
position.Youcanusethissettingfordrysand,ice
melt,orothermaterialsthataredifculttospread.
Note:Usecamsetting9maywhenyouarecleaning
outthehopper.
SprayerControls
g317355
Figure10
1.Leftboomspray-control
valve
4.Sprayerpressuregauge
2.Centerboomspray-control
valve
5.Spray-pumpswitch
3.Rightboomspray-control
valve
Spray-PumpSwitch
Pushthespray-pumpswitch(Figure10)forwardto
turnonspray.
Pushthespray-pumpswitchrearwardtoturnoffspray.
LeftBoomSpray-ControlValve
Pushtheleftboomsprayer-controlvalve(Figure10)
toactivatesprayfortheleftboom.
CenterBoomSpray-ControlValve
Pushthecenterboomsprayer-controlvalve(Figure
10)toactivatesprayforthecenterboom.
RightBoomSpray-ControlValve
Pushtherightboomsprayer-controlvalve(Figure10)
toactivatesprayfortherightboom.
SprayerPressureGauge
Thesprayerpressuregauge(Figure10)displaysthe
pressure(inpsi)whileyouarespraying.
Spray-PumpFootSwitch
Pressandholdthespray-pumpswitch(Figure11)to
turnonthespray.
Releasethespray-pumpswitchtoshutoffthespray.
16
g311618
Figure11
1.Spray-pumpswitch
SprayWand
g311619
Figure12
1.Triggerlock
3.Spraywandhandle
2.Spraywandtrigger4.Spraytip
SprayWandTrigger
Squeezethetrigger(Figure12)tothehandletospray;
releasethetriggertostop.
SprayWandTriggerLock
Squeezethetriggeragainstthehandleandpush
triggerlock(Figure12)forwardtokeepthewandin
theOPENposition.Pullthelockbacktoreleasethe
trigger.
Specications
Overallwidthleftandrightbooms
extended
161cm(63-1/2
inches)
leftandrightbooms
folded
90cm(35-1/2
inches)
Overalllength185cm(73
inches)
Overallheight127cm(50
inches)
Weightsprayertankand
hopperempty
331kg(730lb)
onlyhopperfull386kg(850lb)
onlysprayertank
full
376kg(830lb)
sprayertankand
hopperfullwith2
bagsgranular
476kg(1050lb)
Maximum
machineweight
loadedmachine+
operator
581kg(1280lb)
Hoppercapacity
54kg(120lb)
Spreadercast0.9m(3ft)
through7.6m
(25ft)
Sprayertank
capacity
leftandright91L(24US
gallon)
leftorrightboom61cm(2ft) SprayWidth
centerboom
122cm(4ft)
MaximumSpray
Width
244cm(8ft)
forward11.3kph(7mph)
Maximumground
speed
reverse
6kph(4mph)
17
Operation
Note:Determinetheleftandrightsidesofthe
machinefromthenormaloperatingposition.
BeforeOperation
BeforeOperationSafety
GeneralSafety
Evaluatetheterraintodeterminewhataccessories
andattachmentsareneededtoproperlyand
safelyperformthejob.Useonlyaccessoriesand
attachmentsapprovedbyToro.
Inspecttheareawhereyouwillusetheequipment,
andremoveallrocks,toys,sticks,wires,
bones,andotherforeignobjectsthatmaybe
contaminatedbychemicalsand/oraffectthe
stabilityofthemachine.
Wearappropriateclothing,includingsafety
glasses,substantialslip-resistantfootwear,and
hearingprotection.Tiebacklonghairandavoid
looseclothingorjewelrythatmaygettangledin
movingparts.
Donotoperatethemachinewhilepeople,
especiallychildren,orpetsareinthearea.Stop
themachineandtheattachment(s)ifanyone
entersthearea.
Donotll,calibrate,orcleanthemachinewhile
people,especiallychildren,orpetsareinthearea.
Checkallsprayercomponentsforwearandleaks
beforeapplyingpressuretothesystem.Donot
usethemachineifitisleakingordamaged.
Ensurethattheoperatorplatformiscleanandfree
fromchemicalresidueanddebrisbuildup.
Checkthattheoperator-presencecontrols
(ifapplicable),safetyswitches,andshields
areattachedandfunctioningproperly.Do
notoperatethemachineunlesstheyare
functioningproperly.Frequentlycheckforworn
ordeterioratingcomponentsandreplacethem
withthemanufacturer’srecommendedpartswhen
necessary.
ChemicalSafety
Chemicalsubstancesusedinthespreader-sprayer
systemmaybehazardousandtoxictoyou,
bystanders,animals,plants,soilsorotherproperty.
Carefullyreadandfollowthechemicalwarning
labelsandSafetyDataSheets(SDS)forall
chemicalsusedandprotectyourselfaccordingto
thechemicalmanufacturer'srecommendations.
Ensurethataslittleskinaspossibleisexposed
whileusingchemicals.Useappropriatepersonal
protectiveequipment(PPE)toguardagainst
personalcontactwithchemicals,suchasthe
following:
safetyglasses,goggles,and/orfaceshield
chemical-resistantgloves
rubberbootsorothersubstantialfootwear
hearingprotection
respiratororltermask
cleanchangeofclothes,soap,anddisposable
towels,tobekepton-handintheeventofa
chemicalspill
Ifyouareusingmorethan1chemical,readthe
informationabouteachchemical.Refuseto
operateorworkonthespreader-sprayerifthis
informationisnotavailable.
Beforeworkingonaspreader-sprayersystem,
ensurethatthesystemhasbeentriplerinsedand
neutralizedaccordingtotherecommendations
ofthechemicalmanufacturer(s)andthatallthe
valveshavebeencycledthreetimes.
Verifythereisanadequatesupplyofcleanwater
andsoapnearby,andimmediatelywashoffany
chemicalsthatcontactyou.
Obtainpropertrainingbeforeusingorhandling
chemicals.
Usethecorrectchemicalforthejob.
Followthechemicalmanufacturer'sinstructions
forthesafeapplicationofthechemicalanddo
notexceedtherecommendedsystemapplication
pressure.
Handlechemicalsinawell-ventilatedarea.
Havecleanwateravailable,especiallywhenlling
thespraytank.
Donoteat,drink,orsmokewhileworkingwith
chemicals.
Donotcleanspraynozzlesbyblowingthrough
themorplacingtheminyourmouth.
Alwayswashyourhandsandotherexposedareas
assoonaspossibleafternishingthework.
Keepchemicalsintheiroriginalpackagesandina
safelocation.
Properlydisposeofunusedchemicalsand
chemicalcontainersasinstructedbythechemical
manufacturerandyourlocalcodes.
Chemicalsandfumesaredangerous;neverenter
thetankorhopper,anddonotplaceyourhead
overorintheopening.
Followalllocal,state,andfederalrequirementsfor
spreadingandsprayingchemicals.
18
FuelSafety
Useextremecarewhenhandlingfuel.
Incertainconditionsgasolineisextremelyammable
anditsvaporsareexplosive.Areorexplosionfrom
gasolinecanburnyou,others,andcauseproperty
damage.
Fillthefueltankoutdoorsonlevelground,inan
openarea,whentheengineiscold.Wipeupany
gasolinethatspills.
Neverrellthefueltankordrainthemachine
indoorsorinsideanenclosedtrailer.
Donotllthefueltankcompletelyfull.Fillthefuel
tanktothebottomofthellerneck.Theempty
spaceinthetankallowsthegasolinetoexpand.
Neversmokewhenhandlinggasoline,andstay
awayfromanopenameorwheregasolinefumes
maybeignitedbyaspark.
Storegasolineinanapprovedcontainerandkeep
itoutofthereachofchildren.
Addfuelbeforestartingtheengine.Neverremove
thecapofthefueltankoraddfuelwhenengineis
runningorwhentheengineishot.
Ifyouspillfuel,donotattempttostarttheengine.
Moveawayfromtheareaofthespillandavoid
creatinganysourceofignitionuntilthefuelvapors
havedissipated.
Donotoperatethemachinewithouttheentire
exhaustsysteminplaceandinproperworking
condition.
Incertainconditionsduringfueling,staticelectricity
canbereleased,causingaspark,whichcanignite
gasolinevapors.Areorexplosionfromgasoline
canburnyouandothersandcauseproperty
damage.
Alwaysplacegasolinecontainersonthe
groundawayfromyourvehiclebeforelling.
Donotllgasolinecontainersinsideavehicle
oronatruckortrailerbed,becauseinterior
carpetsorplastictruckbedlinersmayinsulate
thecontainerandslowthelossofanystatic
charge.
Whenpractical,removegasoline-powered
equipmentfromthetruckortrailerandrefuel
theequipmentwithitswheelsontheground.
Ifthisisnotpossible,thenrefuelsuch
equipmentonatruckortrailerfromaportable
containerratherthanfromagasoline-dispenser
nozzle.
Ifyoumustuseagasoline-dispensernozzle,
keepthenozzleincontactwiththerimofthe
fueltankorcontaineropeningatalltimes
untilfuelingiscomplete.Donotuseanozzle
lock-opendevice.
Gasolineisharmfulorfatalifswallowed.
Long-termexposuretovaporshascausedcancer
inlaboratoryanimals.Failuretousecautionmay
causeseriousinjuryorillness.
Avoidprolongedbreathingofvapors.
Keepyourfaceawayfromthenozzleand
gasolinetankorcontaineropening.
Keepgasolineawayfromyoureyesandskin.
Neversiphongasolinebymouth.
Tohelppreventres,dothefollowing:
Keeptheengineandtheengineareafree
fromaccumulationofgrass,leaves,excessive
greaseoroil,andotherdebristhatcan
accumulateintheseareas.
Cleanupoilandfuelspillsandremove
fuel-soakeddebris.
Allowthemachinetocoolbeforestoringthe
machineinanyenclosure.Donotstorethe
machinenearaameoranyenclosedarea
whereopenpilotlightsorheatappliancesare
present.
PerformingDaily
Maintenance
Beforestartingthemachineeachday,performthe
followingdaily-checkprocedures:
CheckingtheEngine-OilLevel(page54)
CheckingtheHydraulicFluidLevel(page69)
CheckingtheMachineforLooseHardware(page
72)
FuelSpecication
Petroleum
fuel
Useunleadedgasolinewithanoctaneratingof87
orhigher((R+M)/2ratingmethod).
Useanunleaded-gasolineblendwithupto10%
ethanol(gasohol)or15%MTBE(methyltertiary
butylether)byvolumeisacceptable.Ethanoland
MTBEarenotthesame.
Ethanol
blended
fuel
Gasolinewith15%ethanol(E15)byvolumeis
notapprovedforuse.Neverusegasolinethat
containsmorethan10%ethanolbyvolume,such
asE15(contains15%ethanol),E20(contains
20%ethanol),orE85(containsupto85%
ethanol).Usingunapprovedgasolinemaycause
performanceproblemsand/orenginedamage
whichmaynotbecoveredunderwarranty.
Important:Forbestresults,useonlyclean,fresh
fuel(lessthan30daysold).
Donotusegasolinecontainingmethanol.
19
Donotstorefueleitherinthefueltankorfuel
containersoverthewinterunlessyouuseafuel
stabilizer.
Donotaddoiltogasoline.
Using
Stabilizer/Conditioner
Useafuelstabilizer/conditionerinthemachineto
providethefollowingbenets:
Important:Donotusefueladditivescontaining
methanolorethanol.
Addthecorrectamountoffuelstabilizer/conditioner
tothegasoline.
Note:Afuelstabilizer/conditionerismosteffective
whenmixedwithfreshgasoline.T ominimizethe
chanceofvarnishdepositsinthefuelsystem,always
usefuelstabilizer.
FillingtheFuelTank
Fueltankcapacity:22.7L(5USgallons)
1.Parkthemachineonalevelsurfaceandshut
offtheengine.
2.Allowtheenginetocool.
3.Cleanaroundthefuel-tankcapandremoveit
(Figure13).
g311556
Figure13
4.Fillthetankwithfuel(Figure13)tothebottom
ofthellerneck.Donotllintothellerneck
ofthetank.
Important:Donotllthetankmorethan
thebottomofthellerneckbecausethefuel
needsroomtoexpand.
5.Installthefuel-tankcapsecurely.
6.Wipeupanyspilledfuel.
DuringOperation
DuringOperationSafety
GeneralSafety
Useyourfullattentionwhenoperatingthemachine.
Donotengageinanyactivitythatcausesdistractions;
otherwise,injuryorpropertydamagemayoccur.
Runningtheenginewillcauseengineparts,
especiallythemufer,tobecomeextremelyhot.
Severeburnscanoccuroncontact,anddebris,
suchasleaves,grass,andbrush,cancatchre.
Allowengineparts,especiallythemufer,to
coolbeforetouchingthem.
Removeaccumulateddebrisfromthemufer
andenginearea.
Engineexhaustcontainscarbonmonoxide,which
isanodorless,deadlypoisonthatcankillyou.Do
notruntheengineindoorsorinasmall,conned
areawherecarbonmonoxidefumescancollect.
Chemicalsarehazardousandcancausepersonal
injury.
Readthedirectionsonthechemicallabels
beforehandlingthechemicalsandfollow
allmanufacturerrecommendationsand
precautions.
Keepchemicalsawayfromyourskin.Should
contactoccur,washtheaffectedarea
thoroughlywithsoapandcleanwater.
Weargoggles,gloves,andanyotherprotective
equipmentrecommendedbythechemical
manufacturer.
Theowner/usercanpreventandisresponsible
foraccidentsthatmaycausepersonalinjuryor
propertydamage.
Thismachinewasdesignedfor1operatoronly.
Donotcarrypassengersandkeepallothers
awayfrommachineduringoperation.
Donotoperatethemachineundertheinuence
ofalcoholordrugs.
Operateonlyindaylightorgoodarticiallight.
Donotoperatethemachinewhenthereisthe
riskoflightning.
Beawareofweatherconditionsandcheck
thatspraynozzles,patterns,andvolumeare
suitable.
Keepawayfromholes,ruts,bumps,rocks,
andotherhiddenhazards.Usecarewhen
approachingblindcorners,shrubs,trees,tall
grassorotherobjectsthatmayhideobstacles
orobscurevision.Uneventerraincould
20
  • Page 1 1
  • Page 2 2
  • Page 3 3
  • Page 4 4
  • Page 5 5
  • Page 6 6
  • Page 7 7
  • Page 8 8
  • Page 9 9
  • Page 10 10
  • Page 11 11
  • Page 12 12
  • Page 13 13
  • Page 14 14
  • Page 15 15
  • Page 16 16
  • Page 17 17
  • Page 18 18
  • Page 19 19
  • Page 20 20
  • Page 21 21
  • Page 22 22
  • Page 23 23
  • Page 24 24
  • Page 25 25
  • Page 26 26
  • Page 27 27
  • Page 28 28
  • Page 29 29
  • Page 30 30
  • Page 31 31
  • Page 32 32
  • Page 33 33
  • Page 34 34
  • Page 35 35
  • Page 36 36
  • Page 37 37
  • Page 38 38
  • Page 39 39
  • Page 40 40
  • Page 41 41
  • Page 42 42
  • Page 43 43
  • Page 44 44
  • Page 45 45
  • Page 46 46
  • Page 47 47
  • Page 48 48
  • Page 49 49
  • Page 50 50
  • Page 51 51
  • Page 52 52
  • Page 53 53
  • Page 54 54
  • Page 55 55
  • Page 56 56
  • Page 57 57
  • Page 58 58
  • Page 59 59
  • Page 60 60
  • Page 61 61
  • Page 62 62
  • Page 63 63
  • Page 64 64
  • Page 65 65
  • Page 66 66
  • Page 67 67
  • Page 68 68
  • Page 69 69
  • Page 70 70
  • Page 71 71
  • Page 72 72
  • Page 73 73
  • Page 74 74
  • Page 75 75
  • Page 76 76
  • Page 77 77
  • Page 78 78
  • Page 79 79
  • Page 80 80
  • Page 81 81
  • Page 82 82
  • Page 83 83
  • Page 84 84

Toro 36in Sprayer, Spray Master User manual

Category
Spreader
Type
User manual

Ask a question and I''ll find the answer in the document

Finding information in a document is now easier with AI