www.homewerksww.com
Questions, problems, missing parts? Before returning to your retailer, call our customer
service department at 1-877-319-3757, 7:30 a.m. - 4:30 p.m., CST, Monday - Friday.
LED MIRROR WITH
ANTI-FOG PAD
MODEL 75-011
March 14, 2019
READ AND SAVE THESE INSTRUCTIONS

2
www.homewerksww.com
TABLE OF CONTENTS
Preparation ........................................................................................................................................................................................................................ 2
Safety Information ............................................................................................................................................................................................................. 2
Package and Hardware Contents...................................................................................................................................................................................... 2
Recommended Tools ......................................................................................................................................................................................................... 3
Wiring Diagram .................................................................................................................................................................................................................. 3
Cord Placement ................................................................................................................................................................................................................. 3
Installation Instructions ...................................................................................................................................................................................................... 3
Operating Instructions ....................................................................................................................................................................................................... 4
Care and Maintenance ...................................................................................................................................................................................................... 4
PREPARATION
Before beginning installation of product, make sure all parts are present. Compare parts with package contents list and hardware contents. If any part is
missing or damaged, do not attempt to install the product. Contact customer service for replacement parts at 847-319-3757.
SAFETY INFORMATION
Please read and understand this entire manual before attempting to assemble, operate or install the product.
1. Always disconnect the power supply prior to installing, servicing or removing the LED mirror.
2. Installationworkmustbecarriedoutbyaqualiedperson(s)inaccordancetoalllocalandsafetycodesincludingtherulesforreratedconstruction.
3. Followalllocalbuilding,safetyandelectricalcodesaswellasNEC(NationalElectricalCode)andOSHA(OccupationalSafetyandHealthAct).
4. Electric service supply must be 120 volts, 60 hertz.
5. This unit must be properly grounded.
6. Do not bend or kink the power wires.
7. Exercise care to not damage existing wiring when cutting or drilling into walls or ceilings.
8. Avoid putting sharp or hard objects against mirror surface. Damage and/or electrical injury may occur if punctured.
9. Turn product off during storms or power surge scenarios as power surges may damage internal components.
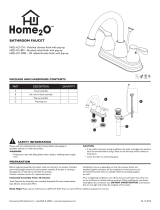
PACKAGE AND HARDWARE CONTENTS
PART DESCRIPTION QTY
A LED mirror 1
B Wall anchors 4
C Screws 4
D Wire connectors 3
A
B
C
D
RECOMMENDED TOOLS (NOT INCLUDED)
Safety goggles Tape
measure
Phillips
Screwdriver
Electric drill
and drill bits
Level Pencil Hammer Electrical
tape

3
www.homewerksww.com
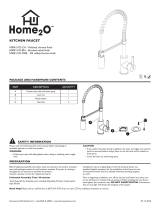
WIRING DIAGRAM
Mirror
House*
black
black
white neutral
ground
live
white
green green
Installations may vary depending on how the previous mirror was installed and the presence of a power source. Supplies necessary for installation of
your new mirror are not all included; however, most are available at your local home improvement or hardware store.
*Housewiresmayvaryincolor.Pleasebesuretoverifyactualhousewireswithacertiedelectricianbeforeinstallation.
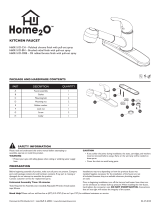
CORD PLACEMENT
Item # Size(in.)HxW A(in.) B(in.) WireLength(in.)
Back View
W
H
B
A
75-001 24 x 30 10.4 8.74 35.4
INSTALLATION INSTRUCTIONS
NOTE: Turn off power at circuit breaker or remove
fuse before attempting installation.
1.Choosetomountyourmirrorineitheravertical(1-A)
orhorizonal(1-B)orientation.Whenorientationis
chosen, measure the distanct between the keyholes
inthebracketasinvertical(1-A)orhorizontal(1-B)
orientation.
Vertical
Horizontal
2. After measuring the distance between the keyholes
on the mirror, mark mounting points on the wall in the
appropriatespots(samedistanceapartasmeasuredin
step1),asin2-Aor2-B.Usealeveltoensurethatthe
points are straight.
Vertical
Horizontal

4
www.homewerksww.com
INSTALLATION INSTRUCTIONS
3.Usinga7/32in.drillbit(notincluded),drillholesthat
where marked in step 2 and insert included wall
anchors.
4. Screw included screws into the wall anchors, leaving
3/8 in. space between the screw head and the wall.
5.Followalllocalelectricalcodesandconsultaqualied
electrician. Check that the black, white and green wires
are all exposed from the mirror. Connect the white wire
on the mirror to the house white wire. Connect the black
wire on the mirror to the black house wire. Connect the
green ground wire on the mirror to the appropriate
house ground wire.
Mirror
white
green
black
House*
white
green
black
* House wires may vary in color. Please be sure to verify actual
housewireswithacertiedelectricianbeforeinstallation.
6. Insert the screw heads into the keyholes on the bracket
then carefully let the mirror drop down so that the screw
heads move into the small sections of the keyholes,
securing the mirror in place.
Turn power back on at circuit breaker or replace fuse.
OPERATING INSTRUCTIONS
Turn on wall switch to turn light and defogger pad on.
NOTE: The defogger pad will only work when light is on.
The defogger pad and light cannot be wired separately.
CARE AND MAINTENANCE
Clean periodically with a soft cloth and glass cleaner. Avoid spraying glass cleaner directly onto mirror. Avoid abrasive
cleaners and harsh chemicals as they may damage the surface of the product.
/