Page is loading ...

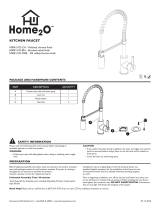
MODEL #HF01-HKQ-WH
#HF01-HKQ-ES
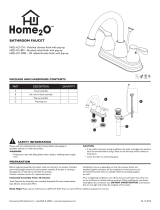
BATHROOM HAMPER
Questions, problems, missing parts? Before returning to your retailer, call our customer service department at
1-877-319-3757, 8 a.m. - 5 p.m., CST, Monday - Friday.
06-01-2018www.homewerksww.com
READ AND SAVE THESE INSTRUCTIONS

2
TABLE OF CONTENTS
PART DESCRIPTION QUANTITY PART DESCRIPTION QUANTITY
A Top panel 1 G Inner left side 1
B Base 1 H Inner back 1
C Front panel 1 I Inner bottom panel 1
D Back panel 1 J Cross bar 2
E Side panel 2 K Laundry bag 1
F Inner right side 1
Package Contents .......................................................................................................................................................................................................................................2
Safety Information .......................................................................................................................................................................................................................................3
Preparation ................................................................................................................................................................................................................................................... 3
Assembly Instructions ................................................................................................................................................................................................................................ 3
Warranty .......................................................................................................................................................................................................................................................6
PACKAGE CONTENTS
www.homewerksww.com
B
C
F
J
J
G
H
A
D
E
E
I
K

3
www.homewerksww.com
SAFETY INFORMATION
Please read and understand this entire manual before attempting to assemble, operate or install the product.
WARNING
• Do not load this unit with more than 30 lbs.
• Safely discard all packing material.
• Keep small parts away from children.
• The assistance of another person may be required to help install this unit.
CAUTION
Take care when moving the product and never drag the pieces across the oor as this will cause damage to the joints.
PREPARATION
Before beginning assembly of product, make sure all parts are present. Compare parts with package contents list and hardware contents
list. If any part is missing or damaged, do not attempt to assemble the product.
Estimated Assembly Time: 60 minutes
ASSEMBLY INSTRUCTIONS
1.
Attach both panels (E) to the front panel (C) by inserting the
tabs on the side panel (E) into the slots on the front panel
(C) and push down until the side panel (E) slides into place.
Repeat this step for the back panel (D).
1
C
E
E
D
2.
Attach the base (B) to the assembled unit and twist the
locking nut clockwise to secure in place.
NOTE: For all applicable steps, ensure the direction of the
locking bolt is parallel when inserted into the nut on the panel.
Lock Nut Operation: To attach a panel with the built-in
locking nut, start by ensuring that the tab on the locking nut is
in the open position (Fig.1). By opening the tab on the locking
nut, the knob on top of the nut will be aligned with the
direction of the slot on the panel you are attaching. Slide the
knob into the slot on the second panel. Then close the tab on
the locking nut to rotate the knob, securing the two panels
together.
2
Open
Closed
Fig. 1
B

4
ASSEMBLY INSTRUCTIONS
3.
Attach the inner left side (G) to the inner back (H) and
twist the locking nut clockwise to secure in place.
Repeat this step for the inner right side panel (F).
Slide the inner bottom panel (I) into the slots on the inner
right side (F) and the inner left side (G).
3
F
H
G
I
4.
Attach the inner assembled unit to the front panel (C) and
twist the locking nut clockwise to secure in place.
4
C
5.
Attach the top panel (A) to the assembled unit, and twist
the locking nut clockwise to secure in place.
5
A
www.homewerksww.com

5
ASSEMBLY INSTRUCTIONS
6.
Place the cross bar (J) with the laundry bag (K) to the
assembled unit. Attach Velcro
®
to both sides (not included).
6
K
J
CARE AND MAINENTANCE
Wipe with a soft, dry cloth as needed. Do not use abrasive cleaners.
LIMITED 1-YEAR WARRANTY
The manufacturer warrants this product to be free from defects in workmanship and material present at time of shipment from the
factory for a limited lifetime from the date of purchase. This warranty applies only to the original purchaser. To obtain warranty service,
call our customer service department at 1-877-319-3757 for return authorization and shipping instructions. Any damage to the product by
accident, misuse or improper installation, or by afxing accessories not produced by the manufacturer are the purchaser’s responsibility. The
manufacturer assumes no responsibility whatsoever for product installation during the warranty period. There is no future expressed
warranty. The manufacturer disclaims any and all implied warranties. The manufacurer shall not be liable for incidental, consequential
or special damages arising at or in connection with product use or performance except as may otherwise be accorded by law. This
warranty supersedes all prior warranties.
Inquiries regarding warranty claims can be directed to 1-877-319-3757, 8 a.m. - 5 p.m., CST, Monday - Friday.
www.homewerksww.com
/