AUDIO TELEX ACM120RC Operating instructions
- Category
- Audio amplifiers
- Type
- Operating instructions

AMililDililr@
ffifill
c o M M
u N I
CAT
I
O
N
SPr\.
L.rD
c
A
v
-
a
g
c
-
O
=
l-
(u
l-
o
ACM12OR
Receiver
Amplifier'
&
ACMI 20RC
Receiver,
Cassette
Amplifier
3
Ouditv
Endorsea
*JH,?|H
Audio
Tefex
Communications
Pty
Ltd
ACN 001345482
lncorporated in NSW
NSW & ACT
QLD
& NT
149 Beaconsfield
Street
Private Bag
149
Silverwater NSW 2128
Australia
Ph 02 9il7141'l
FaxO2 9648 3698
42 CommercialRoad
PO Box 87't
Fortitude Valley
QLD
4006
Ph 07 38s21312
Fax 07 32521237
221277 Middleborough
Road
Box HillVlC
3128
PO Box 151
Blackburn South
VIC 3130
Ph
03 98907477
Fax
03 9890 7977
299 Fitzgerald
Street
West Perth
WA
6005
PO Box 404
North
Perth WA
6906
Ph 08 92284222
Fax 08 9228
4233
Electronic
Concepts Pty Ltd
76
George Street
Thebarton SA 5031
PO Box
7034 Hutt Street
Adelaide SA 5000
Ph 08 8234944'a
Fax 08 82349441
K W McCulloch Pty Ltd
54a Albert Road
MoonahTAS
7009
Ph 03 62286373
Fax 03 6278
1063
New Zealand
Unit B, 11 Piermark Drive
PO Box
512
Albany
NZ 1331
Ph 09 4159426
Fax
09 415 9864

ACMI
20R
Receiver
Amplifier
ACM1 20RC
Receiver/Cassette
Amplifier
Product
Description
The
ACM120R
is a
120
watt,4
channel
(dual
mic/line)
mixer
amplifier
that has
been optioned
with
an AM/FM
radio receiver.
Similarly,
the
ACMI2ORC
is
optioned
with
an AM/FM
radio
receiver
and cassette player.
The
ACM120R
and ACM129RC
operate
from 240
VAC,
50 Hz
(or
I l0
VAC with
factory
modification)
and may
be desk
or rack
mounted
(via
an optional
rack
mognt
kit).
Both
the ACM120R
and
ACM12ORC
will deliver
120
watts into
loads
of
4
or 8
ohms, 70
or
100
volt line. Boih
amplifiers
include
a 6
zone, 100
volt line
speaker
zone
select
feature
complete
with
all-call. The
maximum
recommended
load
of the ACMI29R
and
ACMI20RC
on the 100
volt line
output
is 80
ohms.
&
nuDorflrr
ACMl2ORC
.o
o
o o
o
o
o
;1rl
o
ooooo
#:"'. it'.
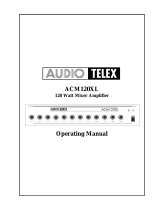
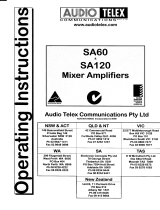
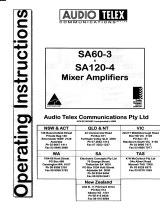
(ACM120RC
shown. The
ACMI20R
does not
include
a cassette
deck but is otherwise
identical)
Front
Panel
Controls
Dual
Microphone/Line
Gain:
The 4
dual mic/line
input
controls
are labelled
Chl
.... Ch4
and should
be adjusted
to
provide
the
required
mix level
for
each individual
channel.
Start with
the
controls set
to Level
0 and
turn the controls
clockwise
until
the
desired mix
level for
each
channel is
reached.
BaSS
TOnal
COntfOl:
Setting
this control
in
the centre position
will give
an overall
flat
bass
response
to the output
of
the
amplifier.
Adjusting
the bass control
in
a clockwise
direction
will
provide
up to 12 dB
of bass
boost
@
100
Hz. Adjusting
the
bass
control
in
a counter-clockwise
direction
will
provide
up to 12
dB of bass
cut
@
100 Hz.
Tfeble
Tonal
Contfol:
Setting
this control
in
the centre
position
will
give
an overall
flat
feble response
to the output
of the
amplifier'
Adjusting
the treble
control in
a clockwise
direction will
provide
up to 9 dB of
treble boost
@
lOK Hz.
Adjustinglhe
treble
control in
a counter-clockwise
direction
will
provide
up
to 9 dB
of treble cut
@
lOK Hz.
MaStef
OUtpUt
This
controls
the overall
output
level of the
amplifier depending
on
the levels set for
the individual
input
mix
channels
as detailed above.
Start with the
control
set to Level
0 and turn
clockwise
until the desired
output level
of the amplifier
is
reached
Page
Chime Button:
This
allows the
user to
disable or
enable the Pre-Announce
Chime. This
switch does not
however
activate
the
chime. Activation
is accomplished
via
the rear
panel
barrier strip
(normally
wired to
a
paging
microphone).
If
the
pre-
announce
chime is connected
to
a
paging
microphone (meaning
that it would
be activated
by the
switch on the microphone),
the fage
Chime
switch
on the front panel
of the
amplifier
allows the
user to disable
the chime
function for
those
occasions when
it is not
wanted.
All Call ButtOn:
When
pressed,
this
grey
button
will connect
the 100 volt
output
of the amplifier
to all 6 of the
switched
outputs
of the
amplifier.
Depressing
this
button again
will disconnect
the
switched output.
This
switch is
push-on, push-off
and is non
interlocking.
Speaker
SeleCtOf:
These 6
black buttons
are
for switching
the 100 volt
line output
of the
amplifier to any
combination
of the
6
available
speaker zones.
The
switches
are
push-on,
push-off
and
are non interlocking (both
with
each other and with
the
all-call
button).
The maximum
capacity
of
each speaker
zone
is 60 watts
so care
should be taken
to
ensure that no individual
zones is
loaded

down for more
than 60 watts,
always
remembering
that
the total amplifier load is 120 watts. It
is
possible
to safely have
one zone set
for 60 watts
and the other 5 zones set for
12 watts for
example.
POWef Switch: This
switch controls
the switching
of AC
power
to the
amplifier. When in
the on
position,
the red LED
to the left
of the switch
will
glow.
AM/FM
ReCeiVefl
The receiver
includes
a
gain
control which
operates identically
to the mic/line
gain
controls described
on the
previous
page (although
it
is completely
independent
ofthe controls described
above). The
gain
control incorporated
in to the receiver
controls the input
level
to the amplifier
for both
the receiver and
the cassette
player
(if
installed).
When
installed
and
activated, the
cassette
player
will override
the receiver
so that
only one ofthe receiver
or cassette
player
may
be operated at once, the
cassette
player
having priority.
You
may monitor
the output
of the receiver via
an internal
monitor speaker. The
volume
of the monitor speaker is
controlled
by the
vedical
slider control
labelled
Monitor, located
centrally
on the front
panel
of the amplifier. If
you
want to
preview
the output
of the
receiver before
sending it
out
live
to the
speakers, simply
tum the amplifiers master
output level
control fully anti-clockwise
to
tum off
the output
of the amplifier.
Note that if
you
do this,
all output is tumed
off,
including
all microphone
inputs.
Five
tuning
bands are
available, 2 x AM
and 3 x FM:
the
receivers
display
panel
will illuminate
to
display the relevant information.
To
select
the desired
band,
press
the
button marked
AM/FM.
Each time this button
is
pressed
a different tuning
band will be indicated
on
the
display
panel.
Up
to 30
preset
channels may
be stored, 6 for
each tuning
band. To store
a channel operate
the up and down
arrow
buttons until
you
locate
and are
properly
tuned
to the radio
station of
your
choice.
Then,
press
the memory
button
which
will
cause
the
channel to flash
on the
display
panel.
Press the
desired storage
channel
(numbered
I to
6). The radio station
chosen is then
stored in
that
memory location.
You
may
automatically
search for radio
stations
by operating the
up and down
arrow buttons. The receiver
will
search for
and automatically
lock on
to threshold
signals in
the frequency
band
you
have
selected.
Continue to
press
the up or
down
arrow buttons
to resume
your
search or to fine
tune
any station selected.
Cassette Player
(ACM120RC
Only): The
cassette
player
has
3 unique controls,
one each for Eject, Rewind
(REW)
and
Fast Forward
(FF).
In
addition, there is
a
gain
control located
on the
receiver
module
that controls the
output
level
ofthe
cassette deck
(and,
when
a cassette is inserted,
has
priority
over the receiver
as detailed above).
The cassette
player
may be monitored
and
previewed
in
exactly the
same fashion
as the receiver.
The
cassette
player
will
begin
playing
immediately
a
cassette is inserted
though the
slot
in
front
of the cassette
player.
The REW
and
FF
buttons will
shuttle the
cassette
backwards
or forwards
respectively.
Pressing both
the REW
and FF buttons
together will
reverse
the
playing
direction ofthe
cassette
player
and
effectively
change the
side ofthe
cassette being
played.
Pressing
the eject
button will
eject
the cassette
and
switch back to the
receivers
output. If
you
do not want
to switah immediately
back to the receivers
output when
you
eject the cassette,
make
sure that
the
gain
control on the receiver
is
turned fully
counter clockwise.
DthEclou
-oHM-LrxE-t=frj?
lc
.
slc
ro
rml 3 d
i S E
o
oo oo
o'o'o o'o
-r-
=..*.,_a
I
2 +
Sign.t
ceciuilo
3.
.
s6n.r
1ilililililililililililt
ooolo
ii:
f,rc.
f,rc3 Mrc2
AC FUSE
4A SB
@ffi]
{ANUFAdURED flAUOIO TEIil
COXMU{ICATIO{s PN
lTO SYDilflAUSTMLI
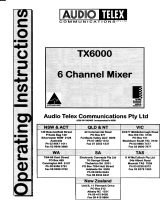
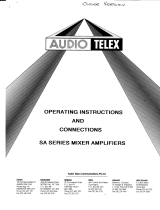
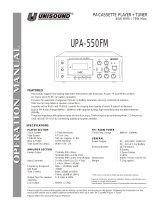
Rear
Panel
Connections
3 Pin
IEC AC
Mains
Power lnlet.
The
operating voltage
is 240 VAC
@
50 Hz
or tl0 vAC
@
60 Hz.
The AC
power
voltage
level
is not extemally
user
adjustable
but is factory
pre-set.
The
inlet is equipped
with
an inbuilt AC
fuse holder fitted
with
a 4
Amp
fuse
plus
a spare. Power
consumption
is 225
VA.
I Please ensure
that the mains power
cord is
disconnected
before
attempting
to check
or replace this
fuse.
Direct
Output
Terminal
Strip:
The
screw terminals
on the left hand
side
of the strip
allow access
to the direct
speaker
outputs of
the amplifier.
The screw
terminals
on the right
hand
side are for activation
of the in-built
4 tone
generator.
Reading
from
left
to right
the terminals
are:
.
Low Impedance
Common
(use
with
4
or 8 ohms)

o
4 Ohms
.
8 Ohms
r
Constant
Voltage
Common
(use
with
70v or
l00v)
o
70 Volt Line
o
100
Volt
Line
o
Spare
o
Tone Generator Common
(use
with
one
of the 4 tones listed
below)
o
Pre-Announce
Chime
o
Alert Tone
.
Bell Chime
o
Evacuation Tone
Note: The minimum impedance
(or
maximum load)
at 100 Volt
line
should be
no
less than 80 Ohms.
Switched Outputs
Terminal Strip: Reading from left to right, these screw terminal
pairs
correspond to the switched 100
volt line outputs and are numbered 6 through 1
as
indicated
on the front
panel
of the
amplifier.
For
each
pair,
the
left hand
terminal is
the
100 volt
output and the right hand terminal is
the common.
Receiver Antenna
Connectiofl. As described above, the receiver can tune
to both the
AM
and
FM
bands.
The
FM band
has dual 75 and 300
ohm impedance capability. For
best
FM
results, we recommend using the 75 ohm connection to a remote
antenna
via 75 ohm coaxial cable.
Tape
OUtpUt.
This
is a mono dual RCA
type output and will
provide
an output of 350 mV in
to a
10K
ohm
load. This
output is
sourced before the master
gain
control and as such, the tape output level is not influenced
by the operation ofthe master
gain
control.
Active Balanced,
XLR Sockets For
The Microphone lnputs.
The mic input
sensitiviry
is lmv
@
200
ohms.
Pin
connections are:
pin
#l-earth;
pin
#2-signal
(high,
+);
pin
#3-signal
(low, -).
Phantom
power
of
+18
volts
is
available on all
microphone
inputs. Reading from left to right
across the rear
panel,
the connection are for microphone inputs 4, 3,2, & I respectively.
RCA
Sockets For The Monaural
Line Level lnputs. Line inputs 1,2
&3
have
an
input
sensitivity of 75mV
@47K
ohms. Input 4 has an input
sensitivity of 300mV
@
47K
ohms making it suitable for high level inputs such as a CD
player.
Reading
from
left to right across
the rear
panel,
the
connections are for inputs 4, 3,2, &, I respectively.
Other Features
TOng
GgngfatOfS: Four separate
tones are available from the in-built tone
generator
board. All
four
tones can be activated
individually
via a contact
closure connected to the screw terminals
on the rear of the amplifier. To activate the bell chime for
example,
just
run a
pair
of
wires from
the Tone
generator
cornmon and the Bell terminal to an extemal
switch.
Activating the switch,
or closing
the
pair
of wires, will activate the
bell. When any tone is activated, all inputs
(except
for inputs
one and two)
will automatically
mute.
To
adjust the level of the
tone
generator,
disconnect the
power
lead, remove
the
amplifrer lid
and
locate the
pot
labeled R6.
(located
behind the Bass adjustment
pot).
This
pot
adjusts the level for all 4 tones.
Tones
available on the ACMI20R and ACMI20RC include:
o
Evacuation Tone
(to
Australian
Standard A52220.1.2)
o
Alert Tone
(to
Australian
Standard
A52220.1.2)
o
Bell
Tone
o
Pre Announce
Chime
MUting: A VOX
muting card
is
installed in the ACM120R
and
ACMI20RC. This feature
provides
automatic
muting
of some
channels when
others are active. It is normally
used so
that
a
paging
microphone can have
priority
(by
muting) over background
music. VOX muting is available from channels I
and
2 meaning
that any signal
on
channels
1
and2
(mic
or
line) will mute channels
3
& 4. The muted channels will automatically ramp
back up to normal volume
when
the signal on channels
I
and/or
2 is no
longer
active. The amplifier ships with the VOX muting
function enabled. To disable the
VOX
muting, disconnect the
mains
power
lead
and remove
the
lid
of the amplifier.
Looking
down from the front of the amplifier, a three
position
jumper
(labeled
JP2) is located
just
to the left and behind the level
pot
for channel l. To
disable
VOX muting, move the
jumper
to the middle and left
pins. (Factory
setting for VOX enabled is the
jumper
on
the
middle
and
right
pins).
Accessories:
ACMRRK: 19" rack mount
kit
Fuse Sizes:
Mains ACMI20R/RC, 240 V ACi 4 Amperes
Slow Blow
-
 1
1
-
 2
2
-
 3
3
-
 4
4


AUDIO TELEX ACM120RC Operating instructions
- Category
- Audio amplifiers
- Type
- Operating instructions
Ask a question and I''ll find the answer in the document
Finding information in a document is now easier with AI
Related papers
-
 AUDIO TELEX ACM120XL Operating instructions
-
 AUDIO TELEX ACM2150 Operating instructions
-
 AUDIO TELEX TX6000 Operating instructions
-
 AUDIO TELEX AT120R Operating instructions
-
AUDIO TELEX ACM60 Quick start guide
-
 AUDIO TELEX TX8201 Operating instructions
-
 AUDIO TELEX SA60 Operating instructions
-
 AUDIO TELEX SA User manual
-
-
 AUDIO TELEX SA60-3 Operating instructions


Other documents
-
AUSTRALIAN MONITOR ACM604 Quick start guide
-
-
-
 Unisound UPA-550FM Operating instructions
-
BIRD ACMI Series (Ethernet Port) Owner's manual
-
-
-
-
Telex ACM1202P User manual
-
Yamaha YHT-500 Owner's manual
