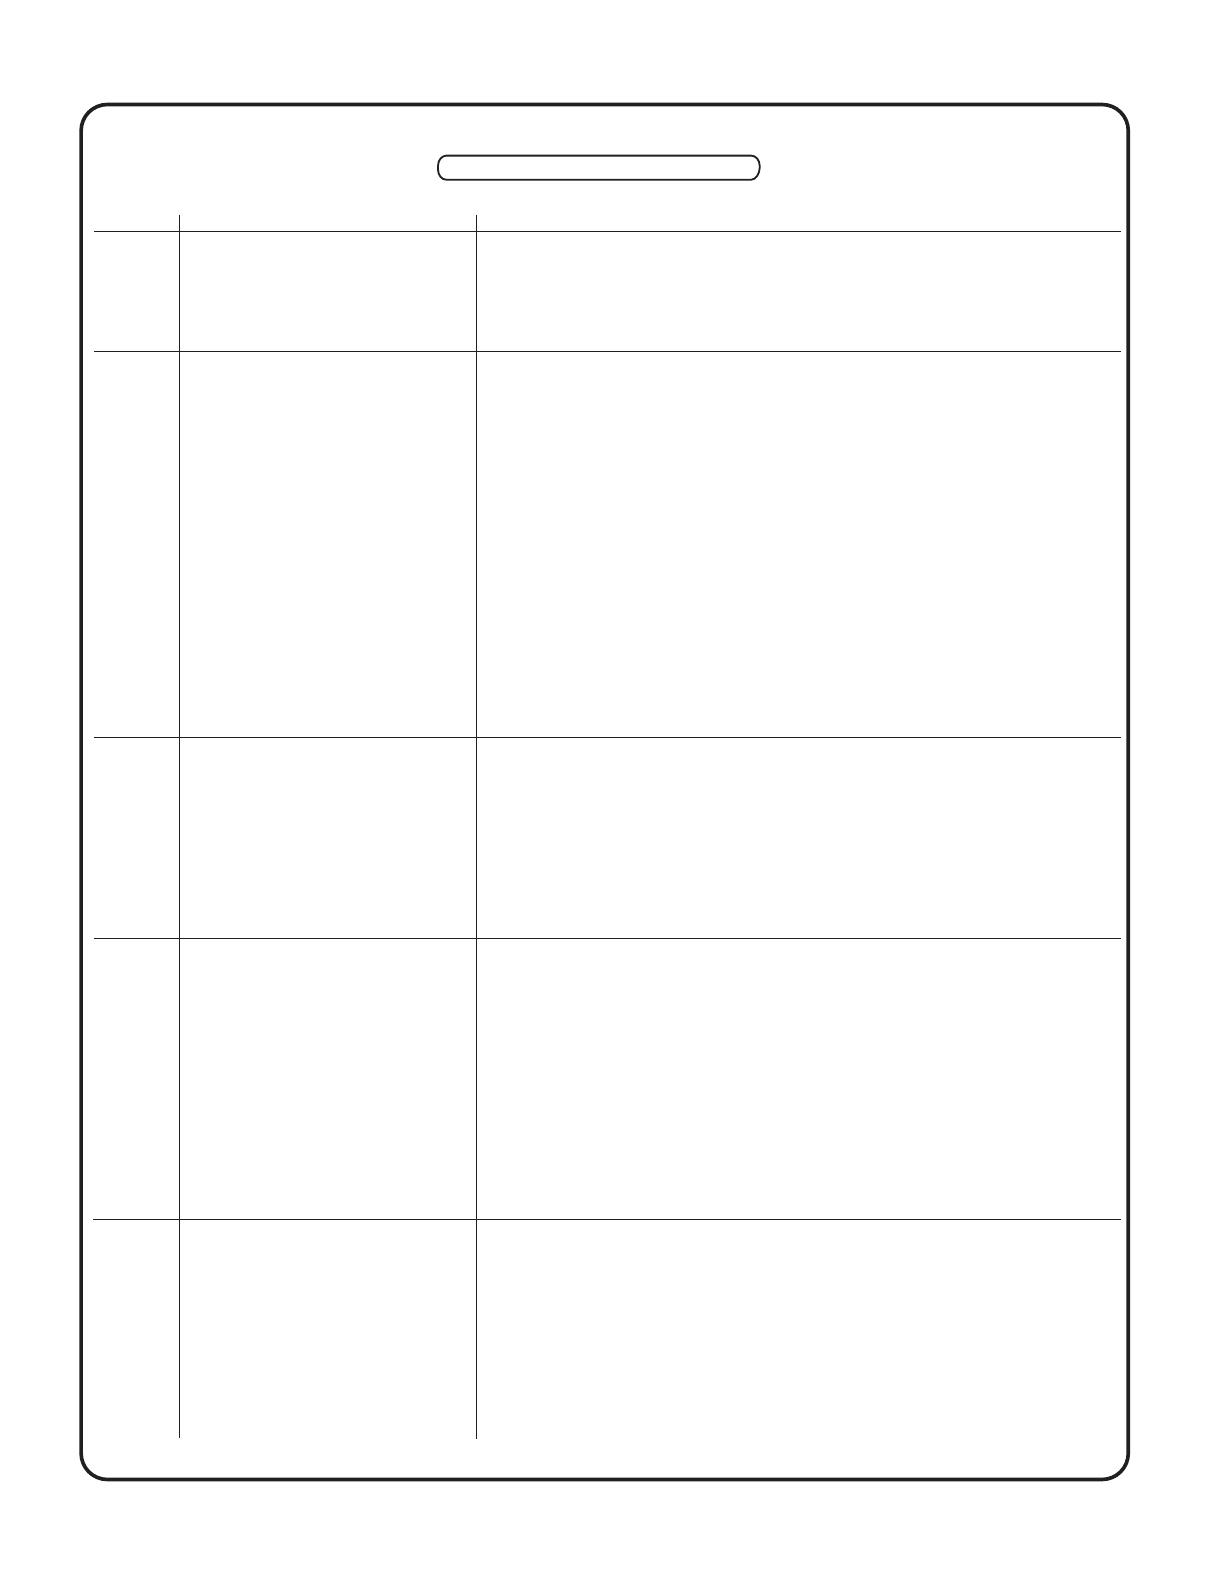
American Standard 714AA151.020 User manual

Category
Sanitary ware
Type
User manual

American Standard 714AA151.020 ActiClean toilet simplifies bathroom cleaning with its self-cleaning system. Featuring two cleaning cycles, Deep Clean and Quick Clean, it uses a cleaning solution to keep the toilet bowl sparkling. The toilet operates on 4AA alkaline batteries (included) that last up to a year, eliminating the need for an electrical outlet.

American Standard 714AA151.020 ActiClean toilet simplifies bathroom cleaning with its self-cleaning system. Featuring two cleaning cycles, Deep Clean and Quick Clean, it uses a cleaning solution to keep the toilet bowl sparkling. The toilet operates on 4AA alkaline batteries (included) that last up to a year, eliminating the need for an electrical outlet.

OWNERS MANUAL
714AA / 214AA Series ActiClean
7302204-100 Rev. B 8/16 EN
Product names listed herein are trademarks of AS America, Inc.
© AS America, Inc. 2016
THANK YOU
Keeping a clean and healthy home just got easier
with the American Standard ActiClean
toilet.
Introducing the ActiClean toilet, the first
self-cleaning toilet by American Standard. The
ActiClean self-cleaning toilet-bowl system makes
cleaning effortless. All it takes is one simple press
of a button to activate the cleaning system and in
minutes your bowl is sparkling clean.
ActiClean features two cleaning cycles, Deep
Clean and Quick Clean, and comes with a 9 week
supply of cleaning solution (based on a usage of
1 Quick Clean and 1 Deep Clean per week).
ActiClean does not require an electrical outlet; it
is powered by 4AA alkaline batteries (included)
which last up to 1 year.
In this document you will find information on how
to install and operate the ActiClean toilet,
frequently asked questions, and troubleshooting
guides. If you have any questions or need help
with installation or operation of your new toilet,
you can rest assured that our Customer Service
team is available to assist you.
To find out more about ActiClean technology or
follow an instructional video visit
www.americanstandard.com/Acticlean
At American Standard we continually work harder
to raise the standard of daily living by making it
easier, safer and more beautiful.
pg2
TABLE OF CONTENTS
If Removing An Existing Toilet................................................................................................................................... page 3
Back-to-Back Installation........................................................................................................................................... page 3
Inside The Box (or Boxes)......................................................................................................................................... page 3
Care Instructions....................................................................................................................................................... page 3
Installation Instructions............................................................................................................................................. page 4
Installing Toilet Cleaning Cartridge............................................................................................................................ page 8
Operating Cleaning Cycles........................................................................................................................................ page 9
Canceling a Cleaning Cycle...................................................................................................................................... page 9
Child Lock ON/OFF................................................................................................................................................... page 9
ActiClean System Instructions................................................................................................................................... page 9
How Does the ActiClean System Work?.................................................................................................................. page 10
Frequently Asked Questions.................................................................................................................................... page 11
ActiClean Unit Troubleshooting Guide..................................................................................................................... page 12
Toilet Troubleshooting Guide................................................................................................................................... page 13
Warranty and Product Registration..........................................................................................................................page 14
pg3
When cleaning your toilet, wash it with mild, soapy water, rinse thoroughly with clear water and dry with a soft cloth.
WARNING: Do not use in-tank cleaners. These products can seriously corrode fittings in the tank. This damage can cause
leakage and property damage. American Standard shall not be responsible or liable for any damage caused by the
use of in-tank cleaners.
WARNING: The ActiClean
Toilet Cleaning Cartridge was specially formulated to work with the ActiClean system. Please do
not rell the cartridge with any other cleaners. Relling the cartridge will void the warranty. Some chemicals could damage
the parts inside of the tank, potentially causing a leak and the system to fail.
WARNING: Remember to practice safety precautions when operating the ActiClean system. If you have animals or children
that may come in contact with the toilet, close the seat while a cleaning cycle is in operation.
Care and Cleaning
Inside The Box (or Boxes):
Attachment Handle
Nuts (3)
Bolt Caps (2)
Bowl-To-Floor
Knobs (2)
T-Bolts with Retainer (2)
Water Supply Line
** SOLD SEPARATELY
* Toilet Seat
AA Alkaline
Batteries (4)
Toilet Cleaning
Cartridge
** Wax Ring
* For seat installation, see
instructions included with seat.
Turn Off Water Supply
Flush to remove
water from tank;
sponge remaining
water from
bowl before
removing toilet.
Clean Flange
IF REMOVING AN EXISTING TOILET
!
Caution: If leaving floor flange
open for more than 1-2 hours,
cover flange to prevent escaping
sewer gasses.
BACK-TO-BACK INSTALLATION
Recommended fitting type for
back-to-back installations.
Depending upon your plumbing and venting conditions, the flow from this toilet in
a back-to-back installation may create a vacuum on the system and draw water
from the opposing bowl. The National Standards Plumbing Code prohibits the use
of a cross fitting for drainage as throw over is possible. The code does approve a
directional "Y" style fitting with proper venting to direct the water downward and
away from the other toilet.
!
!
!
!
BEFORE INSTALLATION:
Before installing your toilet, please see your product spec page to verify the dimensions and water supply
connections. Visit our website where you can search by Model number for the product spec page at:
http://www.americanstandard-us.com/
For further assistance please call Customer Care at: (800) 442-1902
** WAX RING IS ALSO SOLD SEPARATELY
FOR 214AA SERIES ACTICLEAN ONLY.
Flip the bowl upside down
and press the wax ring
down firmly .
1
Align the bowl and bolt
holes to set into place.
Apply weight evenly.
Do not move after
placement as water
tight seal may break.
TIP: Place a piece of
masking tape on the
floor next to the bolts
on both sides to help
with alignment.
Install T-Bolts onto the flange
and screw the retaining nuts
to hold into place.
3
Flip the tank over to confirm
gaskets are fully seated on tank.
Remove all packaging.
4
4
2
6
5
!
Hand tighten
only. Do not
overtighten.
BOLT CAP
BOWL-TO-FLOOR
KNOBS
GASKETS
DO NOT REMOVE FACTORY
INSTALLED NUTS
!
pg4
NOTES:
a) To ease installation, push down on the top of the tank while tightening handles.
b) Tighten all three bolts adequately.
Secure tank to bowl with provided nuts using attachment handle supplied.
Tighten nuts alternately until the tank contacts the front and back of the
bowl achieving complete contact.
8
ATTACHMENT HANDLE WITH NUT
VERIFY ADJUSTABLE SCREW SETUP
1. Depress handle all the way (A).
2. With handle depressed, adjust screw (B) on the teeter bar so red rear frame (C)
slightly touches the black frame stop (D).
DO NOT OVERTIGHTEN SCREW (B)
!
NOTE: Turning the adjustable screw counterclockwise will loosen and move red rear
frame (C) AWAY from black frame stop (D). Clockwise will tighten and move
red rear frame (C) CLOSER to black frame stop (D).
3. Return handle (A) to rest position.
4. Make sure hook (E) is fully engaged under tab on valve body (F). If not engaged properly
repeat Step 2.
(A)
7
pg5
!
BLACK
FLAPPER
BLACK FRAME
STOP (D)
BLACK FRAME
STOP (D)
RED REAR
FRAME (C)
RED REAR
FRAME (C)
ADJUSTABLE
SCREW (B)
RED
FLAPPER
HOOK (E)
NOT
FULLY
ENGAGED
HOOK (E)
VALVE BODY (F)
VALVE BODY (F)
HOOK (E)
FULLY
ENGAGED
RED REAR FRAME (C)
SHOWN IN THE OPEN
POSITION SLIGHTLY
TOUCHING THE BLACK
FRAME STOP (D).
pg6
10
Allow the tank to fill with water and
check that the water level matches
the indicated dimension. Reference
the barcode sticker inside the tank
on the back wall.
If the water level needs to be raised,
move the fine level adjustment up
one or two clicks.
If the water level needs to be lower,
please refer to the Troubleshooting
Guide on page 12.
A
C
Prime the system by flushing the
product 5 times before use to
achieve optimal performance.
B
PROPER FLUSHING METHOD:
Be sure to fully depress the handle
down with each flush. Do not hold
the handle down for extended
periods of time as this could allow
air to enter the system which will
slightly degrade performance for a
few flushes.
Water Supply Line
Set Approximate
Water Level
Fine Water Level
Adjustment
Inlet Valve
Lock
Tab
Barcode
Sticker
Top of Overflow
Turn on water supply. Allow tank to fill.
Connect water supply line. (Sold separately)
Hand tighten nut.
* For seat installation, see instructions included with seat.
9
A
B
Gasket
Nut
4515A
79
4.8 Lpf / 1.28 gpf
!
WARNING: Do not use plumber’s putty, pipe dope, or
any other sealant on the water supply connection to
this tank. If the connection leaks after hand tightening,
replace the supply line. If the connection continues to
leak with the new supply line, replace the inlet valve.
Warranty is void if any type of sealant is used on
the water supply connection.
!
WARNING: Overtightening of water supply
line nuts could result in breakage and
potential flooding. If the connection leaks
after hand tightening, replace the supply line.
pg7
Turn Tank Top right side up and place onto the tank. Make sure all excess packaging is removed prior to doing so.
12
(A)
(A)
(A)
(A)
REMOVE ORANGE TABS FROM LOCKING RETAINER POSTS
Remove Tank Top from packaging and turn it upside down. Place on a clean countertop.
On the underside of the Tank Top, locate the Orange Tabs (A) shown in diagram below.
To remove Orange Tabs
(A) carefully slide off of Locking Retainer Posts.
11
LOCKING RETAINER POSTS
WITH ORANGE TABS
pg8
13
14
1 - Remove the child resistant safety cap from the cartridge
2 - Insert the cartridge straight down until it snaps into place
3 - Press and hold either the QUICK or DEEP icon for three
seconds until the LOW level indicator light goes off
4 - Repeat steps 1 through 4 every time a new cartridge is
inserted to ensure proper operation
INSTALLING BATTERIES
Push tab on the Battery Compartment Cover (D) to open the
Battery Compartment (B).
Place 4 AA Alkaline batteries (C) inside the Battery Compartment
then secure the cover to the Battery Compartment (B).
(A)
(D)
(C)
(B)
LOCK AND UNLOCK POSITIONS
LOCKUNLOCK
If access to the internal tank components is needed, first turn the Locking
Knobs to the UNLOCK position. This will allow you to remove the Tank Top
and work on the tank trim if needed.
REMEMBER: Before operating the ActiClean system, you must always be
sure to turn the Locking Knobs to the LOCK position.
!
BEFORE INSTALLING THE CLEANING CARTRIDGE,
REMOVE CHILD RESISTANT CAP LOCATED ON THE
BOTTOM OF THE CLEANING CARTRIDGE
!
!
A. Open the lid.
B. The tank Locking Knobs should be set to the UNLOCK position to properly seat
the Tank Top in place. If they aren’t, turn them to UNLOCK position first.
C. Then to lock the Tank Top in place, turn the Locking Knobs to the Lock position.
This will ensure proper operation of the ActiClean cleaning cycles.
Toilet Cleaning
Cartridge (A)
Child Resistant Cap
INSTALLING TOILET CLEANING CARTRIDGE
pg9
Control Panel Operation and Indicators
Cleaning Cycles
Quick Clean
Quick Clean is best used for regular upkeep, in between deep cleanings. A Quick Clean cycle will
clean the inside of the toilet bowl in just one minute. We recommend using the quick clean cycle
1 time per week.
Deep Clean
Deep Clean is used for more thorough cleanings. It releases more cleaning fluid and the cycle is
longer compared to a Quick Clean cycle. A Deep Clean cycle completely and thoroughly cleans
the inside of the toilet bowl in 10 minutes. The result is a fresh scented, sparkling clean bowl! We
recommend a deep cleaning 1 time per week.
Low Reminder
Order Cartridge
Replace Batteries
4 AA Required
Deep Clean
10 Minute Cycle
Quick Clean
1 Minute Cycle
To Install New Toilet Cleaning Cartridge:
1 - Remove the child resistant safety cap from the cartridge
2 - Insert the cartridge straight down until it snaps into place
3 - Press and hold either the QUICK or DEEP icon for three
seconds until the LOW level indicator light goes o
4 - Repeat steps 1 through 4 every time a new cartridge is
inserted to ensure proper operation
To Remove Empty Toilet Cleaning Cartridge:
- The cartridge will need to be replaced shortly after
the “LOW” icon is displayed
- Pull upward firmly to remove the empty cartridge
We encourage that you please recycle empty cartridges
To Activate Cleaning Cycle:
- Check bowl for debris and if necessary flush the toilet
- After flushing wait 30 seconds
- Open the control panel door to power the ActiCleansystem
- Select from either QUICK or DEEP cleaning cycles
Note if the selection is not made within 30 seconds the system will go to sleep
To Cancel a Cleaning Cycle:
- Push the QUICK or DEEP cleaning cycle icon a second time
- The cycle will stop and rinse the bowl after 30 seconds
Child Lock:
- ON/OFF: Press and hold both QUICK and DEEP buttons for 3 seconds
ActiClean™ System Instructions
Select the cleaning cycle that best suits your needs.
Cleaning Solution is Released - The cleaner travels
through the designated channel in the tank and is mixed
with water before entering the bowl.
VorMax Jetted Force - This powerful VorMax Jetted
force allows the cleaner to scour the full circumference
of the bowl, cleaning the entire surface from top to
bottom, while exuding a fresh scent.
Cleaner Saturates Bowl - The cleaner will soak in the
bowl for a set amount of time.
• Quick Clean is a 1 minute cycle
• Deep Clean is a 10 minute cycle
Rinse Cycle - Once the soaking time is complete, the
system will automatically switch to the rinse cycle which
will siphon the cleaning agent and rinse the bowl.
The result is a fresh scented, sparkling clean bowl!
1.
2.
3.
4.
5.
pg10
How Does the ActiClean System Work?
pg11
Also see “Fixture Troubleshooting Guide” on page 12 and
ActiClean
Unit Troubleshooting Guide” on page 11.
Can I rell the toilet cleaning cartridge with other cleaning liquids?
No. The ActiClean
Toilet Cleaning Cartridge was specially formulated to work with the ActiClean system.
Do not rell the cartridge with any other cleaners. Relling the cartridge will void the warranty. Some
chemicals could damage the parts inside of the tank, potentially causing a leak and the system to fail.
Can I use the cleaner to clean my other toilets?
The cartridge of cleaner is designed to work with the ActiClean system. It will not work on a toilet that does
not have the ActiClean technology built into it.
Can I use rechargeable batteries with the ActiClean system?
No. For optimal performance only use Alkaline batteries. No other batteries, including Lithium and any
rechargeable battery will work with the ActiClean system.
How often should I change the batteries?
Change the batteries when the word REPLACE is illuminated.
The system is ONLY compatible with Alkaline batteries.
I’d like to change the handle to a nish that matches the ttings in my bathroom, will that
affect performance?
Do NOT change the handle with anything other than an ActiClean handle as the performance will be affected.
The ActiClean system operates on a dual-injection ush valve system which is unlike anything on the market.
Therefore if you change the handle to anything that wasnt made to operate with the ActiClean VorMax
ushing system the toilet will not function properly.
What do I do if my ActiClean system isn’t operating the way it should or I am having issues
with it?
Please review the ActiClean Troubleshooting section of the manual on page 12. If problem persists please
contact Customer Care.
How do I know when the cleaning cycle is nished?
The button will blink while a clean cycle is in operation. It will turn off once the cycle is complete. Do not use
the toilet while a cleaning cycle is in operation.
How do I turn the Child Lock ON or OFF?
To turn the child lock on or off press and hold both the QUICK and DEEP buttons for 3 seconds.
What is the difference between DEEP and QUICK cleaning cycles?
QUICK Clean dispenses 0.85oz (25ml) of cleaner.
Quick Clean is best used for regular upkeep, in between DEEP cleanings. A Quick Clean cycle will clean the
inside of the toilet bowl in just one minute.
DEEP Clean dispenses 1.67oz (50ml) of cleaner.
Deep Clean is used for more thorough cleanings and releases more cleaning uid compared to the QUICK
Clean cycle. A DEEP Clean cycle completely and thoroughly cleans the inside of the toilet bowl in 10 minutes.
The result is a fresh scented, sparkling clean bowl!
Frequently Asked Questions:
pg12
PROBLEM POSSIBLE CAUSE CORRECTIVE ACTION
“Low” uid light indicator has not
been reset
Tank top has not been secured
with the locking knobs
Tank top has not been secured
with the locking knobs
Batteries are defective or depleted
Follow the ActiClean
System Instructions
“To Install New Toilet Cleaning Cartridge
on page 9.
Ensure tank top is securely fastened to china
tank with by turning locking knobs to the
"Locked" position.
Ensure tank top is securely fastened to china
tank with by turning locking knobs to the
"Locked" position.
Remove batteries and reinstall; ensuring batteries
are installed in the correct orientation (follow the
pattern in the battery receptacle). If batteries are
installed correctly and the device is still not
functioning properly, please install four new
AA alkaline batteries.
Remove batteries and reinstall; ensuring batteries
are installed in the correct orientation (follow the
pattern in the battery receptacle). If batteries are
installed correctly and the device is still not
functioning properly, please install four new
AA alkaline batteries.
“Low” uid light is illuminated
even when cartridge is still full
Tank top lifts away from
china tank when a cleaning
cycle has been activated
The bowl does not ll up with
water when a cleaning cycle
has been completed
No lights are illuminated
when device is activated
for either quick or deep
clean cycle
The cleaning system is
not working properly or
works intermittently
ActiClean
Unit Troubleshooting Guide
pg13
Problem Possible Cause Corrective Action
a. Turn water supply on. Water should fill tank to level indicated in Step 10.
b. Shut off water supply, disconnect supply line and inspect all gaskets and washers. Reassemble.
c. Adjust settings according to adjustable screw setup in Step 8.
d. Shut off water supply and disconnect supply line. Use pliers to pull filter and rinse clean.
Re-assemble and turn supply line on.
a. Check that refill tube is connected to water control and inserted into overflow tube without being
kinked or damaged.
b. Open supply valve fully. Be sure that proper supply tube size is used.
c. Remove obstruction. Consult a plumber if necessary.
d. Normal supply pressure must be at least 20 psi.
e. Tighten bolts as shown in Step 7 to make sure the tank is touching the piers of the bowl in the
front and back of the product.
f. Re-prime bowl by ushing 5 times in a row allowing the tank to rell each time to achieve
optimal performance.
g. If water level is too low, follow instruction in Step 10. If water level is too high see “Toilet does not
shut off” below.
h. Adjust settings according to adjustable screw setup in Step 8.
i. Reseat tank by shutting off water supply, disconnect supply line, remove tank mounting nuts,
inspect all gaskets and reassemble.
j. Adjust trip lever nut by loosening the nut a quarter turn at a time clockwise (reverse thread).
k. Do not depress trip lever longer than 2 seconds for optimal performance. Depressing trip lever
longer will negatively affect the toilet performance by causing a loss of prime. Re-prime bowl by
ushing 5 times in a row allowing the tank to rell each time to achieve optimal performance.
a. Review Step 9 of installation procedure.
b. Review Step 1 through 7 of installation procedure.
c. Tighten nuts, reinstall.
d. Tighten nuts, reinstall.
e. Replace gaskets.
f. Clean debris from seal surface. Replace flapper seal as needed and adjust settings according to
adjustable screw setup in Step 8.
g. Clean debris from seal surface. Replace flapper seal as needed and adjust settings according to
adjustable screw setup in Step 8.
a. Clean debris from seal surface. Replace flapper seal as needed. See web for more info.
b. Shut off water supply and disconnect supply line. Use pliers to pull filter and rinse clean.
Re-assemble and turn supply line on.
c. Adjust settings according to adjustable screw setup in Step 8.
d1. Lower fine water level adjustment window in Step 10.
d2. Use step 10 to identify parts. Shut water supply off to toilet and disconnect water supply line
from inlet valve. Disconnect rell tube. Remove all water from inside tank. Locate inlet valve,
loosen and remove bottom nut, and remove inlet valve from tank. Observe inlet valve number
setting directly under lock tab. Holding the base of the inlet valve, push lock tab down, rotate top
of inlet valve 1/8 of a turn. Slide valve to next lower number setting. Rotate top of inlet valve back
an 1/8 turn. Push lock tab up to secure setting. Verify gasket at base of inlet valve. Reinstall inlet
valve into tank, keep inlet valve an 1/8" (3mm) away from back liner, and tighten bottom nut onto
inlet valve and secure. Connect rell tube. Follow steps 9 and 10.
a. Retighten bowl-to-floor knobs.
b. Use toilet shims and /or place a bead of caulk around the base of the toilet.
a. Water supply valve closed.
b. Supply line blocked.
c. Trip lever not opening red jet flapper
to black frame stop.
d. Sand or debris lodged in
water control.
a. Bowl water level too low.
b. Supply valve partly closed.
c. Partially clogged trapway and/or
drain pipe and/or vent.
d. Supply pressure too low.
e. Tank not installed tightly on bowl.
f. Product has air stuck in waterways.
g. Incorrect tank water level.
h. Trip lever not opening red jet flapper to
black frame stop.
i. Toilet lost prime.
j. Trip lever not returning to original position.
k. Loss of prime due to depressing on the
trip lever too long.
a. Poor supply line connection.
b. Poor bowl to tank/floor connection.
c. Loose tank nuts.
d. Loose flush valve mounting nuts.
e. Tank to Bowl gaskets leak.
f. Black rim apper leaking. Inlet valve
will
periodically run and you will see
water
coming from port in to the bowl.
g. Red jet apper leaking. Inlet valve will
periodically run.
a. Flapper seal leaking or deformed.
b.
Sand or debris lodged in water control.
c. Flush valve chain too tight, holding
flapper open.
d. Water level is too high.
a. Wax ring not fully compressed.
b. Floor not level.
Does not
flush
Poor or
sluggish
flush
Toilet leaks
Toilet does
not shut off
Toilet bowl
rocks after
installation
Toilet Troubleshooting Guide
See Step 8 and 10 For Diagram
pg14
ActiClean
Toilet Limited Warranty
This toilet comes with a limited lifetime warranty on chinaware, a limited 10 year warranty on all mechanical parts of the toilet,
1 year warranty on electronic parts and a limited 1 year warranty on the toilet seat if included with product. If inspection of this
AS America, Inc. (“American Standard”) plumbing product, inclusive of the chinaware and all mechanical parts, confirms that it is defective
in materials or workmanship, American Standard will repair or, at its option, exchange the product for the same or a similar model.
This limited warranty applies only to the original purchaser and installation of the products. In the event of a limited warranty claim, proof of
purchase will be required – save sales receipts.
For this warranty to become effective, the warranty registration process must be completed via the internet or telephone per the warranty
registration instructions: http://www.americanstandard-us.com/customerservice/warranty/warrantyRegistration.aspx
This limited warranty does not apply to commercial installations.The warranty for commercial installations is 1 year on chinaware, 1 year
on mechanical parts, 1 year warranty on electronic parts and a limited 1 year warranty on the toilet seat if included with product.
This warranty does not apply to local building code compliance.Since local building codes vary considerably, the purchaser of the
product should check with a local building or plumbing contractor to ensure local code compliance before installation.
This warranty will be void if the product has been moved from its initial place of installation; if it has been subjected to faulty maintenance,
abuse, misuse, accident or other damage; if it was not installed in accordance with American Standard’s instructions; or if it has been
modified in a manner inconsistent with the product as shipped by American Standard.
WARNING: This warranty DOES NOT COVER any damages caused by the use of in-tank cleaners. These products can seriously corrode
the fittings in the tank. This damage can cause leakage and property damage. American Standard will not be responsible or liable for
any damage caused by the use of in-tank cleaners.
American Standard’s option to repair or exchange the product under this warranty does not cover any labor or other costs of removal or
installation including any costs of any surrounding material such as tile or marble.American Standard is not responsible for any other
incidental or consequential damages attributed to a product defect or to the repair or exchange of a defective product, all of
which are expressly excluded from this warranty.(Some states or provinces do not allow the exclusion or limitation of implied
warranties, so this exclusion may not apply to you.)
This warranty gives you specific rights.You may have other statutory rights that may vary from state to state or province to province, in
which case this warranty does not affect such statutory rights.
PLEASE COMPLETE AMERICAN STANDARD WARRANTY REGISTRATION PROCESS AND SAVE THIS WARRANTY INFORMATION
IMPORTANT: Registration of the toilet must be completed for this warranty to become effective.
Your registration will make it easier to contact you in the event of a product recall.*
THIS WARRANTY IS NOT TRANSFERABLE FROM ORIGINAL CONSUMER PURCHASER.
In the United States:
American Standard Brands
P.O. Box 6820
Piscataway, New Jersey 08855
Attention: Director of Customer Care
For residents of the United States, warranty
information may also be obtained by calling the
following toll free number: (800) 442-1902
www.americanstandard.com
In Canada:
AS Canada, ULC
5900 Avebury Rd.
Mississauga, Ontario
Canada L5R 3M3
Toll Free: (800) 387-0369
www.americanstandard.ca
In Mexico:
American Standard B&K Mexico
S. de R.L. de C.V.
Via Morelos #330
Col. Santa Clara
Ecatepec 55540 Edo. Mexico
Toll Free: 01-800-839-1200
www.americanstandard.com.mx
INSTRUCTIONS:
Register your toilet at http://www.americanstandard-us.com/customerservice/warranty/warrantyRegistration.aspx
Please save your proof of purchase (sale receipt).
If you need assistance or do not have access to our website, please contact American Standard Customer Care at: (800) 442-1902.
An American Standard representative will assist in completing the warranty registration.
* In California, your warranty rights remain intact even if you do not complete the registration process.
  • Page 1 1
  • Page 2 2
  • Page 3 3
  • Page 4 4
  • Page 5 5
  • Page 6 6
  • Page 7 7
  • Page 8 8
  • Page 9 9
  • Page 10 10
  • Page 11 11
  • Page 12 12
  • Page 13 13
  • Page 14 14

American Standard 714AA151.020 User manual

Category
Sanitary ware
Type
User manual

American Standard 714AA151.020 ActiClean toilet simplifies bathroom cleaning with its self-cleaning system. Featuring two cleaning cycles, Deep Clean and Quick Clean, it uses a cleaning solution to keep the toilet bowl sparkling. The toilet operates on 4AA alkaline batteries (included) that last up to a year, eliminating the need for an electrical outlet.

Ask a question and I''ll find the answer in the document

Finding information in a document is now easier with AI