
1.05-10022015-163600
DEVELOPMENT GUIDE
AMOS-820
VAB-820
HMI Solution Pack v2.0

Copyright
Copyright © 2015 VIA Technologies Incorporated. All rights reserved.
No part of this document may be reproduced, transmitted, transcribed, stored in a retrieval system, or translated into any language,
in any form or by any means, electronic, mechanical, magnetic, optical, chemical, manual or otherwise without the prior written
permission of VIA Technologies, Incorporated.
Trademarks
All brands, product names, company names, trademarks and service marks are the property of their respective holders.
Disclaimer
VIA Technologies makes no warranties, implied or otherwise, in regard to this document and to the products described in this
document. The information provided in this document is believed to be accurate and reliable as of the publication date of this
document. However, VIA Technologies assumes no responsibility for the use or misuse of the information in this document and for
any patent infringements that may arise from the use of this document. The information and product specifications within this
document are subject to change at any time, without notice and without obligation to notify any person of such change.
VIA Technologies, Inc. reserves the right the make changes to the products described in this manual at any time without prior
notice.

AMOS
AMOSAMOS
AMOS-
--
-8
88
82
22
20
00
0 VAB
VAB VAB
VAB-
--
-820 HMI Solution Pack
820 HMI Solution Pack820 HMI Solution Pack
820 HMI Solution Pack V
V V
V2.0
2.02.0
2.0 Development Guide
Development Guide Development Guide
Development Guide
iii
Revision History
Version
VersionVersion
Version
Date
DateDate
Date
Remarks
RemarksRemarks
Remarks
1.00 2015/1/30 Initial released.
1.01 2015/2/16 Changed the eMMC's index from 1 to 0, sdcard's index from 0 to 1.
Added notice to unmount partitions before flashing images to
SD/eMMC.
1.02 2015/2/17
Changed u-boot.bin to u-boot.imx.
Used EVK to flash images to SD/eMMC.
1.03 2015/8/12 Added section 4.2.2 and 4.2.3
1.04 2015/8/20 Corrected u-boot to U-boot
1.05 2015/9/2 Changed the way of U-boot booting kernel

AMOS
AMOSAMOS
AMOS-
--
-8
88
82
22
20
00
0 VAB
VAB VAB
VAB-
--
-820 HMI Solution Pack
820 HMI Solution Pack820 HMI Solution Pack
820 HMI Solution Pack V
V V
V2.0
2.02.0
2.0 Development Guide
Development Guide Development Guide
Development Guide
iv
Table of Contents
1.
1.1.
1.
Introduction
IntroductionIntroduction
Introduction ................................
................................................................
................................................................
................................................................
................................................................
................................................................
..........................................
....................
.......... 1
11
1
1.1.
Overview........................................................................................................ 1
1.2.
Package Content ........................................................................................... 1
1.2.1.
BSP Folder Contents............................................................................... 1
1.2.2.
EVK Folder Contents .............................................................................. 1
2.
2.2.
2.
Setup Building Environment
Setup Building EnvironmentSetup Building Environment
Setup Building Environment ................................
................................................................
................................................................
................................................................
...............................................
..............................
............... 2
22
2
2.1.
Configure Ubuntu......................................................................................... 2
2.1.1.
Install the Host Packages ...................................................................... 2
3.
3.3.
3.
Image Build
Image BuildImage Build
Image Build ................................
................................................................
................................................................
................................................................
................................................................
................................................................
...........................................
......................
........... 3
33
3
3.1
Extract VAB-820 BSP......................................................................................... 3
3.2
Machine configurations .................................................................................... 3
3.3
Build an image.................................................................................................... 3
4.
4.4.
4.
Image Deployment
Image DeploymentImage Deployment
Image Deployment ................................
................................................................
................................................................
................................................................
..............................................................
............................................................
.............................. 4
44
4
4.1
Making a SD card image................................................................................... 4
4.1.1
Setup U-boot parameters for Micro SD card ................................... 4
4.2
Making a Linux System eMMC ........................................................................ 6
4.2.1
Requirements ........................................................................................... 6
4.2.2
Procedure.................................................................................................. 6
4.2.3
Run “putty” or “Terminal” ..................................................................... 7
4.2.3.1
Run “putty” on host PC................................................................ 7
4.2.3.2
Run “Terminal” on VAB-820....................................................... 7
4.2.4
Burn u-boot.imx into SPI ROM............................................................. 8
4.2.5
Copy images to eMMC .......................................................................... 8
4.2.6
Setup U-boot parameters for SPI ROM.............................................. 8
Appendix A.
Appendix A.Appendix A.
Appendix A. U
U U
U-
--
-boot parameters for display
boot parameters for displayboot parameters for display
boot parameters for display................................
................................................................
..........................................................
....................................................
.......................... 12
1212
12
Appendix B.
Appendix B.Appendix B.
Appendix B. Installing the AXIS USB LAN module AXI88772
Installing the AXIS USB LAN module AXI88772 Installing the AXIS USB LAN module AXI88772
Installing the AXIS USB LAN module AXI88772 .............................
..........................................................
............................. 14
1414
14

AMOS
AMOSAMOS
AMOS-
--
-8
88
82
22
20
00
0 VAB
VAB VAB
VAB-
--
-820 HMI Solution Pack
820 HMI Solution Pack820 HMI Solution Pack
820 HMI Solution Pack V
V V
V2.0
2.02.0
2.0 Development Guide
Development Guide Development Guide
Development Guide
v
Lists of Figures
Figure 1. AMOS-820 Solution Pack content .............................................................. 1
Figure 2: J11 boot select jumper diagram.................................................................. 4
Figure 3. U-boot parameter ........................................................................................... 5
Figure 4. Terminal on Desktop...................................................................................... 7
Figure 5. J11 boot select jumper diagram.................................................................. 9
Figure 6. U-boot parameter ......................................................................................... 10

AMOS
AMOSAMOS
AMOS-
--
-8
88
82
22
20
00
0 VAB
VAB VAB
VAB-
--
-820 HMI Solution Pack
820 HMI Solution Pack820 HMI Solution Pack
820 HMI Solution Pack V
V V
V2.0
2.02.0
2.0 Development Guide
Development Guide Development Guide
Development Guide
vi
Lists of Tables
Table 1. Images generated through Bitbake .............................................................. 3
Table 2. J11 boot select jumper setting ..................................................................... 5
Table 3. J11 boot select jumper setting ..................................................................... 9

AMOS
AMOSAMOS
AMOS-
--
-8
88
82
22
20
00
0 VAB
VAB VAB
VAB-
--
-820 HMI Solution Pack
820 HMI Solution Pack820 HMI Solution Pack
820 HMI Solution Pack V
V V
V2.0
2.02.0
2.0 Development Guide
Development Guide Development Guide
Development Guide
1
1.
1.1.
1. Introduction
IntroductionIntroduction
Introduction
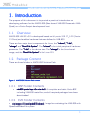
The purpose of this document is to provide a practical introduction on
developing software for the AMOS-820 (Bare board: VAB-820 Freescale i.MX6
Quad) on a Yocto Project development host.
1.1. Overview
AMOS-820 HMI SP v2.0 is developed based on fsl-yocto-3.10.17_1.0.0 (Yocto
1.5 Dora) and enables hardware features defined in VAB-820.
There are four major boot components for Linux, the “
““
“u
uu
u-
--
-boot
bootboot
boot”
””
”,
, ,
, “
““
“*.dts
*.dts*.dts
*.dts”
””
”,
, ,
,
“
““
“uImage
uImageuImage
uImage”
””
” and “
““
“Root File System
Root File SystemRoot File System
Root File System”
””
”. The "u
"u"u
"u-
--
-boot"
boot"boot"
boot" is for initial peripheral hardware
parameter. The “
““
“*.dts
*.dts*.dts
*.dts”
””
” is the device tree. The "u
"u"u
"uImage"
Image"Image"
Image" is the Linux kernel
image, and the "
""
"Root
Root Root
Root File System"
File System"File System"
File System" is for Linux O.S.
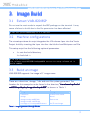
1.2. Package Content
There are three folders in AMOS-820 Solution Pack.
Figure
Figure Figure
Figure 1
11
1.
. .
. AMOS
AMOSAMOS
AMOS-
--
-820
820820
820
Solution P
Solution PSolution P
Solution Pack content
ack contentack content
ack content
1.2.1. BSP Folder Contents
• vab820
vab820vab820
vab820-
--
-ycoto
ycotoycoto
ycoto-
--
-bsp
bspbsp
bsp-
--
-v2.x
v2.xv2.x
v2.x.x.tar.bz2:
.x.tar.bz2:.x.tar.bz2:
.x.tar.bz2: A complete and static Yocto BSP
including VAB-820 meta-files, and all required packages have been
downloaded.
1.2.2. EVK Folder Contents
• via
viavia
via-
--
-image
imageimage
image-
--
-x11
x11x11
x11-
--
-imx6qvab820.sdcard:
imx6qvab820.sdcard:imx6qvab820.sdcard:
imx6qvab820.sdcard: Image for evaluating the VAB-820 with
OpenEmbedded file system.

AMOS
AMOSAMOS
AMOS-
--
-8
88
82
22
20
00
0 VAB
VAB VAB
VAB-
--
-820 HMI Solution Pack
820 HMI Solution Pack820 HMI Solution Pack
820 HMI Solution Pack V
V V
V2.0
2.02.0
2.0 Development Guide
Development Guide Development Guide
Development Guide
2
2.
2.2.
2. Setup Building
Setup BuildingSetup Building
Setup Building Environment
Environment Environment
Environment
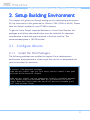
This chapter will guide you through setting up your developing environment.
All the instructions in this guide are for Ubuntu 12.04 (32 Bit or 64 Bit). Please
have the Ubuntu installed in your PC/NB in advance.
To get the Yocto Project expected behavior in a Linux Host Machine, the
packages and utilities described below must be installed. An important
consideration is hard disk space required in the host machine. The
recommended space is 120 GB at least.
2.1. Configure Ubuntu
2.1.1. Install the Host Packages
The following packages are installed to support Yocto development
environment and presented in a bash script that can be cut and pasted into
your environment for execution:
#/bin/bash
# Install LTIB dependant packages
sudo apt-get install wget git-core unzip texinfo libsdl1.2-dev gawk
diffstat build-essential chrpath
sudo apt-get install sed cvs subversion coreutils texi2html docbook-
utils python-pysqlite2 help2man make gcc g++ desktop-file-utils
libgl1-mesa-dev libglu1-mesa-dev mercurial autoconf automake groff
curl lzop asciidoc xterm

AMOS
AMOSAMOS
AMOS-
--
-8
88
82
22
20
00
0 VAB
VAB VAB
VAB-
--
-820 HMI Solution Pack
820 HMI Solution Pack820 HMI Solution Pack
820 HMI Solution Pack V
V V
V2.0
2.02.0
2.0 Development Guide
Development Guide Development Guide
Development Guide
3
3.
3.3.
3.
I
II
Image Build
mage Buildmage Build
mage Build
3.1 Extract VAB-820 BSP
Do not use the root mode to unpack the BSP package on the terminal. It may
cause a failure to build due to the file permission has been affected.
$ tar xvf yocto-vab820-bsp-v2.x.x.tar.bz2
3.2 Machine configurations
The via-setup-release.sh script integrates the VIA release layer into the Yocto
Project build by inserting the layer into the <build dir>/conf/bblayers.conf file.
This setup script has the following optional parameters:
• -b: sets the build directory.
-b <build dir >
$ cd via-release-bsp
via-release-bsp$ MACHINE=imx6qvab820 source via-setup-release.sh -b
build-vab820
3.3 Build an image
VAB-820 BSP supports 'via-image-x11' image name.
via-release-bsp/build-vab820$ bitbake via-image-x11
There are u-boot.imx, uImage, *.dts and root file system generated. The
location for this example can be found in the directory “via
“via“via
“via-
--
-release
releaserelease
release-
--
-bsp/build
bsp/buildbsp/build
bsp/build-
--
-
vab820
vab820vab820
vab820/
//
/tmp/deploy/images/imx6qvab820”
tmp/deploy/images/imx6qvab820”tmp/deploy/images/imx6qvab820”
tmp/deploy/images/imx6qvab820” as shown in Table 1.
Binary
BinaryBinary
Binary
Description
DescriptionDescription
Description
u-boot.imx U-Boot boot loader
uImage Kernel
uImage-imx6q-vab820.dtb
uImage-imx6dl-vab820.dtb
Device tree
via-image-x11-imx6qvab820.sdcard An SD card image
Table
Table Table
Table 1
11
1. Images generated through
. Images generated through . Images generated through
. Images generated through Bitbake
BitbakeBitbake
Bitbake

AMOS
AMOSAMOS
AMOS-
--
-8
88
82
22
20
00
0 VAB
VAB VAB
VAB-
--
-820 HMI Solution Pack
820 HMI Solution Pack820 HMI Solution Pack
820 HMI Solution Pack V
V V
V2.0
2.02.0
2.0 Development Guide
Development Guide Development Guide
Development Guide
4
4.
4.4.
4.
Imag
ImagImag
Image Deployment
e Deploymente Deployment
e Deployment
VAB-820 supports two booting ways. One is from Micro SD storage card and
the other is SPI ROM. This section will guide you through making the Linux
system boot media for VAB-820.
You can use the image that you built from BSP, the previous Section 3.3
mentioned where it locates, or use the demo image in EVK/
EVK/ EVK/
EVK/ folder of AMOS-
820 HMI Solution Pack.
4.1 Making a SD card image
The Micro SD card image provides the full system to boot with U-Boot and
kernel.
One thing should be taken care before making Micro SD card image:
If there is any mounted partition in Micro SD card, it should be unmounted
first. Then, to flash a SD card image, run the following command:
$ umount /dev/sd<partition>
$ sudo dd if=via-image-x11-imx6qvab820.sdcard of=/dev/sd<partition>
bs=1M && sync
4.1.1 Setup U-boot parameters for Micro SD card
Setup the U-boot parameter at the first time we boot from Micro SD card. Set
the J11 jumper setting (refer to Table 2) to make it bootable from Micro SD.
Figure
Figure Figure
Figure 2
22
2: J11 boot select jumper diagram
: J11 boot select jumper diagram: J11 boot select jumper diagram
: J11 boot select jumper diagram

AMOS
AMOSAMOS
AMOS-
--
-8
88
82
22
20
00
0 VAB
VAB VAB
VAB-
--
-820 HMI Solution Pack
820 HMI Solution Pack820 HMI Solution Pack
820 HMI Solution Pack V
V V
V2.0
2.02.0
2.0 Development Guide
Development Guide Development Guide
Development Guide
5
Setting
SettingSetting
Setting
Pin 1
Pin 1 Pin 1
Pin 1 -
--
- 2
2 2
2
Pin 2
Pin 2 Pin 2
Pin 2 -
--
- 3
3 3
3
Micros SD (default) Short Open
SPI Open Short
Table
Table Table
Table 2
22
2. J
. J. J
. J11
1111
11
boot select
boot select boot select
boot select jumper setting
jumper settingjumper setting
jumper setting
Connect the VAB-820 and host PC through J5 (COM2) of VAB-820. Run
“
““
“putty
puttyputty
putty”
””
” on host PC to receive the booting message. Power on the VAB-820 and
press any key to stop the booting process as shown in Figure 3.
Figure
Figure Figure
Figure 3
33
3.
. .
. U
UU
U-
--
-boot parameter
boot parameterboot parameter
boot parameter

AMOS
AMOSAMOS
AMOS-
--
-8
88
82
22
20
00
0 VAB
VAB VAB
VAB-
--
-820 HMI Solution Pack
820 HMI Solution Pack820 HMI Solution Pack
820 HMI Solution Pack V
V V
V2.0
2.02.0
2.0 Development Guide
Development Guide Development Guide
Development Guide
6
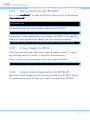
To check the parameter in U-boot:
VAB-820 U-Boot > pri
bootcmd=run bootcmd_auto
...
The default parameter shows that it loads kernel by detecting the Micro SD
card. If the Micro SD card has been inserted, it loads kernel from Micro SD
card. If not, it loads kernel from eMMC.
You have to set the parameters like the example below. Then the VAB-820
will load kernel from Micro SD card.
VAB-820 U-Boot > setenv bootcmd 'run bootcmd_sd'
VAB-820 U-Boot > saveenv
VAB-820 U-Boot > boot
Or you have to set the parameters like the example below. Then the VAB-820
will load kernel from eMMC.
VAB-820 U-Boot > setenv bootcmd 'run bootcmd_mmc'
VAB-820 U-Boot > saveenv
VAB-820 U-Boot > boot
4.2 Making a Linux System eMMC
VAB-820 does not support booting from eMMC by default. If you want to
make a Linux system on eMMC, there is only one choice to put U-boot on SPI
ROM, and put kernel and rootfs on eMMC.
4.2.1 Requirements
• A Linux System Micro SD storage card made in Section 4.1.
• A mass storage includes: “
““
“u
uu
u-
--
-boot.imx
boot.imxboot.imx
boot.imx”
””
”
and “
““
“via
viavia
via-
--
-image
imageimage
image-
--
-x11
x11x11
x11-
--
-
imx6qvab820.sdcard
imx6qvab820.sdcardimx6qvab820.sdcard
imx6qvab820.sdcard”
””
”. You can put those files in a USB pen or SD
storage card.
4.2.2 Procedure
User must first boot from Micro SD card on VAB-820 and follow the steps to
make Linux system on eMMC.

AMOS
AMOSAMOS
AMOS-
--
-8
88
82
22
20
00
0 VAB
VAB VAB
VAB-
--
-820 HMI Solution Pack
820 HMI Solution Pack820 HMI Solution Pack
820 HMI Solution Pack V
V V
V2.0
2.02.0
2.0 Development Guide
Development Guide Development Guide
Development Guide
7
Step 1
Step 1Step 1
Step 1
Run “putty” on host PC or “Terminal” on VAB-820.
Step 2
Step 2Step 2
Step 2
Burn u-boot.imx into SPI ROM.
Step 3
Step 3Step 3
Step 3
Copy images to eMMC.
Step 4
Step 4Step 4
Step 4
Setup U-boot parameters for SPI ROM.
4.2.3 Run “putty” or “Terminal”
User can select to run “putty” on host PC or “Terminal” on VAB-820.
4.2.3.1
4.2.3.14.2.3.1
4.2.3.1
Run “putty” on host PC
Run “putty” on host PCRun “putty” on host PC
Run “putty” on host PC
Run “putty” on host PC to receive the booting message.
Login account is root and press <Enter>.
...
Poky (Yocto Project Reference Distro) 1.5.1 imx6qvab820 /dev/ttymxc1
imx6qvab820 login:root
4.2.3.2
4.2.3.24.2.3.2
4.2.3.2 Run “Terminal” on VAB
Run “Terminal” on VABRun “Terminal” on VAB
Run “Terminal” on VAB-
--
-820
820820
820
Boot VAB-820 and wait into Desktop.
Run “
““
“T
TT
Terminal”
erminal”erminal”
erminal”.
Figure
Figure Figure
Figure 4
44
4.
..
.
Terminal on Desktop
Terminal on DesktopTerminal on Desktop
Terminal on Desktop

AMOS
AMOSAMOS
AMOS-
--
-8
88
82
22
20
00
0 VAB
VAB VAB
VAB-
--
-820 HMI Solution Pack
820 HMI Solution Pack820 HMI Solution Pack
820 HMI Solution Pack V
V V
V2.0
2.02.0
2.0 Development Guide
Development Guide Development Guide
Development Guide
8
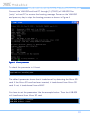
4.2.4 Burn u-boot.imx into SPI ROM
Run “ls /dev/mtdblock*
/mtdblock*/mtdblock*
/mtdblock*” to check the SPI ROM device, which is identified as
“
““
“/dev/mtdblock0
/dev/mtdblock0/dev/mtdblock0
/dev/mtdblock0”
””
”.
$ ls /dev/mtdblock*
/dev/mtdblock0
Run the following command to burn u-boot.imx into SPI ROM.
$ sudo dd if=u-boot.imx of=/dev/mtdblock0 bs=512 seek=2
The previous U-boot parameters will be stored in SPI ROM. If you want to
clear the U-boot parameters to default, use the following command:
$ sudo dd if=/dev/zero of=/dev/mtdblock0 bs=512 seek=1536 count=16
4.2.5 Copy images to eMMC
One thing should be taken care before copying images to eMMC: if there is
any mounted partition in eMMC, it should be unmounted first.
Then, run the following command to burn the image into eMMC.
$ sudo dd if=via-image-x11-imx6qvab820.sdcard of=/dev/mmcblk0 bs=1M
4.2.6 Setup U-boot parameters for SPI ROM
Setup the U-boot parameter at the first time we boot from SPI ROM. Set the
J11 jumper setting (refer to Table 3) to make it bootable from SPI ROM.

AMOS
AMOSAMOS
AMOS-
--
-8
88
82
22
20
00
0 VAB
VAB VAB
VAB-
--
-820 HMI Solution Pack
820 HMI Solution Pack820 HMI Solution Pack
820 HMI Solution Pack V
V V
V2.0
2.02.0
2.0 Development Guide
Development Guide Development Guide
Development Guide
9
Figure
Figure Figure
Figure 5
55
5. J11 boot select jumper diagram
. J11 boot select jumper diagram. J11 boot select jumper diagram
. J11 boot select jumper diagram
Setting
SettingSetting
Setting
Pin 1
Pin 1 Pin 1
Pin 1 -
--
- 2
2 2
2
Pin 2
Pin 2 Pin 2
Pin 2 -
--
- 3
3 3
3
Micros SD (default) Short Open
SPI Open Short
Table
Table Table
Table 3
33
3. J
. J. J
. J11
1111
11
boot select
boot select boot select
boot select jumper setting
jumper settingjumper setting
jumper setting

AMOS
AMOSAMOS
AMOS-
--
-8
88
82
22
20
00
0 VAB
VAB VAB
VAB-
--
-820 HMI Solution Pack
820 HMI Solution Pack820 HMI Solution Pack
820 HMI Solution Pack V
V V
V2.0
2.02.0
2.0 Development Guide
Development Guide Development Guide
Development Guide
10
Connect the VAB-820 and host PC through J5 (COM2) of VAB-820. Run
“putty” on host PC to receive the booting message. Power on the VAB-820
and press any key to stop the booting process as shown in Figure 6.
Figure
Figure Figure
Figure 6
66
6.
..
.
U
UU
U-
--
-boot parameter
boot parameterboot parameter
boot parameter
To check the parameter in U-boot:
VAB-820 U-Boot > pri
bootcmd=run bootcmd_auto
...
The default parameter shows that it loads kernel by detecting the Micro SD
card. If the Micro SD card has been inserted, it loads kernel from Micro SD
card. If not, it loads kernel from eMMC.
You have to set the parameters like the example below. Then the VAB-820
will load kernel from Micro SD card.
VAB-820 U-Boot > setenv bootcmd 'run bootcmd_sd'
VAB-820 U-Boot > saveenv
VAB-820 U-Boot > boot

AMOS
AMOSAMOS
AMOS-
--
-8
88
82
22
20
00
0 VAB
VAB VAB
VAB-
--
-820 HMI Solution Pack
820 HMI Solution Pack820 HMI Solution Pack
820 HMI Solution Pack V
V V
V2.0
2.02.0
2.0 Development Guide
Development Guide Development Guide
Development Guide
11
Or you have to set the parameters like the example below. Then the VAB-820
will load kernel from eMMC.
VAB-820 U-Boot > setenv bootcmd 'run bootcmd_mmc'
VAB-820 U-Boot > saveenv
VAB-820 U-Boot > boot
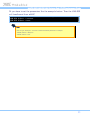
Note:
Note: Note:
Note:
User can type “destroyenv” in U-boot to restore the default parameter. For example:
VAB-820 U-Boot > destroyenv
VAB-820 U-Boot > reset

AMOS
AMOSAMOS
AMOS-
--
-8
88
82
22
20
00
0 VAB
VAB VAB
VAB-
--
-820 HMI Solution Pack
820 HMI Solution Pack820 HMI Solution Pack
820 HMI Solution Pack V
V V
V2.0
2.02.0
2.0 Development Guide
Development Guide Development Guide
Development Guide
12
Appendix A.
Appendix A.Appendix A.
Appendix A. U
UU
U-
--
-boot parameters
boot parametersboot parameters
boot parameters
for display
for displayfor display
for display
Setting the display devices.
[HDMI]
[HDMI][HDMI]
[HDMI]
User can check HDMI parameters in U-boot by typing “pri”:
hdmi=video=mxcfb0:dev=hdmi,1920x1080M@60,if=RGB24
...
o_hdmi=setenv output_display ${hdmi}
To set the HDMI as display output.
run o_hdmi
[LVDS]
[LVDS][LVDS]
[LVDS]
AMOS-820 supports three LVDS types by default since v2.0.0.
• AUO 22” G220SVN01.0 (1680 x 1050)
• AUO 10.4” G104XVN01.0 (1024 x 768)
• AUO 7" G070VW01 V0 (800 x 480)
User can check LVDS parameters in U-boot by typing “pri”:
lvds_auo_g220=video=mxcfb0:dev=ldb,LDB-WSXGA+,if=RGB24 ldb=spl0
lvds_auo_g104=video=mxcfb0:dev=ldb,LDB-XGA,if=RGB24 ldb=sin0
lvds_auo_g070=video=mxcfb0:dev=ldb,480C60,if=RGB666 ldb=sep0
lvds=video=mxcfb0:dev=ldb,LDB-XGA,if=RGB24 ldb=sin0
Check the LVDS power selection setting.
J3
J3J3
J3
: LVDS_power select of AUO 22
: LVDS_power select of AUO 22: LVDS_power select of AUO 22
: LVDS_power select of AUO 22”
””
”
G220SVN01.0
G220SVN01.0G220SVN01.0
G220SVN01.0
IVDD
IVDDIVDD
IVDD
PVDD
PVDDPVDD
PVDD
*1-3 +12V 2-4 +3.3V
3-5 +5V *4-6 +5V

AMOS
AMOSAMOS
AMOS-
--
-8
88
82
22
20
00
0 VAB
VAB VAB
VAB-
--
-820 HMI Solution Pack
820 HMI Solution Pack820 HMI Solution Pack
820 HMI Solution Pack V
V V
V2.0
2.02.0
2.0 Development Guide
Development Guide Development Guide
Development Guide
13
J3 : LVDS_power select of AUO 10.4
J3 : LVDS_power select of AUO 10.4J3 : LVDS_power select of AUO 10.4
J3 : LVDS_power select of AUO 10.4”
””
”
G104XVN01.0
G104XVN01.0G104XVN01.0
G104XVN01.0
IVDD
IVDDIVDD
IVDD
PVDD
PVDDPVDD
PVDD
*1-3 +12V *2-4 +3.3V
3-5 +5V 4-6 +5V
J3 : LVDS_power select of AUO 7
J3 : LVDS_power select of AUO 7J3 : LVDS_power select of AUO 7
J3 : LVDS_power select of AUO 7”
””
”
G070VW01 V0
G070VW01 V0G070VW01 V0
G070VW01 V0
IVDD
IVDDIVDD
IVDD
PVDD
PVDDPVDD
PVDD
*1-3 +12V *2-4 +3.3V
3-5 +5V 4-6 +5V
User can check LVDS setting parameters in U-boot by typing “pri”:
o_lvdsg220=setenv output_display ${lvds_auo_g220}
o_lvdsg104=setenv output_display ${lvds_auo_g104}
o_lvdsg070=setenv output_display ${lvds_auo_g070}
User can set the LVDS type in U-boot, the LVDS for this example is AUO 10.4”
G104XVN01.0:
run o_lvdsg104
saveenv

AMOS
AMOSAMOS
AMOS-
--
-8
88
82
22
20
00
0 VAB
VAB VAB
VAB-
--
-820 HMI Solution Pack
820 HMI Solution Pack820 HMI Solution Pack
820 HMI Solution Pack V
V V
V2.0
2.02.0
2.0 Development Guide
Development Guide Development Guide
Development Guide
14
Appendix B.
Appendix B.Appendix B.
Appendix B. Installing the AXIS
Installing the AXIS Installing the AXIS
Installing the AXIS
USB LAN module AXI88772
USB LAN module AXI88772USB LAN module AXI88772
USB LAN module AXI88772
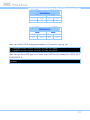
This section illustrates how to setup AXIS USB LAN module AXI88772 on
VAB-820.
First, a driver is required. You can get a pre-build driver, named asix.ko at
EVK\asix folder of BSP, and place it into VAB-820 filesystem. For example:
root@imx6qvab820:~# ls
asix.ko
After that, load the driver by insmod command.
root@imx6qvab820:~# insmod asix.ko
usbcore: registered new interface driver asix
If the driver has been loaded properly with module plugged in, dmesg shows
as follow:
root@imx6qvab820:~# dmesg
…
…
…
ASIX USB Ethernet Adapter:v4.13.0 14:38:52 Mar 2 2015
http://www.asix.com.tw
eth%d: status ep1in, 8 bytes period 11
eth1: register 'asix' at usb-ci_hdrc.1-1.2, ASIX AX88772B USB 2.0
Ethernet, 00:50:b6:12:e9:9f
eth1: rxqlen 0 --> 5
eth1: ax88772b - Link status is: 0
Page is loading ...
-
 1
1
-
 2
2
-
 3
3
-
 4
4
-
 5
5
-
 6
6
-
 7
7
-
 8
8
-
 9
9
-
 10
10
-
 11
11
-
 12
12
-
 13
13
-
 14
14
-
 15
15
-
 16
16
-
 17
17
-
 18
18
-
 19
19
-
 20
20
-
 21
21


VIA Technologies AMOS-820 SKU Development Manual
- Type
- Development Manual
- This manual is also suitable for
Ask a question and I''ll find the answer in the document
Finding information in a document is now easier with AI
Related papers
-
VIA Technologies VAB-820 Development Manual
-
-
-
-
-
-
-
-
-
Other documents
-
Manhattan 506731 Installation guide
-
AXIOMTEK Q7M120 Owner's manual
-
-
LevelOne USB-0301 User manual
-
Nuvoton N9H2/N329 Series MPU Linux 2.6.35 BSP User manual
-
 VersaLogic Swordtail (VL-EPC-2702) User guide
-
AVNET RZBoard V2L Installation guide
-
Intel Quark SoC X1000 User manual
-
 VersaLogic Zebra (VL-EPC-2701) User guide
-
 VersaLogic Tetra (VL-EPC-2700) User guide


