Fluke 1742, 1746 og 1748 Trefaset Effektkvalitetsloggere Operating instructions
- Type
- Operating instructions

1742/1746/1748
3 Phase Power Quality Logger
Fluke Connect and WiFi
Instructions
PN 5041162
February 2019
©2019 Fluke Corporation. All rights reserved. Specifications are subject to change without
notice. All product names are trademarks of their respective companies.

FLUKE CONNECT
®
APPLICATION AND SERVICES
END USER LICENSE AGREEMENT (EULA) AND SERVICES
AGREEMENT
For complete details, go to https://connect.fluke.com/eula.
Visit Fluke's website at www.fluke.com
.
To register your product, visit http://register.fluke.com
.
To view, print, or download the latest manual supplement, visit
http://us.fluke.com/usen/support/manuals.
Fluke Corporation
P.O. Box 9090
Everett, WA 98206-9090
U.S.A.
Fluke Europe B.V.
P.O. Box 1186
5602 BD Eindhoven
The Netherlands
ООО «Флюк СИАЙЭС»
125167, г. Москва,
Ленинградский проспект дом 37,
корпус 9, подъезд 4, 1 этаж

1
Introduction ................................................................................................... 3
Before You Start ........................................................................................... 3
Terms to Know ............................................................................................. 4
Power Quality Logger Setup ........................................................................ 6
Step 1: Verify WiFi Adapter Installation ................................................ 6
Step 2: Product Registration/WiFi License ........................................... 6
Step 3: WiFi License Installation .......................................................... 7
Activate Subscription .................................................................................... 9
Fluke Connect Setup .................................................................................. 11
Step 1: Download the Fluke Connect App ......................................... 11
Step 2: Open the Fluke Connect App ................................................ 12
Connect to Logger ...................................................................................... 12
Step 1: Use the App to Talk to the Logger ......................................... 12
Step 2: Configure the Logger ............................................................. 14
Step 3: Verify and Correct Connections ............................................. 16
Step 3a: Remote Monitoring .............................................................. 20
Step 3b: Local Logging ...................................................................... 24
Instrument Settings .................................................................................... 26
Assets ......................................................................................................... 30
Asset Groups ..................................................................................... 30
Alarms ................................................................................................ 30
Remote Monitoring Session ....................................................................... 31
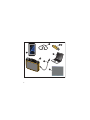
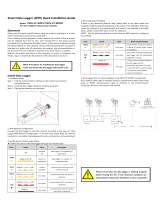
Overview

2
P
O
W
ER
Q
UA
L
I
T
Y
L
O
GG
E
R
1
7
4
6
1
2
3
4
5
7
8
6

3
Introduction
With the wireless connectivity (WiFi) feature of the Product, you can:
• Configure the Logger, verify measurement, and set up a logging session with
Energy Analyze Plus PC software and the Fluke Connect smartphone app
• Download data to Energy Analyze Plus PC software
• Stream all data to the Fluke Connect Cloud
• Manage assets and share data with the Fluke Connect smartphone app
• Receive alarm notification from a remote monitoring session
Before You Start
What you need:
Android or iOS smartphone (go to https://www.fluke.com/en-us/support/fluke-
connect-frequently-asked-questions to find a list of supported devices)
Internet access
WiFi-Infrastructure license that enables Logger connection with WiFi access
points for remote monitoring through WiFi (provided with Product registration)
USB Drive (included with Product)
Power Quality Logger (the Product or Logger)
PC
USB Cable A, mini-USB
Energy Analyze Plus Software (go to https://www.fluke.com/en-us/support/
software-downloads for the latest software update)
During this setup you will need to document the Login name and password for:
• Power Quality Logger
• Fluke Connect app
• WiFi Password (for the Logger)
• WiFi SSID and password for the Internet WiFi Access Point (or use an
Ethernet connection)

4
1742/1746/1748
Instructions
Terms to Know
Definitions of terms used in this document:
WLAN A wireless local area network (WLAN) is a wireless
distribution method for two or more devices that use
high-frequency radio waves and often include an
access point to the Internet. A WLAN allows you
maintain a network connection as you move around
the coverage area, often a home or small office.
WiFi Hotspot With the built in USB WiFi Adapter, the Logger is a
WiFi hotspot for:
• wireless control of the Logger
• download of measurement data
The WiFi direct connection uses WPA2-PSK (pre-
shared key) wi
th AES encryption.
WiF
i Infrastructure WiFi Infrastructure mode is how you connect your
devices using a wireless access point as a central
device. To join the WLAN, all wireless clients must be
configured to use the SSID of the access point. The
access point is then connected with the wired
network to allow wireless clients access to, for
example, Internet connections.
With a second WiFi-to-USB adapter the Logger can
connect to a WiFi access point and supports
WPA2 PSK security as well as no security. This
connection requires a DHCP service running in the
access point to assign IP addresses automatically.

5
3 Phase Power Quality Logger
Terms to Know
Local Logging Logger mode starts a session to store all
measurement data on the Logger.
Remote Monitoring All measurement data is transferred in real-time to
the Fluke Connect Cloud for secure storage.
Measurement data is also available on the Logger
(limited by the internal data storage size) for
download to Energy Analyze Plus software. From the
cloud, your team has access from anywhere to
measurement data with a supported mobile device or
PC web browser. Only Team users defined in Fluke
Connect can access this data.
To sync data to the Fluke Connect Cloud, the Logger
must be connected to a WiFi access point or Local
Area Network with Internet access. WiFi connection
requires a DHCP service running in the access point
to assign IP addresses automatically.

6
1742/1746/1748
Instructions
Power Quality Logger Setup
Step 1: Verify WiFi Adapter Installation
The WiFi adapters are installed when the radio certification is available for your
country. Check www.fluke.com
for availability. To install or replace the adapters,
see the 1742/1746/1748 Users Manual at www.fluke.com
.
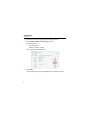
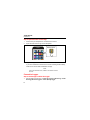
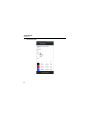
Step 2: Product Registration/WiFi License
1. Register at http://a.fluke.com/registration to receive the complimentary WiFi-
Infrastructure license and the optional Remote Monitor license by email.
License keys not
required for
complimentary
WiFi license
Note
The registration page varies
slightly for the local of the web
page you access.

7
3 Phase Power Quality Logger
Power Quality Logger Setup
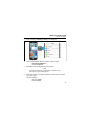
Note
Connection of the Product to a WiFi access point requires
the complimentary WiFi-Infrastructure license.
2. Complete the r
equired fields.
3.
Click Register. You should receive an email within 15 minutes with
the
license
attachment and instructions.
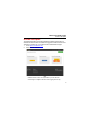
Step 3: WiFi License Installation
1. On the USB drive, create a folder named Fluke174x (do not use spaces in
the folder name).
2.
Copy the license file (*.txt) to this folder
.
3.
Connect the USB drive to the USB port on the Logger.
4.
Push
to turn on the Logger.
5. Connect your PC with the WiFi access point of the Logger. Or,
use the USB
ca
ble to connect the PC to the Logger.
6. Enter the WiFi password: fluketools.

8
1742/1746/1748
Instructions
7. On the PC, open the Energy Analyze Plus software program.
8. Go to Instrument Setup > Select Logger and log in.
The factory default is:
User name: admin
Password: <blank> or admin
The Instrument Setup window opens.
9. Click Install.
A new window opens to show the installed licenses. Follow the prompts.

9
3 Phase Power Quality Logger
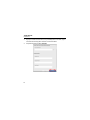
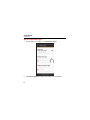
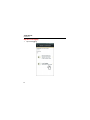
Activate Subscription
Activate Subscription
The optional subscription for the Remote Monitoring feature requires that you
associate the serial number and activate the Logger to a Fluke Connect account.
This setup is required only once unless the device administrator changes.
1. Go to https://connect.fluke.com
.
2.
Select Activate 174x FC
.
Note
Activation of the
174x is not required when you use the Fluke
Connect App to configure and start a local logging session only.

10
1742/1746/1748
Instructions
3. Sign-up to create a new account, or if you already have an account, sign-in.
The Fluke Connect App also uses this account information.
4. Complete the form and select Activate.

11
3 Phase Power Quality Logger
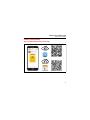
Fluke Connect Setup
Fluke Connect Setup
Step 1: Download the Fluke Connect App
iOS
Android

12
1742/1746/1748
Instructions
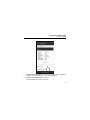
Step 2: Open the Fluke Connect App
1. Confirm that your smartphone is connected to the Internet.
2. Open the Fluke Connect app on the smartphone.
3. Log in to the app.
If you have activated the Product for the remote monitoring feature already,
make sure to use the same credentials in the app.
Note
If you are a first-time user, create a new Fluke Connect
account.
Connect to Logger
Step 1: Use the App to Talk to the Logger
1. With the Fluke Connect app, go to Set Up Logging or Monitoring > Power
& Energy Monitors/Loggers > Power Quality Logger.
Connect
®
Fluke Connect

13
3 Phase Power Quality Logger
Connect to Logger
2. When prompted, go to Settings > WiFi on the smartphone.
3. From the list of available WiFi Access Points, select the Logger:
Fluke174x<SerialNumber>
Password: fluketools
4. Click OK in warning message about Internet access.
Note
It is normal to see the WiFi symbol with an exclamation mark
in the status bar on the mobile phone.
5. When WiFi connection is complete, go back to the Fluke Connect app and
log in to the Logger.
The factory default is:
User name: admin
Password: admin

14
1742/1746/1748
Instructions
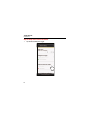
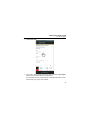
Step 2: Configure the Logger
1. With the Fluke Connect app, go to Configure the Logger.
2. Tap New Configuration to make a new measurement configuration.

15
3 Phase Power Quality Logger
Connect to Logger
3. Tap Previous Configurations to load, edit, and apply a stored configuration
template. Scroll down the screen to see all the information.
4. Tap Done with Configuration to continue.
The app updates with a green check mark.

16
1742/1746/1748
Instructions
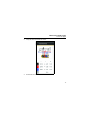
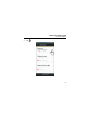
Step 3: Verify and Correct Connections
1. Tap Install and Verify the Logger.

17
3 Phase Power Quality Logger
Connect to Logger
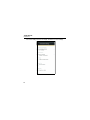
2. Verify that the connections are correct.
3. Scroll down the screen to see all the information.

18
1742/1746/1748
Instructions
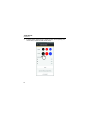
4. To switch phases, hold finger tip on phase and drag. To invert polarity on a
current sensor, activate the slider for that clamp.
Page is loading ...
Page is loading ...
Page is loading ...
Page is loading ...
Page is loading ...
Page is loading ...
Page is loading ...
Page is loading ...
Page is loading ...
Page is loading ...
Page is loading ...
Page is loading ...
Page is loading ...
Page is loading ...
-
 1
1
-
 2
2
-
 3
3
-
 4
4
-
 5
5
-
 6
6
-
 7
7
-
 8
8
-
 9
9
-
 10
10
-
 11
11
-
 12
12
-
 13
13
-
 14
14
-
 15
15
-
 16
16
-
 17
17
-
 18
18
-
 19
19
-
 20
20
-
 21
21
-
 22
22
-
 23
23
-
 24
24
-
 25
25
-
 26
26
-
 27
27
-
 28
28
-
 29
29
-
 30
30
-
 31
31
-
 32
32
-
 33
33
-
 34
34


Fluke 1742, 1746 og 1748 Trefaset Effektkvalitetsloggere Operating instructions
- Type
- Operating instructions
Ask a question and I''ll find the answer in the document
Finding information in a document is now easier with AI
Related papers
-
Fluke 1742, 1746 and 1748 Three-Phase Power Quality Loggers User manual
-
-
-
-
-
Fluke Pince de boucle de terre 1630-2 FC User guide
-
Fluke 1663 Multifunction Testers User manual
-
-
Fluke 805 Vibration Meter Reference guide
-
Fluke 9040 User manual
Other documents
-
Conceptronic C04-057 Datasheet
-
 Canadian Solar CSCU-ST-WFP01 Quick start guide
-
Omega MX2202 Owner's manual
-
Onset CX405 User manual
-
Onset CX402-VFCxxx User manual
-
 InTemp CX450 Temp/RH Logger User manual
-
Turbo Energy Lithium Series Slim 5-1 kWh Battery Installation guide
-
SBS 600 User manual
-
Danfoss AK-EM 100 User guide
-
Mitsubishi Electric ICONICS Product Suite Owner's manual

