Polycom SoundPoint IP 650 Quick Reference Manual
- Type
- Quick Reference Manual
This manual is also suitable for
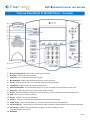
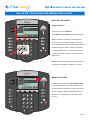
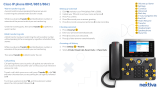
Polycom SoundPoint IP 650 is a versatile business phone designed to enhance communication and productivity. It features a user-friendly interface with a large graphic display for easy navigation. With its multiple line support, you can effortlessly manage and switch between active calls. The Polycom SoundPoint IP 650 offers a range of advanced features, including call hold, transfer, and conferencing, enabling seamless collaboration and efficient call handling.
Polycom SoundPoint IP 650 is a versatile business phone designed to enhance communication and productivity. It features a user-friendly interface with a large graphic display for easy navigation. With its multiple line support, you can effortlessly manage and switch between active calls. The Polycom SoundPoint IP 650 offers a range of advanced features, including call hold, transfer, and conferencing, enabling seamless collaboration and efficient call handling.


-
 1
1
-
 2
2
-
 3
3
-
 4
4
-
 5
5
-
 6
6
-
 7
7
-
 8
8
-
 9
9
-
 10
10
-
 11
11
-
 12
12
-
 13
13
-
 14
14
-
 15
15
-
 16
16


Polycom SoundPoint IP 650 Quick Reference Manual
- Type
- Quick Reference Manual
- This manual is also suitable for
Polycom SoundPoint IP 650 is a versatile business phone designed to enhance communication and productivity. It features a user-friendly interface with a large graphic display for easy navigation. With its multiple line support, you can effortlessly manage and switch between active calls. The Polycom SoundPoint IP 650 offers a range of advanced features, including call hold, transfer, and conferencing, enabling seamless collaboration and efficient call handling.
Ask a question and I''ll find the answer in the document
Finding information in a document is now easier with AI
Related papers
-
Polycom SoundPoint IP 3 Series User manual
-
Polycom Soundpoint ip 600 Quick User Manual
-
Polycom SoundPoint IP 331 Quick Reference Manual
-
Polycom SoundPoint IP 650 User manual
-
Polycom VVX 410 Using Manual
-
Polycom SOUNDSTATION IP5000 Operating instructions
-
-
Polycom VVX 400 Series Quick Reference Manual
-
-
Other documents
-
Yealink T58W User guide
-
Grandstream Networks GXP2130 Series Quick User Manual
-
 Intermedia Polycom IP 7000 Owner's manual
-
CTI Avaya 9650 User manual
-
 Nextiva Cisco IP Phone User guide
-
NEC SV8300 User manual
-
Cisco 7961 User manual
-
Cisco Systems 7941 User manual
-
-

