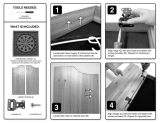
NewAge Products 61118 User manual

Type
User manual
HOME BAR SERIES
63” Shelf
2 Door Cabinet
CABINETS
SHELVING
COUNTERTOPS
3 Drawer CabinetDisplay Cabinet
Double Display CabinetWall Wine Rack
Split
Short Wall
Wine Storage Cabinet
Tall Wall
42” Shelves
84” Countertop 63” Countertop
42” Countertop
HOME BAR SERIES
21in. 2 DOOR CABINET
!
STOP
ATTENTION: Is your cabinet damaged?
Need help or spare parts? For fastest service,
contact NewAge Products at 1-877-306-8930;
or support@newageproducts.com.
Do not return to the retailer.
Use two or more people to move, assemble, or
install cabinets to avoid back injury. Do not leave
children unattended near cabinets. High risk
of tipping if cabinets are installed incorrectly:
securely attach cabinets to the wall to avoid
serious injury.
For assistance, call 1.877.306.8930; for U.K
0800.031.4069: e-mail at info@newageproducts.
com.
Warning: Excessive weight
hazard!
42” Countertop. Fits over 2 Cabinets
63” Countertop. Fits over 3 Cabinet
84” Countertop. Covers over 4 Cabinet
CountertopsWeight
Capacity
25 lbs.
205 lbs.
220lbs.
Bottle Display
Base Cabinet
Max 500lbs.
Handles
Shelf Pins
Adjustable Shelf
Handle Bolts (M4 x 22mm)
2
4
8
1
2 Door Cabinet
Cabinet
#8 x 25mm Screws 6
Parts Supplied
Unpacking
• Begin by placing the package on a covered at surface.
• Remove all cardboard, foam packaging material and clear plastic bags.
• Dispose / recycle all packaging materials.
Verify all the contents in the box and gather the required tools. See “Parts” and Tools Needed in the list below.
Handle Display Racks
Shelf Pins
Tools Needed
1 x Tape Measure
1 x #2 Phillips Bit
(opitional)
1 x Pencil
1 x Cordless Power Drill
(optional)
1 x #2 Phillips head
screwdriver
1 x Flashlight
(optional)
1 x Drill Bit
2.5mm or 3/32”
Screws
#8 x 25mm
Handle Bolt
M4 x 22mm
Installing the Handles
Parts Needed.
Align handle to holes
on doors or drawers.
Screw in bolts.
1
2
3
2 x Handles
Note:
Cabinets come with handles installed on
inside of drawers/doors.
4 x Handle Bolt
M4 x 22mm
Fastening Cabinets
Note:
All shelves must be removed prior to
fastening cabinets together.
Using pilot hole as guides, screw into second cabinet.
Do not over-tighten screws and punch through other side!
X4
Drill 3/32” pilot holes on interior wall of cabinet being
fastened.
Parts Needed.
4
5
6
4- #8 x25mm
screws
Inserting Cabinets Shelves on an angle
Lower shelf down
onto shelf supports.
Insert rack at a slight angle and position
over shelf supports. Rotate shelf so it is level.
Rest shelf on shelf supports
Open cabinet doors. Attach
shelf clips to desired height.
Make sure shelf supports are located
at the same height.
Insert remaining shelves.
4
11
12
13
14
15
16
HOME BAR SERIES
21in. DISPLAY CABINET
!
STOP
ATTENTION: Is your cabinet damaged?
Need help or spare parts? For fastest service,
contact NewAge Products at 1-877-306-8930;
or support@newageproducts.com.
Do not return to the retailer.
Use two or more people to move, assemble, or
install cabinets to avoid back injury. Do not leave
children unattended near cabinets. High risk
of tipping if cabinets are installed incorrectly:
securely attach cabinets to the wall to avoid
serious injury.
For assistance, call 1.877.306.8930; for U.K
0800.031.4069: e-mail at info@newageproducts.
com.
Warning: Excessive weight
hazard!
42” Countertop. Fits over 2 Cabinets
63” Countertop. Fits over 3 Cabinet
84” Countertop. Covers over 4 Cabinet
CountertopsWeight
Capacity
25 lbs.
25 lbs.
25 lbs.
205 lbs.
220lbs.
Bottle Display
Base Cabinet
Max 500lbs.
Handles
Shelf Pins
Adjustable Display Racks
Handle Bolts (M4 x 22mm)
2
4
14
3
Bottle Display
Cabinet
#8 x 25mm Screws 6
Parts Supplied
Unpacking
• Begin by placing the package on a covered at surface.
• Remove all cardboard, foam packaging material and clear plastic bags.
• Dispose / recycle all packaging materials.
Verify all the contents in the box and gather the required tools. See “Parts” and Tools Needed in the list below.
Handle Display Racks
Shelf Pins
Tools Needed
1 x Tape Measure
1 x #2 Phillips Bit
(opitional)
1 x Pencil
1 x Cordless Power Drill
(optional)
1 x #2 Phillips head
screwdriver
1 x Flashlight
(optional)
1 x Drill Bit
2.5mm or 3/32”
Screws
#8 x 25mm
Handle Bolt
M4 x 22mm
Installing the Handles
Parts Needed.
Align handle to holes
on doors or drawers.
Screw in bolts.
1
2
3
2 x Handles
Note:
Cabinets come with handles installed on
inside of drawers/doors.
4 x Handle Bolt
M4 x 22mm
Fastening Cabinets
Note:
All shelves must be removed prior to
fastening cabinets together.
Using pilot hole as guides, screw into second cabinet.
Do not over-tighten screws and punch through other side!
X4
Drill 3/32” pilot holes on interior wall of cabinet being
fastened.
Parts Needed.
4
5
6
4- #8 x25mm
screws
Inserting Cabinets Shelves on an angle
Lower shelf down
onto shelf supports.
Insert rack at a slight angle and position
over shelf supports.
Ensure shelf supports sits in groove
on lower edge of rack.
Open cabinet doors. Attach
shelf clips to desired height.
The shelf supports are inserted into
front and middle hole positions.
Insert remaining shelves.
4
11
12
13
14
15
16
Inserting Cabinets Shelves Horizontal
Lower shelf down onto shelf supports.
Open cabinet doors. Attach
shelf clips to desired height.
The shelf supports are inserted
into front and back holes.
Lower shelf down
onto shelf supports.
Insert rack at a slight angle and position
over shelf supports.
Insert remaining shelves.
17
18
19
20
21
22
HOME BAR SERIES
42in. DISPLAY CABINET
!
STOP
ATTENTION: Is your cabinet damaged?
Need help or spare parts? For fastest service,
contact NewAge Products at 1-877-306-8930;
or support@newageproducts.com.
Do not return to the retailer.
Use two or more people to move, assemble, or
install cabinets to avoid back injury. Do not leave
children unattended near cabinets. High risk
of tipping if cabinets are installed incorrectly:
securely attach cabinets to the wall to avoid
serious injury.
For assistance, call 1.877.306.8930; for U.K
0800.031.4069: e-mail at info@newageproducts.
com.
Warning: Excessive weight
hazard!
42” Countertop. Fits over 2 Cabinets
63” Countertop. Fits over 3 Cabinet
84” Countertop. Covers over 4 Cabinet
CountertopsWeight
Capacity
Bottle Display
Base Cabinet
Max 500lbs.
25 lbs.
25 lbs.
25 lbs.
205 lbs.
220lbs.
25 lbs.
25 lbs.
25 lbs.
205 lbs.
220lbs.
Handles
Shelf Pins
Adjustable Display Racks
Handle Bolts (M4 x 22mm)
2
4
28
6
Bottle Double
Display Cabinet
#8 x 25mm Screws 12
Parts Supplied
Unpacking
• Begin by placing the package on a covered at surface.
• Remove all cardboard, foam packaging material and clear plastic bags.
• Dispose / recycle all packaging materials.
Verify all the contents in the box and gather the required tools. See “Parts” and Tools Needed in the list below.
Handle Display Racks
Shelf Pins
Tools Needed
1 x Tape Measure
1 x #2 Phillips Bit
(opitional)
1 x Pencil
1 x Cordless Power Drill
(optional)
1 x #2 Phillips head
screwdriver
1 x Flashlight
(optional)
1 x Drill Bit
2.5mm or 3/32”
Screws
#8 x 25mm
Handle Bolt
M4 x 22mm
Installing the Handles
Parts Needed.
Align handle to holes
on doors or drawers.
Screw in bolts.
1
2
3
4 x Handles
Note:
Cabinets come with handles installed on
inside of drawers/doors.
8 x Handle Bolt
M4 x 22mm
Fastening Cabinets
Note:
All shelves must be removed prior to
fastening cabinets together.
Using pilot hole as guides, screw into second cabinet.
Do not over-tighten screws and punch through other side!
X4
Drill 3/32” pilot holes on interior wall of cabinet being
fastened.
Parts Needed.
4
5
6
4- #8 x25mm
screws
Mounting the Worktop
Drill 3/32” pilot holes on interior
roof of cabinet.
Tighten screws to secure cabinets.
3
Place worktop over cabinets and lower onto cabinets.
8
Parts
Needed.
7
9
10
3
4- #8 x25mm
screws
  • Page 1 1
  • Page 2 2
  • Page 3 3
  • Page 4 4
  • Page 5 5
  • Page 6 6
  • Page 7 7
  • Page 8 8
  • Page 9 9
  • Page 10 10
  • Page 11 11
  • Page 12 12
  • Page 13 13
  • Page 14 14
  • Page 15 15
  • Page 16 16
  • Page 17 17
  • Page 18 18
  • Page 19 19
  • Page 20 20
  • Page 21 21
  • Page 22 22
  • Page 23 23
  • Page 24 24
  • Page 25 25
  • Page 26 26
  • Page 27 27
  • Page 28 28
  • Page 29 29
  • Page 30 30
  • Page 31 31
  • Page 32 32
  • Page 33 33
  • Page 34 34
  • Page 35 35
  • Page 36 36
  • Page 37 37
  • Page 38 38
  • Page 39 39
  • Page 40 40
  • Page 41 41
  • Page 42 42
  • Page 43 43
  • Page 44 44
  • Page 45 45
  • Page 46 46
  • Page 47 47
  • Page 48 48
  • Page 49 49
  • Page 50 50
  • Page 51 51
  • Page 52 52
  • Page 53 53
  • Page 54 54
  • Page 55 55
  • Page 56 56
  • Page 57 57
  • Page 58 58
  • Page 59 59
  • Page 60 60
  • Page 61 61
  • Page 62 62
  • Page 63 63
  • Page 64 64
  • Page 65 65
  • Page 66 66
  • Page 67 67
  • Page 68 68
  • Page 69 69
  • Page 70 70
  • Page 71 71
  • Page 72 72
  • Page 73 73
  • Page 74 74

NewAge Products 61118 User manual

Type
User manual

Ask a question and I''ll find the answer in the document

Finding information in a document is now easier with AI