Frymaster 819-7995 Operating instructions

Type
Operating instructions

Frymaster 819-7995 is an OQS (Oil Quality Sensor) Replacement Instructions manual for FilterQuick Touch Fryers. It guides users through the process of replacing the OQS sensor, including removing the old sensor, attaching the new sensor, and reconnecting the necessary cables and components. With the help of this manual, users can maintain their FilterQuick Touch Fryers and ensure optimal oil quality.

Frymaster 819-7995 is an OQS (Oil Quality Sensor) Replacement Instructions manual for FilterQuick Touch Fryers. It guides users through the process of replacing the OQS sensor, including removing the old sensor, attaching the new sensor, and reconnecting the necessary cables and components. With the help of this manual, users can maintain their FilterQuick Touch Fryers and ensure optimal oil quality.

Document Number: FRY_INST_8197995 03/2022 1 of 3
8197995
Follow these instructions to remove
Replace the OQS (Oil Quality Sensor).
1. Open the door and remove the oil JIB
container from the fryer (see Figure 1).
2. At the lower end of the OQS (Oil Quality
Sensor), cut the end of the orange cable
close to the OQS sensor (see Figure 2).
3. Disconnect both flexlines from the OQS
sensor (see Figure 3).
4. Although the bracket shown may vary
slightly, remove the screws that attach the
OQS bracket to the frame (see Figure 4).
5. Lay the OQS sensor on its side and remove
the nuts that securing the OQS sensor to the
bracket (see Figure 5).
6. Remove and replace the OQS sensor.
7. Reattach the brackets and flexlines.
8. Tie the old cut harness wire from step 2, that
was cut off the OQS sensor, to the new
harness to use as a pull wire to fish to the
control box.
9. Remove the FAR LEFT controller by removing
the two (2) Phillips head screws (see Figure 6).
10. It may be necessary to loosen or remove the
bar in front of the controller to ease removal.
11. Slide the controller up while pulling the
bottom out (see Figure 7).
FRYMASTER DEAN
8700 LINE AVENUE, SHREVEPORT, LA 71106
318-865-1711
800-551-8633
WWW.FRYMASTER.COM
Subject: OQS (Oil Quality Sensor) Replacement
Instructions
Models affected: FilterQuick Touch Fryers
Instruction Sheet
Figure 1
Figure 4
Figure 5
Figure 2
Figure 3
Figure 6
Figure 7
2 of 3
Document Number: FRY_INST_8197995 03/2022
12. Gently lower
the controller
and hang by
the lanyard
(see Figure 8).
13. Disconnect the
RJ45 controller
cable from the
SIB board (see
Figure 9).
14. The OQS sensor is
connected to the
other end of the
adaptor cable (see
Figure 10).
15. Disconnect the OQS
harness connected
to the adaptor cable
in the previous step
(see Figure 11).
16. Disconnect the terminator from the
harness removed in the previous step and
set aside (see Figure 12) .
17. Use the old harness to fish up the new
harness into the control box. Remove the old OQS harness and discard.
On gas units it may be necessary to remove the module to allow room to
route harness into the control box. If so, go to next step. If not, skip to
step 22
18. Remove the two (2) screws the securing the far left ignition module
assembly, located behind the left door (see Figure 14).
19. Remove the module assembly by pushing the assembly
towards the rear of the fryer and lowering.
20. Allow the module assembly to hang out of the way (see Figure
15 ).
21. Reattach the module assembly removed in steps 18 thru 20.
22. Attach the 6-pin male terminator removed in step 16 into the
6-pin female connector of new OQS harness (see Figure 16).
Figure 8
Figure 9
Figure 10
Figure 11
Figure 12
Figure 13
Figure 14
Figure 15
Figure 16
3 of 3
Document Number: FRY_INST_8197995 03/2022
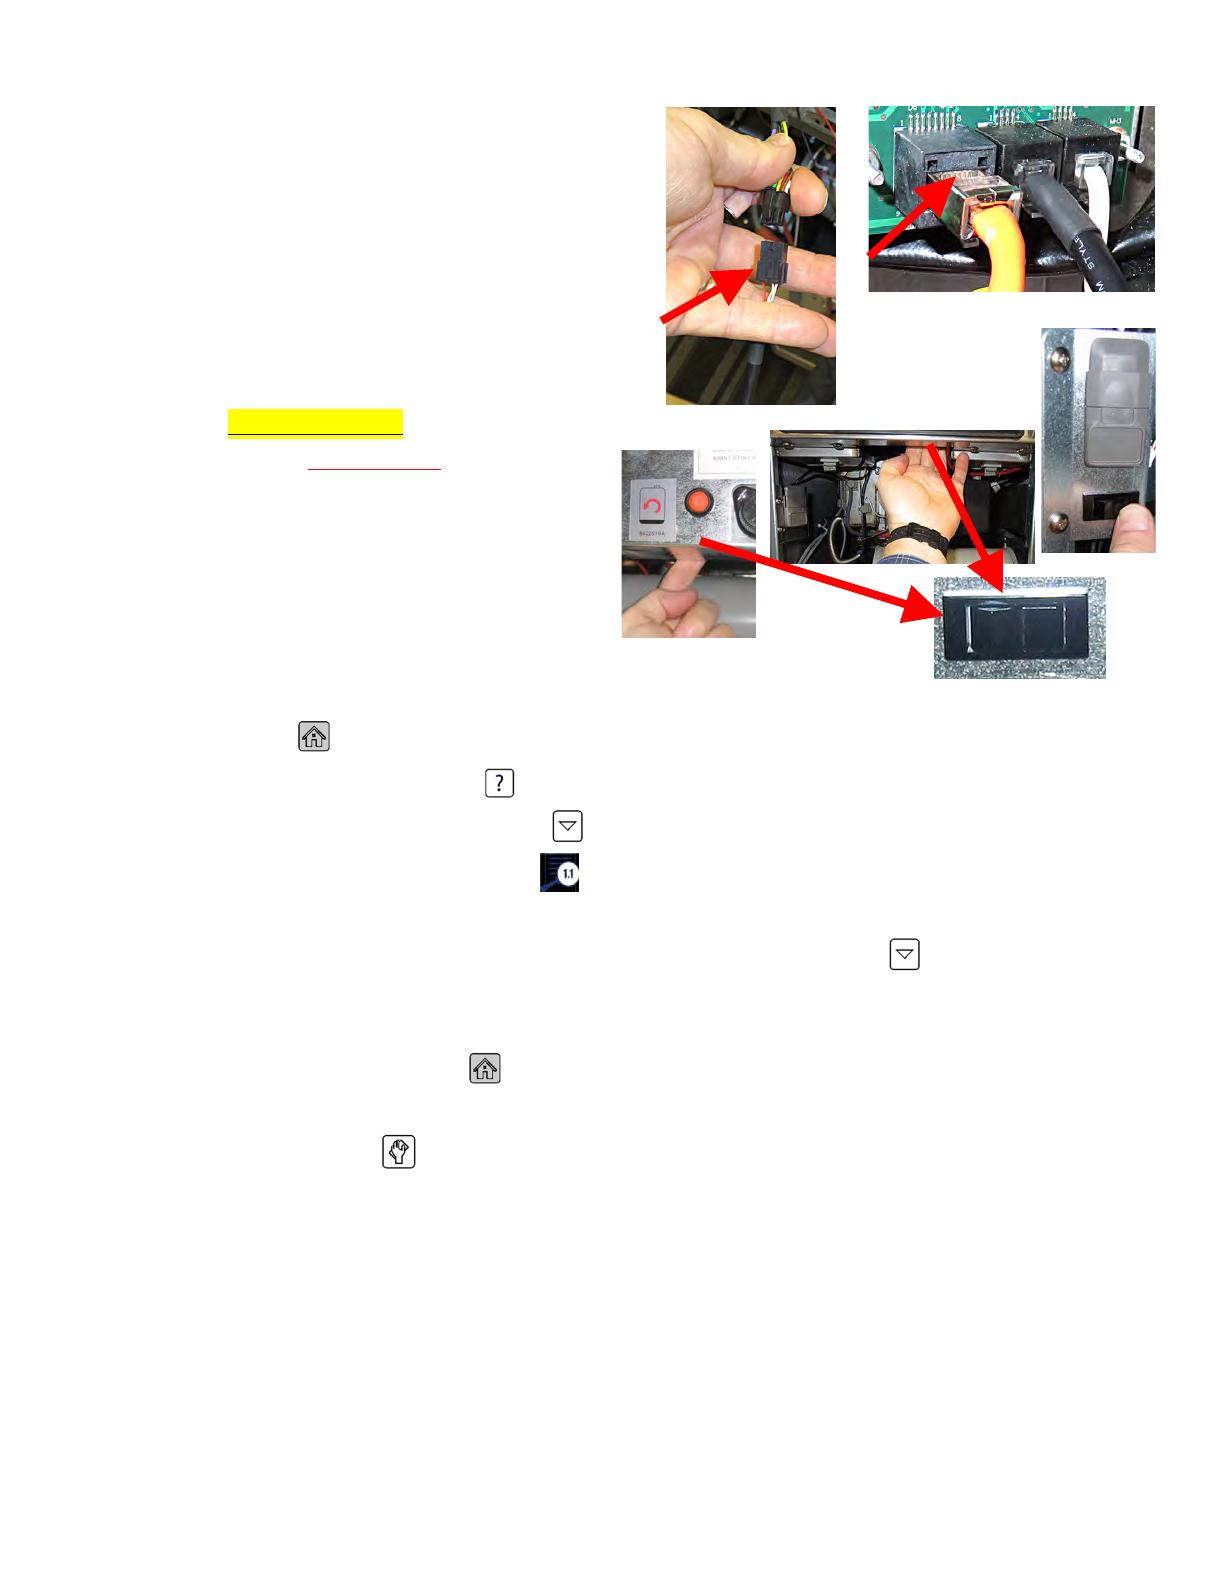
23. Attach the 6-pin male end of the new OQS
harness to the adaptor cable (see Figure 17).
24. Reattach the RJ45 controller cable disconnected
in step 13 (see Figure 18).
25. Use zip ties to secure the OQS sensor harness
out of the way.
26. Reattach the controller to the bezel.
27. Insert JIB removed in step 1.
28. Power cycle the entire fryer. To power cycle the
system, PUSH and HOLD the black toggle
reset switch for 60 SECONDS. The reset
switch is located either under the USB port,
near the USB port, under the left control
box or directly behind the JIB reset switch
(see photos to the right). If the switch is
not accessible, unplug the fryer or turn off
the breaker to the fryer.
29. Once fryer has powered up, wait one (1) additional minute with the left controller OFF and press the
HOME button.
30. Press the INFORMATION button.
31. Press the down arrow button one time.
32. Press the SOFTWARE VERSION button.
33. The controller displays INITIALIZING….
34. Once the software versions are displayed, press the down arrow button.
35. The OQS software version should be displayed. If the displayed version is all zeros (00.0000.00),
check the connections from the OQS sensor to the SIB board again.
36. Press the HOME button to exit.
37. Power on the controller and let the oil heat to setpoint.
38. Press the filter button.
39. Press OQS FILTER or AM FILTER.
40. Press the YES (check) button and test for proper function.
Figure 17
Figure 18


  • Page 1 1
  • Page 2 2
  • Page 3 3

Frymaster 819-7995 Operating instructions

Type
Operating instructions

Frymaster 819-7995 is an OQS (Oil Quality Sensor) Replacement Instructions manual for FilterQuick Touch Fryers. It guides users through the process of replacing the OQS sensor, including removing the old sensor, attaching the new sensor, and reconnecting the necessary cables and components. With the help of this manual, users can maintain their FilterQuick Touch Fryers and ensure optimal oil quality.

Ask a question and I''ll find the answer in the document

Finding information in a document is now easier with AI