FILTERQUICK
™
FRYER START-UP FORM
8700 LINE AVENUE SHREVEPORT, LA 71106 (800) 551-8633
Date_____________________
Store Name Technician
Store # (if applicable) Service Agency
Address Address
City/State City/State
Store Phone ( ) Country
FRYER/FILTER MODEL NUMBER SERIAL NUMBER (10 DIGIT)
No one is to perform start-up or training unless they are Level 3 certified and their certification is current.
Verify gas hose quick disconnect is connected to gas line input beneath the center of the fryer and verify the left gas input
connection is properly capped.
Remove Warranty Label date tabs.
Ensure fryer is level and properly restrained in accordance with the operator’s manual.
Perform SETUP on all computers. Refer to manual.
Record Software Controller_______MIB_______AIF_______ATO_______ OQS(if applicable)_______
Ensure Time and Date are correct in setup.
Program controllers for products to be cooked as per managers request - Refer to controller manual.
Is the fry system being installed connected to a BULK OIL SUPPLY / WASTE DISPOSAL SYSTEM
YES NO
If fryer was setup as a
BULK OIL SUPPLY / WASTE DISPOSAL SYSTEM was power cycled after setup?
YES NO
Place full JIB in fryer for ATO system, or fill provided JIB from Bulk Oil system (as applicable). Refer to controller manual.
Thoroughly clean and dry all vats. Fill all vats with oil to ½” below cold oil line. Allow fryers to heat to set point (see gas and electric
checks below) and verify temperatures are at set point +/- 5°F / 2°C. Verify that oil level is below ATO level sensor (upper oil
level line) but above AIF sensor (lower oil level) (add/remove oil if necessary) and that each vat tops off from JIB. NOTE:
HEAT LED must cycle 3 times before top off is activated.
Check restaurant to ensure that it doesn’t have a severe positive or negative air balance.
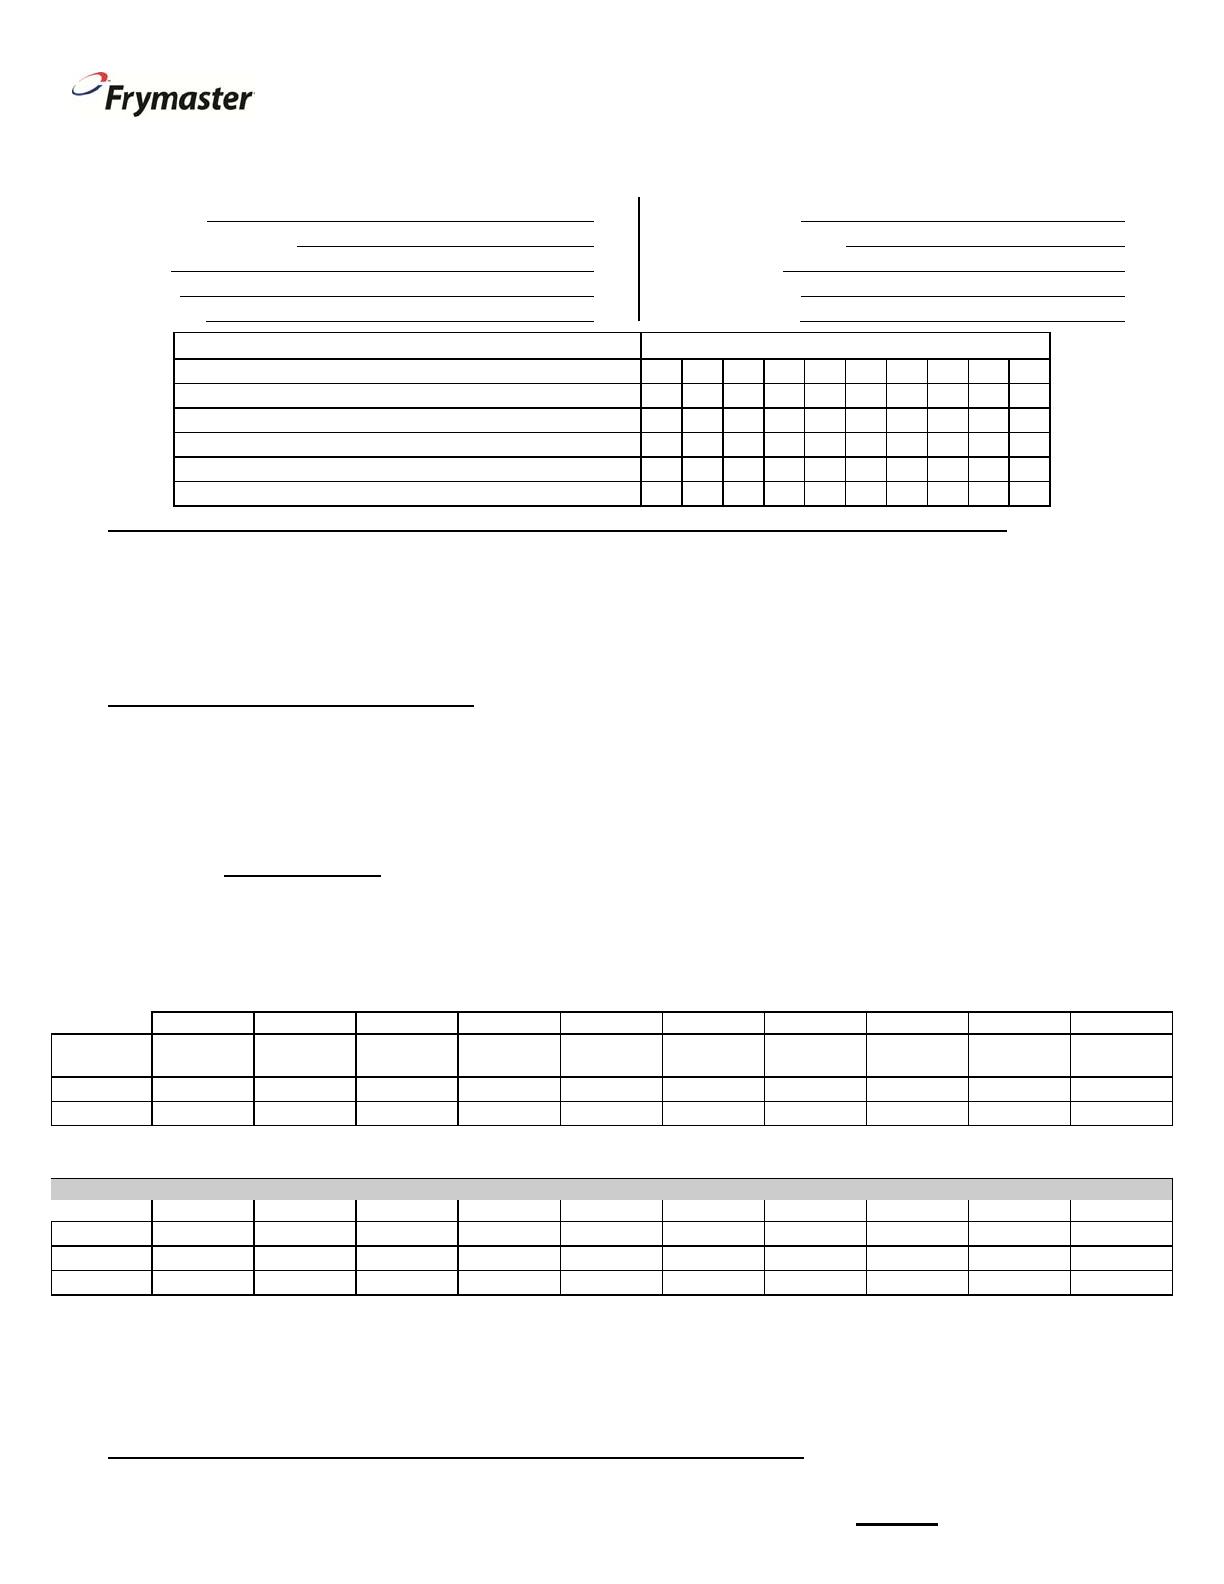
GAS fryers - While units are heating up, check incoming gas pressure (Natural Gas: 6-14" W.C.; LP Gas: 11-14" W.C.). Record
actual incoming pressure ________. Check burner manifold pressure. Record actual burner manifold pressure below. Check for
proper combustion; fryers should have a bright orange flame after approximately 1 minute of operation. Adjust blower air inlet to
achieve .3 – .9 uA (micro amps) on each igniter flame sense circuit. Record micro amp readings below.
Gas
at #1
at #2
at #3
at #4
at #5
at # 6
at # 7
at # 8
at # 9
at # 10
Burner
Pressure
Left u
Right u
ELECTRIC fryers - While units are heating up, ensure applied voltage matches the rating plate. Ensure all phases are balanced
and there is no current draw when controller heat light is off.
AMP DRAW
Electric
at #1
at #2
at #3
at #4
at #5
at # 6
at # 7
at # 8
at # 9
at # 10
L1
L2
L3
Verify that all filter parts (filter pan, filter screen, filter pad or paper, hold-down ring, crumb tray, and O-rings) are present. Visually
inspect the oil drain and return system to ensure all connections are tight.
Verify filter pan alignment. The pan should slide smoothly into position with an “A” displayed on the MIB. Ensure pick-up tube is
fully engaged in the pan suction tube. “P” should be displayed on the MIB when the pan is pulled forward.
Perform an Auto Filter or OQS Filter (if applicable) on a vat to ensure the filter pump is operational and check the drain and return
system for leaks. If OQS is installed, TPM value/Oil is Good______________
Remove old Fryer’s Friend from the store and replace with the new Fryer’s Friend
The startup tech is responsible for training the operators following the “Training Outline Form” PN 8197130.
Two (2) hours are allowed for the above to Start-Up one system.
8197129
08/2016