Page is loading ...

17
1
E
N
G
L
I
S
H
CQ-VD7700U/VD7500U
Contents
¢ Safety Information.................................. 2
¢ Use This Product Safely ........................ 5
¢ Features .................................................. 7
¢ Components ........................................... 8
¢ Differences between 2 models.............. 8
¢ Contents................................................ 17
¢ Preparations ......................................... 18
Remote Control, Main Unit
¢ Name of Controls and Functions........ 20
¢ Touch Panel Operation Overview ....... 24
Operation mode, regular mode
¢ Display Mode Changes ........................ 26
¢ Status Bar ............................................. 27
¢ Icons Used in This Manual .................. 27
¢ Indications on the Screen.................... 28
The state of the current output appears, OSD (On
Screen Display) on/off
¢ Discs that can be Played Back............ 29
¢ System Upgrade ................................... 30
¢ General .................................................. 34
Power, source selection (Mode), volume, mute,
display open/close and monitor position adjust-
ment
¢ TV Tuner/VTR (External Devices)........ 36
TV mode, channel setting, direct channel selection,
preset channels, VTR1/VTR2 mode
¢ DVD/Video CD Player ........................... 38
Disc insert/eject, basic operation, chapter/title
selection, useful functions
¢ CD/MP3 Player ...................................... 42
Disc insert/eject, direct folder and file selection,
basic operations, points to remember when record-
ing an MP3 disc
¢ Radio ..................................................... 46
Radio mode, band, tuning, One-touch Selection of
a Station
¢ CD Changer Control............................. 48
CD Changer mode, system expansion, basic
operations
¢ SD-Card Player ..................................... 50
Notes on SD-Card, Playable data, SD-Card insert-
ing, SD mode selection, go to SD Menu, go to SD
Setup Menu, removing the SD-Card
¢ MENU : User Settings .......................... 54
Display unit, beep, guidance, clock, calender, touch
panel, id-code, memory clear
¢ MENU : Display (Screen) Settings ...... 58
Dimmer, picture, LCD dimmer, LCD contrast
¢ MENU : Capture Function.................... 59
Capture, initialize
¢ MENU : Animation Settings................. 60
Animation, color
¢ MENU : Audio Settings ........................ 61
Parametric-EQ, pro logic II, down mix, DR comp, SP
setup, SP level, SP delay, VTR level, graphic-EQ,
bal/fad, sub-woofer, HPF
¢ MENU : DVD Settings........................... 67
Language, display
¢ MENU : Input/output Setting ............... 68
Navi setup, camera setup, VTR skip, video-cont,
rear monitor, BGC
¢ Aspect Ratio ......................................... 71
¢ Sound Settings ..................................... 72
Space, dynamic range compression
¢ About Rear Monitor.............................. 74
Rear monitor set up, private mode
¢ Sub-LCD Display Change .................... 76
¢ Troubleshooting ................................... 78
¢ Maintenance.......................................... 86
¢ Definition of Terms............................... 88
¢ Language Code List ............................. 90
¢ Specifications ....................................... 91
19
3
E
N
G
L
I
S
H
CQ-VD7700U/VD7500U
18
2
E
N
G
L
I
S
H
CQ-VD7700U/VD7500U
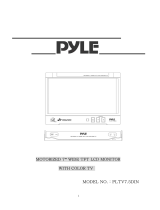
Battery Installation (Inserting/Replacing the Battery)
q Remove the battery holder.
Pull the holder by position B while pushing position A
in the direction indicated by the arrow.
w Install the battery on the battery holder.
Set a new battery properly with its (
+
) side facing up as shown in
the figure.
e Insert the battery holder.
Push the battery holder back into its original position.
Back side
Lithium battery
(CR2025: supplied)
Position B
Position A
Battery holder
Preparations (Remote Control)
Preparations (Main Unit)
You should check and prepare your unit before initial use referring to the following steps:
■
Step 1
Check the connecting external devices for input.
❒ VTR1/VTR2
Connected:
Set the VTR input level, etc. (a page 65, 70)
Unconnected:
Set the VTR Skip. (a page 70)
❒ Rear View Camera
Connected:
Check if the reverse lead is connected. (a installation
Instructions)
Execute the Camera SetUp. (a page 69)
Unconnected:
Set the Rear View Camera to off. (a page 69)
❒ Car Navigation
Connected:
Check the connection terminal. (a Installation
Instructions)
Execute the NAVI SETUP. (a page 68)
Unconnected:
Check if “NAVI INPUT” is set to “RGB”. (a page 68)
■
Step 2
Check the connecting external devices for output.
❒ Rear Monitor
Connected:
Execute the Rear Monitor Set Up. (a page 74)
Unconnected:
❒ Subwoofer and External amplifier
Connected:
Check the connection of external amplifier control lead
and subwoofer output. (a Installation Instructions)
Execute “SP SETUP”. (a page 63: CQ-VD7700U)
Unconnected:
Set “SUB•W” to “NO”. (a page 64)
❒ Other speakers
Check the connected speakers.(a Installation Instructions)
Execute “SP SETUP” and “AUDIO” setting (a page 63, 64: CQ-VD7700U, a page 66: CQ-VD7500U)
■
Step 3
Check the other equipment and settings.
❒ ID code setting (a page 57)
❒ Check the Illumination lead connection. (a Installation Instructions)
❒ Display (Screen) Settings (a page 58)
❒ “DISPLAY UNIT” setting (TILT, OPEN/CLOSE) (a page 54)
❒ Clock Setting (a page 55)
❒ DVD Setting (if necessary)
Language Setting (a page 67)
Display Aspect and DVD Software Mode (a page 68)
Battery Notes
¡Battery life: approx. 6 months (at room temperature)
¡Battery handling:
• Do not disassemble, short-circuit or dispose of batteries in a fire as such action may result in explosion or fire.
• Keep out of the reach of children to prevent risk of choking, swallowing, or other injury.
¡Replace old battery:
Follow the local regulations for disposal.
Caution: Improper use of batteries may cause overheating, an explosion or ignition, resulting in injury or a fire.
Change battery as required - battery leakage may damage the unit.
This book refers to connections to the Panasonic car navigation system that will come onto the market in the future.
Descriptions regarding the car navigation system are boxed with a dotted line.
21
5
E
N
G
L
I
S
H
CQ-VD7700U/VD7500U
20
4
E
N
G
L
I
S
H
CQ-VD7700U/VD7500U
Remote Control (General)
Name of Controls and Functions
Aim the remote control at the remote control sensor of the display unit and operate it (a previous
page)
.
E
N
T
E
R
PWR NAVI MODE MENU
CHAPTER
ASPECT
P-MODE
TRACK
NAVIGATION
STOP
TOP MENU
DVD / SD MENU
ST / MONO
CH1 CH2
RANDOM
RETURN
OSD
RET
RAND
AUDIO
ANGLE
REP
SUB
SPACE MUTE
VOL
GRP
DISP
123
456
7
A
8
0
9
PAGE
SCAN
PAUSE PLAY
SUBTITLE
REPEAT
SCROLL
TITLE / CHAPTER
VOL
CAR AV
[PWR]
¡Switches the power on/off.
(a page 34)
[RET] (RETURN)
¡Cancel the direct channel selection.
(a page 36)
[SD] (TOP MENU)
¡Show the SD-Card menu.
¡Goes back to the top menu.
(a page 52)
[A] (ASPECT) (P • MODE)
¡Selects the aspect ratio.
(a page 71)
¡Activates/inactivates private mode.
(a page 75)
[0] to [9]
¡Selects a TV channel directly. (a page 36)
¡Scan [5], for the CD/CD changer mode.
(a page 42, 48)
¡Sets the ID code. (a page 57)
[NAVI] (NAVIGATION)
Activates/inactivates the car
navigation. (a page 26)
[MODE]
¡Switches the power on/off. (a page 34)
¡Changes the modes such as sound and pic-
ture. (a page 34)
[MENU]
¡Shows the menu screen. (a page 54)
¡Shows the BGC menu. (a page 70)
[OSD] (CAPTURE)
¡Displays information about each source on
the screen. (a page 28)
¡Saves your favorite part of a playing picture
as a freeze-frame picture. (a page 59)
[DISP]
¡Changes the display. (a page 26, 76)
[}] [{] (VOL)
¡Adjusts the sound volume. (a page 35)
[MUTE]
¡Mutes the sound temporarily. (a page 35)
[SPACE]
¡Setting the sound field.
(Only for CQ-VD7700U) (a page 72)
[}] [{]
¡Searches for TV stations and memorizes them
automatically. (a page 36)
¡Selects a disc. (a page 48)
¡Selects (vertically) or adjusts an operation or
item.
[]] [[]
¡Selects or searches for a channel, frequency,
track or file. (a page 36, 38, 42, 46, 48)
¡Selects (horizontally) or adjusts an operation
or item.
[ENTER]
¡Selects a band. (a page 46)
¡Searches for broadcast stations and memo-
rizes them automatically. (a page 46)
¡Determines an operation or item.
[DVD/SD MENU]
¡Displays the DVD or the SD-Card
menu. (Operations vary according
to the medium.) (a page 40, 52)
ENTER
TILT
CQ-VD7700U
OPEN / CLOSE
DISC
SD CARD
TRACK/
CHANNEL
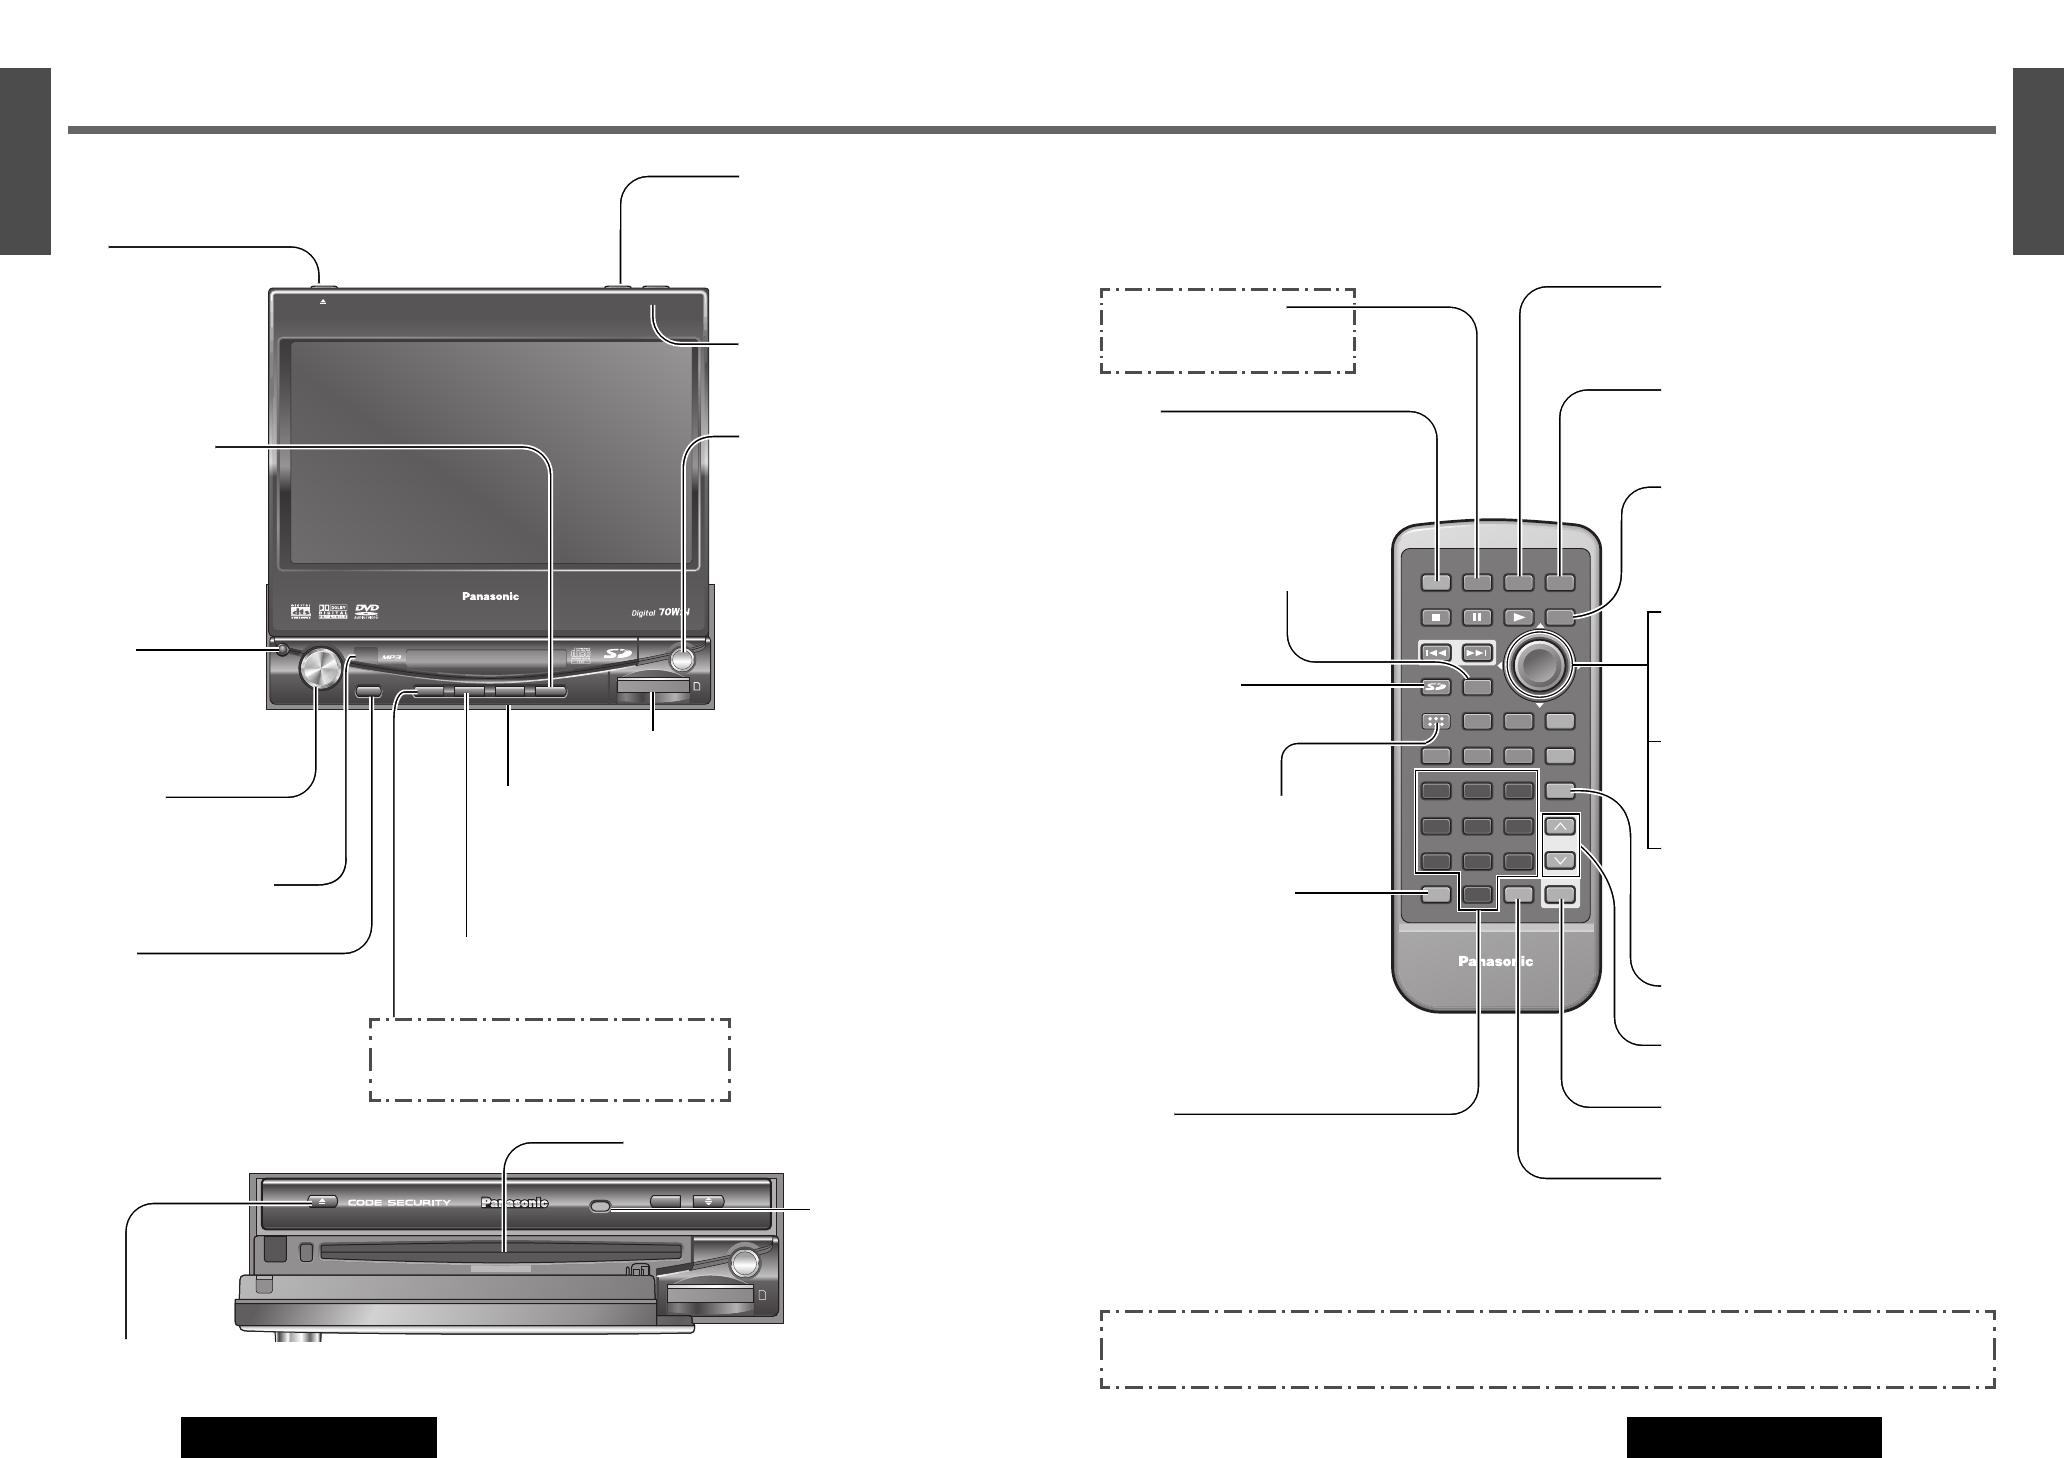
Main Unit
(Front Panel Open)
Disc indicator (EJECT button illumination light) (a page 38, 42)
Caution: A disc is in the slot when this is illuminated in blue.
Disc slot
Dimmer
Sensor
(a page 58)
Main Unit
ENTER
TILT
OPEN
VOLUME
MUTE NAVI DISP
CQ-VD7700U
MODE
OPEN / CLOSE
DISC
POWER ASPECT
P
·
MODE
NAVIGATION
SD CARD
TRACK/
CHANNEL
ASP
IN-DASH 7" WIDESCREEN COLOR LCD MONITOR TV / DVD / SD RECEIVER
OPEN / CLOSE
CQ-VD7700U
TILT
[u]
¡Ejects/reloads a disc.
(a page 38, 42)
Note: You should open
the front panel before
ejecting the disc.
[OPEN/CLOSE]
¡Opens/closes the monitor.
(a page 35)
[TILT]
¡Adjust the monitor position.
(a page 35, 54)
¡Tilts the monitor forward
temporarily. (a page 35, 54)
[}] [{] (DISC)
¡Searches for TV stations and
memorizes them automatically.
(a page 36)
¡Selects a folder or a disc.
(a page 42, 48)
¡Selects (vertically) or adjusts
an operation or item.
[]] [[]
(TRACK/CHANNEL)
¡Selects or searches for a chan-
nel, track, file or frequency.
(a page 36, 38, 42, 46, 48)
¡Selects (horizontally) or
adjusts an operation or item.
[ENTER]
¡Selects a band.
(a page 46)
¡Searches for broadcast sta-
tions and memorizes them
automatically. (a page 46)
¡Determines an operation or
item.
[OPEN]
¡Open the Front Panel.
Note: You should open
the front panel before
ejecting the disc.
[VOLUME]
¡Adjusts the sound volume.
(a page 35)
Remote control sensor
[MUTE]
¡Mutes the sound temporarily.
(a page 35)
[NAVI] (NAVIGATION)
¡Activates/inactivates the car navigation.
(a page 68)
[DISP]
¡Changes sub-LSD display. (a page 76)
[MODE] (POWER)
¡Switches on/off the power.
(a page 34)
¡Changes the modes such as
sound and picture.
(a page 34)
SD-Card Slot
(a page 52)
[ASP] (ASPECT)
(P•MODE)
¡Selects the aspect ratio.
(a page 71)
¡Activates/inactivates
the private mode.
(a page 75)
This book refers to connections to the Panasonic car navigation system that will come onto the market in the future.
Descriptions regarding the car navigation system are boxed with a dotted line.
[ENTER]
¡Changes to direct folder selection
mode. (a page 42)
[}] [{] []] [[]
¡Selects an operation or item.
[]] [[]
¡Selects a track or file. (a page 42, 48)
¡Fast forward/fast reverse (a page 42,
48)
[}] [{]
¡Selects a folder. (a page 42)
¡Selects a disc. (a page 48)
23
7
E
N
G
L
I
S
H
CQ-VD7700U/VD7500U
22
6
E
N
G
L
I
S
H
CQ-VD7700U/VD7500U
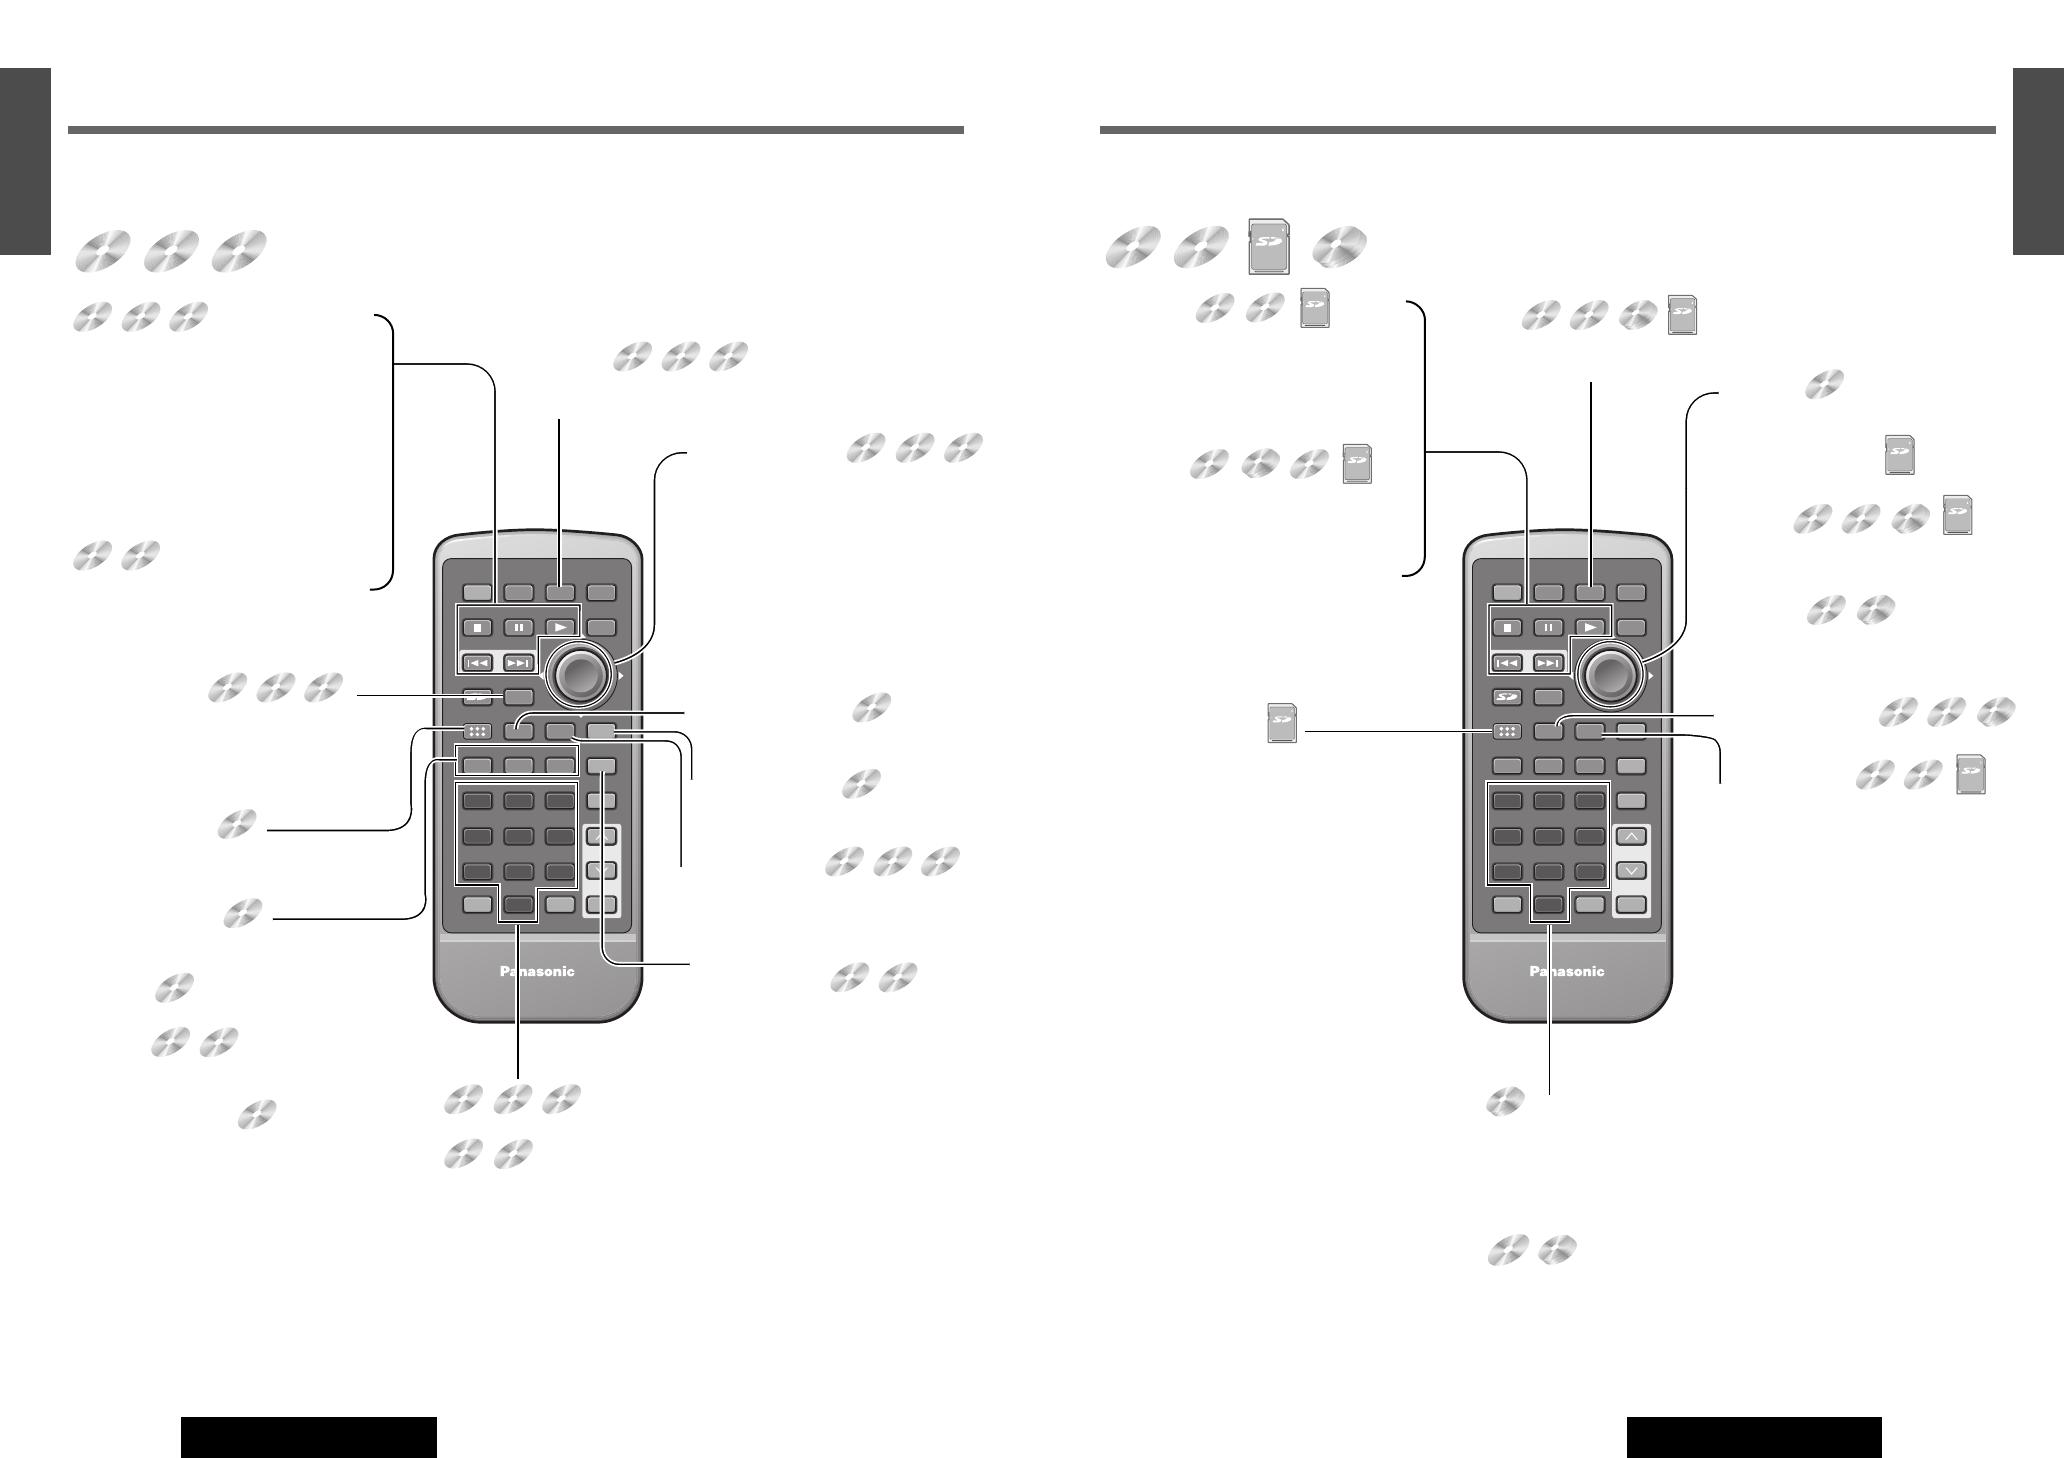
Remote Control Functions for the DVD audio/video, Video CD
E
N
T
E
R
PWR NAVI MODE MENU
CHAPTER
ASPECT
P-MODE
TRACK
NAVIGATION
STOP
TOP MENU
DVD / SD MENU
ST / MONO
CH1 CH2
RANDOM
RETURN
OSD
RET
RAND
AUDIO
ANGLE
REP
SUB
SPACE MUTE
VOL
GRP
DISP
123
456
7
A
8
0
9
PAGE
SCAN
PAUSE PLAY
SUBTITLE
REPEAT
SCROLL
TITLE / CHAPTER
VOL
CAR AV
Indicates compatible types of Media.
DVD
VIDEO
DVD
AUDIO
VIDEO
CD
[■] (STOP)
¡Stops playback. (a page 38)
[❚❚] (PAUSE)
¡Pause (a page 38)
[B] (PLAY)
¡Playback (a page 38)
[s] [d]
¡Goes to beginning. (a page 38)
¡Fast forward/fast reverse. (a page 38)
¡Slow playback [d].(a page 38)
DVD
VIDEO
DVD
AUDIO
VIDEO
CD
VIDEO
CD
[MODE]
¡Changes the modes such as
sound and picture. (a page 34)
[}] [{] []] [[]
¡Selects an operation or item.
[ENTER]
¡Determines an operation or item.
[RAND] (RANDOM)
¡Random play. (a page 38)
[REP] (REPEAT)
¡Repeats a playback. (a page 38)
[PAGE] (SCROLL)
¡Change the page. (a page 38)
[GRP] (TRACK)
(TITLE/CHAPTER)
¡Selects the group/track. (a page 40)
¡Selects the title/chapter. (a page 40)
DVD
VIDEO
DVD
AUDIO
DVD
VIDEO
DVD
VIDEO
DVD
AUDIO
DVD
AUDIO
DVD
AUDIO
VIDEO
CD
[0] to [9]
¡Selects an item on the menu. (a page 40)
[0] to [9]
¡Selects a title or chapter. (a page 40)
¡Selects a group/track. (a page 40)
DVD
VIDEO
DVD
VIDEO
DVD
AUDIO
VIDEO
CD
[RET] (RETURN)
¡Returns to the previous display.
(a page 40)
¡Inputs the number again. (a page 40)
¡Displays the video CD's menu.
(a page 40)
[DVD/SD MENU]
¡Displays the DVD menu. (Operations vary
according to the media.) (a page 40)
[SUB] (SUB TITLE)
¡Switching the subtitle language.
(a page 41)
[ANGLE]
¡Switching the angle. (a page 41)
[AUDIO]
¡Switching the audio language. (a
page 41)
[AUDIO] (ST/MONO)
¡Switches between stereo or
monaural sound. (a page 41)
DVD
VIDEO
DVD
VIDEO
DVD
VIDEO
DVD
VIDEO
DVD
VIDEO
DVD
VIDEO
VIDEO
CD
DVD
AUDIO
DVD
AUDIO
VIDEO
CD
VIDEO
CD
Name of Controls and Functions (continued)
DVD
VIDEO
VIDEO
CD
Remote Control Functions for the CD/MP3/SD/CD Changer
E
N
T
E
R
PWR NAVI MODE MENU
CHAPTER
ASPECT
P-MODE
TRACK
NAVIGATION
STOP
TOP MENU
DVD / SD MENU
ST / MONO
CH1 CH2
RANDOM
RETURN
OSD
RET
RAND
AUDIO
ANGLE
REP
SUB
SPACE MUTE
VOL
GRP
DISP
123
456
7
A
8
0
9
PAGE
SCAN
PAUSE PLAY
SUBTITLE
REPEAT
SCROLL
TITLE / CHAPTER
VOL
CAR AV
Indicates compatible types of Media.
CD MP3
LOCK
SD
[■] (STOP)
¡Stops playback. (a page 42, 48, 52)
[❚❚] (PAUSE)
¡Pause (a page 42, 48, 52)
[B] (PLAY)
¡Playback (a page 42, 48, 52)
[s] [d]
¡Goes to beginning. (a page 42, 48,
52)
¡Fast forward/fast reverse. (a page 42,
48, 52)
CD MP3
CD Changer
LOCK
SD
LOCK
SD
[MODE]
¡Changes modes such as sound
and picture. (a page 34)
[RAND] (RANDOM)
¡Random play. (a page 42, 48)
[REP] (REPEAT)
¡Repeats a playback. (a page 42, 48,
52)
MP3
MP3CD
CD MP3
LOCK
SD
[1] (CH 1)
¡Selects first CD Changer. (a page 48)
[2] (CH 2)
¡Selects second CD Changer. (a page 48)
* When connecting the dual CD changer selector (CA-CD55 option) and two CD
changers.
[5] (SCAN)
¡Scan in the CD/CD Changer mode. (a page 42, 48)
CD Changer
[DVD/SD MENU]
¡Displays the SD-Card menu. (Operations
vary according to the medium.)
(a page 52)
MP3
CD
LOCK
SD
CD Changer
CD
MP3
LOCK
SD
CD Changer
LOCK
SD
CD
CD Changer
DVD
AUDIO
DVD
AUDIO
DVD
AUDIO
CD Changer
MP3
CD Changer
MP3CD
CD Changer
LOCK
SD

25
9
E
N
G
L
I
S
H
CQ-VD7700U/VD7500U
24
8
E
N
G
L
I
S
H
CQ-VD7700U/VD7500U
Touch Panel Operation Overview
Operation Mode
While in operation mode, You can operate almost all functions of this unit by touching symbols on
the panel.
TILT
CQ-VD7700U
OPEN / CLOSE
OPEN / CLOSE
CQ-VD7700U
TILT
How to show operation mode
When not in operation mode, Touch the center of touch panel [Area A]
to show operation display (see next page).
Notes:
¡When no operation is performed for 10 seconds during the Video playback, the display returns to the regular mode.
¡In audio mode (CD/MP3/RADIO/CD Changer), the operation mode remains till the [OPERATION OFF] button is pressed.
Return to the regular mode
To return to the regular mode, touch [OPERATION OFF].
Example: TV mode
The Guidance display
appears for 4 seconds
(
a page 26).
Touch a symbol to operate. When there is no
operation symbol to operate, touch , ,
or to show.
Example: Mode Selection:
Example: DVD operation symbols
TILT
CQ-VD7700U
OPEN / CLOSE
OPEN / CLOSE
CQ-VD7700U
TILT
Regular Mode
While in regular mode, You can operate basic functions of this unit by touching areas to on
the panel. Each area has following control functions.
Example: GUIDANCE ON
(a page 55)
TILT
CQ-VD7700U
OPEN / CLOSE
OPEN / CLOSE
CQ-VD7700U
TILT
Area A
Regular mode:
Shows operation display.
Note: To return the regular mode, press
[OSD] or touch [OPERATION OFF].
Area D
TV/Radio mode:
Next Preset Frequency/Channels
MP3 mode:
Next Folder
CD Changer mode:
Next disc
Area C
TV/Radio mode:
Goes to next fre-
quency or channel.
Seek
DVD/VCD/CD/MP3/C
D Changer mode:
Next Chapter/track/
File
Fast forward
Area B
TV/Radio mode:
Goes to previous frequen-
cy or channel.
DVD/VCD/CD/MP3/CD
Changer mode:
Previous Chapter/track/
File
Fast reverse
Area E
TV/Radio mode:
Previous preset
Frequency/Channels.
Seek
MP3 mode:
Previous Folder
CD Changer mode:
Previous Disc
B C
D
E
A
Notes on the Touch Panel
Before operation
¡Clean the surface of the touch panel. (a page 86)
Operation
¡Use only your fingers to operate the touch panel.
¡Do not press the panel forcefully.
¡Do not scratch the panel by fingernails or any hard objects.
¡Do not use a pen or other sharp implements to operate the touch panel.
¡Do not bump the front panel.
a Failure to observe the above may damage or break the glass on the surface of the touch panel.
TILT
CQ-VD7700U
OPEN / CLOSE
OPEN / CLOSE
CQ-VD7700U
TILT
Touch the center of touch panel.
Operations on the touch panel
Touch operation buttons (Symbols) to opearte.
TILT
CQ-VD7700U
OPEN / CLOSE
OPEN / CLOSE
CQ-VD7700U
TILT

27
11
E
N
G
L
I
S
H
CQ-VD7700U/VD7500U
26
10
E
N
G
L
I
S
H
CQ-VD7700U/VD7500U
Display Mode Changes Status Bar
This unit has 10 types screens. The following operations allow you to change among screens.
■
TV, DVD Video/Audio, VTR 1/2, SD-Card
Operating mode Regular mode
[OPERATION
OFF]
[OSD]
Remote
Panel
Area A
[NAVI]
(NAVIGATION)
[NAVI]
(NAVIGATION)
■
CD, MP3, Radio, CD Changer
■
Navigation
Operating mode
Calender Full Screen
[DISP]
[DISP]
[DISP]
[DISP]
[OPERATION OFF]
[OSD]
Area A
Animation
Capture
Full Screen
Calender Window
Navi mode Play mode
ID 3 Tag data (only for MP3)
[OSD]
Capture Window
The status bar provides various information during the playback.
The status bar will inform you of a change in the unit whenever it occurs.
E
N
T
E
R
PWR NAVI MODE MENU
CHAPTER
ASPECT
P-MODE
TRACK
NAVIGATION
STOP
TOP MENU
DVD / SD MENU
ST/ MONO
CH1 CH2
RANDOM
RETURN
OSD
RET
RAND
AUDIO
ANGLE
REP
SUB
SPACE MUTE
VOL
GRP
DISP
123
456
7
A
8
0
9
PAG E
SCAN
PAUSE PLAY
SUBTITLE
REPEAT
SCROLL
TITLE / CHAPTER
VOL
CAR AV
[OSD]
Volume level
(CQ-VD7700U)
Preset Equalizer Number (a page 62, 66)
Current Source ( : Sound : Video)
Disc Indicator
P·MODE indicator (a page 75)
Current selected chang-
er number when two CD
changers are connect-
ed. (a page 48)
Icons Used in This Manual
Guidance display
appears for 4 seconds
You can let the guidance display set
to off. (a page 55)
This manual uses some icons to explain touch panel operation as follows:
Remote
Panel
¡Operation unit
These icons represent the unit used to perform an operation.
: Operations on the touch panel
: Operations on the remote control or the display unit
This book refers to connections to the Panasonic car navigation system that will come onto the market in the future.
Descriptions regarding the car navigation system are boxed with a dotted line.

29
13
E
N
G
L
I
S
H
CQ-VD7700U/VD7500U
28
12
E
N
G
L
I
S
H
CQ-VD7700U/VD7500U
Indicators on the Screen Discs that can be Played Back
Prohibition
Input is not possible
because a sound-
track, subtitle lan-
guage or angle num-
ber which was not
recorded on the disc
has been selected or
because the user has
attempted to perform
an operation which is
not supported.
Additional Information
Source type, various
settings, etc.
Note: Displaying contents and their positions partly vary with each mode. Refer to the description of each mode for details.
You can switch between OSD-ON and OSD-OFF regarding the mode information when watching a picture.
Example:
DVD Video Mode
(OSD on a see below)
Mode Display/Operating buttons
The current mode and operable touch buttons appear.
Mode Display temporarily hiding
You can hide the mode display temporarily during some
visual related operations such as DVD menu operation.
(During playback)
Touch [Area A]
Touch [OPERA-
TION OFF]
Press [OSD] .
Remote
Panel
Information of Each
Mode
Playing elapsed time,
title, preset list, etc.
Note:On-Screen Display can be toggled between on and off only in the TV, VTR1/2, DVD video, DVD audio, VCD and SD-
Card modes. (When the captured image is set as a wallpaper in the CD, MP3, RADIO and CD changer, pressing [OSD]
switches captured images.)
The State of the Current Output Appears
OSD (On-Screen Display) On/off
OSD on
OSD off
❒ Region Management Information
This product is designed and manufactured to respond to the Region Management
Information that is recorded on a DVD disc. If the Region number described on the
DVD disc does not correspond to the Region number of this product, this product
cannot play the disc.
The Region number for this product is “1” and “ALL”.
❒ The following discs cannot be played back on this product.
¡DVD-ROM ¡DVD-R ¡DVD-RAM ¡DVD+RW ¡DVD-RW ¡SVCD
¡VSD ¡CVD ¡CD-G ¡CD-ROM (except MP3)
¡CD-RW (except MP3 and CD-DA) ¡CD-R (except MP3 and CD-DA) ¡SACD ¡photo CD
¡CDV ¡Divx Video Discs ¡CD-EXTRA (audio-only playback possible)
¡Discs recorded in PAL format, others
¡DVDs with a region number other than “1” or “ALL”
¡Playing back a photo CD disc with this unit could damage the data that is recorded on the disc.
4
:
3
1
ALL
12
46
❒ Symbols used on jackets (Examples of such symbols include)
¡Number of subtitle languages
¡Number of audio tracks
¡Number of angles
Screen size (H:V aspect ratio)
The numbers indicate the number of lan-
guages, tracks, angles, etc., recorded on the
disc.
¡4:3 standard size
¡Letterbox
¡16:9 wide size
: Play back in letterbox format on a stan-
dard screen (4:3).
: Play back in “Pan & Scan” (a page 88)
format on a standard screen (4:3).
Note: The size of the image that is displayed on the screen
depends on the screen mode (“Aspect Ratio”
a
page 71),
and on the screen size for the content on the disc.
2
3
(a page 88)
Example:
LB
LB16
:
9
PS16
:
9
2
Notes:
¡About CD-Rs, CD-RWs and SD-Card refer to “Notes on CD-Rs/RWs” and “Notes on SD-Card”. (a page 50, 87)
¡Some copy-protected music CDs are not playable.
NTSC
LPCM (CD-DA),
MP3
Disc
DVD audio/
video
Video CD
CD
5” (12 cm)
1
ALL
Mark (logo) Disc size
Video format Region No.
TEXT
Audio format
LPCM, PPCM,
MPEG1, MPEG2,
dts,
Dolby Digital
LPCM, MPEG1
Touch this.
Hide
Appear
Touch this
to appear.
Mode
Display
31
15
E
N
G
L
I
S
H
CQ-VD7700U/VD7500U
30
14
E
N
G
L
I
S
H
CQ-VD7700U/VD7500U
ENTER
TILT
OPEN
VOLUME
MUTE NAVI DISP
CQ-VD7700U
MODE
OPEN / CLOSE
DISC
POWER ASPECT
P
·
MODE
NAVIGATION
SD CARD
TRACK/
CHANNEL
ASP
IN-DASH 7 INCH WIDE COLOR LCD TV / DVD / SD RECEIVER
OPEN / CLOSE
CQ-VD7700U
TILT
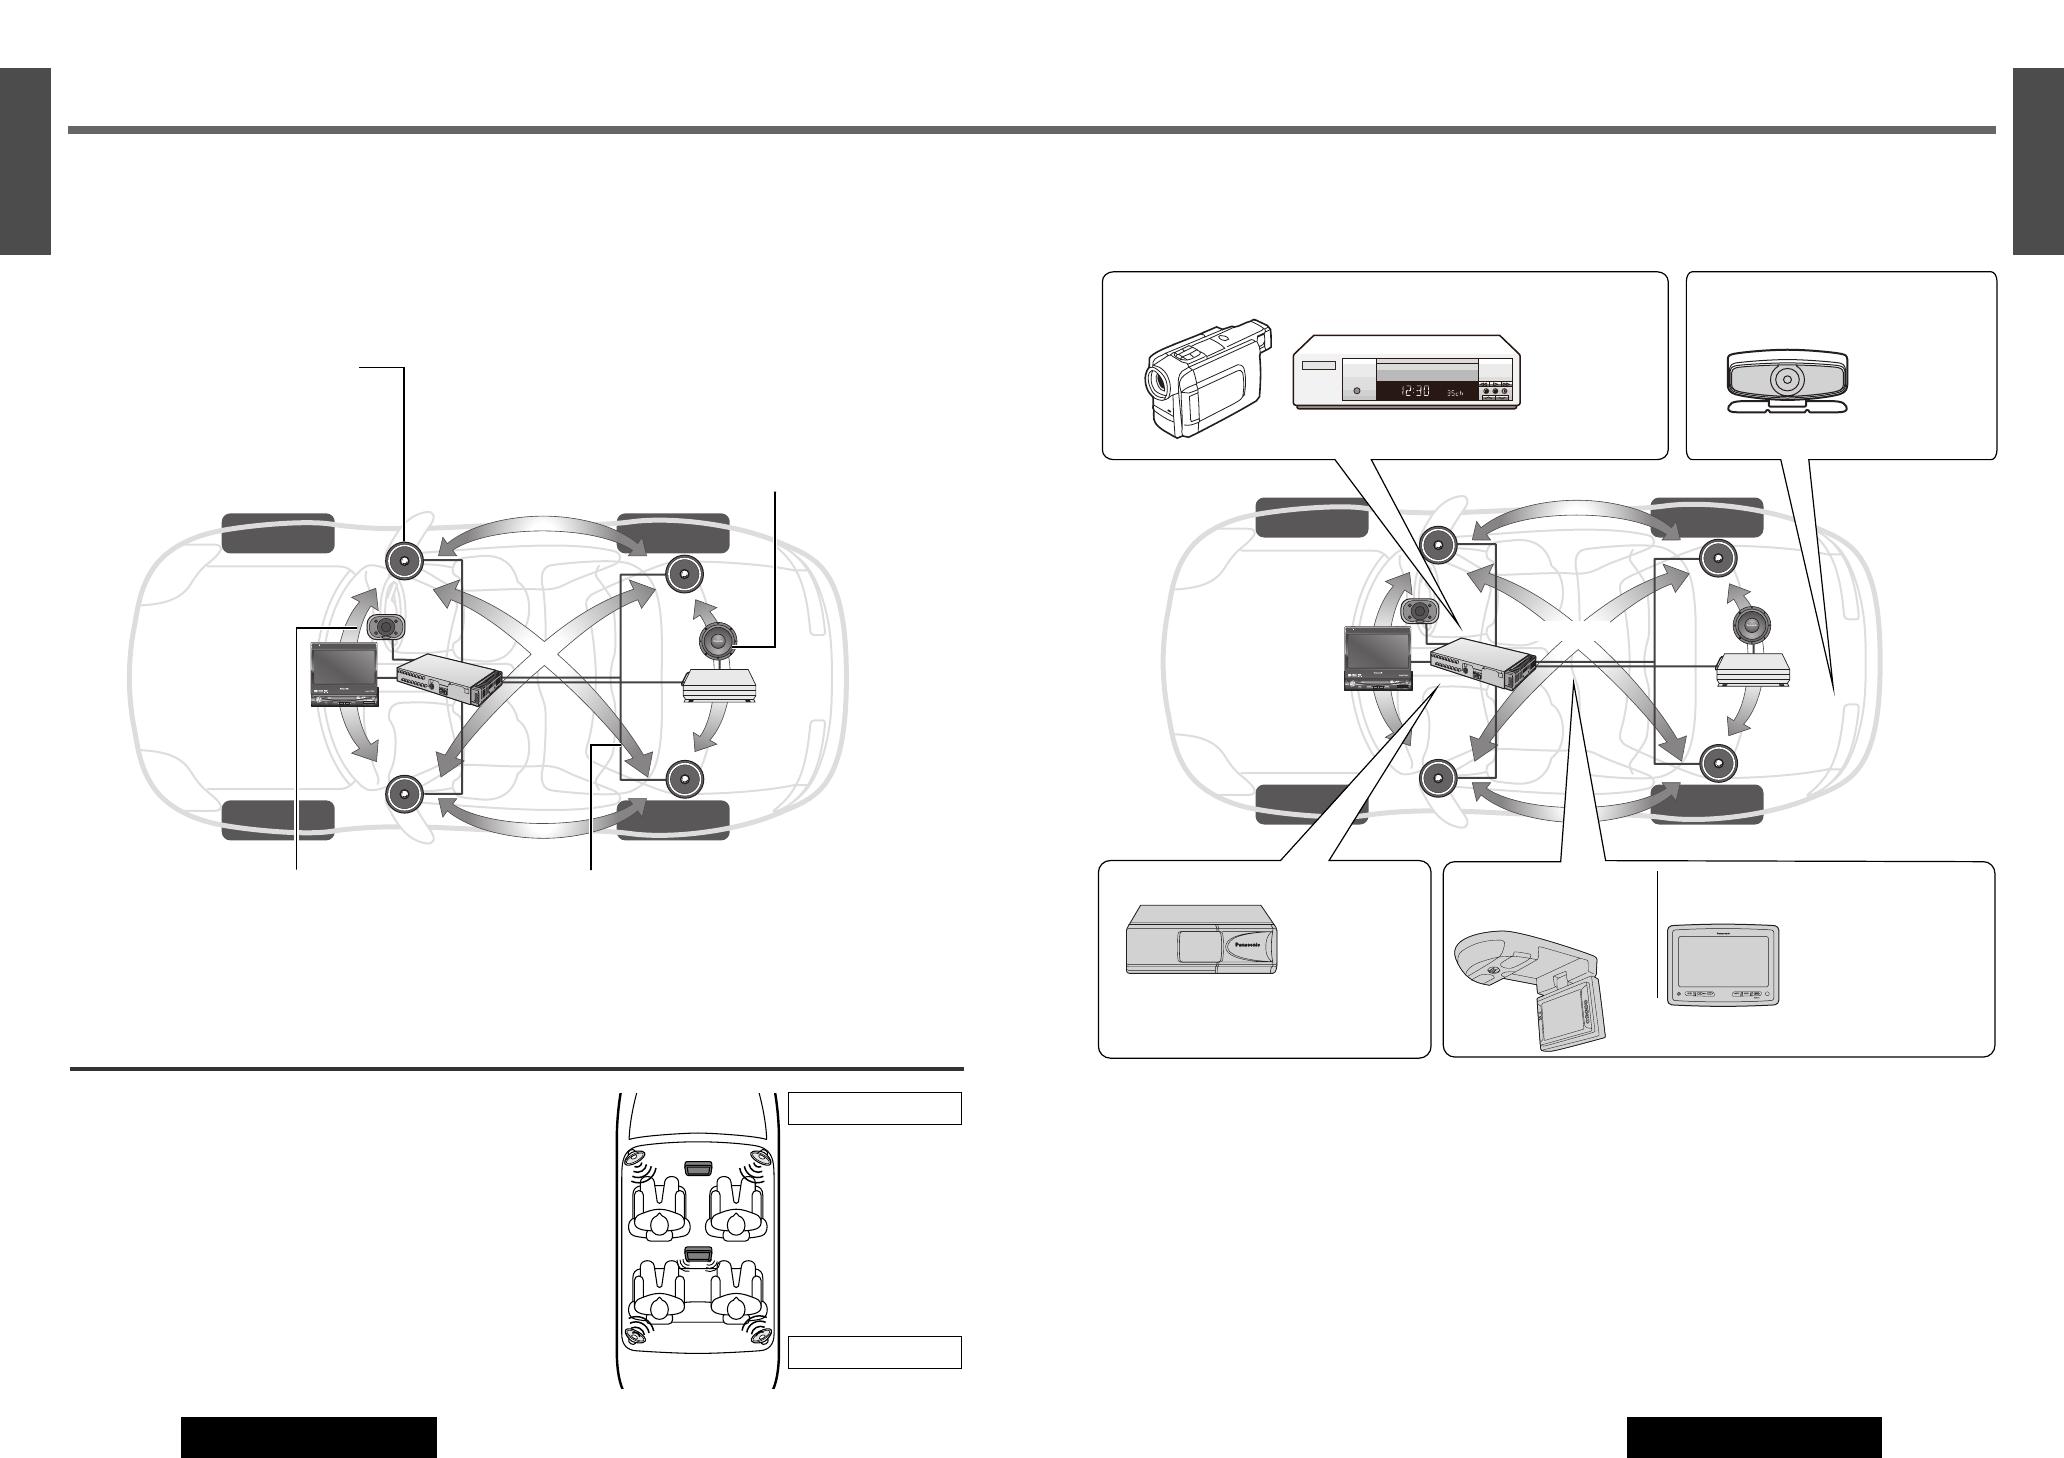
System Upgrade (CQ-VD7700U)
ENTER
TILT
OPEN
VOLUME
MUTE NAVI DISP
CQ-VD7700U
MODE
OPEN / CLOSE
DISC
POWER ASPECT
P
·
MODE
NAVIGATION
SD CARD
TRACK/
CHANNEL
ASP
IN-DASH 7 INCH WIDE COLOR LCD TV / DVD / SD RECEIVER
OPEN / CLOSE
CQ-VD7700U
TILT
CQ-VD7700U
Power amplifier
CQ-VD7700U
Recommended system: 5.1-channel Surround System
This unit has a built-in 5-channel amplifier. The procedure for setting up a 5.1-channel surround
system in order to play DVD software in a way that creates a “you are there” feel in a car is
described below.
Front Speakers: CJ-DVD177
Use the left and right front speakers (such as
speakers that are built into the front door).
Center Speaker: EAB-CF2
Install in the middle of the dashboard, near the
monitor.
Surround Speakers: CJ-SS162
Use the left and right rear speakers (such as speakers
that are built into the rear door or the rear deck)
Subwoofer: CJ-SW38
Because the audio imaging is not nearly as dependent
on the position where the subwoofer is installed as it
is with the other speakers, the subwoofer can be
installed anywhere that is convenient. (A separate
power amplifier for the subwoofer is needed.)
¡Details on wiring:
a Installation Instructions
¡Speaker settings:
a page 63-64
¡Details on wiring:
a Installation Instructions
Advanced system
Connecting the devices shown below allows you to enjoy a wonderful world consisting of a
wide variety of pictures and sounds.
About Rear Monitor (a page 74)
You can have different pictures and sound on the
front monitor and rear monitor at the same time.
Private Mode (a page 75)
You can mute the sounds from the rear speakers if
necessary.
(Example: The case of using CY-V7100U with the
headphones)
P
a
n
a
s
o
n
i
c
Camcorder Rear View
Camera
Note: Even if you are using this unit without installing a center speaker, surround speakers, or a subwoofer, it is still nec-
essary to adjust the speaker settings in order to adjust the sound balance. (a page 63)
INTELLIGENT SYSTEM
BS G-CODE
POWER
VCR
Refer to
“Connection with
VCR or
Camcorder”
(a Installation
Instructions).
Refer to
“Connection
with Rear View
Camera”
(a Installation
Instructions).
Rear Monitor
Main Unit Monitor
CD Changer: CX-DP880U
Refer to “CD
Changer
Control”
(a page 48).
OverHead Monitor:
CY-VMX6800U
CY-V7100U
PHONES
Headrest Monitor:
CY-V7100U, etc.
Refer to “Connection with Rear Monitor”
(a Installation Instructions)
Refer to “Connection
with Headrest Monitor”
(a Installation
Instructions)
Note: Two CD Changers can be connect-
ed at once by incorporating with CA-CD55
(option).
33
17
E
N
G
L
I
S
H
CQ-VD7700U/VD7500U
32
16
E
N
G
L
I
S
H
CQ-VD7700U/VD7500U
ENTER
TILT
OPEN
VOLUME
MUTE NAVI DISP
CQ-VD7500U
MODE
OPEN / CLOSE
DISC
POWERNAVIGATION
SD CARD
TRACK/
CHANNEL
IN-DASH 7 INCH WIDE COLOR LCD TV / DVD / SD RECEIVER
ASPECT
P
·
MODE
ASP
OPEN / CLOSE
CQ-VD7500U
TILT
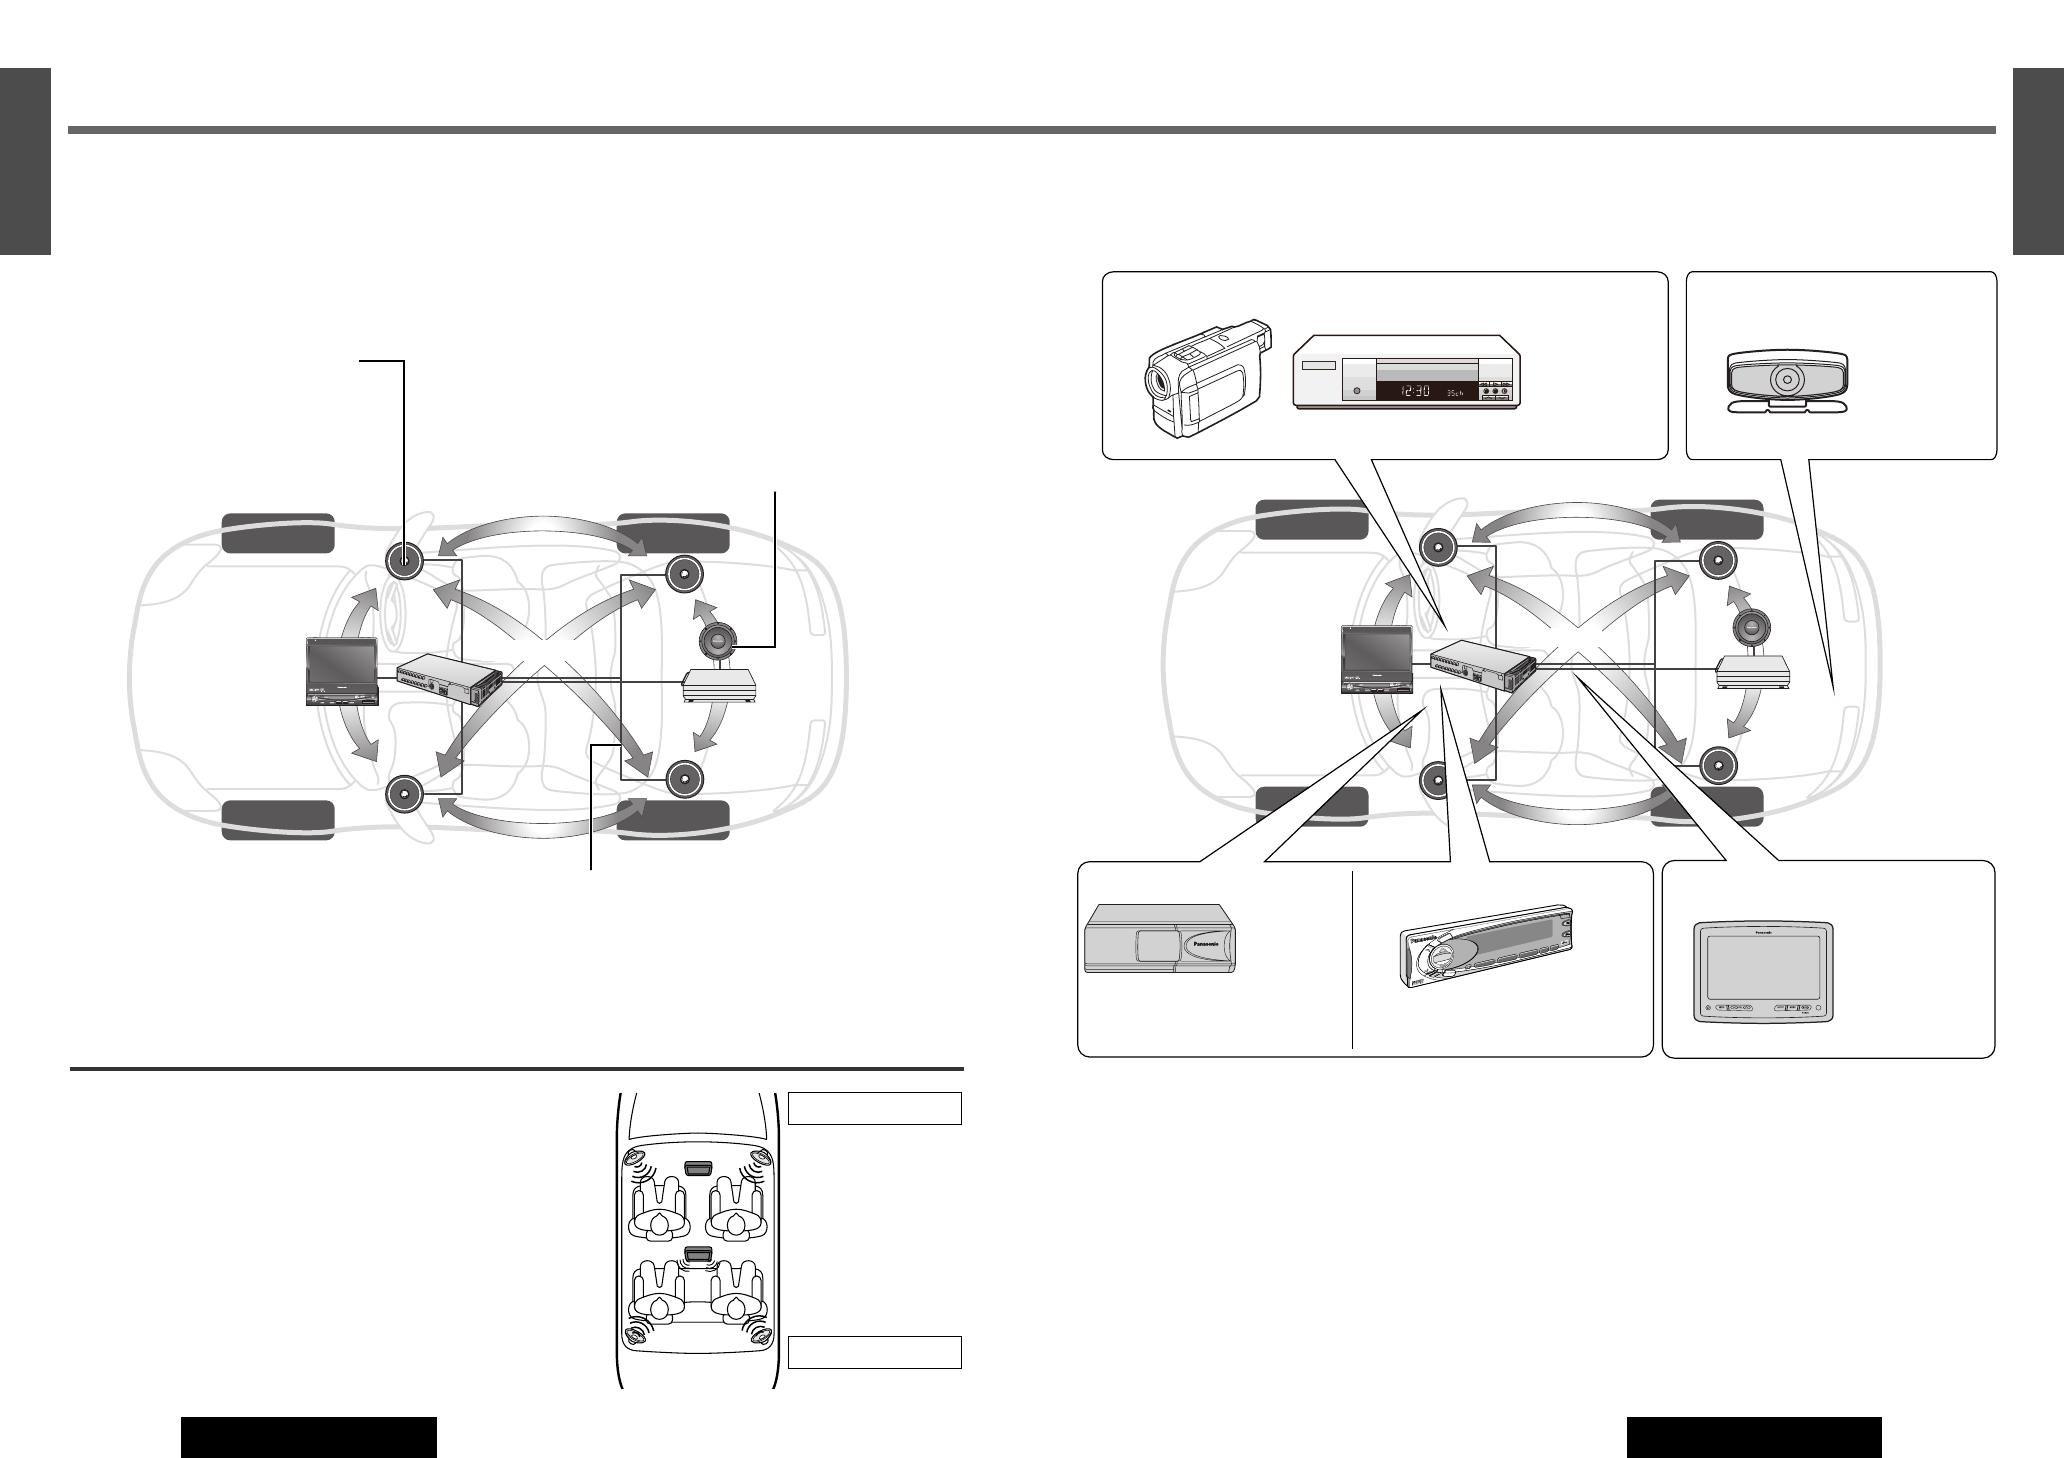
System Upgrade (CQ-VD7500U)
ENTER
TILT
OPEN
VOLUME
MUTE NAVI DISP
CQ-VD7500U
MODE
OPEN / CLOSE
DISC
POWERNAVIGATION
SD CARD
TRACK/
CHANNEL
IN-DASH 7 INCH WIDE COLOR LCD TV / DVD / SD RECEIVER
ASPECT
P
·
MODE
ASP
OPEN / CLOSE
CQ-VD7500U
TILT
CQ-VD7500U
Power amplifier
CQ-VD7500U
Recommended system: 4.1-channel Surround System
This unit has a built-in 4-channel amplifier. The procedure for setting up a 4.1-channel
surround system in order to play DVD software in a way that creates a “you are there” feel in a
car is described below.
Front Speakers: CJ-DVD177
Use the left and right front speakers (such as
speakers that are built into the front door).
Surround Speakers: CJ-SS162
Use the left and right rear speakers (such as speakers
that are built into the rear door or the rear deck)
Subwoofer: CJ-SW38
Because the audio imaging is not nearly as dependent
on the position where the subwoofer is installed as it
is with the other speakers, the subwoofer can be
installed anywhere that is convenient. (A separate
power amplifier for the subwoofer is needed.)
¡Details on wiring:
a Installation Instructions
¡Speaker settings:
a page 66
¡Details on wiring:
a Installation Instructions
Note: When a DVD audio disc is
playing, no digital audio data
comes out on the optical output.
Advanced system
Connecting the devices shown below allows you to enjoy a wonderful world consisting of a
wide variety of pictures and sounds.
About Rear Monitor (a page 74)
You can have different pictures and sound at the
front monitor and rear monitor at the same time.
Private Mode (a page 75)
You can mute the sounds from the rear speakers if
necessary.
(Example: The case of using CY-V7100U with the
headphones)
P
a
n
a
s
o
n
i
c
Camcorder Rear View
Camera
Note: Even if you are using this unit without installing surround speakers or a subwoofer, it is still necessary to adjust the
speaker settings in order to adjust the sound balance.
INTELLIGENT SYSTEM
BS G-CODE
POWER
VCR
Refer to
“Connection with
VCR or
Camcorder”
(a Installation
Instructions).
Refer to
“Connection
with Rear View
Camera”
(a Installation
Instructions).
Rear Monitor
Main Unit Monitor
CY-V7100U
PHONES
Headrest Monitor: CY-V7100U,
etc.
Refer to
“Connection with
Headrest Monitor”
(a Installation
Instructions)
CD Changer: CX-DP880U
Note: Two CD Changers can be
connected at once by incorporating
with CA-CD55 (option).
S
O
U
R
C
E
S
E
L
VOL
S
O
U
R
C
E
1
2
3
4
D
R
C
O
M
P
POSI
S
P
C
D
IM
M
U
T
E
A
C
3
0
0
s
u
p
e
r
b
r
i
g
h
t
m
u
l
t
i
-
c
o
l
o
r
d
i
s
p
l
a
y
&
3
0
w
P
o
w
e
r
A
m
p
l
i
f
i
e
r
f
o
r
C
e
n
te
r
S
p
e
a
k
e
r
D
IGIT
A
L
PR
O
LO
G
IC
D
I
G
A
T
A
L
S
U
R
R
O
U
N
D
P
R
O
C
E
S
S
O
R
P
O
S
I
T
I
O
N
D
IM
M
E
R
S
P
AC
E
PWR
Refer to “CD
Changer
Control”
(a page 48).
Digital Surround Processor:
CY-AC300
Refer to “Connection with Digital
Surround Processor” (a Installation
Instructions)
ENTER
TILT
OPEN
VOLUME
MUTE NAVI DISP
CQ-VD7500U
MODE
OPEN / CLOSE
DISC
POWERNAVIGATION
SD CARD
TRACK/
CHANNEL
IN-DASH 7 INCH WIDE COLOR LCD TV / DVD / SD RECEIVER
ASPECT
P
·
MODE
ASP
OPEN / CLOSE
CQ-VD7500U
TILT
ENTER
TILT
OPEN
VOLUME
MUTE NAVI DISP
CQ-VD7500U
MODE
OPEN / CLOSE
DISC
POWERNAVIGATION
SD CARD
TRACK/
CHANNEL
IN-DASH 7 INCH WIDE COLOR LCD TV / DVD / SD RECEIVER
ASPECT
P
·
MODE
ASP
OPEN / CLOSE
CQ-VD7500U
TILT

ENTER
TILT
OPEN
VOLUME
MUTE NAVI DISP
CQ-VD7700U
MODE
OPEN / CLOSE
DISC
POWERNAVIGATION
SD CARD
TRACK/
CHANNEL
IN-DASH 7" WIDESCREEN COLOR LCD MONITOR TV / DVD / SD RECEIVER
ASPECT
P
·
MODE
ASP
ENTER
TILT
MUTE MODE
ENTER
35
19
E
N
G
L
I
S
H
CQ-VD7700U/VD7500U
34
18
E
N
G
L
I
S
H
CQ-VD7700U/VD7500U
E
N
T
E
R
PWR NAVI MODE MENU
CHAPTER
ASPECT
P-MODE
TRACK
NAVIGATION
STOP
TOP MENU
DVD / SD MENU
ST/ MONO
CH1 CH2
RANDOM
RETURN
OSD
RET
RAND
AUDIO
ANGLE
REP
SUB
SPACE MUTE
VOL
GRP
DISP
123
456
7
A
8
0
9
PAG E
SCAN
PAUSE PLAY
SUBTITLE
REPEAT
SCROLL
TITLE / CHAPTER
VOL
CAR AV
PWR
MUTE
MODE
(a page 36)
(a page 38, 42)
(a page 50)
General
(a page 46)
(a page 37)
(a page 37)
(a page 48)
TV
DVD/VCD (Video CD)/CD/MP3
Radio(AM/FM)
VTR1
VTR2
SD-Card (MPEG4/MP3/AAC/JPEG)
* Selectable only when a CD changer is connected.
[MUTE]
[]
(OPEN/CLOSE)
[MODE] (POWER)
TILT
CQ-VD7700U
OPEN / CLOSE
OPEN / CLOSE
CQ-VD7700U
TILT
[TILT]
[]][[]
(Adjust)
[VOLUME]
Power
Turn your car's ignition key to ACC or ON position.
ON: press [MODE] (POWER) on the display unit.
Press [PWR] or [MODE] on the remote control.
OFF: press [MODE] (POWER) again for more than
2 seconds on the display unit.
Press [PWR] again or [MODE] again for more
than 2 seconds on the remote control.
Source selection (Mode)
Press [MODE] to change the mode.
[PWR] (Power)
[MODE]
[MUTE]
[
}] [{] (VOL)
CH-C (CD Changer Control)*
Mode change on the Touch Panel
Touch and then touch a symbol in the .
A
B
Volume
[}] (VOLUME) :up
[
{] (VOLUME) :down
(on the remote control)
Setting Range:
–82 dB to 0 dB 0 to 40 (step)
default:
–
40 dB 18 (step)
(CQ-VD7700U) (CQ-VD7500U)
Note: The sound level for each source is stored in memory.
Mute
MUTE ON: press [MUTE].
MUTE OFF: press [MUTE] again.
Display Open/Close
OPEN
: press
[]
(OPEN/CLOSE).
CLOSE
: press
[]
(OPEN/CLOSE) again.
(After returning the lateral angle to the
neutral position.)
Notes:
¡
When the display unit is opened or closed, a loud beep
sounds three times.
¡
If the unit stops halfway, press
[]
(OPEN/CLOSE) again
to draw it all the way in.
¡Opening/closing the display can be done when the power
is off.
Tilt Angle
q
Press and hold [TILT] on the display unit for more
than 2 seconds.
w
Press []] or [[] to adjust. Setup is the same as
from MENU. Refer to “MENU: User Settings” for
details. (a page 54)
Notes:
¡
Vertical angle (TILT) is saved in the memory, so when the
display unit is drawn out next, it is automatically set at
the angle and in the position adjusted before.
¡After adjusting its angle, also adjust the brightness to
make it easy for you to watch. (
a page 58)
¡The car model and installation conditions may impose
some restrictions on the adjustment of the monitor's
angle.
Folding Down the Display
Temporarily
Fold Down: press [TILT] on the display unit.
Raise: press [TILT] again on the display unit.
Note: Even when the unit power is off, you can fold down
the display temporarily.
Warning:
Do not touch the unit while the display
is moving. Inserting hands, fingers or foreign
objects into the unit can cause injuries and
damage to the unit.
Cautions:
¡
Avoid physical shock to the monitor.
¡Do not place any object on the display unit, or subject
it to undue force.
¡Do not move the display forcibly.
¡
The monitor movable range may be limited by the type of
car, a position where the display is mounted, etc.
Remote Control Sensor
Example: DVD VIDEO
A
B
Up
Down
or
[ ]] [[ ]
(adjust)

ENTER
TILT
OPEN
VOLUME
MUTE NAVI DISP
CQ-VD7700U
MODE
OPEN / CLOSE
DISC
POWER ASPECT
P
·
MODE
NAVIGATION
SD CARD
TRACK/
CHANNEL
ASP
IN-DASH 7" WIDESCREEN COLOR LCD MONITOR TV / DVD / SD RECEIVER
OPEN / CLOSE
CQ-VD7700U
TILT
ENTER
MODE
21
E
N
G
L
I
S
H
CQ-VD7700U/VD7500U
36
20
E
N
G
L
I
S
H
CQ-VD7700U/VD7500U
Note: To go back to regular mode, press [OSD] (OSD OFF) or touch [OPERATION OFF].
❑
Preset Channels
This function can search for channels automatically. Up to 18 channels can be stored.
Auto Preset Memory
Press and hold [}] or [{] for more than 2 seconds.
[}]: the search starts from ch. 2 and proceeds successively.
[{]: the search starts from ch. 69 in reverse succession.
Touch and hold for more than 2 seconds. Search starts from ch.2 successively.
¡A stored channel can be renewed every time you store another channel.
¡The unit may receive a channel that has poor-quality images depending on broadcasting conditions.
¡The search returns to the start position if there is no receivable channel.
Preset Channel Calling
Press [}] or [{] to select the channel.
Touch a preset channel number on the touch panel. (Example: channel number 17. Touch .)
Panel
Remote
Panel
Remote
You can view the images and listen to the sounds from the connected external devices in the VTR1 mode and VTR2 mode
respectively.
VTR1/VTR2 Mode
Press [MODE] to change to VTR1 or VTR2 mode.
Touch or .
Notes:
¡You can set up the system so that the VTR mode is not select-
ed (VTR skip). (a page 70)
(VTR set to NAVI INPUT is not skipped even if VTR skip is set
to on.)
¡VTR1 and VTR2 terminals are not used for the Panasonic car
navigation system (available in future). Refer to “Installation
Instructions” and “NAVI SETUP” for setting. (a page 68)
Panel
Remote
Example:
: Camcorder
: VCR
VTR1
VTR2
VTR1-IN
VTR2-IN
For details (a Installation Instructions)
CQ-VD7700U
Hide-away Unit
TV Tuner/VTR (External Devices)
TV Mode
Press [MODE] to change to TV mode.
Touch .
Channel Setting
[[] (CHANNEL): up
[]] (CHANNEL): down
Press and hold [[] (CHANNEL) or
[]] (CHANNEL) for more than 0.5 seconds.
Seeking will start.
Direct Channel Selection
Enter a channel number by pressing [0] to [9].
Example: Channel Number 17
Press [1] and [7].
Not available.
Panel
Remote
Panel
Remote
1
2
It is necessary to install the supplied antenna to receive TV broadcasts. Refer to the description on mounting the TV
antenna. (
a
Installation Instructions)
E
N
T
E
R
PWR NAVI MODE MENU
CHAPTER
ASPECT
P-MODE
TRACK
NAVIGATION
STOP
TOP MENU
DVD / SD MENU
ST / MONO
CH1 CH2
RANDOM
RETURN
OSD
RET
RAND
AUDIO
ANGLE
REP
SUB
SPACE MUTE
VOL
GRP
DISP
123
456
7
A
8
0
9
PAG E
SCAN
PAUSE PLAY
SUBTITLE
REPEAT
SCROLL
TITLE / CHAPTER
VOL
CAR AV
1 2 3
4 5 6
7 8
0
9
MODE
OSD
[MODE]
[ ]] [[ ]
(CHANNEL)
[}] [{]
[0] to [9]
(Direct channel
selection)
[MODE]
[ ]] [[ ] (CHANNEL)
[}] [{]
Current channel number
Sub-LCD
(a page 76)
Mode selection
Operation off
Preset channel
calling
Auto preset memory
Channel selection
TV Tuner
VTR
37
When not in operation mode, Touch the center of touch panel [Area A] to show operation display. (a page 24)
[OSD]

ENTER
TILT
OPEN
VOLUME
MUTE NAVI DISP
CQ-VD7700U
MODE
OPEN / CLOSE
DISC
POWERNAVIGATION
SD CARD
TRACK/
CHANNEL
IN-DASH 7" WIDESCREEN COLOR LCD MONITOR TV / DVD / SD RECEIVER
ASPECT
P
·
MODE
ASP
39
23
E
N
G
L
I
S
H
CQ-VD7700U/VD7500U
38
22
E
N
G
L
I
S
H
CQ-VD7700U/VD7500U
Go to Beginning
Indicates compatible disc types.
: next track (chapter)
:
beginning of the current track (chapter)
Previous track (chapter) (Touch twice.)
[d]: next track (chapter)
[s]:
beginning of the current track (chapter)
Previous track (chapter) (Press twice.)
❑
Basic Operation
Operations vary according to the disc. For details, refer to the guide
provided with the disc.
Note: When there are no operation buttons
you want to operate, touch .
Operations
Panel Remote
Fast Forward/
Fast Reverse
Touch and hold
: fast forward
: fast reverse
Press and hold
[d]: fast forward
[s]: fast reverse
Stop
Touch .
Touch , and playback resumes where
(Stop) was touched. To cancel resume,
touch again while stopping.
Press [3] (STOP).
Press [5] (PLAY) again, and play will
resume from the point where [3] (STOP)
was pressed. (Continued playback function)
To cancel continued playback, press [3]
(STOP) again in the stop mode.
Pause
Touch .
To resume playback, touch or .
Press [y] (PAUSE).
To resume playback, press [5] (PLAY) or
[y](PAUSE) again.
Slow
Playback
Touch and hold during pause, and play-
back is at about 1/3 normal speed.
Touch to resume normal playback.
Touch to pause again.
Press and hold [d] in the pause mode.
Playback is at about 1/3 normal speed.
To resume normal playback, press [5]
(PLAY).
To pause, press [y](PAUSE) again.
Repeat
Play
Touch .
Touch again to cancel.
Press [REP] (REPEAT).
Press [REP] (REPEAT) again to cancel.
Random
DVD
AUDIO
DVD
AUDIO
Touch .
Touch again to cancel.
Press [RAND] (RANDOM).
Press [RAND] (RANDOM) again to cancel.
Page
Touch to change the still image. Press [PAGE] (SCROLL) to change the still
image.
Note: When playing a DVD video, there are cases where it is not possible to return to
the start of a chapter that spans 2 titles. (a page 88)
Release to resume playback.
The speed changes if the button is held down as follows (except DVD AUDIO).
Regular speed /1.5 times (DVD Video) /10 times (DVD Video) /20 times
Note: Reverse slow playback is not possible.
Random playback is done in the same group.
DVD
VIDEO
DVD
AUDIO
VIDEO
CD
DVD
VIDEO
DVD
AUDIO
VIDEO
CD
DVD
VIDEO
DVD
AUDIO
VIDEO
CD
DVD
VIDEO
DVD
AUDIO
VIDEO
CD
DVD
VIDEO
VIDEO
CD
DVD
VIDEO
DVD
AUDIO
VIDEO
CD
DVD
VIDEO
DVD
AUDIO
VIDEO
CD
DVD/Video CD Player
Video CD mode displayDVD mode display
Audio format
(a page 88)
Mode display
Operation buttons Shows next operation buttons
Chapter number
Mode display Playing time
Title number
Operating buttons Sound setting
[u] (Eject)
(lights when a disc is in the slot)
[3] (STOP)
[y] (PAUSE)
[5] (PLAY)
[s][d]
(a page 39)
[REP]
(REPEAT)
[MODE]
E
N
T
E
R
PWR NAVI MODE MENU
CHAPTER
ASPECT
P-MODE
TRACK
NAVIGATION
STOP
TOP MENU
DVD / SD MENU
ST/ MONO
CH1 CH2
RANDOM
RETURN
OSD
RET
RAND
AUDIO
ANGLE
REP
SUB
SPACE MUTE
VOL
GRP
DISP
123
456
7
A
8
0
9
PAG E
SCAN
PAUSE PLAY
SUBTITLE
REPEAT
SCROLL
TITLE / CHAPTER
VOL
CAR AV
MODE
RAND
REP
PAGE
CAR AV
MODE
ENTER
C
Q
-
V
D
7
7
0
0
U
[OPEN]
[MODE]
[]][[]
(a page 39)
[PAGE]
(SCROLL)
Label side
Caution: When the disc is inserted or ejected, to
prevent disc scratches never exert any downward
force on the disc.
Notes:
¡Due to limitations of certain discs, some DVD video and
Video CD discs may not operate as described in these
Operating Instructions. Refer to the disc jacket for fur-
ther details.
¡This unit does not support DVD and Video CD karaoke
functions.
Disc Insert
¡Press [OPEN] to open the front panel.
¡Insert the disc horizontally and gently.
¡Push the front panel up to close it.
¡
The mode that supports the disc is selected, and playback starts.
¡The audio/video format is automatically identified.
(a page 88)
¡When the menu screen appears, see “DVD Menu/Video
CD Menu” on page 40.
When a DVD or Video CD is in the player, press [MODE]
or touch a symbol to change to DVD or Video CD player
mode and playback starts.
Notes:
¡Do not insert a disc when disc indicator or eject
button lights because a disc is already loaded.
¡
The power will be turned on automatically when a disc is loaded.
¡You can play a disc even if the monitor is closed.
¡The sound may be interrupted for a few moments while
the audio format is being identified.
Disc Eject
¡Press [OPEN] to open the front panel.
¡Press [u] to stop playback and eject the disc.
(Press [u] again to reload the disc.)
Note: If you leave a disc in the slot for more than 30 sec-
onds after its ejection, the disc will be automatically
reloaded after a loud beep is emitted three times.
Cautions:
¡Please refer to page 87 for disc-related matters.
¡Do not insert foreign matter into the disc slot.
Sub-LCD
(a page 76)
[RAND]
(RANDOM)
When not in operation mode, Touch the center of touch panel [Area A] to show operation display. (a page 24)

41
25
E
N
G
L
I
S
H
CQ-VD7700U/VD7500U
40
24
E
N
G
L
I
S
H
CQ-VD7700U/VD7500U
Notes:
¡If no operation is performed for 5 seconds,
the display returns to the regular mode.
¡This unit can perform playback only in 2-
channel stereo for the 192 kHz DVD audio
format.
Use the “Prologic II” function for the multi-
channel playback with this format.
¡It may not be possible to switch the lan-
guage unless the unit is at the DVD menu
(a page 40) or is at the DVD settings.
(a page 67)
¡The language on the DVD settings takes pri-
ority when the power is turned on or the
disc is loaded. (a page 67)
¡The number of languages depends on the
disc. Some discs have only one language or
have no language.
¡About DVD Video/Audio Wide Dynamic
Range (a page 73)
Indicates compatible disc types.
DVD
VIDEO
DVD
AUDIO
VIDEO
CD
Switching the
Subtitle Language
Touch . (only for DVD VIDEO) Press [SUB] (SUBTITLE) during playback.
❑
Useful Functions
Operations
Panel Remote
VIDEO
CD
It is possible to change the subtitle language during play if multiple languages are
recorded on the disc.
Note: There may be a brief delay before the subtitles appear.
Switching the
Audio Language
Touch . Press [AUDIO] during playback.
It is possible to change the audio language during play if multiple audio languages are
recorded on the disc.
Switching the
Angle
Touch . (only for DVD VIDEO) Press [ANGLE] during playback.
For DVDs which contain scenes which have been shot simultaneously from a number of
different angles the same scene can be viewed from each of these different angles dur-
ing play.
Switching
between Stereo
and Monaural
Touch . Press [AUDIO] (ST/MONO).
It is possible to switch the audio between
stereo sound and monaural sound (L or R).
DVD
VIDEO
DVD
AUDIO
DVD
VIDEO
DVD
AUDIO
DVD
VIDEO
DVD
AUDIO
: the left channel audio is output on both the left and right speakers.
:
the right channel audio is output on both the left and right speakers.
: stereo sound
STEREO
MONO.R
MONO.L
Note: Operation symbols will be change whenever they are touched.
Note: When there are no play buttons you
want to operate, touch .
E
N
T
E
R
PWR NAVI MODE MENU
CHAPTER
ASPECT
P-MODE
TRACK
NAVIGATION
STOP
TOP MENU
DVD / SD MENU
ST / MONO
CH1 CH2
RANDOM
RETURN
OSD
RET
RAND
AUDIO
ANGLE
REP
SUB
SPACE MUTE
VOL
GRP
DISP
123
456
7
A
8
0
9
PAG E
SCAN
PAUSE PLAY
SUBTITLE
REPEAT
SCROLL
TITLE / CHAPTER
VOL
CAR AV
RET
AUDIO
ANGLE
SUB
GRP
1 2 3
4 5 6
7 8
0
9
CAR AV
[0] to [9]
(Title/chapter/track
/group Number)
(a page 40)
[DVD/SD MENU]
(a page 40)
[ANGLE]
[AUDIO]
(ST/MONO)
[RET] (RETURN)
[]][[] [}] [{]
[ENTER]
[SUB]
(SUBTITLE)
[GRP]
(TRACK/TITLE/
CHAPTER)
(a page 40)
DVD/Video CD Player(continued)
DVD Menu/
Video CD Menu
Use this menu during
playback to select content,
audio, subtitle, etc., from
a menu (the DVD/Video
CD menu) that is unique
to each disc.
q Touch . : DVD
Touch . : VCD
w Touch ,,, to select
the desired menu.
e Touch .
Touch to return the previous display.
q Press [DVD/SD MENU] .
(For the Video CD menu, press [RET]
(RETURN).)
w Press []], [[], [}] or [{] to select
the desired menu.
For a DVD/Video CD with playback con-
trol (a page 88), press [0] to [9].
e Press [ENTER].
To return the previous display, press [RET]
(RETURN).
❑
Chapter/Title Selection
Operations
During playback
Panel
During playback
Remote
Title Menu
If the DVD has multiple
titles recorded on it, it is
possible to select the pre-
ferred title from the title
menu to start playback.
q Touch and hold for more than 2
seconds.
w Touch ,,, to select
the desired title.
e Touch .
Touch to return the previous display.
q Press and hold [DVD/SD MENU] for
more than 2 seconds.
w Press []], [[], [}] or [{] to
select the desired title.
For a DVD with playback control
(a page 88), press [0] to [9].
e Press [ENTER].
To return the previous display, press [RET]
(RETURN).
Starting Playback
from a Specific
Chapter/Title/
Group/Track
q Touch to select input mode.
w Touch to to input desired
title/chapter/group/track number.
To input the number again, touch .
e Touch or . Playback will
start.
q Press [GRP] (TRACK/TITLE/CHAPTER)
to select the input mode. The mode
changes as shown at right every time
[GRP] (TRACK/TITLE/CHAPTER) is
pressed.
w Press [0] to [9] to input desired
title/chapter/group/track number.
To input the number again, press [RET]
(RETURN).
e Press [GRP] (TRACK/TITLE/CHAPTER).
Playback will start automatically.
DVD
VIDEO
VIDEO
CD
DVD
VIDEO
DVD
VIDEO
DVD
AUDIO
DVD VIDEO:
Regular Mode Chapter Number Input Title Number Input
DVD Audio:
Regular Mode Track Number Input Group Number Input
Notes:
¡For VCD mode, press the numerical key to enter a number directly.
¡If no operation is performed for 8 seconds after you have touched [GRP], the display
returns to regular mode.
¡If the title/chapter/track/group number is inputted and no operation is performed for 2
seconds, playback will start from the number of the title/chapter/track/group entered.
blinks when the
title/track selecting
blinks when the chapter/
group selecting
DVD
AUDIO
Playing bonus groups
Some discs contain bonus
groups. If a password screen
appears after selecting a
group, enter the password
with the numbered buttons.
Refer also to the disc’s jacket.
ENTER
TILT
OPEN
VOLUME
MUTE NAVI DISP
CQ-VD7700U
MODE
OPEN / CLOSE
DISC
POWERNAVIGATION
SD CARD
TRACK/
CHANNEL
IN-DASH 7" WIDESCREEN COLOR LCD MONITOR TV / DVD / SD RECEIVER
ASPECT
P
·
MODE
ASP
Repeat
Play
or
*
[REP]
(REPEAT)
Touch/Press.
Touch/Press again to cancel.
Current
File
Touch/Press.
Touch/Press again to cancel.
Current
Folder
Touch/Press and hold for more than 2 seconds.
Touch/Press and hold again to cancel.
Scan Play
The first 10 seconds
of each track/file
will be played.
[5] (SCAN) Touch/Press.
Touch/Press again to cancel.
43
27
E
N
G
L
I
S
H
CQ-VD7700U/VD7500U
42
26
E
N
G
L
I
S
H
CQ-VD7700U/VD7500U
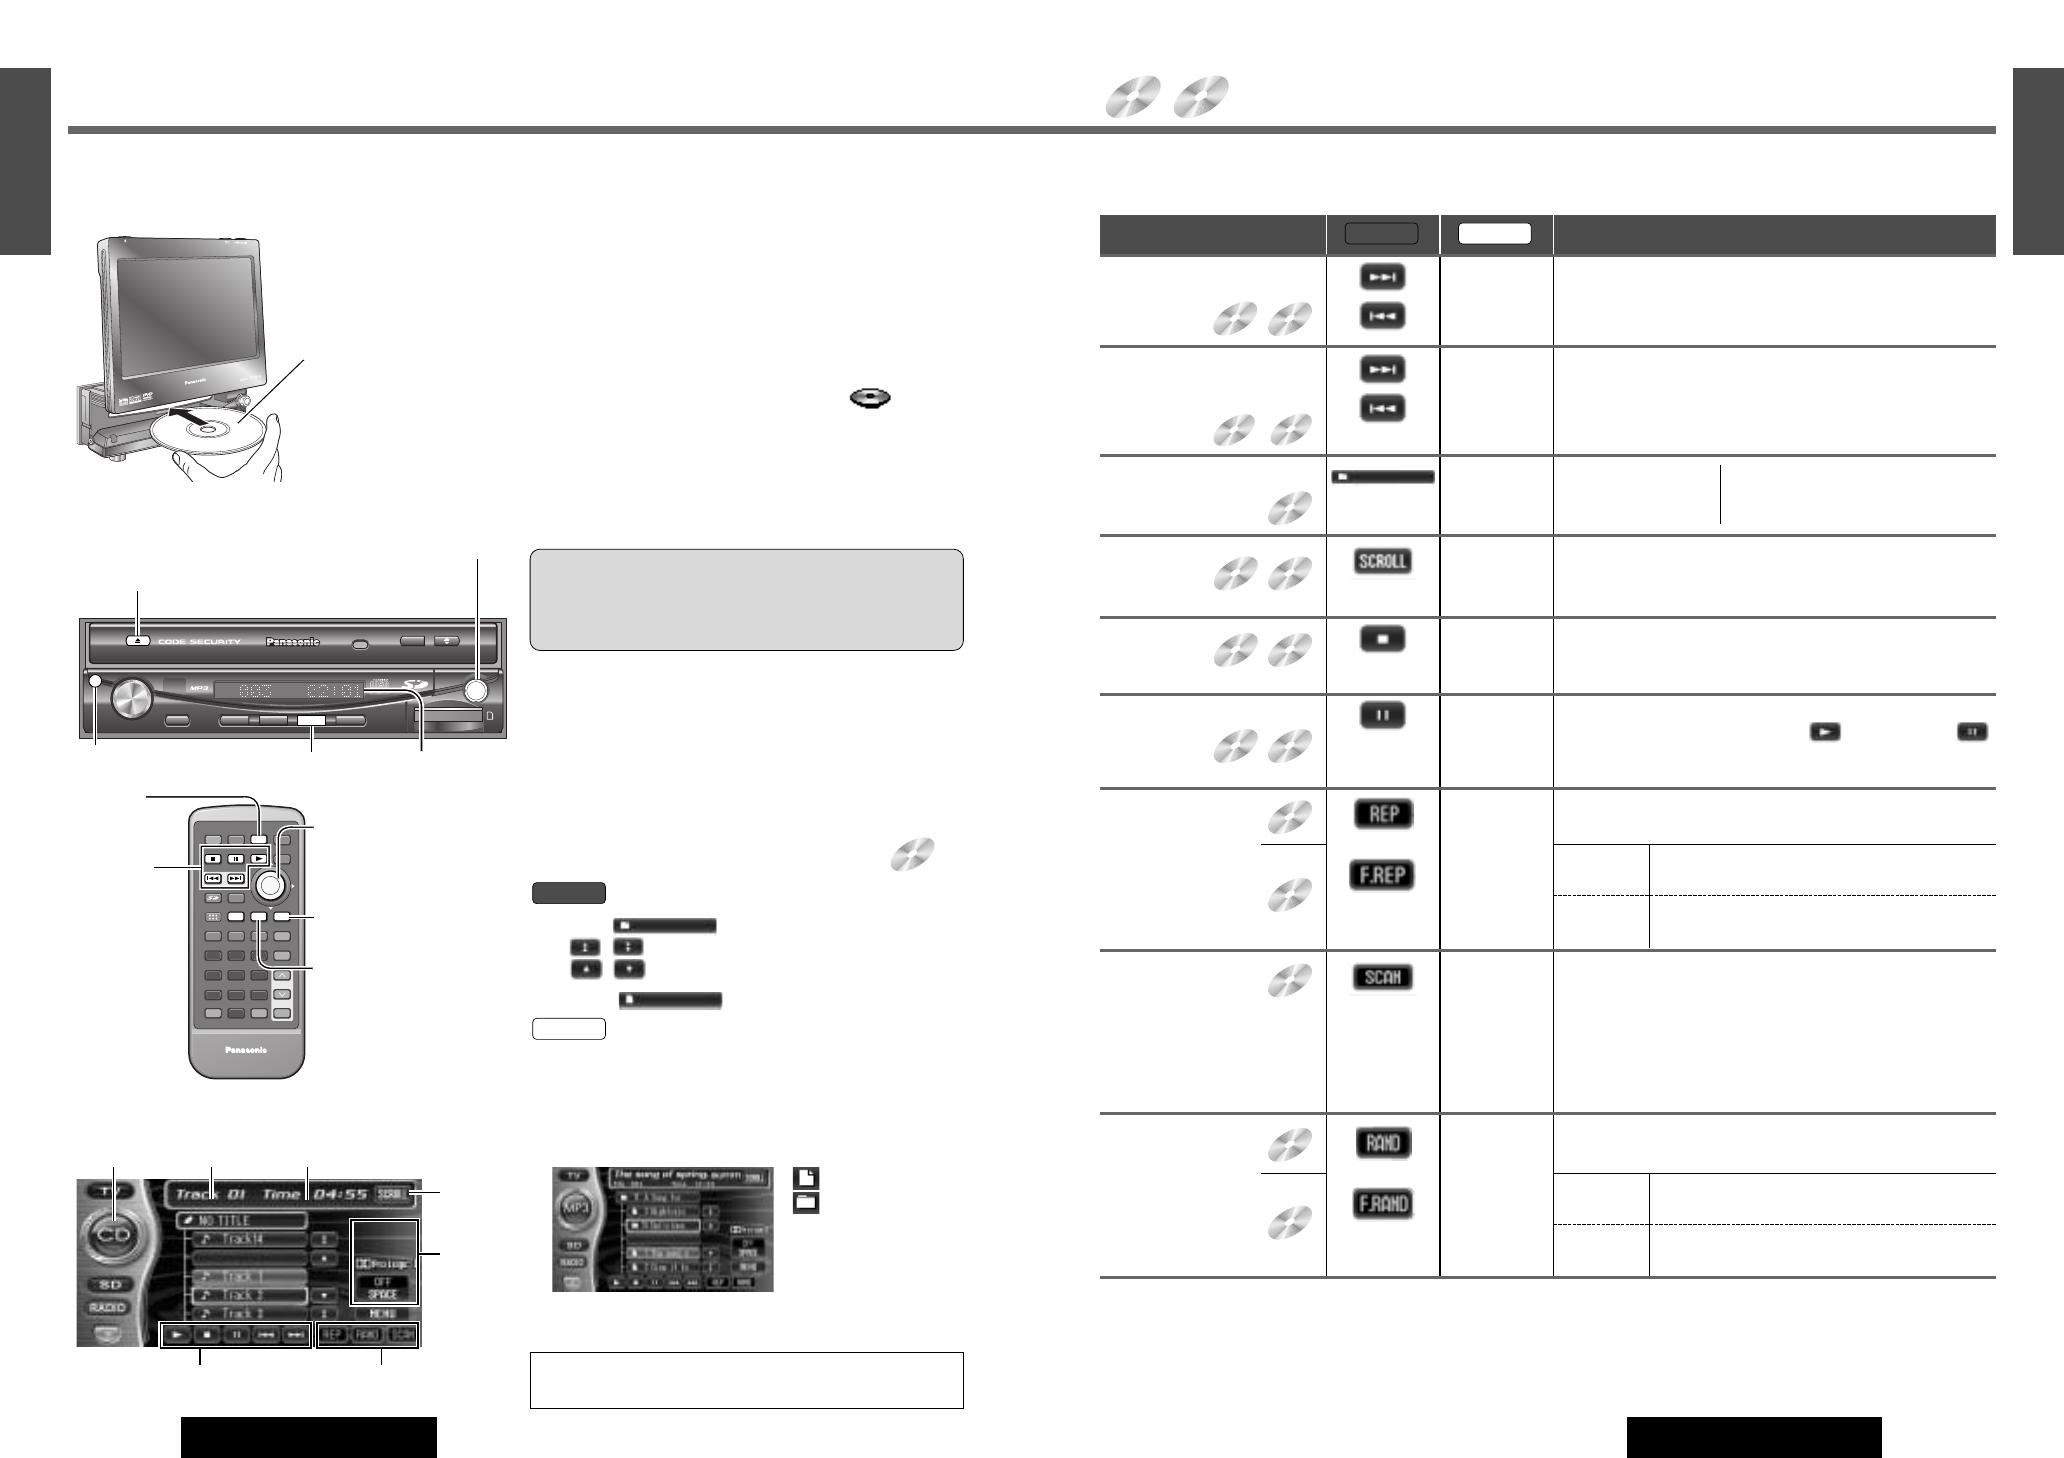
Indicates compatible disc types.
Go to Beginning
[d]
[s]
Next track/file
Beginning of the current track/file
Previous track/file (Touch/press twice.)
❑
Basic Operations
Operations
Panel Remote
Note: It is possible to press []] [[] on the display unit instead of [s] [d] on the remote control
.
Fast Forward/
Fast Reverse
[d]
[s]
Touch/Press and hold.
Fast forward
Fast reverse
Release to resume playback.
Folder
Selection
[}]
[
{]
Next folder
Previous folder
When the file list is displayed:
[
}]: previous folder
[
{]: next folder
Title
Scroll
[PAGE]
(SCROLL)
Touch/Press.
Stop
[3]
(STOP)
Touch/Press.
Pause
[y]
(PAUSE)
Touch/Press.
To resume playback, Touch/Press /[5] (PLAY) or
/[y](PAUSE) again.
CD
MP3
CD MP3
CD MP3
CD MP3
MP3
MP3
CD
MP3
CD
CD
CD MP3
CD/MP3 Player
[u] (Eject)
(lights when a disc is in the slot)
CD/MP3 mode display
Operation Buttons
Disc Insert
q Press [OPEN] to open the front panel.
w Insert a disc horizontally and gently.
When a CD or MP3 disc is in the player, press [MODE] or
touch a symbol to change to CD or MP3 disc player mode
and playback starts.
Notes:
¡Do not insert a disc when disc indicator or eject
button lights because a disc is already loaded.
¡The power will be turned on automatically when a disc is
loaded.
¡You can play a disc even if the monitor is closed.
¡To prevent disc scratches, never exert the downward force
on the disc when inserting or ejecting.
Disc Eject
¡Press [OPEN] to open the front panel.
¡Press [u] to stop playback and eject the disc.
(Press [u] again to reload the disc.)
Note: If you leave a disc in the slot for more than 30 sec-
onds after its ejection, the disc will be automatically
reloaded after a loud beep is emitted three times.
Cautions:
¡Please refer to page 87 for disc-related matters.
¡Do not insert foreign matter into the disc slot.
¡Do not pinch your finger or hand in the front panel.
Folder and File Selection
q
Touch (folder name) to select a folder.
, : scrolls up/down the file list by 1 page.
, : scrolls up/down the file list by 1 line.
w Touch (file name) to play.
q Press [ENTER] during playback.
w Press []], [[] , [}] or [{] to select a folder.
[]][[]: movement among different levels of trees
[}] [{]: movement in the same tree
e Press [ENTER].
Remote
Panel
Note: It is not possible to display the whole tree and file
list in a folder.
For “Folder selection order/MP3 file playback order”.
(a page 45)
: MP3 file
: Folder
(Lighted up symbols
include MP3 files.)
MP3
Mode display Track Number Playing time
Play Setting
Sound
Setting
Title/text
scroll
[3] (STOP)
[y] (PAUSE)
[5] (PLAY)
[s][d]
(a page 43)
[RAND]
(RANDOM)
[REP]
(REPEAT)
[MODE]
E
N
T
E
R
PWR NAVI MODE MENU
CHAPTER
ASPECT
P-MODE
TRACK
NAVIGATION
STOP
TOP MENU
DVD / SD MENU
ST/ MONO
CH1 CH2
RANDOM
RETURN
OSD
RET
RAND
AUDIO
ANGLE
REP
SUB
SPACE MUTE
VOL
GRP
DISP
123
456
7
A
8
0
9
PAG E
SCAN
PAUSE PLAY
SUBTITLE
REPEAT
SCROLL
TITLE / CHAPTER
VOL
CAR AV
MODE
RAND
REP
PAGE
CAR AV
[OPEN]
[MODE]
[ ] ] [ [ ] (Track/file)
[}] [{] (Folder)
Label side
Caution: When the disc is
inserted or ejected, to pre-
vent disc scratches never
exert any downward force on
the disc.
[]][[]
(Track/file)
[}] [{]
(Folder)
[PAGE]
(SCROLL)
*Touch Panel symbols will change to indicate current mode.
(see previous
page)
Random
Play
or
[RAND]
(RANDOM)
Touch/Press.
Touch/Press again to cancel.
All
Files
Touch/Press.
Touch/Press again to cancel.
All Files in the
Current Folder
Touch/Press and hold for more than 2 seconds.
Touch/Press and hold again to cancel.
MP3
CD
*
Sub-LCD
(a page 76)
ENTER
C
Q
-
V
D
7
7
0
0
U
When not in operation mode, Touch the center of touch panel [Area A] to show operation display. (a page 24)
MODE
ENTER

45
29
E
N
G
L
I
S
H
CQ-VD7700U/VD7500U
44
28
E
N
G
L
I
S
H
CQ-VD7700U/VD7500U
Folder selection order/MP3 file playback order (Example)
Notes:
¡This unit counts the number of folders irrespective
of the presence or absence of MP3 file.
¡If the selected folder does not contain any MP3
files, the nearest MP3 files in the order of playback
will be played.
¡Playback order may be different from other MP3
players even if the same disc is used.
¡“ROOT” appears when displaying the root folder’s
folder name.
Root Folder
(Root Directory)
Folder Selection
File Selection
Tree 1 Root Tree 2 Tree 3
2
1
3
4
5
q
w
e
r
6
16
~
In the order
In the order
q
r
~
: []][[]
: [}][{]
Tree 1 Root Tree 2
13
2
4
5
: MP3 files are included : No MP3 files
Playing Folder
Current playing file
Folder in the next
lower level of tree
Supported file systems and file names
Maximum number of files/folders
¡Maximum number of trees: 8
¡Maximum number of folders: 254 (Root folder is not included.)
¡Maximum number of files: 512
Note: If the number of files and folders exceeds the number mentioned above, successful playback may not be
performed.
Copyright
It is prohibited by copyright laws to copy, distribute and deliver copyrighted materials such as music without the approval
of the copyright holder except to enjoy yourself personally.
No warranty
Above description complies with our investigations as of December 2003. There is no warranty for reproducibility and dis-
playability of MP3.
Note: MP3 encoding software and writing software are not supplied with this model.
ISO 9660 Level 1/Level 2
Joliet*
Romeo
Apple Extension to ISO 9660
Supported file system Displayable folder names and file names
Name files and folders in accordance with the standard of each file system.
Refer to the instructions of writing software for details.
¡This player can display file names of up to 31 ASCII characters set in scroll
mode.
* Up to 15 letters can be displayed when scrolling in the Joliet system.
According to the standard, “á”, “ç”, etc. can be used. However, this unit can
not display those letters.
¡The unit recognizes only the ASCII character set. Chinese characters, accented
French characters and accented Spanish characters will be converted into aster-
isks.
CD/MP3 Player (continued)
This player allows you to play MP3 files recorded on CD-ROMs, CD-Rs
(Recordable), CD-RWs (Rewritable).
¡It is recommended that you set the bit rate to “128 kbps or more” and “Fixed”.
¡Bit rate of 8 kbps for MPEG-2 and sampling frequency of 16 kHz for MPEG-2 can not be reproduced.
¡VBR (Variable Bit Rate) is not supported.
¡The playback sound quality differs depending on the encoding software and the bit rate. For details refer to the user
manual of your encoding software.
■ Converting (encoding) audio data to an MP3 file
¡Do not record files other than MP3s or unnecessary folders on a disc. If many folders or files other than MP3s
are recorded on a disc, it may take some time before playback starts.
¡Use ISO 9660 file system (Extension of the ISO 9660 file systems are included.) (a page 45). APPLE HFS file
system is not supported. If files do not conform to ISO 9660 file system, they may not play normally, or the file or
folder names may not be displayed correctly.
¡Make sure to add the “.mp3” extension to each MP3 file name. A file with a different file name extension or none
at all will not play.
¡Although Multi session recording is supported, the use of Disc-at-Once is recommended. Make sure to close the
session when you finished recording on a disc.
¡Discs recorded by the packet writing software are not supported.
¡A playlist function is not supported. Record files and folders in the order in which you want them to be played.
Some writing software lets you specify the recording order by adding a prefix in the range of “01” - “99”, etc. to the
file name. For details refer to the user manual of your writing software.
Notes:
¡You may encounter trouble in playing MP3s or displaying the information of MP3 files recorded with certain writing
software or CD recorders (CD-R/RW drives).
¡If a disc contains both MP3 and CD-DA, only CD-DA data is reproduced properly. (MP3 files are played but no sound
is output).
■ Recording MP3 files on a CD-R/RW
What is MP3?
MP3, short for MPEG-1 Audio Layer 3, MPEG-2 Audio Layer 3 LSF (Low Sampling Frequency), is a standard for compress-
ing digital video data adopted for video CDs and similar media. It is one of the audio compression systems covered by
MPEG's (Motion Picture Experts Group) digital audio compression standards. What it does is reduce the number of bytes
in a song without detracting from the sound quality by eliminating big sound waves within the sound range that are imper-
ceptible to the human ear. This compression allows you to reduce the contents of a conventional music CD by a factor of
around 10. This means that you can record the contents of 10 music CDs on a single CD-R or CD-RW. (The figures refer
to data recorded on a 650 MB CD-R or CD-RW at a fixed bit rate of 128 kbps and a sampling frequency of 44.1 kHz.)
Points to Remember When Recording an MP3 Disc
Warning: Never assign the “.mp3” file name extension to a file that is not in the MP3 format. This may produce
noise from the speakers and cause speaker damage and can damage your hearing.

47
31
E
N
G
L
I
S
H
CQ-VD7700U/VD7500U
46
30
E
N
G
L
I
S
H
CQ-VD7700U/VD7500U
Manual Preset
Memory
Radio
Note: New stations overwrite existing saved stations after following this procedure.
Touch and hold.
to for more than 2 seconds.
Press and hold [1] to [6] on the remote
control for more than 2 seconds.
❑
One-touch Selection of a Station
Up to 6 stations can be saved in each FM1, FM2, FM3 and AM preset station memories.
Operations
Panel Remote
Auto Preset
Memory
Touch and hold for more than 2
seconds.
Press and hold [ENTER] for more than
2 seconds.
Preset Station
Calling
Touch to . Press [1] to [6] on the remote control.
Select a band and frequency (step w and e on the previous page).
Select a band. (step w on the previous page)
Select a band. (step w on the previous page)
The frequency blinks once, and the station is saved in the
memory.
¡The 6 stations with good reception will be automatically saved in the memory
under preset numbers 1
to 6.
¡Once set, the preset stations are sequentially scanned for 5 seconds each.
¡To stop the scanning, touch or press numbers [1] to [6].
ENTER
TILT
OPEN
VOLUME
MUTE NAVI DISP
CQ-VD7700U
MODE
OPEN / CLOSE
DISC
POWER ASPECT
P
·
MODE
NAVIGATION
SD CARD
TRACK/
CHANNEL
ASP
IN-DASH 7" WIDESCREEN COLOR LCD MONITOR TV / DVD / SD RECEIVER
OPEN / CLOSE
CQ-VD7700U
TILT
ENTER
MODE
Band
Stereo indicator
Mode display
[MODE]
[]] [[] (Tuning)
[ENTER] (Band)
Frequency
E
N
T
E
R
PWR NAVI MODE MENU
CHAPTER
ASPECT
P-MODE
TRACK
NAVIGATION
STOP
TOP MENU
DVD / SD MENU
ST / MONO
CH1 CH2
RANDOM
RETURN
OSD
RET
RAND
AUDIO
ANGLE
REP
SUB
SPACE MUTE
VOL
GRP
DISP
123
456
7
A
8
0
9
PAG E
SCAN
PAUSE PLAY
SUBTITLE
REPEAT
SCROLL
TITLE / CHAPTER
VOL
CAR AV
1 2 3
4 5 6
MODE
[1] to [6]
(Preset memory)
[]] [[]
(Tuning)
[ENTER]
(Band)
[MODE]
Radio Mode
Touch .
.
Press [MODE] to change to radio mode.
Remote
Panel
Band
Touch , , or .
Press [ENTER] to change band.
Note: The stereo indicator lights during
reception of an FM stereo broadcast.
Remote
Panel
1
2
Tuning
Touch TUNE : up
TUNE : down
[[]: up
[]]: down
Touch/press and hold [[] or []] for more than 0.5 seconds,
then release. Seeking will start and stop at next available sta-
tion.
Remote
Panel
3
FM1
FM2
FM3
AM
Band Selection
When not in operation mode, Touch the center of touch panel [Area A] to show operation display. (a page 24)
49
33
E
N
G
L
I
S
H
CQ-VD7700U/VD7500U
48
32
E
N
G
L
I
S
H
CQ-VD7700U/VD7500U
ENTER
TILT
OPEN
VOLUME
MUTE NAVI DISP
CQ-VD7700U
MODE
OPEN / CLOSE
DISC
POWER ASPECT
P
·
MODE
NAVIGATION
SD CARD
TRACK/
CHANNEL
ASP
IN-DASH 7" WIDESCREEN COLOR LCD MONITOR TV / DVD / SD RECEIVER
OPEN / CLOSE
CQ-VD7700U
TILT
ENTER
MODE
E
N
T
E
R
PWR NAVI MODE MENU
CHAPTER
ASPECT
P-MODE
TRACK
NAVIGATION
STOP
TOP MENU
DVD / SD MENU
ST / MONO
CH1 CH2
RANDOM
RETURN
OSD
RET
RAND
AUDIO
ANGLE
REP
SUB
SPACE MUTE
VOL
GRP
DISP
123
456
7
A
8
0
9
PAG E
SCAN
PAUSE PLAY
SUBTITLE
REPEAT
SCROLL
TITLE / CHAPTER
VOL
CAR AV
MODE
RAND
REP
1 2
5
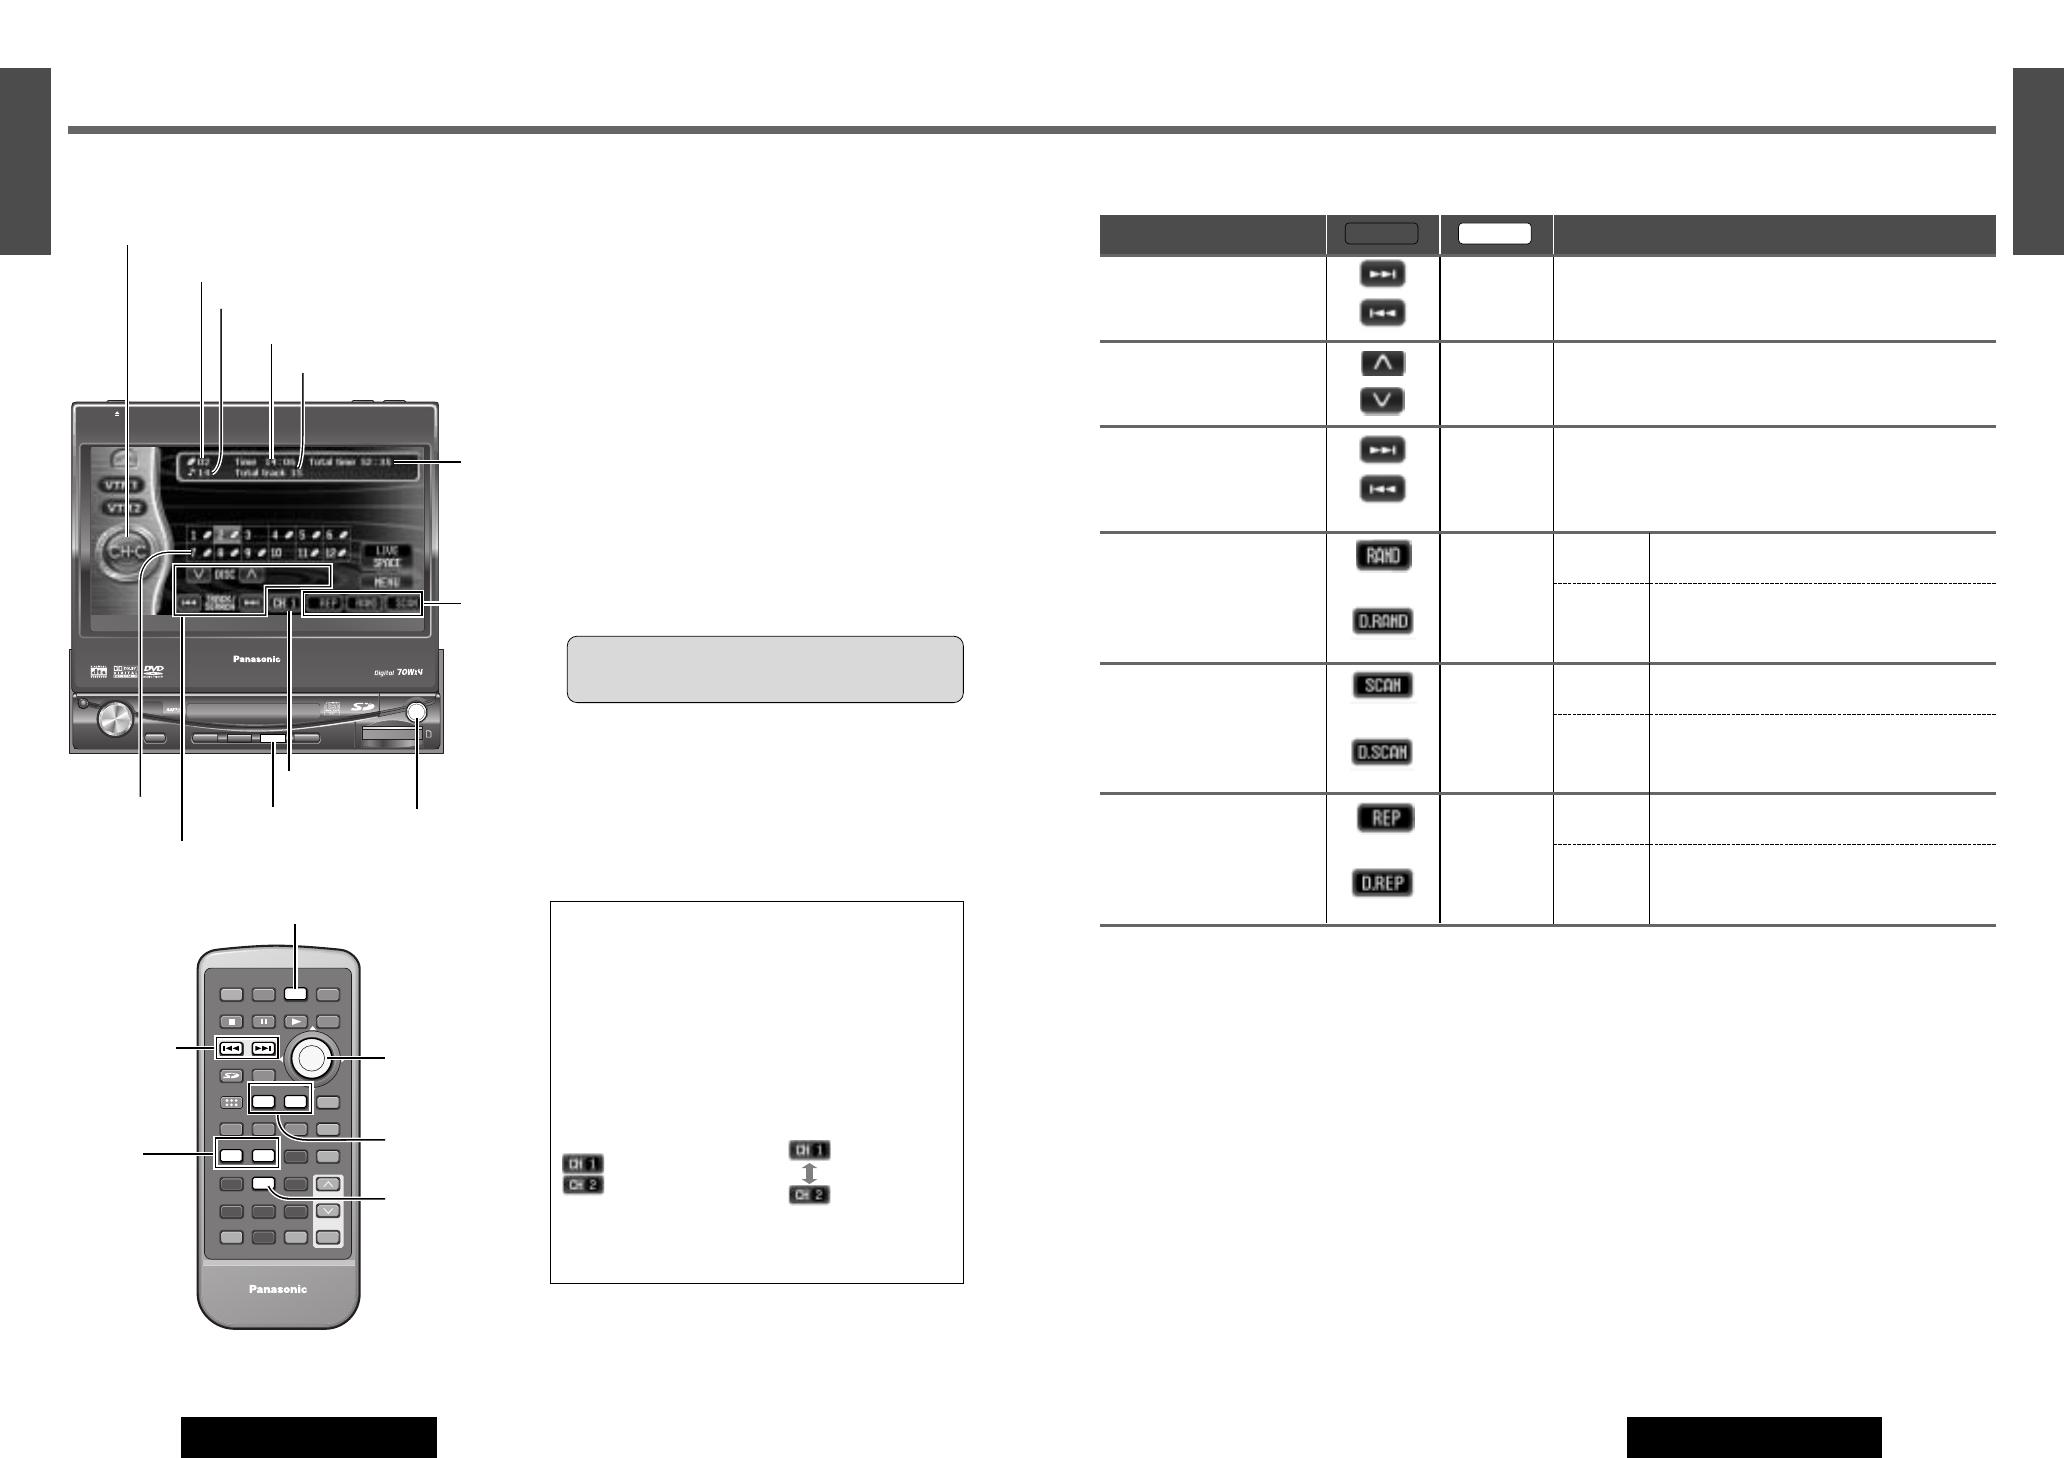
[MODE]
[ ] ] [ [ ] (TRACK)
[}] [{] (DISC)
[RAND] (RANDOM)
[REP] (REPEAT)
CD Changer Control
CD changer functions are designed for an optional
Panasonic CD changer unit.
Read the operating instructions for CD changer as well.
Preparation: Connect the CD changer (a Installation
instructions), and load a magazine (disc).
Caution: Please refer to page 87 for disc-related
matters.
Notes:
¡The power will be turned on automatically when a
magazine is loaded.
¡Load a magazine with CDs when “NO MAGAZINE” is
displayed.
¡
CD text is not supported in CD changer mode.
¡CD changer cannot play MP3 data recorded CD-
R/RW discs.
CD Changer Mode
Press [MODE] to change to CD changer mode and
playback starts.
System Expansion
The use of Dual CD Changer Selector CA-CD55
(option) allows you to make the following connec-
tions.
(a Installation Instructions)
Dual changers connection
Two changers can be connected to the terminals of
CA-CD55 respectively.
The changers are arranged as follows.
*/ [1]: CH 1
*/ [2]: CH 2
* Touch panel symbols will change to indicate these
current mode.
Mode display
Track number
Playing time
Total track number
Total time
Disc list
Operation buttons
Disc number
Play
setting
Changer number
[MODE]
[ ] ] [ [ ] (TRACK)
[}] [{] (DISC)
[d] (TRACK)
[s] (TRACK)
[1] (CH 1)
[2] (CH 2)
[5] (SCAN)
Track Selection
[d]
(TRACK)
[s]
(TRACK)
Next track
Beginning of the current track
Previous track (Touch/Press twice.)
❑ Basic Operations
Operations
Panel Remote
Disc Selection
[}] (DISC)
[{] (DISC):
Next disc
Previous disc
Fast Forward/
Fast Reverse
[d]
[s]
Touch/Press and hold.
Fast forward
Fast reverse
Release to resume playback.
Random Play
or
[RAND]
(RANDOM)
Touch/Press and hold for more than 2 sec-
onds.
Touch/Press and hold again to cancel.
All Tracks
Touch/Press.
Touch/Press again to cancel.
All Tracks
on the
Current
Disc
Scan Play
The first 10 seconds of each
track will be played.
or
[5] (SCAN)
Touch/Press and hold for more than 2 sec-
onds.
Touch/Press and hold again to cancel.
All Tracks
Touch/Press.
Touch/Press again to cancel.
1st Track
on Each
Disc
*
*
Repeat Play
or
[REP]
(REPEAT)
Touch/Press and hold for more than 2 sec-
onds.
Touch/Press and hold again to cancel.
Current
Track
Touch/Press.
Touch/Press again to cancel.
Current
Disc
*
Note: It is possible to press []] [[] on the display unit instead of [s] [d] on the remote control
.
* Touch panel symbols will change to indicate these current mode.
When not in operation mode, Touch the center of touch panel [Area A] to show operation display. (a page 24)
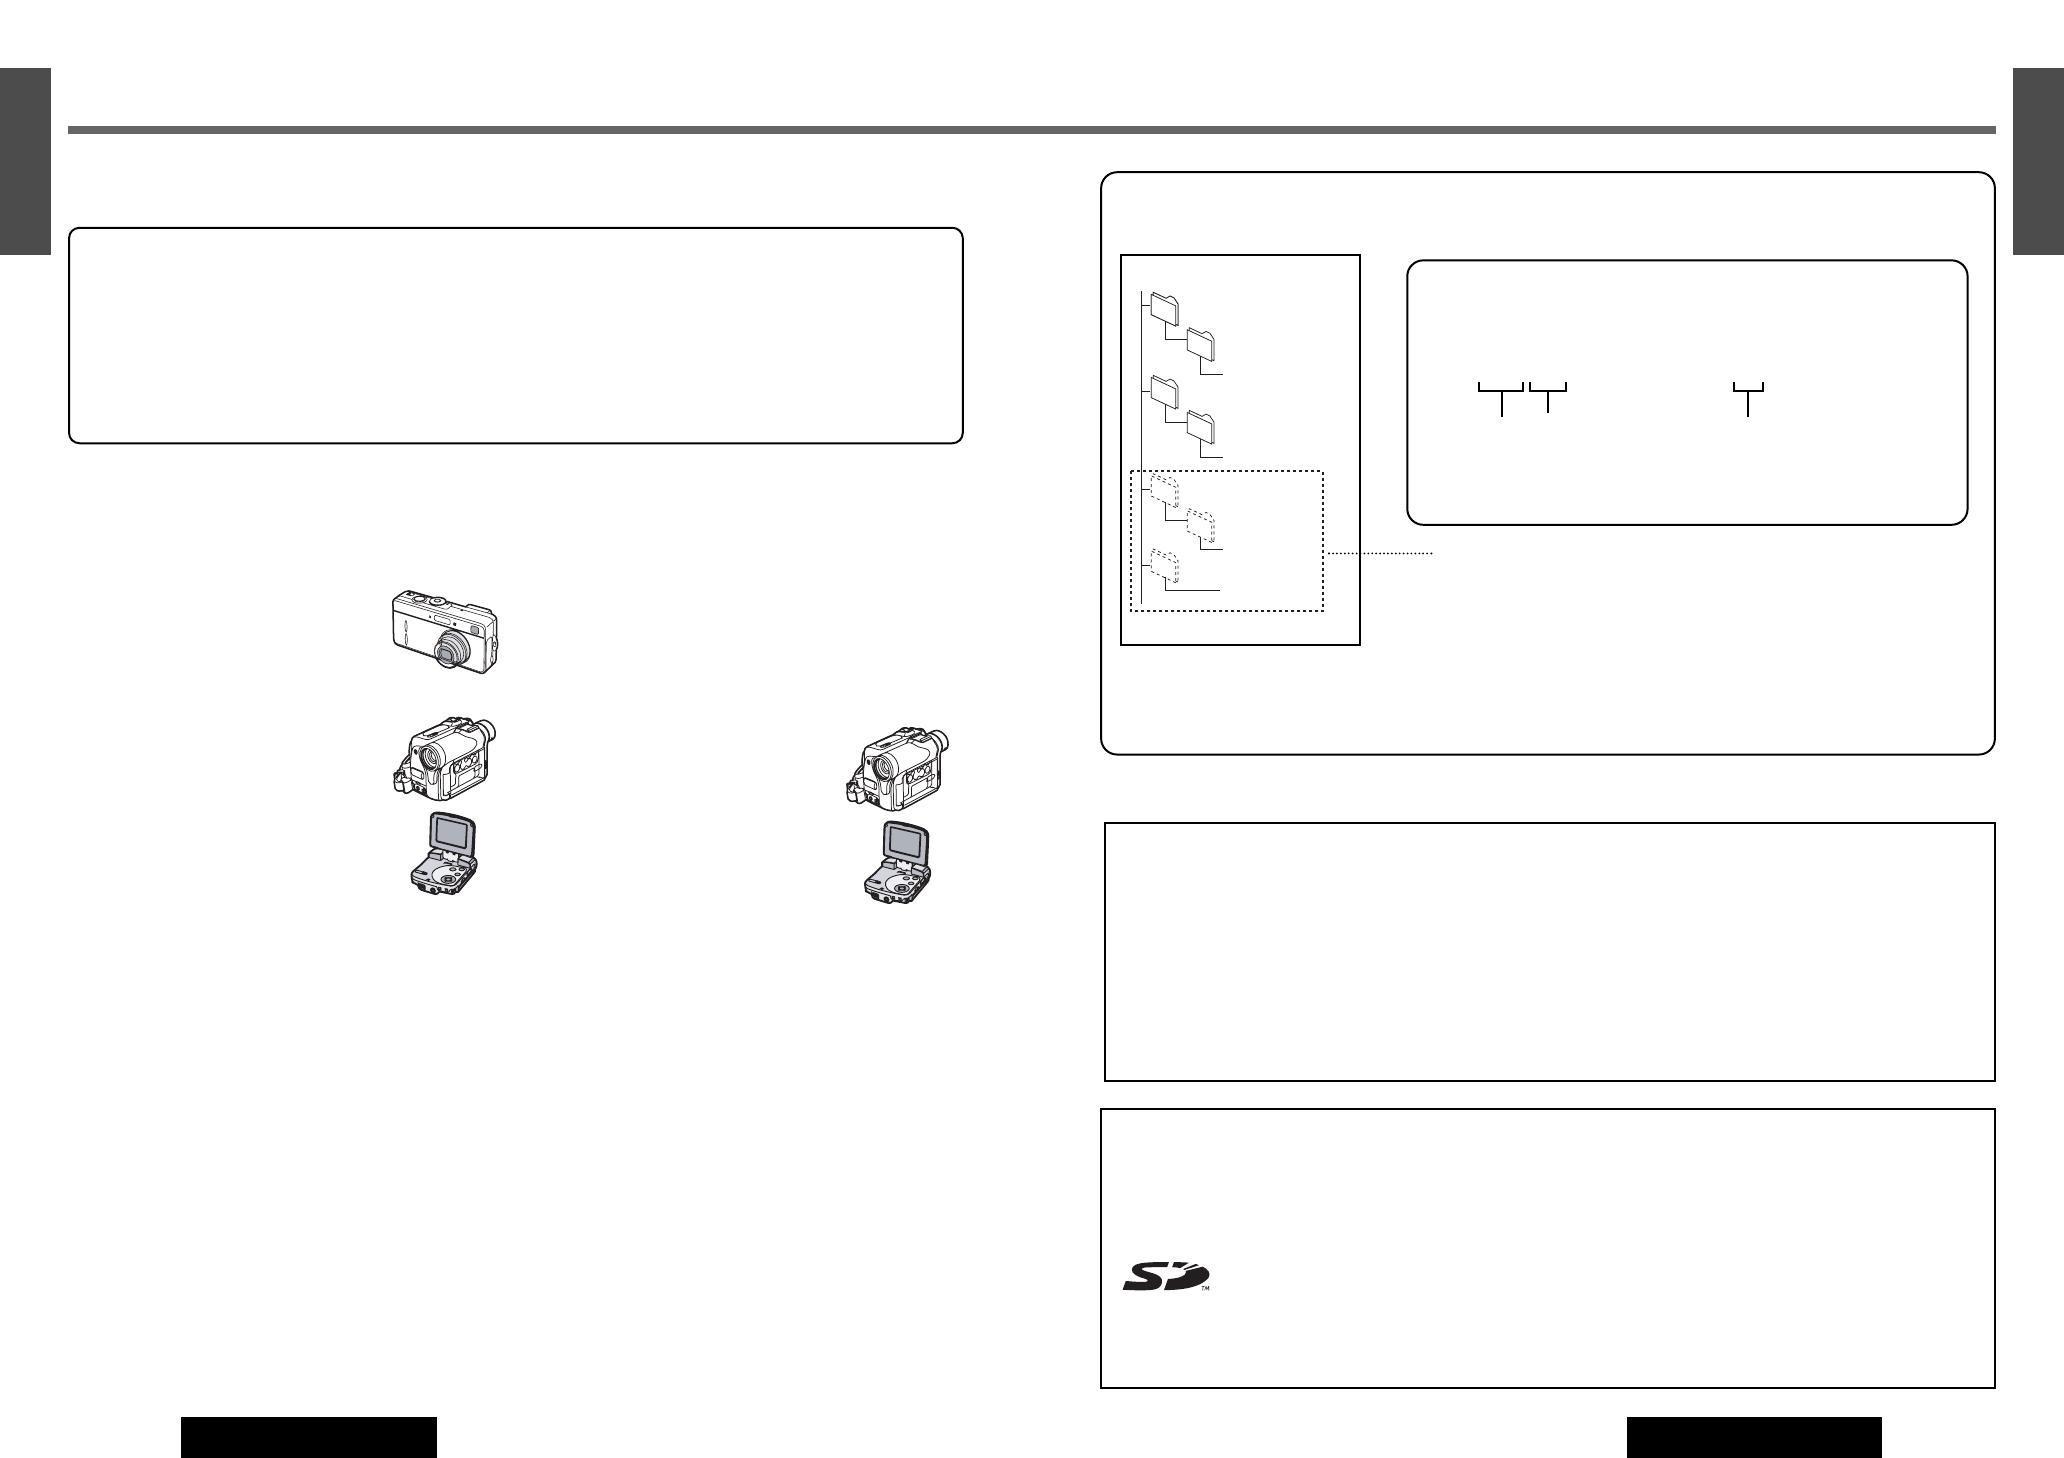
35
E
N
G
L
I
S
H
CQ-VD7700U/VD7500U
50
34
E
N
G
L
I
S
H
CQ-VD7700U/VD7500U
SD-Card Player
IMPORTANT
• If you have saved still image and/or moving image
data on SD Memory Cards by yourself using a PC, you
may not be able to play images unless you have con-
figured the folders correctly and named the folders
and files correctly. For further detail, refer to the next
page.
• When playing music using an SD card, play the SD
Audio files which were written on the card using SD-
Jukebox (option).
• If you have saved data on SD cards using “Panasonic
SD Multi AV Device”, for instance, which is available
as an optional accessory, the data can be played by
the unit straight way.
• Use SD card with a memory size of 512 MB or less.
Playable data formats on the SD-Card
CQ-VD7700U/VD7500U can treat the following data for-
mats.
Still Pictures: JPEG files taken on digital
cameras conforming to DCF standards.
(set down by the Japan Electronics and
Information Technology Industries
Association.)
Motion pictures: MPEG4 files (ASF for-
mat) taken on a digital video camera or
SD Multi AV Device.
Notes:
• If the file list screen contains 7 or more
files, press [}], [{],
[]] or [[] to
scroll to the next (or previous)
page.
• When MPEG4 moving pictures are
played back, mosaic-like patterns may occur or frames
may be dropped during scenes with fast-moving subjects.
This is normal and not a sign of trouble.
Music (Audio files): MP3 and AAC audio files recorded with
“Panasonic Media Manager” or “SD-Jukebox” software
included with Panasonic SD Multi AV Device and SD Audio
Player.
Notes:
• SD audio files written using a function other than SD-
Jukebox may not be recognized.
• MP3 audio files cannot be played. (However, this does
not apply to MP3 files that were written using SD-
Jukebox for use as SD audio files.)
• This unit can neither record nor erase the data.
• Titles and names of the artists may not always appear on
the display.
• If there are multiple numbers of still
pictures that are tied in with SD-
Jukebox, only the first still picture is
displayed.
• It may not be possible for the unit to
play back some kind of still pictures
even when they are tied in with SD-
Jukebox.
Voice: G.726 files recorded on a digital video camera or SD
Multi AV Device.
Notes:
• Some files are not compatible with this unit and can not be
played back. For example: Motion picture files recorded
using a digital still camera with motion picture function, IC
recorder voice files etc.
• Under certain condition, some files may not be played back
even if these are compatible ones.
How to record play data on SD-Cards
❒ Personal Computer
• You can copy Still pictures and Motion pictures to your
SD-Card by connecting it to a computer with a USB SD-
Card Reader/Writer (BN-SDCAP, option) or PC card adapter
(BN-SDABP, option) When recording to an SD-Card on a
computer. (Please refer to the “IMPORTANT” statement
above.)
• If you have attached still pictures to an audio file (using
SD-Jukebox Ver.3.0 or later, option) the unit can also show
the first of these pictures.
Treatments of SD-Card
❒ Other equipment (example: Digital still camera, IC Voice Recorder, Digital Camcorder)
The SD-Card recorded by some certain equipment (see previous page) can be played back on this unit without special
procedures. This equipment creates folders and files in the following way:
DCIM
100CDPFP
PRL001
SD_VIDEO
SD_VC100
SD_VOICE
SD_AUDIO
root
JPEG files
MPEG4 files
Voice files
Music files
• SD_VOICE and SD_AUDIO are hidden folders created when you record
voice or audio files, and play automatically on other equipment.
This unit needs these folders on an SD-Card to play the files. Do not delete
them on your computer.
• “DCIM”, “SD_VIDEO”, “SD_VOICE” and “SD_AUDIO” are necessary to play
files but have no effect on operation.
• You may be unable to play some files due to the origin of the copy, or the
naming of folders and files.
❒ Naming rule for the recoding files on SD-Cards.
JPEG still pictures MPEG4 motion pictures
Example: Example:
IMGA 0001.JPG MOL 001.ASF
Four Four numbers 3 digits hexadecimal numbers
characters (Numbers 0 to 9 and letters A
to F)
Make sure that none of the files in a folder have the same last 4 (or 3)
characters These files can not be played back.
SD logo is a trademark.
Portions of this product are protected under copyright law and are provided a license by
ARIS/SOLANA/4C. Licensed AAC Patents (U.S. patent under numbers);
08/937,950 5,394,473 5,579,430 5,481,614 5,299,238 5,581,654 5848391
5,583,962 08/678,666 5,592,584 5,299,239 05-183,988 5,291,557 5,274,740
98/03037 5,781,888 5,299,240 5,548,574 5,451,954 5,633,981 97/02875
08/039,478 5,197,087 08/506,729 5 400 433 5 297 236 97/02874 08/211,547
5,490,170 08/576,495 5,222,189 4,914,701 98/03036 5,703,999 5,264,846
5,264,846 5,717,821 5,357,594 5,235,671 5,227,788 08/557,046 5,268,685
08/392,756 5 752 225 07/640,550 5,285,498 08/894,844 5,375,189
Cautions:
• Do not leave the SD-Card where they will be become
hot or exposed to direct sunlight or where electric-
magnetic waves or static electricity occurs readily.
• Keep the terminal area on the back of the cards free
from dirt, water and foreign matter. Do not touch this
area with your hands or any other objects.
• Static-Electricity or malfunctioning of the unit or the
cards may cause the cards to be damaged or their data
to be lost. It is recommended that valuable data be
stored on the PC as well.
Note:
Do not leave cards on the following places:
• Direct sunlight
• Near car heaters
• Dirty, dusty and damp areas
• Seats and dashboards
❑
Notes on SD-Card
51

53
37
E
N
G
L
I
S
H
CQ-VD7700U/VD7500U
52
36
E
N
G
L
I
S
H
CQ-VD7700U/VD7500U
SD-Card Player(continued)
E
N
T
E
R
PWR NAVI MODE MENU
CHAPTER
ASPECT
TRACK
NAVIGATION
STOP
TOP MENU
DVD / SD MENU
ST/ MONO
CH1 CH2
RANDOM
RETURN
OSD
RET
RAND
AUDIO
ANGLE
REP
SUB
VOL
GRP
DISP
123
456
789
PAG E
SCAN
PAUSE PLAY
SUBTITLE
REPEAT
SCROLL
TITLE / CHAPTER
VOL
Still pictures Movie Music Voice
JPEG
(DCF Standard)
MPEG4
(ASF format)
AAC G.726
❑
Playable Data
❑
Inserting the SD-Card
Insert and slide
the card until it
clicks into
place.
Cautions:
¡Do not place your face in front of the slot when inserting
and removing cards. The slot mechanism has a spring
so the card may eject with force.
¡Do not insert the SD-Card into the CD slot.
¡Do not insert foreign materials into the SD-Card slot.
❑
SD Mode Selection
q
Select the SD.
:
: [MODE]
w Select the data type.
: Not available
: [}] or [{]
a
[ENTER]
Caution: To prevent the data damage to the SD-Card,
never eject the SD-Card while playing or turn the ACC off
while the unit is using the card.
e Select the playing data.
: Not available
: [}], [{], []] or [[]
a
[ENTER]
❑
Go to SD Menu
:
: [SD] (TOP MENU)
❑
Go to SD Setup Menu*
:
: [DVD/SD MENU] (SETUP MENU)
❑
Removing the SD-Card
Press on the center of the card to unlock, then pull
straight out.
Press on the center. Pull straight out.
Caution: Do not keep the SD-Card in the slot at half-way
to prevent the front panel from hitting the card when the
front panel is opening or closing.
Note: Do not leave an SD-Card inserted inside the unit
when it is not used.
Remote
Panel
Remote
Panel
Remote
Remote
Panel
Remote
Panel
[3] (STOP)
[y] (PAUSE)
[5] (PLAY)
[s][d]
[SD]
(TOP MENU)
[REP]
(REPEAT)
REP
[ ] ] [ [ ]
[}] [{]
[ENTER]
Notes:
¡Play may not be possible sometimes due to the condition of the data.
¡Operation is not guaranteed with Multi Media Card.
¡All functions of SD Card Player cannot be operable only on the
touch panel. Use buttons on the remote control and the main
unit as well.
You can play the following types of data recorded on
an SD-Card:
For details, (a page 50).
SD-Card slot
Beveled edge
Label side up
[DVD/SD MENU]
(SETUP MENU)
Panel
Note: In the SD mode, when the following operation is performed
and then the SD mode is restored, the
“MODE SELECT” screen will
appear without failure.
¡Power off ¡ACC off ¡Mode Change
❑
Operation of SD-Card
Operations
* While the file list screen is displayed.
Note: It is possible to press []] [[] on the display unit instead of [s] [d] on the remote control
.
Fast Forward/
Fast Reverse
[d]
[s]
Press and hold.
Fast forward
Fast reverse
Release to resume playback.
Play (Slideshow)
[5] (PLAY)
[
}][]]
[
{][[]
Playback starts.
The still pictures will be played back for 5 seconds each
(Slidshow). (While the still picture playback screen is displayed.)
REPEAT*
Current
File
Select [1 FILE/MUSIC] in [REPEAT] .
Select [OFF] in [REPEAT] to cancel.
ALL
Files
Select [ALL] in [REPEAT] .
Select [OFF] in [REPEAT] to cancel.
Note: To record data on SD-Cards, (a page 50).
LOCK
JPEG
LOCK
MPEG4
ASF
LOCK
AAC
LOCK
VOICE
LOCK
MPEG4
ASF
LOCK
AAC
LOCK
VOICE
LOCK
JPEG
LOCK
MPEG4
ASF
LOCK
AAC
LOCK
VOICE
LOCK
JPEG
LOCK
MPEG4
ASF
LOCK
AAC
LOCK
VOICE
LOCK
MPEG4
ASF
LOCK
AAC
[DVD/SD
MENU]
a
[
}][]]
[
{][[]
SELECT PLAYLIST*
LOCK
AAC
[DVD/SD
MENU]
a
[
}][]]
[
{][[]
DISPLAY ON/OFF*
SCREEN*
[DVD/SD
MENU]
a
[
}][]]
[
{][[]
LOCK
JPEG
LOCK
MPEG4
ASF
LOCK
AAC
LOCK
VOICE
LOCK
MPEG4
ASF
[DVD/SD
MENU]
a
[
}][]]
[
{][[]
Remote
Go to Beginning
[d]
[s]
Next file
Beginning of the current file
Previous file (Press twice.)
File Selection
LOCK
JPEG
LOCK
MPEG4
ASF
LOCK
AAC
LOCK
VOICE
Select a file to play back.
Stop
[3]
(STOP)
Press this to return to the file list screen.
LOCK
JPEG
LOCK
MPEG4
ASF
LOCK
AAC
LOCK
VOICE
Pause
[y]
(PAUSE)
Press this to stop the playback temporarily.
DEFAULT
PLAYLIST
PLAYLISTx
ON
OFF
FULL
NORMAL
All music files recorded are played back.
(default)
The selected playlist is played back.
(If the PLAYLIST is recorded on the SD-Card.)
The SD information display is set to ON.
(default)
The SD information display is set to off.
Enlarged screen (default)
Normal screen
Indicates compatible data types.
LOCK
JPEG
LOCK
MPEG4
ASF
LOCK
AAC
LOCK
VOICE
ENTER
DISC
SD CARD
TRACK/
CHANNEL
ER
ODE
LOCK
ENTER
[ ] ] [ [ ]
[}] [{]
(ENTER)
When not in operation mode, Touch the center of touch panel [Area A] to show operation display. (a page 24)

55
39
E
N
G
L
I
S
H
CQ-VD7700U/VD7500U
54
38
E
N
G
L
I
S
H
CQ-VD7700U/VD7500U
MENU: User Settings
❏ MENU Operation
: Previous menu
: Exit
E
N
T
E
R
PWR NAVI MODE MENU
CHAPTER
ASPECT
P-MODE
TRACK
NAVIGATION
STOP
TOP MENU
DVD / SD MENU
ST/ MONO
CH1 CH2
RANDOM
RETURN
OSD
RET
RAND
AUDIO
ANGLE
REP
SUB
SPACE MUTE
VOL
GRP
DISP
123
456
7
A
8
0
9
PAGE
SCAN
PAUSE PLAY
SUBTITLE
REPEAT
SCROLL
TITLE / CHAPTER
VOL
CAR AV
MODE MENU
ENTER
TILT
NAVI DISP
CQ-VD7700U
MODE
OPEN / CLOSE
DISC
POWERNAVIGATION
SD CARD
TRACK/
CHANNEL
D
ASH 7" WIDESCREEN COLOR LCD MONITOR TV / DVD / SD RECEIVER
ASPECT
P
·
MODE
ASP
ENTER
MODE
[MODE] [MENU]
[}][{][]][[]
(Select/adjust)
[ENTER]
[MODE]
[}][{][]][[]
(Select/adjust)
[ENTER]
¡Go to MENU
: Touch .
: Press [MENU].
¡Operations
Touching a menu symbol: Item selection and adjust
: previous menu.
: Return to regular mode
[}], [{], []], [[]
a [ENTER] : Item selection and adjust
[MENU] : Previous menu
[MODE] : Return to regular mode
Remote
Panel
Remote
Panel
Note:
The display returns to the previous status if there is no operation for more than 60 seconds after changing to the setting menu.
DISPLAY UNIT
(Monitor position)
¡Tilt angle adjustment
TILT
Notes:
¡
For smooth adjustment, make sure
to first return the lateral angle to the
neutral position and then adjust the
tilt angle.
¡The monitor position setting menu
can also be displayed by pressing
the [TILT] button on the display
unit for more than 2 seconds.
(a page 35)
OPEN/CLOSE
default: MANUAL
AUTO: The monitor is opened
automatically when turning ON
ACC.
MANUAL: The monitor is not
opened automatically.
AUTOMANUAL
or
[]] or [[] a [ENTER]
Note: You can also enter this setting
menu by pressing and holding [TILT]
button.
Remote
AUTOMANUAL
Panel
54321
or
[]] or [[]
* [1] to [5] keys are not available.
Remote
[]
Panel
1
default: 5
5
Menu Setting Value Operations
: Previous menu
: Exit
BEEP
(Beep or no beep during operating)
GUIDANCE
Guidance appearance during
video mode operation.
: guidance appears
: no guidance
appears
default: ON
OFF
ON
or
[]] or [[] a [ENTER]
Remote
ONOFF
Panel
CLOCK
(Clock display)
DISPLAY
:
clock display OFF
:
clock display ON ([12:00] is dis-
played before adjusting the
clock.)
default: OFF
ON
OFF
or
[]] or [[]
a [ENTER]
Remote
ONOFF
Panel
(Year adjustment)
(Month adjustment)
(Day adjustment)
(Hour adjustment)
(Minute adjustment)
Notes:
¡To starts the clock return to regular
mode by pressing [MODE] or
touching .
¡Perform the setup of Daylight
Saving Time manually.
MINUTE ADJUST
HOUR ADJUST
DAY ADJUST
MONTH ADJUST
YEAR ADJUST
default:
YEAR ADJUST: 2004
MONTH ADJUST: 1
DAY ADJUST: 1
HOUR ADJUST: AM12
MINUTE ADJUST: 0
or
[}] or [{] a []] or [[]
a [ENTER]
Remote
[
]
Panel
default: ON
ONOFF
[]] or [[] a [ENTER]
Remote
ONOFF
Panel
Menu Setting Value Operations
Guidance display
Menu selection order (a page 245)
/