Page is loading ...

i
Your machine includes the following documentation. This documentation has been designed so that you can
easily use your machine to suit your particular needs.
Setting up the MultiPASS ...................................
Setting up paper ..............................................
Installing the MultiPASS Suite .............................
Document and paper handling .............................
Making copies ................................................
Maintenance ..................................................
Troubleshooting feed and copy issues ....................
Sending and receiving faxes ...............................
Speed dialing .................................................
Troubleshooting fax issues .................................
Controlling the MultiPASS from
your PC.........................................................
Documentation is included on the CD-ROM in PDF form.
• The machine shown in this guide is the F50 model.
Copyright
Copyright © 2001 by Canon, Inc. All rights reserved. No part of this publication may be reproduced, transmitted,
transcribed, stored in a retrieval system, or translated into any language or computer language in any form or by
any means, electronic, mechanical, magnetic, optical, chemical, manual, or otherwise, without the prior written
permission of Canon, Inc.
Trademarks
Canon and BJ are registered trademarks. BCI, Bubble Jet, and MultiPASS are trademarks of Canon Inc.
All other product and brand names are registered trademarks, trademarks or service marks of their respective
owners.
As an ENERGY STAR
®
Partner, Canon U.S.A., Inc. has determined that this product
meets the ENERGY STAR
®
guidelines for energy efficiency.
NOTE
Using Your Documentation
Quick Start Guide
MultiPASS
Reference Guide
MultiPASS
Fax Guide
MultiPASS Suite for
Windows
®
Software
User’s Guide
F50 model only

Contents
ii
Chapter 1: Introduction
Customer Support .............................................1-1
Important Safety Instructions ...........................1-1
Main Components of the Machine ...................1-4
Operation Panel ................................................1-5
Standby Display ................................................1-6
Chapter 2: Document Handling
Document Requirements .................................2-1
Scanned Area of a Document .......................2-2
Setting Up Documents ......................................2-3
Placing a Document on the Platen Glass......2-3
Loading Documents into the ADF
(F50 Model Only) ...........................................2-4
Chapter 3: Paper Handling
Print Media Requirements.................................3-1
Paper Types and Sizes ..................................3-1
Paper Guidelines ...........................................3-3
Printable Areas ..............................................3-4
Loading Paper ..................................................3-5
Loading Envelopes............................................3-5
Using Canon Specialty Print Media .................3-7
Specialty Print Media Guidelines...................3-7
Printing on Banner Paper .............................3-8
Chapter 4: Making Copies
Documents You Can Copy ...............................4-1
Copying Documents .........................................4-1
Making Multiple Copies..................................4-2
Setting Paper Size and Paper Type ...............4-2
Setting Enlarging/Reducing ...........................4-3
Setting the Image Quality ..............................4-4
Adjusting the Copy Exposure ........................4-4
Special Features ...............................................4-5
Repeating an Image over the Paper..............4-5
Creating a Mirror Image.................................4-7
Shrinking an Image to Fit onto the Paper......4-8
Chapter 5: Maintenance
Periodic Cleaning ..............................................5-1
Cleaning the Exterior .....................................5-1
Cleaning the Scanning Area..........................5-1
Cleaning Inside the Machine .........................5-2
Cleaning the Roller ........................................5-3
Cleaning Inside the ADF (F50 Model Only)...5-3
Ink Tanks ...........................................................5-4
Guidelines ......................................................5-4
When to Replace an Ink Tank..........................5-5
Replacing an Ink Tank....................................5-6
Testing and Cleaning the Printhead ..................5-7
Printing the Nozzle Check Pattern.................5-8
Cleaning the Printhead ..................................5-8
Chapter 6: Troubleshooting
Clearing Jams ...................................................6-1
Jams in the Multi-Purpose Tray......................6-1
Jams in the ADF (F50 Model Only) ...............6-2
LCD Messages .................................................6-4
Paper Feeding Problems...................................6-6
Copying Problems ............................................6-7
Print Quality Problems .....................................6-8
Printing Problems .............................................6-9
General Problems ...........................................6-11
If You Cannot Solve the Problem ...................6-11
Chapter 7: Summary of Settings
Understanding the Menu System .....................7-1
Accessing the Menus ....................................7-1
Menus in Copy Mode ....................................7-2
Appendix: Specifications
General Specifications .................................A-1
Copier ............................................................A-1
Ink Tanks........................................................A-1
Printer ............................................................A-2
Scanner .........................................................A-2
Index ................................................................I-1

iii
Please read the list below of symbols, terms, and abbreviations used in this guide.
• Indicates a warning concerning operations that may lead to death or injury to persons if not
performed correctly. In order to use the machine safely, always pay attention to these warnings.
• Indicates a caution concerning operations that may lead to injury to persons or damage to
property if not performed correctly. In order to use the machine safely, always pay attention to
these cautions.
• Indicates operational warnings and restrictions. Be certain to read these items to operate the machine
correctly, and to avoid damage to the machine.
• Indicates notes for operation or additional explanations. Reading these is highly recommended.
(→ p. n-nn) A number preceded by an arrow and enclosed in parentheses references a page number
in this guide which contains more information on the topic of the previous sentence.
→ Quick Start Guide Refer to the Quick Start Guide for details on the topic of the previous sentence.
→ Fax Guide* Refer to the MultiPASS Fax Guide for details on the topic of the previous sentence.
→ MultiPASS Refer to the MultiPASS Suite for Windows
®
Software User’s Guide for details on the
Suite User’s Guide topic of the previous sentence.
machine The word “machine” is the general term used to represent the MultiPASS F50/F30.
default A setting that remains in effect unless you change it.
document or fax* The original sheet(s) of paper you copy, send or receive with the machine.
menu A list of settings from which you select an item to set up or change. A menu has a title
which appears in the LCD.
Available menus and the display differ depending on the machine type (F50 or F30) and
the current mode (Copy, Fax*, or Scan Mode). This guide shows the display of the F50
model in Copy Mode as an example.
In addition, this guide uses distinctive typefaces to identify buttons and information in the LCD:
• The buttons you press appear in this typeface: Stop/Reset.
• Information in the LCD appears in this typeface: PRINTER SETTINGS.
* F50 model only
NOTE
IMPORTANT
CAUTION
WARNING
Type Conventions Used in This Guide

1-1
Your machine is designed with the latest technology to provide trouble-free operation. If you encounter a problem
with the machine’s operation, try to solve it by using the information in Chapter 6. If you cannot solve the
problem or if you think your machine needs servicing, contact the Canon Customer Care Center. (1-800-423-
2366)
Read these safety instructions thoroughly before using your machine, and keep them handy in case you need to
refer to them later.
• This product emits low level magnetic flux. If you use a cardiac pacemaker and feel
abnormalities, please move away from this product and consult your doctor.
• Do not disassemble or modify. There are high-temperature and high-voltage components inside
the machine which may result in a fire or electrical shock.
• Follow all warnings and instructions marked on the machine.
■ Location
• Do not place the machine near alcohol, paint thinner or other
inflammable substances. If inflammable substances come into
contact with electrical parts inside the machine, it may result in a
fire or electrical shock.
• Do not block or cover the ventilation port or any openings on the
machine with objects, as this may result in a fire.
• Place the machine on a flat, stable, vibration-free surface that is
strong enough to support its weight (approx. 27.3 lb./12.4 kg [F50
model] / 22 lb./10 kg [F30 model]).
• Make sure the area is free from dust.
• Make sure the location is not affected by extreme temperature changes, and
always stays between 50° and 90.5°F (10° and 32.5°C).
• Make sure the relative humidity of the area is between 20% and 85%.
• Keep the machine away from direct sunlight.
• Do not use or store the machine outdoors.
• Do not install the machine near devices that contain magnets or generate
magnetic fields, such as speakers.
• Make sure the machine is approximately 4 inches (10 cm) away from walls
and other equipment for proper ventilation.
CAUTION
WARNING
CAUTION
Important Safety Instructions
Customer Support
Introduction
1
Introduction
Chapter 1

1-2
■ Power Supply
• Do not damage or modify the power cord and power plug. Also do
not place heavy objects on the power cord, pull on it, or extensively
bend it. These actions may cause electrical damage and result in a
fire or electrical shock.
• Do not insert or unplug the power plug with wet hands, as this may
result in electrical shock.
• During electrical storms, turn off the power and disconnect the
power cord from the power outlet. (Please note that any documents
stored in the machine’s memory will be deleted when you turn off
the power.)
• If dust accumulates around the plug of the power cord when it is
connected to a power outlet, unplug the machine and wipe the plug with
a clean, dry cloth.
• For using the F50 model, do not plug the machine into the same circuit
with appliances such as an air conditioner, television, or copier. These
devices generate an electrical noise, and this may interfere with your
machine’s ability.
• Whenever you turn off the power and unplug the machine, wait at least
five seconds before you plug it in again.
• Plug the machine into a standard 120V AC/60Hz, three-prong grounded outlet. Operate the machine only
from the type of power source indicated on the machine’s label. If you are not sure of the type of power
available, consult your local power company.
• Use only the power cord that came with the machine.
• Turn off the power and unplug the machine in the following conditions:
- When the power cord or plug is damaged or frayed.
- If liquid has spilled into the machine.
- If the machine has been exposed to rain or water.
- If the machine does not operate normally when you have followed the instructions in the guides included
with your machine. Adjust only those controls that are covered by the instructions in the guides since
improper adjustment of other controls may result in damage and will often require extensive work by a
qualified technician to restore the product to normal operation.
- If the machine has been dropped or damaged.
- If the machine exhibits a distinct change in performance, indicating a need for servicing.
IMPORTANT
CAUTION
WARNING

1-3
■ Handling
• Do not drop paper clips, staples, or other metal objects inside the
machine. Also do not spill water, liquid or inflammable substances
inside the machine. If these items come into contact with high-voltage
parts inside the machine, it may result in a fire or electrical shock. If
these items are dropped or spilled in the machine, turn off the power
and unplug the power cord immediately with dry hands. Then,
contact the Canon Customer Care Center.
• Do not use any highly flammable spray near the machine. If gas
from a spray comes into contact with the electrical components
inside the machine, it will result in a fire.
• Close the ADF, the platen glass cover, or the scanning unit gently to
avoid catching your hand. Failing to do so may result in personal
injury.
• Do not press down hard on the ADF or the platen glass cover when
using the platen glass to scan thick books. This may damage the platen
glass and/or result in personal injury.
• Do not fix your eyes on the luminous source while making copies and
scanning, as this may result in personal injury.
• Do not subject the machine to strong physical shock or vibration.
• Turn off the power and unplug the machine before moving it.
• Do not lift the machine by any of its attachments.
• If the machine exhibits a distinct change in performance, this indicates a need
for servicing.
■ Maintenance
• Do not service the machine yourself except as specifically described in this guide. If further
servicing is required, contact the Canon Customer Care Center.
• Keep the machine clean. Dust accumulation may prevent the machine from operating properly.
WARNING
CAUTION
WARNING
Introduction
1

1-4
This section describes the main components of the machine.
Front View
Inside View
* F50 model only
PLATEN GLASS
OPEN BUTTON
Push to lift up the scanning unit.
OUTPUT TRAY
Holds printed pages as they exit the machine.
OPERATION PANEL
Controls the machine.
ADF (AUTOMATIC DOCUMENT FEEDER)*
Holds documents for copying, scanning and sending faxes and
feeds them automatically into the machine.
MULTI-PURPOSE TRAY and TRAY COVER
Holds plain paper and other print media.
DOCUMENT OUTPUT SLOT
Documents come out here.
PLATEN GLASS COVER
Open to place a document on the platen glass.
SCANNING UNIT
Lift up to install the Printhead (Cartridge) and
Ink Tanks.
DOCUMENT GUIDES
Adjust to the width of the document.
FEEDER
COVER
Main Components of the Machine
HOLDER
PAPER THICKNESS LEVER
Adjusts the gap between the
printhead and the surface of the
printing paper. Set the paper
thickness lever to the left when
loading paper other than
envelopes, Banner Paper, and
T-Shirt Transfers.

1-5
This section describes buttons used when making copies and scanning.
• The operation panel shown below is the example for the F50 model.
* F50 model only
ABC
Copy Fax Scan
DEF
Color
/B&W
Coded Dial
Hook
Enlarge/
Reduce
Redial/Pause
Paper Select
Stop/Reset
Start
Exposure
Image Quality
123
JKL MNO
456
TUV
GHI
PRS WXY
789
OPER
Tone
SYMBOLS
0
ON/OFF
Menu
Set
In Use/ Memory Alarm
Resume
01 02 03 04
05 06 07 08
09 10 11 12
Color/B&W Button
Sets the machine for color or black
& white copying. For color copying,
press this button to turn on its light.
Resume Button
Resumes printing after an error is corrected. Also ejects a jammed document from the ADF.
*
LCD
Displays messages and prompts during operation.
Also displays selections, text and numbers when setting information.
Set Button
Selects and
confirms the
settings.
Enlarge/Reduce Button
Sets an enlargement or reduction of the document.
Paper Select Button
Selects paper size and paper type.
Exposure Button
Adjusts the copy exposure.
Image Quality Button
Selects the resolution
setting the machine uses
to copy.
Copy Button
Switches standby display to Copy Mode.
Scan Button
Switches standby display to Scan Mode. When the machine
is connected to your PC, pressing this button starts scanning
and sends the scanned data to your PC. In Scan Mode,
pressing Start starts scanning. For details of scanning,
→ MultiPASS Suite User’s Guide.
Numeric Buttons
Enters copy
quantity and other
numerical values.
Stop/Reset Button
Cancels copying and other operations,
and returns the machine to standby mode.
Start Button
Starts copying and scanning.
t(-), s(+)(Menu) Buttons
Scroll through the selection so you can see other selections. s(+)(Menu) button also has a
function to show the menu that customizes the way your machine operates.
ON/OFF Button
Turns the machine on/off.
In Use/Memory Light
*
Lights during copying
and scanning.
Fax Button, → Fax Guide
*
Alarm Light
Flashes when
an error occurs,
or when the
machine is out
of paper or ink.
→ Fax Guide
*
Operation Panel
Introduction
1

1-6
The standby display differs depending on which mode is selected. The standby display in Copy Mode and Scan
Mode are as follows:
• The standby display in Fax Mode is, → Fax Guide.
■ Copy Mode
• When the machine is turned on, the Copy Mode standby display appears.
■ Scan Mode
• When you start scanning by using your PC, the machine switches automatically to this mode if
necessary.
NOTE
NOTE
Copy Ratio
Exposure Paper Type Copy Quantity
Paper Size Image Quality
NOTE
Standby Display

2-1
The documents you place on the platen glass or load into the ADF must meet the requirements shown in the table
below.
* 20 lb. (75 g/m
2
) paper
**14 in. (356 mm) for the F30 model
11 in. (279 mm) for sending faxes
Document Requirements
Document Handling
2
Document Handling
Chapter 2
Type of document
Size (W × L)
Quantity
Thickness
Weight
Platen Glass
- Thick paper
- Documents with uneven surfaces
- Photographs
- Small documents
(e.g. business cards, postcards)
- Special types of paper
- Book
Max. 8.5 × 11.7 in. **
(Max. 216 × 297 mm)
–––
Max. 0.79 in. (20 mm)
–––
ADF (F50 model only)
Multipage documents of the same
thickness and weight.
Max. 8.5 × 39 in.
(Max. 216 × 1 m)
Min. 4.13 × 5.83 in.
(Min. 105 × 148 mm)
Max. 30 letter-, legal- or A4 size sheets*
1 sheet for sizes other than these.
0.002 to 0.005 in.
(0.06 to 0.13 mm)
13 to 24 lb. (50 to 90 g/m
2
)

2-2
Problem Documents
• Make sure any glue, ink, or correction fluid on the document is completely dry before placing it on the platen
glass or loading it into the ADF.
• Remove all fasteners (staples, paper clips, etc.) before loading the document into the ADF.
• To prevent document jams in the ADF, do not use any of the following:
Scanned Area of a Document
The shaded area in the illustration below shows the scanned area of a document. Make sure your document’s text
and graphics are within this area.
* When using legal-size documents with the F50 model, load them into the ADF.
** F50 model only
*** When using legal-size documents with the F30 model, the bottom margin is MAX. 0.32 in. (MAX 8.0 mm)
Wrinkled or creased paper Curled or rolled paper Torn paper
Carbon paper or carbon-
backed paper
Coated paper Onion skin or thin paper
MAX. 0.18"
(MAX. 4.5 mm)
MAX. 0.16"
(MAX. 4.0 mm)
Letter/Legal*/A4
MAX. 0.16" (MAX. 4.0 mm)
***
COLOR FAX: MAX. 0.24"
**
(MAX. 6.0 mm)
MAX. 0.18"
(MAX. 4.5 mm)

Document Handling
2
2-3
For scanning, place your documents on the platen glass or load them into the ADF. Where you set up your
documents depends on the size and type of documents you have, and the machine you are using. (→ p. 2-1)
Placing a Document on the Platen Glass
Positioning Documents
Align the upper left corner of your document with the mark at the upper left corner of the guide plate.
Use the guide plate on the upper side and left side of the platen glass to position a document.
■ F50 Model ■ F30 Model
• If your document is 4"× 6" size, align the document with the marks.
NOTE
Setting Up Documents
1
Open the ADF or the platen glass cover.
2
Place your document face down on the
platen glass. Align the document with the
appropriate paper size marks.
3
Gently lower the ADF or the platen glass
cover.
The document is now ready for scanning.
B5 LTR A4
B5
LTR
A4
LGL
LTR
A4
B5
B5 LTR A4 LGL

Loading Documents into the ADF (F50 Model Only)
2-4
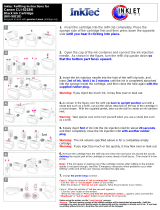
1
Make sure there is no document on the
platen glass.
2
Fan the edge that will feed into the
machine first then, tap the edge of
multipage documents on a flat surface to
even the stack.
3
Adjust the document guides to the width of
the document.
4
Gently insert the top of the document, face
up, into the ADF until you hear a beep.
The document is now ready for scanning.
• For a multipage document, the pages are
fed one by one from the top of the stack.
• Wait until all pages of your document have
been scanned before starting a new job.
NOTE

3-1
Paper Types and Sizes
This section describes the different print media you can use with your machine. To achieve the best possible
printing performance of your machine, be sure to select the correct print media.
Print Media Requirements
Paper Handling
3
Paper Handling
Chapter 3
Print Media
Plain paper
Envelopes
Glossy Photo
Paper
Banner Paper
High Resolution
Paper
Bubble Jet Paper
Transparencies
High Gloss
Photo Film
Glossy Photo
Cards
Size
Letter
(8.5 × 11 in. / 215.9 × 279.4 mm)
Legal
(8.5 × 14 in. / 215.9 × 355.6 mm)
A4
(8.27 × 11.69 in. / 210 × 297 mm)
U.S. Commercial No. 10
(9.5 × 4.1 in. / 241.3 × 104.1 mm)
European DL
(8.66 × 4.33 in. / 220 × 110 mm)
Letter and A4
8.5 × 11 in.
(215.9 × 279.4 mm)
Max. length: 66 in. (1676 mm)
Letter and A4
Letter and A4
Letter and A4
Letter and A4
Weight
17 - 28 lb.
(64 - 105 g/m
2
)
17 - 28 lb.
(64 - 105 g/m
2
)
17 - 28 lb.
(64 - 105 g/m
2
)
Quantity
Approx. 100 sheets*
(Max. 0.4 in. (10 mm) stack)
Approx. 100 sheets*
(Max. 0.4 in. (10 mm) stack)
Approx. 100 sheets*
(Max. 0.4 in. (10 mm) stack)
10 envelopes
10 sheets
2 to 6 sheets (joined)
Approx. 80 sheets
(Max. 0.4 in. (10 mm) stack)
Approx. 100 sheets
(Max. 0.4 in. (10 mm) stack)
30 sheets
1 sheet
20 cards
* 20 lb. (75g/m
2
) paper

3-2
• Be sure to test print media before purchasing large quantities.
• For Canon print media, be sure to purchase the recommended print media types.
• Set the paper thickness lever to the left when loading paper other than envelopes, Banner Paper, and T-
Shirt Transfers. (→ p. 1-4)
Description of print media
■ Plain Paper
The machine supports letter-, legal-, and A4-size paper in portrait orientation. You can use regular copier
paper, cotton bond paper, or typical letterhead. Your machine does not require special ink jet paper. Always
use paper without curls, folds, staples, or damaged edges. Look at the label on the package to see if the paper
has a preferred side for printing.
■ Envelopes
The machine can print on U.S. Commercial No. 10 and European DL envelopes. You may be able to load
other sizes, but Canon cannot guarantee consistent performance on these.
Do not use the following types of envelopes since they may cause problems:
• Envelopes with windows, holes, perforations, cutouts, and double flaps.
• Envelopes made with special coated paper or deeply embossed paper.
• Envelopes with peel-off sealing strips.
• Envelopes with letters enclosed.
■ Glossy Photo Paper GP-301
A high gloss, thick paper that produces the look and feel of a photograph.
■ Banner Paper BP-101
Specifically designed for printing one continuous sheet in a banner format. The connected sheets are divided
by perforations and you can print from two to six sheets at a time.
■ High Resolution Paper HR-101/HR-101N
Designed to produce near-photographic quality print output with sharp and vivid graphics.
■ Bubble Jet Paper LC-301
Developed for high quality printing with minimal or no smearing when in contact with water or damp
surfaces. This specially coated paper produces bright and vivid colors and stands up to normal office
highlighters.
■ Transparencies CF-102
Produce excellent contrast, sharpness, and color, creating crisp and professional overhead presentations.
Do not use normal transparencies in the machine as they do not absorb ink and may cause ink to run.
■ High Gloss Photo Film HG-201
A bright white finish film that lends striking visual power to charts, graphs, and photographic images. It
creates a sharper and more vivid color output than is possible with coated paper.
■ Glossy Photo Cards FM-101
Made from the same stock as Glossy Photo Paper, these cards allow you to print images over the entire area of
the card. Print the image so that it extends beyond the perforations and then trim off the unwanted white
margins.
NOTE
Print Media
Photo Paper Pro
T-Shirt Transfers
Size
4" × 6" and Letter
Letter
Weight Quantity
20 sheets (4" × 6")
1 sheet (Letter)
1 sheet

3-3
■ Photo Paper Pro PR-101/ PC-101S
Photo Paper Pro PR-101 is thick paper with a treated surface that enhances gloss and provides superior color
reproduction. It is ideal for printing high quality photographs.
Photo Paper Pro PC-101S is made of the same material as Photo Paper Pro PR-101, this photo-size paper is
intended for printing images that cover the entire surface of the card, without a white border. To take full
advantage of PC-101S, make the images slightly larger than the area indicated by the perforations. This paper
is ideal for printing high quality photographs.
■ T-Shirt Transfers TR-201
This paper is used to produce iron-on transfers.
Paper Guidelines
• Store all print media wrapped and on a flat surface until ready to use. Keep opened packs in their original
packaging, in a cool, dry location.
• Store paper at 64.4° - 75.2°F (18° - 24°C), 40% - 60% relative humidity.
• To avoid paper jams and poor print quality, do not print on damp, curled, wrinkled, or torn paper.
• Use cut-sheet paper only, not paper that comes on a roll.
• Do not use paper thicker than can be used for the machine (→ p. 3-1). Thick paper can cause damage to the
printhead.
• Do not load paper beyond the paper limit mark (|t) or beyond the tabs on the multi-purpose tray. Doing so
may cause problems. Also, make sure there are no gaps on either side of the paper stack.
• If the print media has a print side, set it in the multi-purpose tray with the print side facing upwards.
• The capacity of the output tray is 50 sheets of paper. To prevent paper jams, remove paper from the output tray
before the count reaches 50.
• Let the paper run out before refilling the multi-purpose tray. Avoid mixing new stock with paper already
loaded.
• Do not leave paper stacked in the multi-purpose tray for long periods of time since it may bend or curl and
cause problems.
• Certain environmental conditions, such as extreme temperatures or humidity, can cause some print media to
misfeed in the multi-purpose tray. If you have trouble, feed one sheet at a time.
• Depending on the density of the printed pages, the ink may need time to dry. Within two or three seconds, the
ink becomes smudge resistant. After drying for several minutes, the ink becomes water-resistant.
• If your printed page contains a large amount of graphics, the ink on the page may be damp due to the print
density. Leave the page in the output tray for 30 to 60 seconds to allow the ink to dry. Then remove the page
carefully without touching any surfaces.
• Printing dense graphics on light paper stock may cause the paper to curl. Try using heavier stock.
• If paper curls after printing, remove it immediately; otherwise paper jams may occur.
• The platen (a roller inside the machine) may become inked if you print data beyond the width of the page. If
this happens, clean inside the machine. (→ p. 5-2)
Paper Handling
3

3-4
Printable Areas
Please note that the term “printing area” represents both the recommended area for optimum print quality and the
entire area where the machine can technically print.
Printing area (light shade) : Canon recommends that you print within this area.
Printable area (dark shade) : The area in which it is possible to print. However, printing in this area can
adversely affect the print quality or the paper feed precision.
■ Paper
■ Envelope
0.13" (3.4 mm) 0.13" (3.4 mm)
1.04" (26.5 mm)
0.12" (3 mm)
0.13" (3.4 mm) 0.13" (3.4 mm)
1.04" (26.5 mm)
0.12" (3 mm)
FEED
DIRECTION
FEED
DIRECTION
EUROPEAN DL
U.S.
COMMERCIAL
NO. 10
0.12" (3 mm)
0.20" (5 mm)
1.10" (28 mm)
1.10" (28 mm)
1.10" (28 mm)
1.04" (26.5 mm)
1.04" (26.5 mm)
0.25" (6.3 mm)
0.20" (5 mm)
1.04" (26.5 mm)
0.25" (6.4 mm)
0.12" (3 mm)
0.13" (3.4 mm)0.13" (3.4 mm)
0.12" (3 mm)
0.20" (5 mm)
0.25" (6.3 mm)0.25" (6.4 mm)
FEED
DIRECTION
FEED
DIRECTION
FEED
DIRECTION
LEGAL
A4
LETTER

3-5
Refer to the Quick Start Guide to load plain paper in the multi-purpose tray.
Loading Envelopes
Loading Paper
Paper Handling
3
1
Push the Open button and lift up the
scanning unit.
2
Move the paper thickness lever to the right
and close the scanning unit.
3
Arrange the stack of envelopes on a firm,
clean surface, and press down firmly on the
edges to make the folds crisp.
• Press all the way around the envelopes to remove
any curls and expel air from inside the envelopes.
Also, press firmly on the area that corresponds to
the edges of the back flap.
4
Remove any curling from the envelopes by
holding the edges diagonally and bending
them gently.

3-6
5
Run a pen or other rounded object along
the back flaps to flatten them.
• The flaps should not bulge more than 0.2 inch
(5 mm).
6
Insert the stack of envelopes into the multi-
purpose tray ➀, and align the right edge of
the stack with the right side of the multi-
purpose tray. Pinch the paper guide, then
slide it snugly against the left edge of the
stack ➁.
• Insert the envelopes with the print side up (flaps
should not be visible).
• Feed the left side of the envelope (return address
portion) into the multi-purpose tray first.
• Make sure the stack does not exceed the paper
limit mark (|t).
7
Place the tray cover on the multi-purpose
tray.
The machine is now ready to print.
1
2
PAPER LIMIT MARK
PAPER GUIDE
FLAP

3-7
Specialty Print Media Guidelines
• Be sure to read all instructions that come with your Canon specialty print media, as these provide
important information on how to achieve the highest print quality.
Follow these guidelines:
• When feeding Transparencies, remove each sheet after it is delivered, being careful not to touch any surfaces.
Do not allow film sheets to stack up in the output tray.
• Let the printed sheets of film or paper dry completely before storing them.
Drying time:
- Canon High Gloss Photo Film HG-201, Canon Glossy Photo Paper GP-301, and Canon Glossy Photo Cards
FM-101: 2 minutes
- Canon Transparencies CF-102: 15 minutes
• When your printed sheets of film have dried completely, cover the printed sides with a sheet of plain (not
coated) paper before storing. This is recommended even if you place the sheets in a clear file or plastic holder.
• When loading Transparencies, insert one sheet of plain paper as the last sheet in the stack.
• Do not leave film in the multi-purpose tray for long periods of time. Dust and dirt may accumulate on the film
resulting in spotty printing.
• To avoid smudging caused by fingerprints, use a pair of thin cloth gloves while loading and handling film.
• To avoid fading, do not expose printed film to prolonged sunlight.
• Store all print media flat. Do not remove them from their protective packaging until you are ready to use them.
• Store unused film at temperatures between 59° and 86°F (15° and 30°C). The relative humidity should be
between 10% and 70%.
NOTE
Using Canon Specialty Print Media
Paper Handling
3
/