Page is loading ...

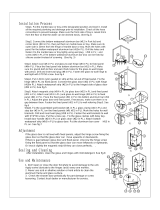
Step1. Place the marble base at the designated position and level it (Make sure the
floor is level if no marble base will be installed.See Fig.2
20
If the door can not close perfectly or loose, knock slightly the aluminum
channel attaching magnetic strip till the glass doors can close perfectly.
Apply transparent silicone sealant around the perimeter of fixed panels (horizontally between bottoms
of fixed panel and side fixed panel and tray or marble base. Clean the hinges and glass panels using
mild detergent. (See fig.6)
1. Don't open or close the door forcefully to avoid damage to the unit. Apply some
lubricate to the hinges every one months.
2. Never use acid or alkaline solution or hard article to clean the aluminum frame
and glass surface.
3. Check the shower door periodically for part damage or screw loosening.
Contact local dealer or manufacturer for service.
Step2. Place the bottom waterproof aluminum bar (#12 in Part List) on the marble
base or tray. Make sure its outer side is 20mm from the fringe of marble base or tray.
Mark the holes with pencil for the bottom waterproof aluminum bar (#12 in PL). Drill
the holes and fasten it to the marble base or tray tightly using wall plug#5 in
PLand ST4*20 screw (#11 in PL) See Fig.3
Step3. Attach bottom waterproof strip (#13 in PL) to glass door (#18 in PL), and
magnetic strip (#9 in PL) to the other side. Connect the wall hinge (#14 in PL) on the
glass door. (Note: don't screw them tight). Put a wood block on the bottom waterproof
aluminum bar (#12 in PL). Place the glass door on the wood block. Make sure the
magnetic strips on the glass door and fixed panel can close perfectly. Make the holes for
the door hinge (#14 in PL). Remove the glass door and drill. Fasten the door hinge tight
to wall with wall plug (#17 in PL) and ST5*50 screw. See Fig.5
Step4. Adjust the magnetic strips on the fixed panel (#8 in PL) and glass door (#18 in PL),
make sure there is no gap between them. Fix the door hinges (#14 in PL) to glass door (#18
in PL)
Step5. Place the assembly of the connecting pole on the left fixed panel (#8 in PL)
and mark the holes for the wall mount bracket (#1 in PL). Fasten the wall mount
bracket (#1 in PL) to the wall using wall plug (#5 in PL) and ST4*30 screws (#7 in
PL). Fix the glass clamp to the left fixed panel (#7 in PL) with Allen key. Attach
door handle (#15 in PL) and bottom waterproof strip (#19 in PL) to the glass door
(#18 in PL) ).
Step3.Insert fixed panel profile into wall profile (#6 in PL). First put the fixed
panel (#6 in PL) into the bottom waterproof aluminum bar (#12 in PL). Check and
calibrate it to make sure it's plumb both to wall and floor. Mark the holes for wall
profile (#6 in PL) and drill. Fasten the wall profile to the wall with wall plug (#5 in
PL) and ST4*30 screw. See Fig.4
/