Page is loading ...

If the glass door is not level with fixed panels, adjust the hinge screw fixing the
glass door so that the glass door can move upwards or downwards.
If there is gap between glass door and fixed panel. Unscrew the hinge screw
fixing the fixed panel so that the glass door can move leftwards or rightwards.
Or knock slightly the magnetic strip till they can close perfectly. .
Step2. Connect the bottom waterproof aluminum bar (#12 in Part list) and
corner block (#13 in PL), then put them on marble base or tray. Make sure its
outer side is 20mm from the fringe of marble base or tray. Mark the holes with
pencil for the bottom waterproof aluminum bar (#12in PL). Drill the holes and
fasten it to the marble base or tray tightly using wall plug #19 in PLand
screw (#20 in PL).The bottom waterproof aluminum bar also can be fixed by
silicone sealant instead of screwing. (See fig. 3)
Step4. Put 2-3mm nylon gasket or strip at the cut-out of fixed panel. Fix the
hinge (#8 in PL) to fixed panel. Connect the glass door (#22 in PL) with hinge
(#10in PL). Attach waterproof strip (#11in PL) to the hinged side of glass door
(#22 in PL) See fig.5
Step5. Attach magnetic strip (#24 in PL) to glass door (#22 in PL) and fixed panel
(#21 in PL). Attach seal (#11 in PL) and glass-to-wall hinge (#10 in PL) to fixed
panel (#21 in PL). Place the fixed panel (#21 in PL) into bottom aluminum bar (#12
in PL). Adjust the glass door and fixed panel, if necessary, make sure there is no
gap between them. Fasten the fixed panel (#21 in PL) to wall referring Step3. See
fig.6 .
Step6. Fix the assembled wall bracket (#1 in PL), glass clamp (#4 in PL) and
stay bar (#2 in PL) on the fixed panels (#9, #21 in PL). Mark the holes for wall
brackets. Drill and insert wall plug (#19 in PL). Fasten the wall brackets to wall
with ST4*30 screw. Put the screw cap . Fix the glass clamps with Alley key.
Install door handle (#23 in PL) on glass door (#22 in PL). Attach bottom
waterproof strip (#16 in PL) to glass door. Put the aluminum bar cover #15 in
PL on. See fig.7
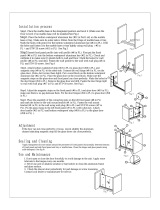
1. Don't open or close the door forcefully to avoid damage to the unit.
Apply some lubricate to the hinges (axis) every one months.
2. Never use acid or alkaline solution or hard article to clean the
aluminum frame and glass surface.
3. Check the shower door periodically for part damage or screw
loosening. Contact local dealer or manufacturer for service.
After installation, clean the glass and hinges with mild detergent. See fig.8
Step1. Put the marble base or tray at the designated position and level it. Install
all the required plumbing and drainage prior to installation. Check all the hose
connections to prevent leakage. Make sure the front side of tray is raised 3mm
from the floor so that the water can be drained easily. (See fig.2)
Step3. Attach seal (#5 in PL) and glass-to-wall hinge (#8 in PL) to fixed panel
(#9in PL). Place the fixed panel into bottom aluminum bar (#12 in PL). Make
sure it is plumb both to floor and wall. Mark holes for the glass-to-wall hinges
with pencil. Drill and insert wall plug (#6 in PL). Fasten the glass-to-wall hinge to
wall tight with ST5*50 screw. See fig.4
/