Page is loading ...

electrolux integrated barbecue contents i
Electrolux Home Products
Australia
telephone: 1300 363 640
fax: 1800 350 067
email: customercar[email protected]
web: www.electrolux.com.au
New Zealand
telephone: 09 573 2230
fax: 0800 36 36 00
email: customercar[email protected]
web: www.electrolux.co.nz
P/No. 0616001937 - Rev B
© 2011 Electrolux Home Products Pty Ltd
ABN 51 004 762 341
Print code: EINTBBQUM_Jun11
The Thoughtful Design Innovator.
Do you remember the last time you opened a gift that made you say “Oh! How did you know?
That’s exactly what I wanted!” That’s the kind of feeling that the designers at Electrolux seek to
evoke in everyone who chooses or uses one of our products. We devote time, knowledge, and a
great deal of thought to anticipating and creating the kind of appliances that our customers really
need and want.
This kind of thoughtful care means innovating with insight. Not design for design’s sake, but design
for the user’s sake. For us, thoughtful design means making appliances easier to use and tasks more
enjoyable to perform, freeing our customers to experience that ultimate 21st century luxury, ease
of mind. Our aim is to make this ease of mind more available to more people in more parts of their
everyday lives, all over the world. So when we say we’re thinking of you, you know we mean just that.
The “Thinking of you” promise from Electrolux goes beyond meeting the needs of today’s consumers.
It also means we’re committed to making appliances safe for the environment—now and for future
generations.
Electrolux. Thinking of you.
Share more of our thinking at www.electrolux.com.au or www.electrolux.co.nz
environmental tip
Information on disposal for users
• Most of the packing materials are recyclable.
Please dispose of those materials through your local
recycling depot or by placing them in appropriate
collection containers.
• If you wish to discard this product, please contact your
local authorities and ask for the correct method of disposal.
user manual
integrated barbecue
(EQBL100AS and EQBH100AS)
Congratulations
Congratulations and thank you for choosing our integrated
barbecue. We are sure you will find your new barbecue
a pleasure to use. Before you use the barbecue, we
recommend that you read through the entire user manual,
which provides the description of the barbecue and
its functions.
To avoid the risks that are always present when you use
a gas appliance, it is important that it is installed correctly
and that you read the safety instructions carefully to avoid
misuse and hazards.
We recommend that you keep this instruction booklet for
future reference and pass it on to any future owners.
After unpacking the barbecue please check it is not
damaged. If in doubt, do not use the appliance but contact
your local Electrolux Customer Care Centre.
CONDITIONS OF USE
This appliance is intended to be used in household and
similar applications such as:
• Farm houses
• By clients in holiday apartments and other residential
type environments.
Contents
• Product description ii
• Parts iii
• Important safety instructions 1
• Assembling the barbecue 2
• Gas specications 3
• Gas connection detail 3
• Natural Gas installation 3
• Universal LPG installation 4
• Gas bottle safety information 5
• Leak test procedure 5
• Installation warnings 6
• Installation instructions 6
• Dimensions 7
• Gas requirements 8
• Setting up the barbecue 8
• Fitting the slimline lid or roasting hood 8
• Options for conguration of hotplates and grills 9
• Operating instructions 9
• Lid safety lid – slimline lid only 10
• Cleaning and care 10
• Maintenance 11
• Troubleshooting 11
• Warranty 12

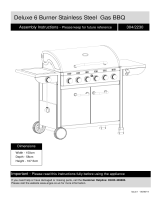
ii product description electrolux integrated barbecue electrolux integrated barbecue parts iii
PartsIntegrated barbecue with slimline lid
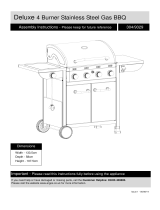
Integrated barbecue with roasting hood
1 Pivotting leg
2 Slimline lid
3 Battery cover
4 Gas connection point
5 Burner controls
6 Grill assemblies x 2 sets
7 Hotplate
8 Removable oil reservoir
located at front of cooking
surface (not illustrated)
9 Flame tamers x 2 located
under grills (not illustrated)
3
2
1
4
5
6
7
12
10
13
14
15
16
11
10 Roasting hood
11 Warming racks
12 Battery cover
13 Gas connection point
14 Burner controls
15 Grill assembly
16 Hotplate
17 Removable oil reservoir
located at front of cooking
surface (not illustrated)
18 Flame tamers x 2 located
under grills (not illustrated)
description qty
Burner box &
trim surround
1
Rear heat
shield
1
Flame tamers 2
Oil reservoirs
(1 x left hand
and 1 x right
hand)
1 LH
1 RH
Solid hot plate 1
Grill
assemblies
2
description qty
Natural gas
regulator and
braided hose
1
Universal LPG
regulator and
braided hose
1
1 plastic bag containing this instruction book,
labels, 4 ULPG injectors, allen key, ULPG adaptor,
2 fibre washers, natural gas installation pipe,
match holder and chain
EITHER
Roasting
hood
assembly
1
OR
Slimline lid
assembly
1
Tools you will need for assembly:
• philips head screw driver
Contents of your barbecue pack:
left
right
15

electrolux integrated barbecue important safety instructions 1
Please read the user manual carefully and store in a handy
place for later reference.
Meanings of the symbols used in this manual are shown below:
warning
This symbol indicates information concerning your
personal safety
caution
This symbol indicates information on how to avoid
damaging the appliance
tips and information
This symbol indicates tips and information about use
of the appliance
environmental tip
This symbol indicates tips and information about
economical and ecological use of the appliance
This symbol indicates never to do this
Important safety instructions
For your safety please read this book before operating
your barbecue.
warning
This appliance MUST be installed and serviced only
by a qualified licensed person.
Improper installation, adjustment alteration or
maintenance can cause injury or property damage.
Please contact your nearest Electrolux Service
Department for additional information or assistance
for an approved installer.
NOTE TO THE INSTALLER
THIS MANUAL MUST REMAIN WITH THE OWNER FOR
FUTURE REFERENCE
warning
IF YOU SMELL GAS, do not attempt to light the
barbecue. Locate the leak and re-tighten the leaking
joint. Carry out the Leak Test procedure as described in
this manual. If the leak persists, turn off the gas supply
and call Electrolux Service or a Licensed Gas Fitter.
warning
Do not lean over barbecue when lighting.
Do not leave the barbecue unattended when alight.
Do not delay lighting once the gas has been
turned on.
Do not store or use aerosol cans in the vicinity
of the barbecue.
Do not store flammable liquids in the vicinity
of the barbecue.
Do not use caustic or abrasive based cleaners
on the barbecue.
Do not operate the barbecue with the cover on.
Do not attempt to dismantle or adjust the
control valves.
Do not attempt to dismantle or adjust the regulator.
Do not test for leaks with a naked flame.
Do not modify the construction of this appliance
or modify the injector orifice size.
Do not obstruct any ventilation of the barbecue.
Do not allow children to operate or play near
the barbecue.
caution
This barbecue is supplied set up for Natural Gas and
is labelled accordingly. A Universal LPG conversion
kit is included if required. Conversion of this unit
to Universal LPG must be carried out by a qualified
licensed person and a Certificate of Compliance
must be issued to the owner on completion of the
installation and conversion.

Preparing the unit for Natural Gas installation
This barbecue is supplied set up for Natural Gas and is
labelled accordingly. A Universal LPG conversion kit is
included if required. Conversion of this unit to Universal LPG
must be carried out by a qualified licensed person.
A Certificate of Compliance must be issued to the owner on
completion of the installation and conversion.
Fit Natural Gas installation pipe to the barbecue gas inlet to
enable access to the regulator in the installed position.
When tightening the regulator or any other connection do
not over-tighten.
1. Fitting the Natural Gas installation pipe
• Fitthepipeensuringthebluesealingwasherisin
place. Do not over-tighten.
2. Fitting the regulator
• Fittheregulatorensuringthebluesealingwasher
is in place and the arrow indicating gas flow is
correct. Do not over-tighten.
3. Fit the hose
• Applythreadtapeorsealanttothemalethread
on the hose and screw into the regulator. Do not
over-tighten.
4. Fit to mains
• Connectthebayonetendtomains
Preparing the unit for Natural Gas connection
to mains
For Natural Gas connection a bayonet connection point
should be installed by a licensed gas fitter prior to installing
the barbecue unit.
2 assembling electrolux integrated barbecue
gas type natural gas universal LPG
Maximum gas consumption 50 MJ/hr 50 MJ/hr
Injector orifice diameter 1.75mm 0.95mm
Number of injectors 4 4
Regulator pressure 1.00 kPa 2.75 kPa
Notes
• This appliance MUST be installed and serviced only by
a qualied licensed person.
• This product is intended for outdoor use only.
• This product must be installed as per the instructions
which requires the installation of venting to enable
the barbecue to operate correctly. Failure to provide
adequate ventilation for supply of air to the appliance
may result in poor burner performance or excessive
heat build-up within the mounting enclosure.
• Ventilation holes in the unit must not be obscured by
the installation.
Gas connection detail
electrolux integrated barbecue gas specifications/natural gas installation 3
Natural Gas installationGas specifications
408mm
137mm
regulator – ensure
arrow is pointing in
the right direction
hose with tapered
thread – thread tape
required
sealing washer
1. Remove all components from box.
2. Attach heat shield to rear of unit by inserting the three
top tabs into the rear holes and sliding the shield down.
3. Position flame tamers into desired locations (under
where grill sections will be fitted) and fix back edge of
the flame tamer into rear of barbecue body.
4. Fit left and right hand oil reservoirs at front of barbecue.
Assembling the barbecue
5. Place hotplate and grill sections into desired positions
ensuring that the flame tamers are under grill sections
NOTE ensure that grill assemblies are orientated
correctly so that the surface of the grill is sloping
forward to allow oil to drain into oil reservoirs.
6. After installation in bench, attach slimline lid or roasting
hood as described in “Fitting the slimline lid or roasting
hood” section of this manual.
46mm
Natural Gas
installation pipe
barbecue gas inlet
back
front
assembled grill
sealing washer

• Re-fastenthecliptoretainthetubeintheburner.
Do not over tighten or distort supply tube.
• Fitthefrontcoverbackonandfastenscrews.
2. Adjust the turndown setting on the valve
• Iftted,removetheknobsfromthevalves.
• Removerubbergrommetsfromcontrolpanelholes.
• Adjusttheturndownscrewfullyclockwiseoneachof
the 4 valves using a small flat blade screwdriver. The
valve is now set correctly for LPG operation
(see diagram).
3. Connect the test point adaptor to the barbecue gas inlet
• Fitthetestpointadaptorensuringthebluesealing
washer is in place and the arrow is pointing in the
direction of gas flow. Do not over-tighten.
4. Connect the hose to the test point adaptor
• Applythreadtapeorsealanttothemalethreadon
the hose and screw into the test point adaptor.
5. Replace the ‘gas type’ sticker
• Locatethe‘NaturalGas’stickerlocatedonthe
barbecue gas inlet and remove it. Put the Universal
LPG sticker in its place.
4 universal LPG installation electrolux integrated barbecue electrolux integrated barbecue electronic display controls – electronic models 5
• ThisapplianceonceconvertedtouseUniversalLPG
is designed to use a 9kg (20 lbs) gas cylinder.
• Thegascylindermustbemadeandmarkedin
accordance with specifications for LPG cylinders
• Itisrecommendedtoturnoffthecylindervalvewhen
the appliance is not in use.
• Gascylindersmustbestoredinanapprovedhousing
out of reach of children.
• Whendisconnectingthegasbottleensurethatallthe
control valves are in the ‘OFF’ position.
• Removethebottlefromanyhousinginwhichitmay
be stored before disconnection.
• Whenreconnectingthehosetothebottle,ensure
that all connections are tight before replacing in the
storage compartment.
• Carryoutaleakagecheckasdetailedbelowafter
each reconnection.
• Ensureallgasvalvesareinthe‘OFF’position.
• Inasmallcontainer,mixasolutionofwaterand
detergent or soap.
• Afterconnectionofthehose,turnonthevalveatthe
gas bottle or mains as appropriate.
• Usingabrushapplythesolutiontothegasconnection
points and look for bubbles forming.
• Bubblingwillindicatealeak.
• Turnoffthevalveandre-tightenthejoint.Repeatthe
leak test.
• Iftheleakpersists,turnofthegasattheisolationvalves
and contact a licensed gas fitter to correct.
Gas bottle safety information Leak test procedure
Preparing the unit for Universal LPG installation.
This barbecue is supplied set up for Natural Gas and
is labelled accordingly. A Universal LPG conversion Kit
is included to enable conversion to Universal LPG and
connection to a 9kg LPG bottle.
Remote ULPG supply
The barbecue can be plumbed into a remote or household
ULPG supply. Never connect the barbecue to an
unregulated supply, ensure the supply pressure at the
barbecue is 2.75kPa. Electrolux strongly recommends that a
manual shut off valve be installed in the gas supply line in an
accessible position so that the gas supply can be turned off
in the event of an emergency or during servicing.
Note
Conversion of this unit to Universal LPG must be carried
out by a qualied licensed person and a Certicate of
Compliance must be issued to the owner on completion of
the installation and conversion.
The required components for conversion have been
supplied. The components are:
• Hoseandregulatorassembly
• Smallplasticbagcontaining4brassinjectors
• 1UniversalLPGsticker
• 1testpointadaptor
• 1sealingwasher
1. Change the injectors
• Removethefrontcover.
• Releasetheburnerretainerclipasshown.
• Unscrewandreplacethe4injectornippleslocated
in the end of each tube feeding the burners. The
Universal LPG injectors have a 0.95mm diameter
orifice in them. They appear substantially smaller
than the Natural Gas injectors.
Universal LPG installation
LPG injector
turndown screw
test point adaptor –
ensure arrow is pointing
in the right direction
hose with tapered thread
– thread tape required
sealing washer
barbecue gas inlet
Leak test
points
Check hose
for signs of
abrasions,
cracks or leaks
remove spring clip
by rotating over
burner tube end
front cover

6 installation warnings/installation instructions electrolux integrated barbecue
warning
• Thisapplianceshallonlybeusedinanaboveground,
open air situation with natural ventilation without
stagnant areas, where gas leakage and product of
combustion are rapidly dispersed by wind or natural
convection. This barbecue has been designed for
outdoor use only. Refer to diagrams below.
• Neverinstallthisbarbecueinsideanybuilding,garage,
shed or breezeway or inside a boat, caravan or
recreational vehicle. This is to prevent the possibility of
fire or carbon monoxide poisoning or asphyxiation.
• Anyenclosureinwhichthisapplianceisinstalledshall
comply with one of the following:
– An enclosure with walls on all sides, but at least
one permanent opening at the ground level and no
overhead covering.
– Within a partial enclosure that includes an overhead
cover and no more than 2 walls.
– Within a partial enclosure that includes an overhead
cover and more than 2 walls, the following shall apply:
– at least 25% of the total wall area is completely
open and at least 30% of the remaining wall area
is open and unrestricted
• Inthecaseofbalconies,atleast20%ofthetotalof
the side, back and front wall areas shall be and remain
open and unrestricted.
Outdoor area example 1
Outdoor area example 2
Outdoor area example 3
Outdoor area example 4
Outdoor area example 5
Installation warnings
electrolux integrated barbecue installation instructions/dimensions 7
Choosing a location
• Thisappliancemustnotbeinstalledonanycombustible
material. A minimum clearance from any combustible
materials is 450mm (18”).
• Theverticalclearanceabovethecookingsurfacetoany
combustible materials must be at least 600mm.
• Thisappliancemustbeinstalledaccordancewith
Australian Standards AS 4557 and AS 5601 and in
accordance with local authority.
• WhenusingLPGinanenclosureventilationmustbe
provided. Gas is highly explosive and can cause serious
injury and damage to property if allowed to accumulate
and then be ignited.
• Thisbarbecueisintendedtobebuiltintoabenchtop
with a minimum depth of 600 mm.
• Avoidwindypositionsasthiswillaffectcooking
performance and burner efficiency. If this situation
cannot be avoided some shielding may be necessary.
The mounting enclosure
• Thebarbecuerequiresanon-combustiblebarrierunder
the barbecue to prevent excessive temperatures being
accessed. The barrier panel is to be placed 30mm
under the base of unit. There are spacers added to
bottom of unit to prevent barrier panel being too close
to barbecue base. Refer to diagram on next page.
• Themountingenclosuremustbeconstructedfrom
non-combustible materials. Suitable materials for
construction include masonry, granite, marble,
Hardiplank
®
, Villaboard
®
over a metal frame or tiles.
• Thisappliancerequiresventinginthefrontwallofthe
enclosure. See diagram below for details.
• Thisappliancecanbemountedeitherinanislandtype
bench or a bench with a splashback. Please read the
specific requirements for each mounting situation.
• For ULPG use, cabinetry below the barbecue must
have low level venting to prevent the possibility of
ULPG accumulating.
Island style installation
• Ifthisapplianceisinstalledinanislandmount,itcanbe
centrally positioned. Special attention should be given
to the overall size of the island top to consider the hood
open and the overhang. Please see below.
• Thecut-outsizerequiredis1025mmx502mm
(see diagram).
Installing in a bench with a splashback
• Thesplashbackmustbemadefromanon-combustible
material.
• Inthecaseofmountingthisapplianceagainstawall
or fence it is imperative that care be taken to ensure
the isolation of combustible materials. All combustible
materials must be kept 450mm away from the
barbecue.
• Theminimumwidthofthemountingsurfaceis600mm
• Thecut-outsizerequiredis1025mmx502mm
(see diagram).
• Forroastinghoodmodelsthereisaspecicclearance
required at the back of the barbecue between the
splashback and the bench cut-out of 73mm minimum.
This is to allow clearance for the hood to open.
warning
• Thisappliancerequiresventing.Forallinstallationsan
open area 700mmx25mm minimum positioned 135mm
below the mounting surface must be allowed for. This
vent area is to allow air into the combustion enclosure
for the correct combustion of gases and the corect
exhausting of products of combustion. A suitable grill
can be fitted if desired. See diagram below.
Installation instructions
both ends
open
open side at
least 25% of
total wall area
30% or more
in total of the
remaining wall
area is open and
unrestricted
open side at
least 25% of
total wall area
30% or more
in total of the
remaining wall
area is open and
unrestricted
bench
wall
56mm
73mm min.
from cut-out
453mm 601mm
bench
211mm
589mm
538mm
177mm
25mm
464mm
1058mm
538mm
600mm min.
135mm
700mm
25mm
1025mm cut-out
1025mm x 502
cut-out
502mm
cut-out
943mm
553mm
splashback
1058mm
538mm
600mm min.
135mm
700mm
25mm
1025mm cut-out
1025mm x 502
cut-out
502mm
cut-out
925mm
526mm
bench
562mm
73mm min.
from cut-out
wall
bench width 600mm min.
177mm
42mm
25mm
553mm
464mm
bench
minimum clearance to back wall minimum clearance to back wall
Dimensions
Island style installation
(example shown with barbecue with slimline line)
Installation in a bench with splashback
(example shown with barbecue with roasting hood)
Top Vent: High level ventilation below the separation panel is required if a gas bottle
stored below barbecue. Minimum 200cm
2
required.
BottomVent:Lowlevelventilationrequiredincabinetrybelowbarbecueforgas
bottle storage or if ULPG is used. Minimum 200cm
2
required. The top of low
level ventilation must be no more than 125mm above the base.
Top
Vent
Bottom
Vent
Top
Vent
Bottom
Vent

8 gas requirements/setting up the barbecue/fitting the lid or hood electrolux integrated barbecue
Natural Gas requirements
• Theenclosuremustbeconstructedsothataccesscan
be gained to the Natural Gas regulator at all times.
• ForNaturalGasthegassupplyisrequiredtobe
connected to 1.2m flexible hose supplied and therefore
must be located within this distance
• Theexiblehosehasaquickconnectgascoupling.
The corresponding mating fitting will be required at the
gas supply end.
• ForpipesizingrequirementsforsupplypiperefertoAS5601.
Universal LPG Requirements
warning
• IfanLPGbottleistobestoredintheenclosureunder
the barbecue unit, it must be isolated from the barbecue
unit with a non-combustible panel. The enclosure must
comply with the requirements of AS5601.
• AS5601ventilationrequirementsforcylinderstorageare:
Where of sheet metal or similar impervious construction
there shall be ventilation openings at the top and
bottom of the enclosure or recess, each opening
providing a free area of at least 200cm
2
for every
cylinder enclosed. Refer to diagram on previous page.
• ForULPGinstallationshavingenclosedcabinetrybelow
the separation panel that does not contain a gas bottle,
low level venting must be installed. This is to allow
the gas which is heavier than air to escape from the
enclosure in the situation where there may be a leak.
A minimum opening of 200cm
2
is required – refer to
diagram on previous page.
Setting up the barbecue in mounting enclosure
• Amatchholderwithattachedchainhasbeenincluded
with the instruction manual. This is provided for manual
ignition in the event the automatic ignition does not work.
The free end of chain is required to be permanently
fixed to the installation in a location that enables the
match holder to reach each burner (refer to page 9 for
manual lighting instructions).
• Aftertheenclosurehasbeenconstructedasdescribed
on page 6, position the assembled barbecue into the
cut-out hole.
Gas requirements
Setting up the barbecue
electrolux integrated barbecue configuration of hotplates and grills/operating instructions 9
Fitting of slimline lid
• Unpacktheslimlinelid.
• Removesidescrewsfrombarbecuetrimsurroundusing
allen key supplied.
• Fitbracketstotrimsurroundwiththesamescrews.
• Fitlidtobrackets.
Fitting of roasting hood
• Unpacktheroastinghood.
• Removesideandrearscrewsfrombarbecuetrim
surround using allen key supplied.
important
• Duetothesizeoftheroastinghood,itisrecommended
that two people place the roasting hood into position.
• Whenttingroastinghoodassembly,takeparticular
care to avoid scratching of the external trim.
• Onceinposition,xhoodassemblytotrimsurround
with same screws.
important
Ensure flame tamers are positioned under the
grill panels
Left hand hotplate, right hand grill – preferred orientation
for grilling
Left hand half grill, central hotplate, right hand half
grill – preferred orientation for roasting
Left hand grill, right hand hotplate – alternative preferred
orientation for grilling
Fitting the slimline lid or roasting hood Options for configuration of hotplates
and grills
210mm
non-combustible barrier
required under barbecue
at least 30mm clearance between
bottom of barbecue and barrier
cut hole in non- combustible
barrier for hose only
front of enclosure removed
for clarity
grill panels
flame tamers
Control functions
Beforelightingthebarbecue:
• Checkthatallhosesandgasttingsaretight.
• Opentheslimlinelidortheroastinghood.
NOTE The slimline lid is designed as a cover for weather
protection. The lid is not designed to be used as a
cooking hood.
• Checkallcontrolknobsareinthe‘OFF’position.
• Ensurethatthecookingsurfacesareclean.
• Turnthegasisolationvalve‘ON’.
Lighting instructions
• Donotattempttolightburnerswiththecooking
surfaces covered.
• Readinstructionsbeforelighting.
• Tolightaburner,depresstheknobandrotateto
‘RAPID PREHEAT’.
• Holdfor3seconds,releaseandchecktheame.
• Ifburnerdidnotlight,turnknobtothe‘OFF’position.
Allow gas to disperse, then repeat lighting procedure.
Manual lighting
• If,intheadventoftheautomaticignitionsystemnot
working, the barbecue can be lit manually.
• Tolightmanually,ta40mmmatchtomatchholder
provided. Pass lit match through viewing slots below the
front of cooking plates down towards the burner, then
rotate the knob to ‘RAPID PREHEAT’ to ignite. If ignition
fails turn the control valve off and allow several minutes
for the gas to disperse before attempting to light again.
• Oncealight,repeatforotherburnersasrequired.
pass match holder through viewing slot at front under cooking plates
Preheating
• Thisbarbecueisttedwithhighpowerburners.Inmost
conditions it will only be necessary to preheat the barbecue
for 5 minutes before cooking can commence.
• Aswithmostthings,experiencewillfamiliariseyou
with the effectiveness of and the time required to
achieve the desired preheating time to obtain the
desired cooking temperature.
• Testinghasshownthattheburnerscanbeturned
to the low position for satisfactory cooking.
• Ifthebarbecueisttedwithaslimlinelid,itisadvisable
to remove the slimline lid in windy conditions.
• Iftheunitdoesnotoperatecorrectlyrefertothe
troubleshooting section on page 11.
• Iftheburnersarelefttoruntoohottherewillbeexcessive
smoking during the cooking process and subsequent
burning of the food being prepared. This may also result
in excessive flaring of the fat being emitted from the food.
• Roastingwiththehoodclosedonlyrequiresthe2outermost
burners to be on low setting for satisfactory cooking.
To turn the burner off
• Whencookingiscomplete,rotatetheknobfullyclockwise
so the pointer on the knob is positioned at the off position.
Operating instructions
• Checkthatthebarbecueislevelandisrmlysupported.
When barbecue is level hotplate and grills will slope
downwards towards front for drainage.
• Connecttogassupply(UniversalLPGorNaturalGas)
and leak test.
• Fortmentoftheslimlinelidorroastinghood(seeright).

10 lid safety leg/cleaning and care electrolux integrated barbecue
The Electrolux Integrated barbecue has been constructed
from select grade stainless steel which, if not cared for, may
discolour over time. To keep your barbecue looking its best
we recommend that the cooking surfaces are cleaned after
every use.
warning
Please ensure that your barbecue is switched
off and has cooled down before following the
instructions below.
Cleaning of Stainless Steel components
Hot Plate and Grill
• Removeallsolidmaterialsandexcessgreasefromgrill
and hotplate using scraper or wire brush
• Tomakecleaningeasy,thetwogrillhalvescanbe
removed with the hotplate. For stubborn stains, simply
soak the grill and plate components in hot soapy water
before rinsing thoroughly
• Ensurethatallsurfacesaredriedwithacleandrycloth
Other stainless steel surfaces
caution
Do not use abrasive or caustic cleaners, scourers or
metal scrapers on these stainless steel surfaces as they
may permanently scratch and damage your barbecue.
• Washallstainlesssteelcomponents,includingthe
slimline lid, the roasting hood and control knobs with
a soft dishcloth using hot soapy water
• Thebarbecueinteriorcanbewipeddownwithasoft
cloth in hot soapy water. The rear panel of the interior
is removable for easy cleaning
• Ensurethatallsurfacesaredriedwithacleandrycloth
caution
Take extra care (particularly when cleaning on and
around the control knobs) to ensure that water and
soapy residue do not enter the control panel, where
the valves are or into the burners. Care should also be
taken not to disturb the spark electrode. A distance
of 5mm should be maintained between it and the
burners (see diagram below).
To ensure that the user remembers to turn off the gas
before closing the lid, a pivoting safety leg has been fitted.
When closing the lid the safety leg will pivot forward and
rest against the trim surface to prevent the lid closing.
After ensuring the gas has been turned off, to fully close
the lid, the leg needs to be rotated backwards.
warning
THE SLIMLINE LID MUST NOT BE CLOSED WHEN
THE BURNERS ARE OPERATING.
Closing the lid during burner operation can cause
discolouration and damage to the lid and barbecue unit.
Cleaning and careLid safety leg – slimline lid only
electrolux integrated barbecue cleaning and care/maintenance/troubleshooting 11
Maintenance
Troubleshooting
problem possible cause remedy
Barbecuewon’t
light
No gas Check isolation valve
is ON
Gas bottle empty – refill
or change gas bottle
Ignition system
not working
Check battery – should
hear a clicking noise
when the knob is
depressed
Replace battery
Manually light the
barbecue
Ignition electrode
wet or dirty
Gently clean and dry
electrode ensuring
position is correct
Excess smoke
being emitted
from the cooking
area
Gas valve set too
high
Turn gas valves down or
turn off selected burners
Smell of gas
DO NOT
ATTEMPT TO
LIGHT THE
APPLIANCE
Gas leak Turn off gas at the
isolation valves
Check for leaks, tighten
joints
If problem persists call
Electrolux Service
The ignition system
To change the battery rotate the cover anti-clockwise
to release. Lift off the cover to access spring and battery.
Lift out the spring and battery. Replace with a new AA
battery and replace the cover. Test by depressing the
knob and an audible ‘clicking’ sound should be heard.
Note
Ensure that the battery has been placed in the
correct orientation.
Air vents
The mounting enclosure air vents should be checked prior
to each use, to ensure they are clear of any obstructions
that may affect the free flow of air.
Stainless steel burners
Burnersshouldbecheckedatleastonceperyearand
cleaned as necessary. Inspect burners to ensure no
residues have been deposited and gas ports are clear.
Cleaning the Oil Reservoirs
The Integrated barbecue has a unique oil management
system which uses overlapping channels to drain all oil
to the front into easily removed reservoirs and should be
cleaned after each use.
• Toremovereservoirs,pullupwardsfromthefrontofthe
barbecue and dispose of the contents of the catchment
responsibly. Rinse oil reservoirs in warm soapy water.
The reservoirs can be placed in the dishwasher
if desired.
tips and information
Special note on “tea staining”
Sometimes stainless steel surfaces are affected by a brown
discolouration called tea staining. This usually occurs in
areas which use high heat and can be easily removed using
specialised stainless steel cleaners. For best results, we
recommend that specialised cleaners be used regularly on
all stainless steel components. You will find these cleaners
at most hardware stores.
tips and information
Special note on stainless steel
The stainless steel panels may distort while in use but will
return to normal when cold.
5mm
pivoting safety leg
pivoting safety leg

This document sets out the terms and conditions of the product
warranties for Electrolux Appliances. It is an important document.
Please keep it with your proof of purchase documents in a safe place
for future reference should you require service for your Appliance.
1. Inthiswarranty
(a) ‘acceptablequality’asreferredtoinclause10ofthiswarrantyhas
thesamemeaningreferredtointheACL;
(b) ‘ACL’meansTradePracticesAmendment(AustralianConsumer
Law)Act(No.2)2010;
(c) ‘Appliance’meansanyElectroluxproductpurchasedbyyou
accompaniedbythisdocument;
(d) ‘ASC’meansElectrolux’authorisedservicedcentres;
(e) ‘Electrolux’meansElectroluxHomeProductsPtyLtdof163
O’RiordanStreet,Mascot,NSW2020,ABN51004762341in
respectofAppliancespurchasedinAustraliaandElectrolux(NZ)
Limitedof3-5NiallBurgessRoad,MountWellington,inrespect
ofAppliancespurchasedinNewZealand;
(f) ‘majorfailure’asreferredtoinclause10ofthiswarrantyhasthe
samemeaningreferredtointheACLandincludesasituationwhen
anAppliancecannotberepairedoritisuneconomicforElectrolux,at
itsdiscretion,torepairanApplianceduringtheWarrantyPeriod;
(g) ‘WarrantyPeriod’means:
(i) wheretheApplianceisusedforpersonal,domesticorhousehold
use(i.e.normalsinglefamilyuse)assetoutintheinstruction
manual,theApplianceiswarrantedagainstmanufacturing
defectsinAustraliafor24monthsandinNewZealandfor24
months,followingthedateoforiginalpurchaseoftheAppliance;
(ii) wheretheApplianceisusedforcommercialpurposes(including
beingusedtodirectlyassistabusinessorwheretheApplianceis
usedinamulti-familycommunalorsharetypeenvironment),the
Appliancewillthenbewarrantedagainstmanufacturingdefects
inAustraliafor3monthsandinNewZealandfor3months,
followingthedateoforiginalpurchaseoftheAppliance.
(h) ‘you’meansthepurchaseroftheAppliancenothavingpurchased
theApplianceforre-sale,and‘your’hasacorrespondingmeaning.
2. ThiswarrantyonlyappliestoAppliancespurchasedandusedinAustralia
orNewZealandandisinadditionto(anddoesnotexclude,restrict,or
modifyinanyway)anynon-excludablestatutorywarrantiesinAustralia
orNewZealand
3. DuringtheWarrantyPeriodElectroluxoritsASCwill,atnoextracharge
ifyourApplianceisreadilyaccessibleforservice,withoutspecial
equipmentandsubjecttothesetermsandconditions,repairorreplace
anypartswhichitconsiderstobedefective.ElectroluxoritsASCmay
useremanufacturedpartstorepairyourAppliance.Youagreethat
anyreplacedAppliancesorpartsbecomethepropertyofElectrolux.
Thiswarrantydoesnotapplytolightglobes,batteries,
ltersorsimilar
perishableparts.
4. PartsandAppliancesnotsuppliedbyElectroluxarenotcoveredbythis
warranty.
5. Youwillbearthecostoftransportation,travelanddeliveryofthe
AppliancetoandfromElectroluxoritsASC.Ifyouresideoutsideofthe
servicearea,youwillbearthecostof:
(a) travelofanauthorisedrepresentative;
(b) transportationanddeliveryoftheAppliancetoandfromElectrolux
oritsASC,
Inallinstances,unlesstheApplianceistransportedbyElectroluxoran
Electroluxauthorisedrepresentative,theApplianceistransportedatthe
owner’scostandriskwhileintransittoandfromElectroluxoritsASC.
6. Proofofpurchaseisrequiredbeforeyoucanmakeaclaimunder
thiswarranty.
7. Youmaynotmakeaclaimunderthiswarrantyunlessthedefectclaimed
isduetofaultyordefectivepartsorworkmanship.Electroluxisnotliable
inthefollowingsituations(whicharenotexhaustive):
(a) theApplianceisdamagedby:
(i) accident
(ii) misuseorabuse,includingfailuretoproperlymaintainorservice
(iii) normalwearandtear
(iv) powersurges,electricalstormdamageorincorrectpowersupply
(v) incompleteorimproperinstallation
(vi) incorrect,improperorinappropriateoperation
(vii)insectorvermininfestation
(viii)failuretocomplywithany
additionalinstructionssuppliedwiththe
Appliance;
(b) theApplianceismodiedwithoutauthorityfromElectroluxinwriting;
(c) theAppliance’sserialnumberorwarrantysealhasbeenremoved
ordefaced;
(d) theAppliancewasservicedorrepairedbyanyoneotherthan
Electrolux,anauthorisedrepairerorASC.
8. Thiswarranty,thecontracttowhichitrelatesandtherelationship
betweenyouandElectroluxaregovernedbythelawapplicablewhere
theAppliancewaspurchased.WheretheAppliancewaspurchasedin
NewZealandforbusinesspurposestheConsumerGuaranteeActdoes
notapply.
9. Totheextentpermittedbylaw,Electroluxexcludesallwarrantiesand
liabilities(otherthanascontainedinthisdocument)includingliabilityfor
anylossordamagewhetherdirectorindirectarisingfromyourpurchase,
useornonuseoftheAppliance.
10.ForAppliancesandservicesprovidedbyElectroluxinAustralia,the
AppliancescomewithaguaranteebyElectroluxthatcannotbe
excludedundertheAustralianConsumerLaw.Youareentitledtoa
replacementorrefundforamajorfailureandforcompensationforany
otherreasonablyforeseeablelossordamage.Youarealsoentitledto
havetheAppliancerepairedorreplacediftheAppliancefailstobeof
acceptable
qualityandthefailuredoesnotamounttoamajorfailure.
Thebenetstoyougivenbythiswarrantyareinadditiontoyourother
rightsandremediesunderalawinrelationtotheAppliancesorservices
towhichwarrantyrelates.
11.AtalltimesduringtheWarrantyPeriod,Electroluxshall,atitsdiscretion,
determinewhetherrepair,replacementorrefundwillapplyifan
Appliancehasavalidwarrantyclaimapplicabletoit.
12.ForAppliancesandservicesprovidedbyElectroluxinNewZealand,
theAppliancescomewithaguaranteebyElectroluxpursuanttothe
provisionsoftheConsumerGuaranteesAct,theSaleofGoodsActand
theFairTradingAct.
13.Toenquireaboutclaimingunderthiswarranty,pleasefollowthesesteps:
(a) carefullychecktheoperatinginstructions,usermanualandtheterms
ofthiswarranty;
(b) havethemodelandserialnumberoftheApplianceavailable;
(c) havetheproofofpurchase(eganinvoice)available;
(d) telephonethenumbersshownbelow.
14.Youacceptthatifyoumakeawarrantyclaim,ElectroluxanditsASC
mayexchangeinformationinrelationtoyoutoenableElectroluxtomeet
itsobligationsunderthiswarranty.
Warranty
FORSALESINAUSTRALIAANDNEWZEALAND
APPLIANCE:ELECTROLUXBARBECUE
Important Notice
Beforecallingforservice,pleaseensurethatthestepslistedinpoint13abovehavebeenfollowed.
FOR SERVICE
ortondtheaddressofyournearest
stateservicecentreinAustralia
PLEASE CALL 13 13 49
Forthecostofalocalcall(Australiaonly)
SERVICE AUSTRALIA
ELECTROLUXHOMEPRODUCTS
www.electrolux.com.au
FOR SPARE PARTS
ortondtheaddressofyournearest
statesparepartscentreinAustralia
PLEASE CALL 13 13 50
Forthecostofalocalcall(Australiaonly)
FOR SERVICE
ortondtheaddressofyournearest
authorisedservicecentreinNewZealand
FREE CALL 0800 10 66 10
(NewZealandonly)
SERVICE NEW ZEALAND
ELECTROLUXHOMEPRODUCTS
www.electrolux.co.nz
FOR SPARE PARTS
ortondtheaddressofyournearest
statesparepartscentreinNewZealand
FREE CALL 0800 10 66 20
(NewZealandonly)
EBBQ_Warr_Apr11
/