Page is loading ...

APEC PERMEATE-PUMPED R.O. SYSTEM: Installation
Addendum
How to install your RO-PERM system:
The steps for installing your Permeate Pumped RO system are the same as for installing the
non-pumped systems.
Please follow instructions in the Installation Manual from Pages 1 – 11.
When you get to Step 6: “Connecting the System” in the Manual, use this Addendum
for Steps 6. (Skip Manual pages 12-16).
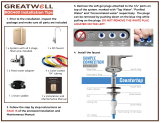
Step 6: Connecting The System
Fitting Types: There are 3 types of fitting provided for connecting the system
1. Metal compression nut fitting
(comes with 1 insert, 1 sleeve, 1 nut)
Fig. 11
Important! Use plastic sleeve on the plastic tubing we provide.
Do Not use metal sleeve on plastic tubing or the connection
will leak!
1
free drinking water.com

2. Plastic compression nut fitting with built-in sleeve (comes with 1 insert, 1 nut)
Fig. 11A
How to connect: - See Fig. 11A. Slide the compression nut onto the tubing.
- Insert the “insert” into the tubing.
- Insert the tubing into the opening of the fitting.
- Slide the nut up, then tighten nut with a wrench. No Teflon tape!
3. Quick-Connect fitting
(no insert, sleeve, or nut)
Fig. 11B
Fig. 11C
How to Connect: - See Fig. 11B. Simply push the tubing into the Quick-Connect fitting.
- No inserts, sleeve, or nuts are needed to secure the connection.
- No Teflon tape!
To Disconnect: - See Fig. 11C. Push in and hold down on the collet ring around the
base of the fitting, then pull out tubing.
2
free drinking water.com
How to connect: - See Fig. 11. Slide the compression nut onto the tubing.
- Slide the plastic sleeve onto the Clear tubing.
- Insert the “insert” into the tubing.
- Insert the tubing into the opening of the fitting.
- Slide the brass nut up, then tighten nut with a wrench.No Teflon tape!
(An extra metal sleeve is provided in case you need to connect your own metal tubing.
Use Teflon tape if connecting metal tubing.)

Summary of Tubing Connections:
There are 4 connections: See Fig. 10 and 10A
Point A to X: Connect RO to COLD water supply — Red tubing.
Point G to Y: Connect product water from 5th -stage filters to tank — Yellow tubing. This tubing is a 2-way
line. Product water enters and leaves the tank via this same line.
Point H to Z: Connect product water from 5th-stage output to dispensing faucet — Clear tubing.
Pump “Brine Out” to W: Connect waste water from Pump’s “Brine Out” port to the drain outlet — Black tubing.
Fig 10
Fig 10A
3
free drinking water.com

Details on Tubing Connections:
To ensure a smooth and correct installation, please connect the water lines following the sequence and the
order outlined below. Refer to Fig. 10 and Fig. 10A for proper point locations.
1. Point Z Faucet connections:
Tubing color: Clear tubing. Connect the CLEAR tubing to the base of the RO faucet.
Fitting type: See Fig. 11A. Metal compression nut fitting. Use plastic sleeve.
Add “insert” to tubing. No teflon type here. Tighten nut with wrench.
(DO NOT use metal sleeve on plastic tubing, will cause leakage! A metal sleeve is
provided for metal tubing usage. Apply teflon if using metal tubing and sleeve.)
2. Point X Feed water connection:
Tubing color: Red tubing. Connect the RED tubing to the Feed Water Needle Valve.
Fitting type: See Fig. 11. Metal compression nut fitting. Use plastic sleeve.
Add “insert” to tubing. No teflon type here. Tighten nut with wrench.
Tips! If points Point Z or Point X leaks after you have tightened the brass nut, check to make sure
you did put the plastic “insert” into the tubing. If the insert is alreday in place, then try
applying Teflon tape from the threaded metal stud all the way to the plastic tubing, wrap the
whole connection with 8-10 rounds of Teflon tape. Smooth out the tape on the threaded part
with your fingers. Tighten brass nut again. This should stop the leak.
If the plastic sleeve is damaged, you can use the metal sleeve, but you need to
apply Teflon tape as described above, this should stop the leak.
3. Point W Wastewater connections:
Tubing color: Black tubing. Connect the BLACK tubing from the Pump’s “Brine Out” port to the Drain
Saddle.
Fitting type: See Fig. 11B & 11C. Quick-Connect fitting on drain saddle. No teflon tape needed here.
Do not add “insert” into Black tubing. Simply push tubing into port.
4. Point A System water inlet (to Stage 1 prefilter) connection:
Tubing color: Red tubing. Connect the RED tubing from the Feed Water Valve to the RO’s stage
- 1 prefilter.
Fitting type: Plastic compression nut fitting with built-in sleeve . No teflon tape needed here.
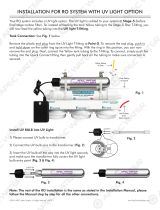
(Note: If stage-1 filter on your system is a UV light, then connect the Red tubing to the UV
light inlet)
5. Point H Stage-5 filtered water to faucet connection:
Tubing color: Clear tubing. Connect the CLEAR tubing from the faucet base to the Stage 5 filter’s outflow
end at point H. (See “Flow -->” arrow on the filter for flow direction.)
Please: Do not disconnect the 4 lines on the Pump! No need to touch these lines for installation.
Switching the lines on pump will cause Pump to malfunction.
4
free drinking water.com

Fitting type: See Fig. 11A. Plastic compression nut fitting with built-in sleeve. No teflon tape needed here.
6. Point G Stage-5 filter’s T-fitting connection:
Tubing color: Yellow tubing. Connect the YELLOW tubing to Stage-5 filter’s T-fitting.
Fitting type: See Fig. 11A. Plastic compression nut fitting with built-in sleeve. No teflon tape needed here.
7. Point Y Tank’s input & output connection:
Prepare tank: See Fig. 12. Apply Teflon tape to tank’s threaded Output stem on top of tank (remove rubber
cap if there is one). Screw the tank Valve onto the Output stem.
Tubing color: Yellow tubing. Connect the YELLOW tubing from Stage-5 T-fitting to the tank’s valve.
Fitting type: Tank valve has Quick-Connect port. Simply push Yellow line into valve to hook up tank to
RO.
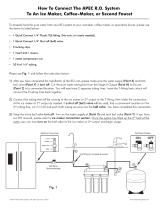
Option: Ice-maker Connection
If you want to connect product water from the RO to your icemaker, you will need:
• One T-fitting, preferably the quick-connect type fitting
• Extra ¼ “ tubing long enough to go from the RO system to your ice-maker
• Optional: One shut-off valve, preferably the quick-connect type.
Before connecting the product water line from Point Z to H, add a T-fitting near point H (see Fig. 10) to divert
product water to both the icemaker and the RO faucet.
Fig. 12
Standard 4-gallon Tank Diagram:
Off Position On Position
5
free drinking water.com
Using RO for Ice-maker only:
If you want the RO to feed your ice-maker (fridge) only, you should still connect the RO faucet as a 2nd outlet.
This allows you to drain the tank, flush new filters through the faucet rather than through your icemaker line. You
can hang the faucet by the system and not mount it.

Step 7: System Start-Up (Please see page 16 in Owner’s Manual for system start-up instructions)
Congratulations! You have successfully installed the RO-PERM System.
How Permeate Pump Works:
The permeate pump has a built-in Auto-Shut-Off (ASO) function, this equals to the ASO valve on a
non-pumped system, so you don’t see a separate ASO valve on the system.
The pump operates by collecting the RO’s waste water, stores it up in the pump chamber for a few
seconds (interval depends water pressure) until sufficient pressure is built up, then uses that pressure to
spurt the pure water into the tank. The pump will make clicking and spurting sounds. If the sound is
too loud, just add some buffering material around the pump, or put the RO system in a cabinet where
the sound is less audible.
Permeate Pump Diagram
Permeate In: Pure water enters pump from Membrane pure water output
Permeate Out: Pure water exit pump to tank
Brine In: Brine/ wastewater enters pump from Membrane waste line
Brine Out: Brine/ wastewater exit pump to drain pipe
Arrow: Make sure “arrow” on pump is pointing upward after installation.
Option: Multiple Outputs - Add Shut Off Valve:
If your RO is feeding several output points (icemaker, fridges, bathroom), you should add a Shut-Off valve to
each output line (except the RO spigot line). This way, if you ever need to diagnose a problem in the system, you
can easily shut off these lines to isolate the water flow and do accurate troubleshooting.
6
free drinking water.com
/