Existing Center Anchor
Pickleball Post Locations
22’ apart, measured Inside-to-Inside
Set
Screw
Cap
Eyebolts
Take Up Post
Dummy Post
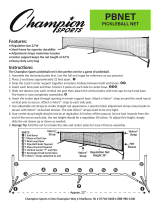
Douglas® Pickleball Premier™ SQ
Surface Mount Item # 63080
1. Use 1/2” Bolts (not included) to
secure posts to the court surface.
Posts should be square to the
playing surface 22’ apart,
measured inside-to-inside.
2. Install hardware to post
3. Adjust set screw to tighten
tennis post caps.
4. Screw on the top and bottom
eyebolts to each post.
During the off season, it is best to
winterize your court by removing
the tennis posts and storing them
indoors.
Hardware is located inside the end of take up post and
Includes (1) removable chrome handle and (4) eyebolts.
POST INSTALLATION:
NOT TO SCALE
CARE & MAINTENANCE
NOTE:
Ensure pulley on
cap is facing away
from the court and
the net cable is
installed down the
side of the post
and into gears.
It should NOT be
installed down
through the cap.
36”
POST & BOLT PLATE
1”
3/4”
4-1/2”
5”
7”
6”
Plate: 6” x 7“
Holes: 9/16”
Hole Pattern: 4-1/2” x 5”
9/16”
Install with 1/2” Bolts
(not Included)
(Post side with gears and lacing rods)
6”
7”

Item # 63080
White Cord, tie
off at eye bolt
Black
Cord
Dowel
Remove tennis net cable loop
on wind up side only
Bottom Band
Bottom Eyebolt
Top
Eyebolt
Cable
Grommet
Cable
Hook
Set
Screw
Dummy Post
Take Up Post
Side Tape
Turn
Clockwise
Cable
Gear
Headband
Center Strap (optional, purchased separately from net)
Center Strap
hooked to optional
center anchor
34"
NOT TO SCALE
1. Stretch out the net across the court.
2. Attach the loop on the other end of the cable to the
hook half way down the outside of the “dummy” post.
3. Since the Premier is an internally wound post, cut off
the loop at one end of the cable for the take up side.
Leave some excess in order to allow for several turns
around the internal mechanism. Now, insert the plain
cable into the hole on the gear.
4. Turning the handle clockwise, crank up cable so center
of net is approximately 36". DO NOT OVERWIND.
5. Insert dowels (provided) through the end side tapes.
6. To secure the net with provided lacing cord; You will receive (2)
shorter white pieces of cord and (2) longer pieces of black
cord. Take one piece of white lacing cord and tie a knotted
loop approximately 2” at one end. Use this white cord to lace
through the (2) grommets on the net headband, as well as the
1st top grommet on the side of the net; tie a knot and secure
to top eyebolt. Next, use the black cord and start by tying the
top of the black cord to the top eyebolt, and proceed in lacing
the cord through the grommets and onto the lacing rods (if
available) or around the post. Continue this along the entire
side of the net. As you move down the post, keep tension on
the lacing cord. Once the lacing cord has been installed
through all the grommets, begin at the top and pull on the
lacing cord until the net is flush against the net post from top
to bottom. Once the net is flush against the net post, tie the
lacing cord at the bottom of the net post to the eyebolt. Cut off
any excess lacing cord. Repeat for other post.
7. Measure the depth of the net in the center and adjust the
optional center strap to make the net 34” at the center line of
the courts.
8. Your installation is now complete. Your net should sit
comfortable but somewhat taut between the net posts with a
small gap between the net and posts.
Douglas® Pickleball Premier™ SQ
Surface Mount
/