Page is loading ...

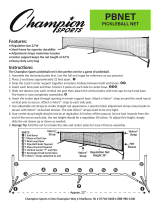
Douglas® PPS-22SQ
Premier™ Portable Pickleball, 3’ x 22’ Item # 63122
PARTS LIST
REF QTY PART DESCRIPTION
A (1) Premier™ Sq, Pair (Cut to 33")
B (2) Corner Braces
C (2) End Wheel Assembly
D (2) Stabalizer Flat Legs
E (4) 3" Square x 5'6" Base Frame
F (2) Coupler Base Frames
G (1) Center Coupler Base Frame
H (1) PN-30 Pickleball Net (31” x 21’9”)
I (2) Dowels
J (1) Velcro Center Strap
(1) Hardware Bag
INCLUDES: (1) Handle
(4) Eyebolts
(6) Extra Screws
(6) Tie Wraps
(1) 3/16” Allen Wrench
(for Set Screws)
TOOLS NEEDED (NOT PROVIDED)
9/16 Wrench or Socket
Tape Measure
PAGE 1 OF 3

Douglas® PPS-22SQ
Premier™ Portable Pickleball, 3’ x 22’ Item # 63122
FRAME INSTALLATION
STEP 1
Lay out all parts as shown in drawing;
start by attaching Stabilizer Legs (Ref. D)
to Corner Braces (Ref. B)
STEP 2
Insert the vertical end posts (Ref. A),
into the corner braces (Ref. B). Vertical
end posts should drop all the way down
to ground level inside the corner brace.
STEP 3
Attach and secure wheel assemblies
to the corner braces with a 9/16
wrench.
STEP 4
Assemble bottom frame by sliding
together all (4) bottom frame pieces
(Ref. E) using coupler pieces (Ref. F,G)
in layout as shown in drawing. There
should be no gaps between bottom
pieces. Full length should be 22’ once
assembled. (Inside of Post to Inside
of Post)
STEP 5
Tighten all pre-attached set
screws with provided allen
wrench to secure frame-
work into place. (Extra set
screws are included in
hardware bag in case any
are missing from frame)
STEP 6
Screw the (2) provided Eyebolts
into the threaded hole at top of
each vertical post.
Note: The eyebolts and handle
are located in a bag inside of the
take up post. **(2) extra eyebolts
are included.
SET
SCREWS
SET
SCREWS
HANDLE
EYE
BOLT
PAGE 2 OF 3
NOTE:
All base frame pieces
should touch
inside couplers
EYE
BOLT
DUMMY POST
TAKE UP POST
STEP 6
STEP 6
STEPS
4 & 5
STEPS
1 - 3
NOTE:
CAP IS PLACED
ON POST WITH
PULLEY FACING
OUT

NET INSTALLATION:
STEP 1
On the Dummy post,
Attach the “Loop” end
of the cable to the hook.
NOTE: Make sure to
hold onto the opposite
“cut end” of the cable
so that it does not get
pulled into the net
headband.
STEP 2
On the Take-up Post;
bring the cable over
the pulley on top of
the post, down the side,
and insert the cut end
into the gear hole. Use
provided chrome
handle to start cranking
the net up.
STEP 3
Insert provided dowels
through the end side
tapes of net.
Douglas® PPS-22SQ
Premier™ Portable Pickleball, 3’ x 22’ Item # 63122
PAGE 3 OF 3
STEP 1
DUMMY POST
STEP 2
TAKE UP POST
STEPS 2 - 4
TAKE UP POST
TURN HANDLE
CLOCKWISE.
DO NOT
OVERTIGHTEN
Tie Wrap
Tie Wrap
STEP 4
Use (4) total Tie Raps to attach the top of the
net to the Eyebolts, and bottom of the net to
corner bars on bottom of frame.
NOTE: Optional lacing cord is provided
if desired in lieu of tie raps.
STEP 5
Install center strap over the net and secure to Center
Coupler (Ref. G). NOTE: Chrome loop snap is preinstalled
on strap, but should be removed prior to installation, as
attaching directly to coupler looks cleaner. Adjust strap
so that the center of the net sits at 34”.
STEP 5
/