Page is loading ...

Call us toll free at (866) 650-1500 for installation, warranty or sales assistance.
VintageView® Floor and Ceiling Mount Frame Installation Instructions
Tools commonly required for installation:
• Tape measure
• Electric drill with Phillips head screw tip
• Hack saw
• Metal file
Each FCF comes with the following:
• 2 frame pieces
• 2 plastic couplers
• 40 self-drilling screws
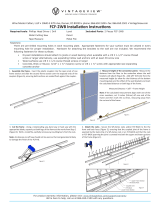
1. Measure the exact dimension between the floor and ceiling in the exact position you
intend to place the frame. Subtract 5 feet (60 inches) from the measured dimension.
Example:
98” floor to ceiling measurement
98” – 60” = 38”
2. Using the resulting dimension, mark both rails on one of the frame halves.
Note: Be sure to mark the end opposite the mounting plate.
3. Using a hack saw, carefully cut both rails squarely at the markings. Clean off any burrs
with a metal file.
4. Insert the plastic couplers into the ends of one frame piece and slide the two frame
sections together. Place the assembled frame on a level surface, so that the frame lays flat
with support under the joint.
5. Remove 2 WS series racks from their packaging and remove the plastic end caps from
the bottom of one set and from the top of the other set.
6. Determine whether you would like the bottle necks to face left or right. Using the set of
WS series racks with the plugs removed from the top, place either the neck or base of the
rack on the 5’ section of the frame rail. Butt the bottom of the rack against the mounting
plate that will be fastened to the floor. Using the provided self-drilling screws, mount the
WS series rack to the frame.
Note: To prevent striping the screws, do not over tighten.
7. Attach the other side of the rack to the 2
nd
rail and insert the plastic couplers provided
with the WS series racks into the bottom of the 2
nd
set of racks.
8. Slide the coupler into the 1
st
rack and attach it to the frame. Repeat for the other half of
the rack.
Note: It is recommended that you only attach racks to one side of the frame before
installation to retain easy access to the mounting plates.

Call us toll free at (866) 650-1500 for installation, warranty or sales assistance.
9. Stand the frame in place and shim at the top, if necessary, to achieve a snug fit.
10. Attach the frame to the ceiling first with the appropriate fasteners for your surface*.
Next, attach the frame to the floor using fasteners suitable for that surface*.
11. Once the frame is securely fastened to the floor and ceiling, attach the remaining racks to
the opposite side.
Note: You may need to offset the racks vertically about 1/8” so that the screws will not
hit.
12. Load your racks with wine and enjoy the VintageView®!
j|Çx `táàxÜ VxÄÄtÜá, LLC warrants to the original consumer-purchaser that this product shall
be free from defects in workmanship and materials under normal and reasonable use for the lifetime of the
product.
Wine Master Cellars, LLC will, at its option, refinish or replace any product or part found to be
defective during the warranty period and excludes installation charges, shipping charges, and
cost of removal and reinstallation. Wine Master Cellars, LLC may require you to return the part(s)
claimed to be defective, for its inspection - freight or postage prepaid.
This warranty does not include the cost of any inconvenience or property damage due to the
failure of the product and does not cover damage due to misuse, abuse, accident, or damage
arising out of transportation of this product. THIS WARRANTY IS EXCLUSIVE AND IN LIEU OF
ALL OTHER OBLIGATIONS, LIABILITIES OR WARRANTIES. In no event shall Wine Master
Cellars, LLC be liable or responsible for INCIDENTAL OR CONSEQUENTIAL DAMAGES or for
any other direct or indirect damage, loss, cost, expense or fee. Neither the Wine Master Cellars,
LLC distributor nor the retail establishment selling this product has any authority to make any
warranties or to promise remedies in addition to or inconsistent with those stated above. Wine
Master Cellars’, LLC maximum liability, in any event, shall not exceed the purchase price of the
product paid by the original consumer-purchaser. Some states do not allow the exclusion or
limitation of incidental or consequential damages. In such a case, the above limitations or
exclusions may not be applicable.
This warranty gives you specific legal rights, and you may also have other rights which vary from state to
state.
*Recommended Fasteners:
For attachment to drywall ceiling, use spiral inserts or expanding wall anchors for both
attachment points. When possible to attach into wood joists, use #10 X 1-1/2” screws.
For attachment directly into wood, use #10 coarse thread 1” screws.
Attaching into concrete we recommend predrilling and using 3/16” X 1” masonry screws or
concrete anchors.
/
